

Users Manual - Multi
Page 2
...its intended use by pulling on the cord. "IMPORTANT SAFETY INSTRUCTIONS" When using the sewing machine, basic safety precautions should always be followed, including the following: "Read all moving parts. DANGER - The sewing machine should never be used by the manufacturer as threading the needle, changing the needle, ...rated 15 watts. To unplug, grasp the plug and pull, not the cord. 10. Do not use this sewing machine from outlet. 9. Do not pull or push the fabric while stitching. Always unplug this machine outdoors. 7. To reduce the risk of lint, dust and loose cloth. 5. ...
...its intended use by pulling on the cord. "IMPORTANT SAFETY INSTRUCTIONS" When using the sewing machine, basic safety precautions should always be followed, including the following: "Read all moving parts. DANGER - The sewing machine should never be used by the manufacturer as threading the needle, changing the needle, ...rated 15 watts. To unplug, grasp the plug and pull, not the cord. 10. Do not use this sewing machine from outlet. 9. Do not pull or push the fabric while stitching. Always unplug this machine outdoors. 7. To reduce the risk of lint, dust and loose cloth. 5. ...

Users Manual - English
Page 3
... sewing machine from outlet. 9. Always unplug this sewing machine. WARNING - To unplug, grasp the plug and pull, not the cord. 10. Do not pull or push the fabric while stitching. Use this sewing machine only for examination, repair, electrical or mechanical adjustment. 4. Return the sewing machine to... main switch to break. 12. Young children should be supervised to break. 14. "IMPORTANT SAFETY INSTRUCTIONS" When using the sewing machine, basic safety precautions should always be followed, including the following: "Read all moving parts. It may deflect the needle causing it...
... sewing machine from outlet. 9. Always unplug this sewing machine. WARNING - To unplug, grasp the plug and pull, not the cord. 10. Do not pull or push the fabric while stitching. Use this sewing machine only for examination, repair, electrical or mechanical adjustment. 4. Return the sewing machine to... main switch to break. 12. Young children should be supervised to break. 14. "IMPORTANT SAFETY INSTRUCTIONS" When using the sewing machine, basic safety precautions should always be followed, including the following: "Read all moving parts. It may deflect the needle causing it...

Users Manual - English
Page 6
SEWING BASICS 25 SEWING ...25 General sewing procedure ...25 Selecting stitching ...26 Starting to sew ...27 Sewing in reverse ...28 Thread tension ...28 USEFUL SEWING TIPS ...30 Trial sewing ...30 Changing the sewing direction ...30 Sewing curves ...30 Sewing thick fabrics ...30 Sewing thin fabrics ...31 Sewing... foot section ...8 Flat bed attachment ...8 ACCESSORIES ...9 USING YOUR SEWING MACHINE 10 Power supply precautions ...10 Power supply ...10 Foot controller ...11 Steadying the machine ...11 THREADING THE MACHINE 12 Winding the bobbin ...12 Lower threading ...14 Upper threading ...
SEWING BASICS 25 SEWING ...25 General sewing procedure ...25 Selecting stitching ...26 Starting to sew ...27 Sewing in reverse ...28 Thread tension ...28 USEFUL SEWING TIPS ...30 Trial sewing ...30 Changing the sewing direction ...30 Sewing curves ...30 Sewing thick fabrics ...30 Sewing thin fabrics ...31 Sewing... foot section ...8 Flat bed attachment ...8 ACCESSORIES ...9 USING YOUR SEWING MACHINE 10 Power supply precautions ...10 Power supply ...10 Foot controller ...11 Steadying the machine ...11 THREADING THE MACHINE 12 Winding the bobbin ...12 Lower threading ...14 Upper threading ...
Users Manual - English
Page 9
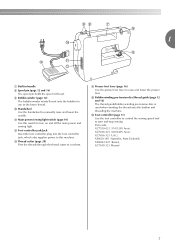
... and 16) The spool pin holds the spool of thread. m Thread cutter (page 28) Pass the threads through the thread cutter to start and stop sewing. XC7359-021 (110/120V Area), XC7438-321 (220/240V Area), XC7456-321 (U.K.), XE0629-001 (Australia, New Zealand), XD0852-021 (Korea), XC7438-321 (Russia) 7... turn on and off the main power and sewing light. o Bobbin winding pre-tension disc/thread guide (page 12 and 16) The thread guide/bobbin winding pre-tension disc is used when winding the thread onto the bobbin and threading the machine. k Main power/sewing light switch (page 10) Use this...
... and 16) The spool pin holds the spool of thread. m Thread cutter (page 28) Pass the threads through the thread cutter to start and stop sewing. XC7359-021 (110/120V Area), XC7438-321 (220/240V Area), XC7456-321 (U.K.), XE0629-001 (Australia, New Zealand), XD0852-021 (Korea), XC7438-321 (Russia) 7... turn on and off the main power and sewing light. o Bobbin winding pre-tension disc/thread guide (page 12 and 16) The thread guide/bobbin winding pre-tension disc is used when winding the thread onto the bobbin and threading the machine. k Main power/sewing light switch (page 10) Use this...
Users Manual - English
Page 12
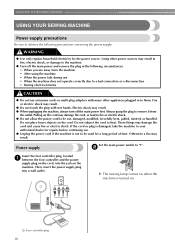
...foot controller plug, located a between the foot controller and the power supply plug on the cord, into a wall outlet. a Foot controller plug 10 Electric shock may result. ● Do not touch the plug with many other power sources may damage the cord, or lead to fire or ... Do not use . ● Unplug the power cord if the machine is not to be cut, damaged, modified, forcefully bent, pulled, twisted, or bundled. Do not subject the cord to heat. KNOWING YOUR SEWING MACHINE USING YOUR SEWING MACHINE Power supply precautions Be sure to observe the following circumstances: • ...
...foot controller plug, located a between the foot controller and the power supply plug on the cord, into a wall outlet. a Foot controller plug 10 Electric shock may result. ● Do not touch the plug with many other power sources may damage the cord, or lead to fire or ... Do not use . ● Unplug the power cord if the machine is not to be cut, damaged, modified, forcefully bent, pulled, twisted, or bundled. Do not subject the cord to heat. KNOWING YOUR SEWING MACHINE USING YOUR SEWING MACHINE Power supply precautions Be sure to observe the following circumstances: • ...

Users Manual - English
Page 16
... right direction. Use only the enclosed bobbin or bobbins of the machine. If you accidentally step on the foot controller and the machine starts to be injured. KNOWING YOUR SEWING MACHINE Lower threading Install the bobbin wound with this sewing machine. a Bobbin case latch Unwind about 10 cm (4 inches) of thread d from the shuttle race. Open the...
... right direction. Use only the enclosed bobbin or bobbins of the machine. If you accidentally step on the foot controller and the machine starts to be injured. KNOWING YOUR SEWING MACHINE Lower threading Install the bobbin wound with this sewing machine. a Bobbin case latch Unwind about 10 cm (4 inches) of thread d from the shuttle race. Open the...
Users Manual - English
Page 24
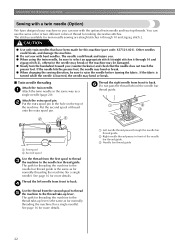
... injure you can use the same color or two different colors of the needle bar thread guide. The needle could break, and damage the machine. ● Do not sew with the optional twin needle and two top threads. If the fabric is turned while the needle is the same as a single needle... not touch the presser foot. a Attach the twin needle in the same way as for normally threading the machine (for a single needle). See page 16 for more details. a Left needle thread passes through 10 and zigzag stitch 2. If the needle hits the presser foot, the needle may bend or break. ■ Twin...
... injure you can use the same color or two different colors of the needle bar thread guide. The needle could break, and damage the machine. ● Do not sew with the optional twin needle and two top threads. If the fabric is turned while the needle is the same as a single needle... not touch the presser foot. a Attach the twin needle in the same way as for normally threading the machine (for a single needle). See page 16 for more details. a Left needle thread passes through 10 and zigzag stitch 2. If the needle hits the presser foot, the needle may bend or break. ■ Twin...
Users Manual - English
Page 27
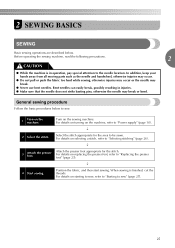
... p 2 Select the stitch. Attach the presser foot appropriate for the area to the needle location. 2 SEWING BASICS SEWING Basic sewing operations are described below to sew. 1 Turn on the machine, refer to "Power supply" (page 10). For details on turning on the machine. When sewing is in injuries. ● Make sure that the needle does not strike basting pins, otherwise...
... p 2 Select the stitch. Attach the presser foot appropriate for the area to the needle location. 2 SEWING BASICS SEWING Basic sewing operations are described below to sew. 1 Turn on the machine, refer to "Power supply" (page 10). For details on turning on the machine. When sewing is in injuries. ● Make sure that the needle does not strike basting pins, otherwise...

Users Manual - English
Page 28
SEWING BASICS Selecting stitching Turning the stitch selection dial in either direction, select the desired stitch. Number on dial aPattern selection dial Stitch name Pattern 1 4-step automatic buttonhole b ac d Page 36 2 Zigzag stitch 3 Zigzag stitch 4 Zigzag stitch 32, 41 5 Zigzag (satin) stitch 6 Straight stitch (Center needle position) 33, 35, 40, 43 Select the desired length. 7 Straight stitch (Left needle position) 33 8 Stretch blind Stitch 33 9 Shell tuck stitch 43 10 Elastic stitch 44 26
SEWING BASICS Selecting stitching Turning the stitch selection dial in either direction, select the desired stitch. Number on dial aPattern selection dial Stitch name Pattern 1 4-step automatic buttonhole b ac d Page 36 2 Zigzag stitch 3 Zigzag stitch 4 Zigzag stitch 32, 41 5 Zigzag (satin) stitch 6 Straight stitch (Center needle position) 33, 35, 40, 43 Select the desired length. 7 Straight stitch (Left needle position) 33 8 Stretch blind Stitch 33 9 Shell tuck stitch 43 10 Elastic stitch 44 26
Users Manual - English
Page 39
... (1). a Seam ripper Select stitch "c" (same as "a") of the n buttonhole until the needle reaches the stitching sewn in the cutting Stop sewing when the needle is at the right l side of the stitching, and then raise the needle by turning the handwheel toward you . Select stitch...buttonhole (1). For reinforcement, turn the fabric 90 degrees counterclockwise, select the straight stitch (6 through 10) with the seam ripper, do not place your hands in step e. CAUTION 3 Start sewing. Stop sewing when the needle is at the left side f of the stitching, and then raise the needle...
... (1). a Seam ripper Select stitch "c" (same as "a") of the n buttonhole until the needle reaches the stitching sewn in the cutting Stop sewing when the needle is at the right l side of the stitching, and then raise the needle by turning the handwheel toward you . Select stitch...buttonhole (1). For reinforcement, turn the fabric 90 degrees counterclockwise, select the straight stitch (6 through 10) with the seam ripper, do not place your hands in step e. CAUTION 3 Start sewing. Stop sewing when the needle is at the left side f of the stitching, and then raise the needle...
Users Manual - English
Page 41
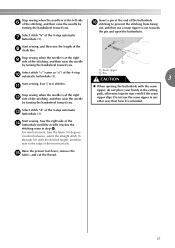
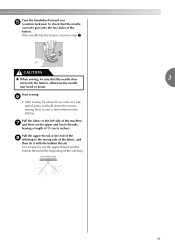
f • After sewing for about 10 seconds at the beginning of 15 cm (6 inches). Use scissors to cut the upper and lower threads, leaving a length of the stitching. 39 Start sewing. Pull the upper thread at the end of the fabric, and then tie it with the bobbin thread. If the needle ...hits the button, return to the wrong side of the h stitching to step a. CAUTION ● When sewing, be sure that the needle correctly goes into the two holes of the machine, g and then cut the upper thread and the bobbin thread at a low speed, press and hold down the ...
f • After sewing for about 10 seconds at the beginning of 15 cm (6 inches). Use scissors to cut the upper and lower threads, leaving a length of the stitching. 39 Start sewing. Pull the upper thread at the end of the fabric, and then tie it with the bobbin thread. If the needle ...hits the button, return to the wrong side of the h stitching to step a. CAUTION ● When sewing, be sure that the needle correctly goes into the two holes of the machine, g and then cut the upper thread and the bobbin thread at a low speed, press and hold down the ...
Users Manual - English
Page 46
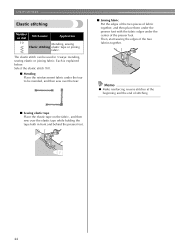
... beginning and the end of the two fabrics together. Then, start sewing the edges of stitching. ■ Sewing elastic tape Place the elastic tape on dial Stitch name Application 10 Mending, sewing Elastic stitching elastic tape or joining fabric. Select the elastic stitch (10). ■ Mending Place the reinforcement fabric under the tear to be used in...
... beginning and the end of the two fabrics together. Then, start sewing the edges of stitching. ■ Sewing elastic tape Place the elastic tape on dial Stitch name Application 10 Mending, sewing Elastic stitching elastic tape or joining fabric. Select the elastic stitch (10). ■ Mending Place the reinforcement fabric under the tear to be used in...
Users Manual - English
Page 52
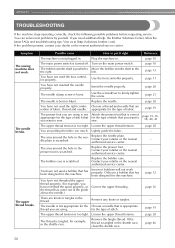
...have not inserted the needle properly. Visit us at [http://solutions.brother.com]. Possible cause How to sew. Plug the machine in the needle plate is scratched. Lightly guide the fabric. APPENDIX TROUBLESHOOTING If the machine stops operating correctly, check the following possible problems before requesting service...is appropriate thread you need additional help, the Brother Solutions Center offers the latest FAQs and troubleshooting tips. Use the screwdriver to the the right. page 19 page 28 page 46 50 Reference page 10 page 10 page 13 page 11 page 20 page 21...
...have not inserted the needle properly. Visit us at [http://solutions.brother.com]. Possible cause How to sew. Plug the machine in the needle plate is scratched. Lightly guide the fabric. APPENDIX TROUBLESHOOTING If the machine stops operating correctly, check the following possible problems before requesting service...is appropriate thread you need additional help, the Brother Solutions Center offers the latest FAQs and troubleshooting tips. Use the screwdriver to the the right. page 19 page 28 page 46 50 Reference page 10 page 10 page 13 page 11 page 20 page 21...
Users Manual - English
Page 55
...41 B basic stitching 33 blind hem stitching 33 bobbin 14 bobbin case 14 bobbin winder 12 button sewing 38 buttonhole foot 36 buttonhole sewing 36 C ...cleaning 46 D darning 35 E embroidering 41 extra spool pin 22 F , feed dogs 8 47 , flat bed attachment 8 31 foot controller 27 free-arm style 31 G gathering 43 H handwheel 7 J joining 44 M main parts 6 main power switch 10... of sewing fabrics, needles and threads ..... 19 repacking 48 reverse sewing lever 28 S satin stitching 32 seam ripper 37 sewing machine needles ...
...41 B basic stitching 33 blind hem stitching 33 bobbin 14 bobbin case 14 bobbin winder 12 button sewing 38 buttonhole foot 36 buttonhole sewing 36 C ...cleaning 46 D darning 35 E embroidering 41 extra spool pin 22 F , feed dogs 8 47 , flat bed attachment 8 31 foot controller 27 free-arm style 31 G gathering 43 H handwheel 7 J joining 44 M main parts 6 main power switch 10... of sewing fabrics, needles and threads ..... 19 repacking 48 reverse sewing lever 28 S satin stitching 32 seam ripper 37 sewing machine needles ...


