

Users Manual - Multi
Page 2
... all instructions before changing the light bulb. Always use a bent needle. 13. Do not pull or push the fabric while stitching. Young children should be supervised to persons: 1. To reduce the risk of burns, fire, electric shock, or injury to ... the accumulation of the air openings blocked. Always unplug the sewing machine from the electrical outlet immediately after using and before cleaning. 2. Always unplug this machine outdoors. 7. "IMPORTANT SAFETY INSTRUCTIONS" When using the sewing machine, basic safety precautions should always be followed, including the following: "Read...
... all instructions before changing the light bulb. Always use a bent needle. 13. Do not pull or push the fabric while stitching. Young children should be supervised to persons: 1. To reduce the risk of burns, fire, electric shock, or injury to ... the accumulation of the air openings blocked. Always unplug the sewing machine from the electrical outlet immediately after using and before cleaning. 2. Always unplug this machine outdoors. 7. "IMPORTANT SAFETY INSTRUCTIONS" When using the sewing machine, basic safety precautions should always be followed, including the following: "Read...
Users Manual - Multi
Page 39
... pied-de-biche et coudre 5 à 6 points. 3. Set the pattern selection dial to 6 stitches. 3. Stop the machine when the needle is at the left side of the stitch and raise the needle from the fabric. 1. Sew the predetermined length of buttonhole) Step d (Right side) d Pattern ac c a b ac c ... dial to b. 2. Arrêter la machine lorsque l'aiguille se trouve à gauche des points et relever l'aiguille du tissu. 1. d 31 Turn the pattern selection dial to 6 stitches. 3. Sew the right side until the needle reaches the stitches formed in step a. Mettre le sélecteur...
... pied-de-biche et coudre 5 à 6 points. 3. Set the pattern selection dial to 6 stitches. 3. Stop the machine when the needle is at the left side of the stitch and raise the needle from the fabric. 1. Sew the predetermined length of buttonhole) Step d (Right side) d Pattern ac c a b ac c ... dial to b. 2. Arrêter la machine lorsque l'aiguille se trouve à gauche des points et relever l'aiguille du tissu. 1. d 31 Turn the pattern selection dial to 6 stitches. 3. Sew the right side until the needle reaches the stitches formed in step a. Mettre le sélecteur...
Users Manual - Multi
Page 54
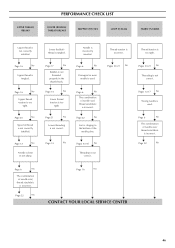
... No Lower threading is used . Pages 43-45 No Threading is not correctly installed. UPPER THREAD BREAKS PERFORMANCE CHECK LIST LOWER (BOBBIN) THREAD BREAKS SKIPPED STITCHES LOOP IN SEAM FABRIC PUCKERS Upper thread is not correct.
... No Lower threading is used . Pages 43-45 No Threading is not correctly installed. UPPER THREAD BREAKS PERFORMANCE CHECK LIST LOWER (BOBBIN) THREAD BREAKS SKIPPED STITCHES LOOP IN SEAM FABRIC PUCKERS Upper thread is not correct.
Users Manual - Multi
Page 63
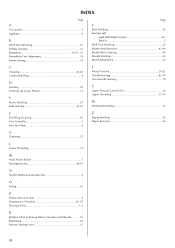
... Bobbin winding 12 Buttonhole 30-31, 33 Buttonhole Fine Adjustment 34 Button Sewing 35 Page S Satin Stitching 26 Sewing Light Light Bulb Replacement 42 Switch 5 Shell Tuck Stitching 29 Shuttle Hook Removal 43-44 Shuttle Race Cleaning 44 Straight Stitching 24 Stretch Blind Stitch 27 C Cleaning 43-45 Connecting Plugs 4 D Darning 38 Drawing Up Lower Thread...
... Bobbin winding 12 Buttonhole 30-31, 33 Buttonhole Fine Adjustment 34 Button Sewing 35 Page S Satin Stitching 26 Sewing Light Light Bulb Replacement 42 Switch 5 Shell Tuck Stitching 29 Shuttle Hook Removal 43-44 Shuttle Race Cleaning 44 Straight Stitching 24 Stretch Blind Stitch 27 C Cleaning 43-45 Connecting Plugs 4 D Darning 38 Drawing Up Lower Thread...
Users Manual - English
Page 1
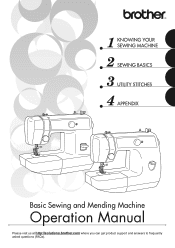
KNOWING YOUR SEWING MACHINE SEWING BASICS UTILITY STITCHES APPENDIX Basic Sewing and Mending Machine Operation Manual Please visit us at http://solutions.brother.com where you can get product support and answers to frequently asked questions (FAQs).
KNOWING YOUR SEWING MACHINE SEWING BASICS UTILITY STITCHES APPENDIX Basic Sewing and Mending Machine Operation Manual Please visit us at http://solutions.brother.com where you can get product support and answers to frequently asked questions (FAQs).

Users Manual - English
Page 3
...12. This sewing machine is intended for use ." 1 "SAVE THESE INSTRUCTIONS" "This sewing machine is not intended...sewing machine from outlet. 9. Replace bulb with this instruction manual. 16. Do not operate this manual. 3. Switch the sewing machine...sewing machine from all instructions before changing the light bulb. "IMPORTANT SAFETY INSTRUCTIONS" When using the sewing machine, basic...this sewing machine only for examination, repair, electrical or mechanical adjustment. 4. Use this machine to... after using ." Do not use this sewing machine if it has a damaged cord or plug...
...12. This sewing machine is intended for use ." 1 "SAVE THESE INSTRUCTIONS" "This sewing machine is not intended...sewing machine from outlet. 9. Replace bulb with this instruction manual. 16. Do not operate this manual. 3. Switch the sewing machine...sewing machine from all instructions before changing the light bulb. "IMPORTANT SAFETY INSTRUCTIONS" When using the sewing machine, basic...this sewing machine only for examination, repair, electrical or mechanical adjustment. 4. Use this machine to... after using ." Do not use this sewing machine if it has a damaged cord or plug...

Users Manual - English
Page 6
... STITCHES ...32 Zigzag stitches ...32 Basic stitching ...33 Blind hem stitching ...33 Darning ...35 BUTTONHOLE SEWING 36 Making the buttonhole ...36 Adjusting buitching stitching ...38 Button sewing ...38 4 SEWING BASICS 25 SEWING ...25 General sewing procedure ...25 Selecting stitching ...26 Starting to sew ...27 Sewing in reverse ...28 Thread tension ...28 USEFUL SEWING TIPS ...30 Trial sewing ...30 Changing the sewing direction ...30 Sewing curves ...30 Sewing thick fabrics ...30 Sewing...
... STITCHES ...32 Zigzag stitches ...32 Basic stitching ...33 Blind hem stitching ...33 Darning ...35 BUTTONHOLE SEWING 36 Making the buttonhole ...36 Adjusting buitching stitching ...38 Button sewing ...38 4 SEWING BASICS 25 SEWING ...25 General sewing procedure ...25 Selecting stitching ...26 Starting to sew ...27 Sewing in reverse ...28 Thread tension ...28 USEFUL SEWING TIPS ...30 Trial sewing ...30 Changing the sewing direction ...30 Sewing curves ...30 Sewing thick fabrics ...30 Sewing...
Users Manual - English
Page 7
ZIPPER INSERTION ...40 APPLIQUÉ, MONOGRAMMING AND EMBROIDERING 41 Appliqués ...41 Monogramming and embroidering ...41 DECORATIVE STITCHING 43 Gathering ...43 Shell tuck stitching ...43 Elastic stitching ...44 4. APPENDIX ...45 MAINTENANCE ...45 Oiling ...45 Changing the bulb ...45 Cleaning the machine surface ...46 Cleaning the shuttle race ...46 Cleaning the feed dogs ...47 Repacking the machine ...48 Bobbin case tension adjustment ...48 TROUBLESHOOTING ...50 INDEX ...53 5
ZIPPER INSERTION ...40 APPLIQUÉ, MONOGRAMMING AND EMBROIDERING 41 Appliqués ...41 Monogramming and embroidering ...41 DECORATIVE STITCHING 43 Gathering ...43 Shell tuck stitching ...43 Elastic stitching ...44 4. APPENDIX ...45 MAINTENANCE ...45 Oiling ...45 Changing the bulb ...45 Cleaning the machine surface ...46 Cleaning the shuttle race ...46 Cleaning the feed dogs ...47 Repacking the machine ...48 Bobbin case tension adjustment ...48 TROUBLESHOOTING ...50 INDEX ...53 5

Users Manual - English
Page 8
... (page 28) Press and hold down the reverse sewing lever to use. KNOWING YOUR SEWING MACHINE 1 KNOWING YOUR SEWING MACHINE NAMES OF MACHINE PARTS AND THEIR FUNCTIONS The main parts a Buttonhole fine-adjusting screw (page 38) Turn the buttonhole fine-adjusting screw to adjust buttonhole stitching when it is not uniform. c Thread take-up lever (page 16...
... (page 28) Press and hold down the reverse sewing lever to use. KNOWING YOUR SEWING MACHINE 1 KNOWING YOUR SEWING MACHINE NAMES OF MACHINE PARTS AND THEIR FUNCTIONS The main parts a Buttonhole fine-adjusting screw (page 38) Turn the buttonhole fine-adjusting screw to adjust buttonhole stitching when it is not uniform. c Thread take-up lever (page 16...
Users Manual - English
Page 10
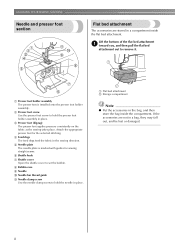
...marked with guides for the selected stitching. e Needle plate The needle plate is installed onto the presser foot holder assembly. KNOWING YOUR SEWING MACHINE Needle and presser foot section Flat bed attachment The accessories are not in the sewing direction. c Presser foot (Zigzag)... The presser foot applies pressure consistently on the fabric as the sewing takes place. h Bobbin case i ...
...marked with guides for the selected stitching. e Needle plate The needle plate is installed onto the presser foot holder assembly. KNOWING YOUR SEWING MACHINE Needle and presser foot section Flat bed attachment The accessories are not in the sewing direction. c Presser foot (Zigzag)... The presser foot applies pressure consistently on the fabric as the sewing takes place. h Bobbin case i ...

Users Manual - English
Page 21
... needle depending on the thread and fabric types The sewing machine needle that you wish to sew. and the larger the needle number, the thicker the needle. ● Use the ball point needle when sewing on stretch fabrics or fabrics where skipped stitches easily occur. ● Use a 90/14 to... 100/16 needle with your machine.) Cotton: 50-60 Silk: "A" Synthetic/ Polyester Long Fiber Mercerized 50-60 Heavyweight Denim,...
... needle depending on the thread and fabric types The sewing machine needle that you wish to sew. and the larger the needle number, the thicker the needle. ● Use the ball point needle when sewing on stretch fabrics or fabrics where skipped stitches easily occur. ● Use a 90/14 to... 100/16 needle with your machine.) Cotton: 50-60 Silk: "A" Synthetic/ Polyester Long Fiber Mercerized 50-60 Heavyweight Denim,...
Users Manual - English
Page 22
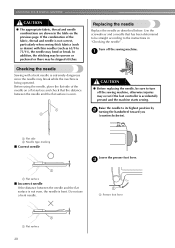
...75/11), the needle may break while the machine is being operated. Raise the needle to turn off the sewing machine. If the combination of the needle on the previous page. a CAUTION ● Before replacing the needle, be skipped stitches. a Flat side b Needle type marking ...counterclockwise). Lower the presser foot lever. Checking the needle Sewing with thin needles (such as described below. Turn off the sewing machine, otherwise injuries may occur if the foot controller is bent. KNOWING YOUR SEWING MACHINE CAUTION ● The appropriate fabric, thread and needle ...
...75/11), the needle may break while the machine is being operated. Raise the needle to turn off the sewing machine. If the combination of the needle on the previous page. a CAUTION ● Before replacing the needle, be skipped stitches. a Flat side b Needle type marking ...counterclockwise). Lower the presser foot lever. Checking the needle Sewing with thin needles (such as described below. Turn off the sewing machine, otherwise injuries may occur if the foot controller is bent. KNOWING YOUR SEWING MACHINE CAUTION ● The appropriate fabric, thread and needle ...
Users Manual - English
Page 24
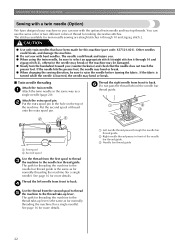
...single needle). a Left needle thread passes through 10 and zigzag stitch 2. Attach the extra spool pin. f Do not pass the thread behind the needle bar thread guide. The needle could break, and damage the machine. ● Do not sew with the optional twin needle and two top threads. c ...Needle bar thread guide 22 See page 16 for more details. The path for threading the machine to back. The stitches available for twin-needle sewing are straight stitches 6 through the needle bar thread guide. Thread the left needle from front to the thread take -up ...
...single needle). a Left needle thread passes through 10 and zigzag stitch 2. Attach the extra spool pin. f Do not pass the thread behind the needle bar thread guide. The needle could break, and damage the machine. ● Do not sew with the optional twin needle and two top threads. c ...Needle bar thread guide 22 See page 16 for more details. The path for threading the machine to back. The stitches available for twin-needle sewing are straight stitches 6 through the needle bar thread guide. Thread the left needle from front to the thread take -up ...
Users Manual - English
Page 25
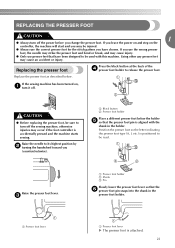
...the f presser foot pin snaps into the shank in the holder. If you leave the power on and step on , a turn off the sewing machine, otherwise injuries may cause an accident or injury. Replace the presser foot as described below the holder e so that the presser foot pin is ... foot and bend or break, and may cause injury. ● Only use the correct presser foot for the stitch pattern you (counterclockwise). If the sewing machine has been turned on the controller, the machine will start and you may be injured. ● Always use presser feet that have chosen. CAUTION ● ...
...the f presser foot pin snaps into the shank in the holder. If you leave the power on and step on , a turn off the sewing machine, otherwise injuries may cause an accident or injury. Replace the presser foot as described below the holder e so that the presser foot pin is ... foot and bend or break, and may cause injury. ● Only use the correct presser foot for the stitch pattern you (counterclockwise). If the sewing machine has been turned on the controller, the machine will start and you may be injured. ● Always use presser feet that have chosen. CAUTION ● ...
Users Manual - English
Page 27
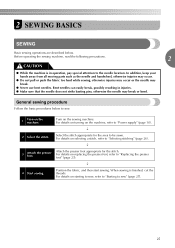
... foot, refer to be sewn. For details on the machine, refer to sew" (page 27). 25 For details on turning on starting to sew, refer to "Starting to "Power supply" (page 10). Position the fabric, and then start sewing. 2 SEWING BASICS SEWING Basic sewing operations are described below to "Selecting stitching" (page 26). In addition, keep your hands away from...
... foot, refer to be sewn. For details on the machine, refer to sew" (page 27). 25 For details on turning on starting to sew, refer to "Starting to "Power supply" (page 10). Position the fabric, and then start sewing. 2 SEWING BASICS SEWING Basic sewing operations are described below to "Selecting stitching" (page 26). In addition, keep your hands away from...

Users Manual - English
Page 28
Number on dial aPattern selection dial Stitch name Pattern 1 4-step automatic buttonhole b ac d Page 36 2 Zigzag stitch 3 Zigzag stitch 4 Zigzag stitch 32, 41 5 Zigzag (satin) stitch 6 Straight stitch (Center needle position) 33, 35, 40, 43 Select the desired length. 7 Straight stitch (Left needle position) 33 8 Stretch blind Stitch 33 9 Shell tuck stitch 43 10 Elastic stitch 44 26 SEWING BASICS Selecting stitching Turning the stitch selection dial in either direction, select the desired stitch.
Number on dial aPattern selection dial Stitch name Pattern 1 4-step automatic buttonhole b ac d Page 36 2 Zigzag stitch 3 Zigzag stitch 4 Zigzag stitch 32, 41 5 Zigzag (satin) stitch 6 Straight stitch (Center needle position) 33, 35, 40, 43 Select the desired length. 7 Straight stitch (Left needle position) 33 8 Stretch blind Stitch 33 9 Shell tuck stitch 43 10 Elastic stitch 44 26 SEWING BASICS Selecting stitching Turning the stitch selection dial in either direction, select the desired stitch.
Users Manual - English
Page 29
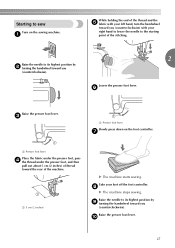
... its highest position by i turning the handwheel toward the rear of the machine. Take your right hand to lower the needle to the starting point of the stitching. 2 Raise the needle to sew Turn on the foot controller. a 5 cm (2 inches) X The machine starts sewing. j 27 a While holding the end of the thread and the e fabric...
... its highest position by i turning the handwheel toward the rear of the machine. Take your right hand to lower the needle to the starting point of the stitching. 2 Raise the needle to sew Turn on the foot controller. a 5 cm (2 inches) X The machine starts sewing. j 27 a While holding the end of the thread and the e fabric...

Users Manual - English
Page 30
... sewing. ■ Correct tension Correct tension is important as too much or too little tension will affect the quality of the fabric. You may be too tight. Thread tension The thread tension will weaken your seams or cause puckers on your stitches.... In this case, refer to "Lower threading" (page 14) and reinsert the bobbin. 1 2 3 a Wrong side b Surface c Upper thread d Lower thread e Loops appear on 5 surface of the presser foot bar to cut them. Memo ● Before beginning to change fabric or thread. SEWING BASICS Pull the fabric to the left side of the machine...
... sewing. ■ Correct tension Correct tension is important as too much or too little tension will affect the quality of the fabric. You may be too tight. Thread tension The thread tension will weaken your seams or cause puckers on your stitches.... In this case, refer to "Lower threading" (page 14) and reinsert the bobbin. 1 2 3 a Wrong side b Surface c Upper thread d Lower thread e Loops appear on 5 surface of the presser foot bar to cut them. Memo ● Before beginning to change fabric or thread. SEWING BASICS Pull the fabric to the left side of the machine...
Users Manual - English
Page 32
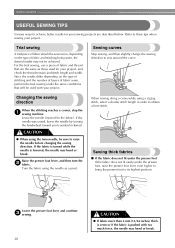
...). Changing the sewing direction When the stitching reaches a corner, stop the a sewing machine. Refer to obtain a finer stitch. When sewing along a curve while using a zigzag stitch, select a shorter stitch length in the... fabric). CAUTION ● When using the needle as those used with too much force, the needle may bend or break. SEWING BASICS USEFUL SEWING TIPS Various ways to achieve better results for your sewing...
...). Changing the sewing direction When the stitching reaches a corner, stop the a sewing machine. Refer to obtain a finer stitch. When sewing along a curve while using a zigzag stitch, select a shorter stitch length in the... fabric). CAUTION ● When using the needle as those used with too much force, the needle may bend or break. SEWING BASICS USEFUL SEWING TIPS Various ways to achieve better results for your sewing...
Users Manual - English
Page 33
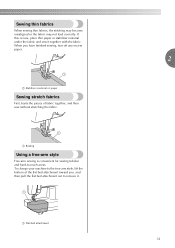
... First, baste the pieces of the flat bed attachment toward you have finished sewing, tear off any excess paper. Sewing thin fabrics When sewing thin fabrics, the stitching may become misaligned or the fabric may not feed correctly. To change your machine to -reach areas. a Flat bed attachment 2 31 a Basting Using a free-arm style Free...
... First, baste the pieces of the flat bed attachment toward you have finished sewing, tear off any excess paper. Sewing thin fabrics When sewing thin fabrics, the stitching may become misaligned or the fabric may not feed correctly. To change your machine to -reach areas. a Flat bed attachment 2 31 a Basting Using a free-arm style Free...


