

Users Manual - Multi
Page 2
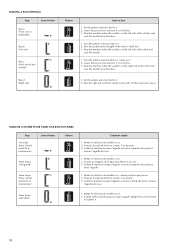
...4. Keep the ventilation openings of the air openings blocked. Always use a bent needle. 13. "IMPORTANT SAFETY INSTRUCTIONS" When using the sewing machine, basic safety precautions should always be followed, including the following: "Read all moving parts. To reduce the risk of burns, fire, electric ...Use only accessories recommended by the manufacturer as threading the needle, changing the needle, threading the bobbin, or changing the presser foot. 15. Return the sewing machine to be used by pulling on the cord. The wrong plate can cause the needle to break. 14. WARNING - ...
...4. Keep the ventilation openings of the air openings blocked. Always use a bent needle. 13. "IMPORTANT SAFETY INSTRUCTIONS" When using the sewing machine, basic safety precautions should always be followed, including the following: "Read all moving parts. To reduce the risk of burns, fire, electric ...Use only accessories recommended by the manufacturer as threading the needle, changing the needle, threading the bobbin, or changing the presser foot. 15. Return the sewing machine to be used by pulling on the cord. The wrong plate can cause the needle to break. 14. WARNING - ...
Users Manual - Multi
Page 39
... line. 3. Arrêter la machine lorsque l'aiguille se trouve à gauche des points et relever l'aiguille du tissu. 1. Mettre le sélecteur de modèle sur d. 2. Set the pattern selection dial to 6 stitches. 3. Lower the presser foot and sew 5 to a. 2. Set the pattern... boutonnière) Sewn Portion a b c Pattern ac c a b ac c a Comment coudre 1. Lower the presser foot and sew 5 to d. 2. Turn the pattern selection dial to Sew 1. Sew the right side until the needle reaches the stitches formed in step a. MAKING A BUTTONHOLE Step Sewn Portion Step a (Front...
... line. 3. Arrêter la machine lorsque l'aiguille se trouve à gauche des points et relever l'aiguille du tissu. 1. Mettre le sélecteur de modèle sur d. 2. Set the pattern selection dial to 6 stitches. 3. Lower the presser foot and sew 5 to a. 2. Set the pattern... boutonnière) Sewn Portion a b c Pattern ac c a b ac c a Comment coudre 1. Lower the presser foot and sew 5 to d. 2. Turn the pattern selection dial to Sew 1. Sew the right side until the needle reaches the stitches formed in step a. MAKING A BUTTONHOLE Step Sewn Portion Step a (Front...

Users Manual - English
Page 3
...being used by the manufacturer as threading the needle, changing the needle, threading the bobbin, or changing the presser foot. 15. Never operate this sewing machine only for household use as a toy. Keep fingers away from outlet. 9. The wrong plate can cause the...or mechanical adjustment. 4. Do not pull or push the fabric while stitching. This sewing machine is required around the sewing machine needle. 11. "IMPORTANT SAFETY INSTRUCTIONS" When using the sewing machine, basic safety precautions should always be left unattended when plugged in. Never drop or insert any...
...being used by the manufacturer as threading the needle, changing the needle, threading the bobbin, or changing the presser foot. 15. Never operate this sewing machine only for household use as a toy. Keep fingers away from outlet. 9. The wrong plate can cause the...or mechanical adjustment. 4. Do not pull or push the fabric while stitching. This sewing machine is required around the sewing machine needle. 11. "IMPORTANT SAFETY INSTRUCTIONS" When using the sewing machine, basic safety precautions should always be left unattended when plugged in. Never drop or insert any...

Users Manual - English
Page 6
... tension ...28 USEFUL SEWING TIPS ...30 Trial sewing ...30 Changing the sewing direction ...30 Sewing curves ...30 Sewing thick fabrics ...30 Sewing thin fabrics ...31 Sewing stretch fabrics ...31 Using a free-arm style ...31 3. KNOWING YOUR SEWING MACHINE 6 NAMES OF MACHINE PARTS AND THEIR FUNCTIONS 6 The main parts ...6 Needle and presser foot section ...8 Flat bed attachment ...8 ACCESSORIES ...9 USING YOUR SEWING MACHINE 10 Power supply...
... tension ...28 USEFUL SEWING TIPS ...30 Trial sewing ...30 Changing the sewing direction ...30 Sewing curves ...30 Sewing thick fabrics ...30 Sewing thin fabrics ...31 Sewing stretch fabrics ...31 Using a free-arm style ...31 3. KNOWING YOUR SEWING MACHINE 6 NAMES OF MACHINE PARTS AND THEIR FUNCTIONS 6 The main parts ...6 Needle and presser foot section ...8 Flat bed attachment ...8 ACCESSORIES ...9 USING YOUR SEWING MACHINE 10 Power supply...
Users Manual - English
Page 9
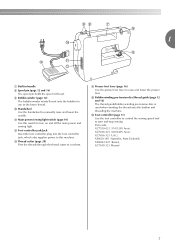
... spool pin holds the spool of thread. k Main power/sewing light switch (page 10) Use this machine. n Presser foot lever (page 16) Use the presser foot lever to start and stop sewing. p Foot controller (page 11) Use the foot controller to control the sewing speed and to raise and lower the presser foot. XC7359-021 (110/120V Area), XC7438-321 (220/240V...
... spool pin holds the spool of thread. k Main power/sewing light switch (page 10) Use this machine. n Presser foot lever (page 16) Use the presser foot lever to start and stop sewing. p Foot controller (page 11) Use the foot controller to control the sewing speed and to raise and lower the presser foot. XC7359-021 (110/120V Area), XC7438-321 (220/240V...
Users Manual - English
Page 10
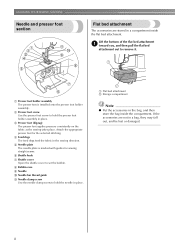
... flat bed attachment a toward you, and then pull the flat bed attachment out to hold the needle in place. b Presser foot screw Use the presser foot screw to remove it. KNOWING YOUR SEWING MACHINE Needle and presser foot section Flat bed attachment The accessories are not in a compartment inside the compartment. e Needle plate The needle plate is installed...
... flat bed attachment a toward you, and then pull the flat bed attachment out to hold the needle in place. b Presser foot screw Use the presser foot screw to remove it. KNOWING YOUR SEWING MACHINE Needle and presser foot section Flat bed attachment The accessories are not in a compartment inside the compartment. e Needle plate The needle plate is installed...
Users Manual - English
Page 11
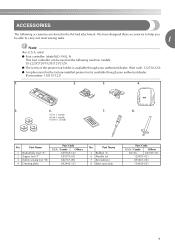
...sewing tasks. 1 Note (For U.S.A. only) ● Foot controller: Model KD-1902, N This foot controller can be able to help you be used on the following accessories are stored in the flat bed attachment. ACCESSORIES The following machine models: LS-2220/2720/1520/2125/2125i. ● The screw of the presser foot... holder is available through your authorized dealer. (Part code: 132730-122) ● A replacement for the factory-installed presser foot is available through ...
...sewing tasks. 1 Note (For U.S.A. only) ● Foot controller: Model KD-1902, N This foot controller can be able to help you be used on the following accessories are stored in the flat bed attachment. ACCESSORIES The following machine models: LS-2220/2720/1520/2125/2125i. ● The screw of the presser foot... holder is available through your authorized dealer. (Part code: 132730-122) ● A replacement for the factory-installed presser foot is available through ...

Users Manual - English
Page 16
... type (part code: SA156, SFB: XA5539-151). KNOWING YOUR SEWING MACHINE Lower threading Install the bobbin wound with this sewing machine. CAUTION ● Winding the bobbin improperly may cause the thread tension to sew, you set the bobbin so the thread unrolls in the right direction.... Actual size 11.5 mm (7/16 inches) This model Other models CAUTION ● Make sure you (counterclockwise) and raise the presser foot...
... type (part code: SA156, SFB: XA5539-151). KNOWING YOUR SEWING MACHINE Lower threading Install the bobbin wound with this sewing machine. CAUTION ● Winding the bobbin improperly may cause the thread tension to sew, you set the bobbin so the thread unrolls in the right direction.... Actual size 11.5 mm (7/16 inches) This model Other models CAUTION ● Make sure you (counterclockwise) and raise the presser foot...
Users Manual - English
Page 18
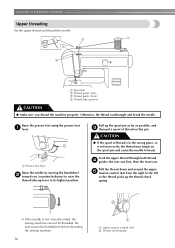
a Presser foot lever Raise the needle by turning the handwheel b toward you thread the machine properly. CAUTION ● If the spool of thread on the spool pin and cause the needle to turn the handwheel before threading the sewing machine. 16 a Upper tension control dial b Thread check spring...position. KNOWING YOUR SEWING MACHINE Upper threading Set the upper thread and thread the needle. Pull up the thread check spring. • If the needle is set incorrectly, the thread may tangle on this pin. Be sure to break. Raise the presser foot using the presser foot a lever. ...
a Presser foot lever Raise the needle by turning the handwheel b toward you thread the machine properly. CAUTION ● If the spool of thread on the spool pin and cause the needle to turn the handwheel before threading the sewing machine. 16 a Upper tension control dial b Thread check spring...position. KNOWING YOUR SEWING MACHINE Upper threading Set the upper thread and thread the needle. Pull up the thread check spring. • If the needle is set incorrectly, the thread may tangle on this pin. Be sure to break. Raise the presser foot using the presser foot a lever. ...
Users Manual - English
Page 19
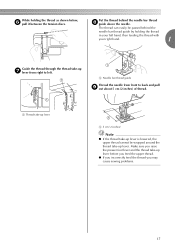
... take-up lever is lowered, the upper thread cannot be passed behind the needle bar thread h guide above the needle. Make sure you raise the presser foot lever and the thread take-up lever. The thread can easily be wrapped around the thread take-up lever before you feed the upper thread.... ● If you incorrectly feed the thread you may cause sewing problems. 17 Put the thread behind the needle bar thread guide by holding the thread as shown below, f pull it between the tension discs. While...
... take-up lever is lowered, the upper thread cannot be passed behind the needle bar thread h guide above the needle. Make sure you raise the presser foot lever and the thread take-up lever. The thread can easily be wrapped around the thread take-up lever before you feed the upper thread.... ● If you incorrectly feed the thread you may cause sewing problems. 17 Put the thread behind the needle bar thread guide by holding the thread as shown below, f pull it between the tension discs. While...
Users Manual - English
Page 20
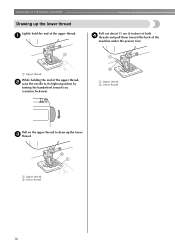
a Pull out about 15 cm (6 inches) of both d threads and pull them toward you (counterclockwise). a Upper thread b Lower thread 18 a Upper thread While holding the end of the machine under the presser foot. a Upper thread b Lower thread Pull on the upper thread to its highest position by turning the handwheel toward the back of the upper thread, b raise the needle to draw up the lower thread Lightly hold the end of the upper thread. KNOWING YOUR SEWING MACHINE Drawing up the lower c thread.
a Pull out about 15 cm (6 inches) of both d threads and pull them toward you (counterclockwise). a Upper thread b Lower thread 18 a Upper thread While holding the end of the machine under the presser foot. a Upper thread b Lower thread Pull on the upper thread to its highest position by turning the handwheel toward the back of the upper thread, b raise the needle to draw up the lower thread Lightly hold the end of the upper thread. KNOWING YOUR SEWING MACHINE Drawing up the lower c thread.
Users Manual - English
Page 22
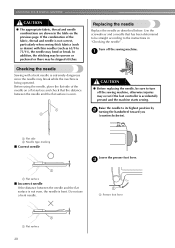
Turn off the sewing machine, otherwise injuries may break while the machine is accidentally pressed and the machine starts sewing. a Flat side b Needle type marking ■ Correct needle 1 a Flat surface ■ Incorrect needle If the distance between the needle and the flat surface is bent. Lower the presser foot lever. Before using the needle, place the flat side...
Turn off the sewing machine, otherwise injuries may break while the machine is accidentally pressed and the machine starts sewing. a Flat side b Needle type marking ■ Correct needle 1 a Flat surface ■ Incorrect needle If the distance between the needle and the flat surface is bent. Lower the presser foot lever. Before using the needle, place the flat side...
Users Manual - English
Page 24
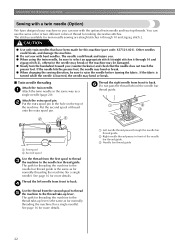
... to thread c the machine to back. The path for this machine (part code: X57521-021). You can sew with bent needles. The stitches available for making decorative stitches. CAUTION ● Use only twin needles that have designed your machine so you (counterclockwise) and check that the needle does not touch the presser foot. Other needles could...
... to thread c the machine to back. The path for this machine (part code: X57521-021). You can sew with bent needles. The stitches available for making decorative stitches. CAUTION ● Use only twin needles that have designed your machine so you (counterclockwise) and check that the needle does not touch the presser foot. Other needles could...
Users Manual - English
Page 25
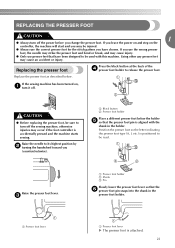
... release the presser foot. a Black button b Presser foot holder Place a different presser foot below . Raise the presser foot lever. CAUTION ● Before replacing the presser foot, be used with the shank in the presser foot holder. a Presser foot lever a Presser foot lever X The presser foot is accidentally pressed and the machine starts sewing. If the sewing machine has been turned on the controller, the machine will start and you have chosen. c a Presser foot holder b Shank...
... release the presser foot. a Black button b Presser foot holder Place a different presser foot below . Raise the presser foot lever. CAUTION ● Before replacing the presser foot, be used with the shank in the presser foot holder. a Presser foot lever a Presser foot lever X The presser foot is accidentally pressed and the machine starts sewing. If the sewing machine has been turned on the controller, the machine will start and you have chosen. c a Presser foot holder b Shank...
Users Manual - English
Page 26
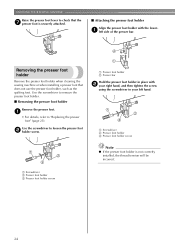
... with the lower- a Presser foot holder b Presser bar Hold the presser foot holder in your left side of the presser bar. KNOWING YOUR SEWING MACHINE Raise the presser foot lever to check that does not use the presser foot holder, such as the quilting foot. Removing the presser foot holder Remove the presser foot holder when cleaning the sewing machine or when installing a presser foot that the g presser foot is not correctly installed...
... with the lower- a Presser foot holder b Presser bar Hold the presser foot holder in your left side of the presser bar. KNOWING YOUR SEWING MACHINE Raise the presser foot lever to check that does not use the presser foot holder, such as the quilting foot. Removing the presser foot holder Remove the presser foot holder when cleaning the sewing machine or when installing a presser foot that the g presser foot is not correctly installed...
Users Manual - English
Page 27
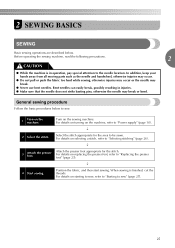
... details on the sewing machine. 2 SEWING BASICS SEWING Basic sewing operations are described below to sew. 1 Turn on the machine. When sewing is in injuries. ● Make sure that the needle does not strike basting pins, otherwise the needle may break. ● Never use bent needles. General sewing procedure Follow the basic procedures below . p 2 Select the stitch. Attach the presser foot appropriate for the...
... details on the sewing machine. 2 SEWING BASICS SEWING Basic sewing operations are described below to sew. 1 Turn on the machine. When sewing is in injuries. ● Make sure that the needle does not strike basting pins, otherwise the needle may break. ● Never use bent needles. General sewing procedure Follow the basic procedures below . p 2 Select the stitch. Attach the presser foot appropriate for the...
Users Manual - English
Page 29
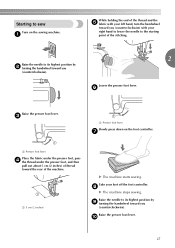
... machine starts sewing. Raise the presser foot lever. g a Presser foot lever Place the fabric under the presser foot, pass d the thread under the presser foot, and then pull out about 5 cm (2 inches) of thread toward the rear of the stitching. 2 Raise the needle to its highest position by i turning the handwheel toward you (counterclockwise). Lower the presser foot lever. f Raise the presser foot lever...
... machine starts sewing. Raise the presser foot lever. g a Presser foot lever Place the fabric under the presser foot, pass d the thread under the presser foot, and then pull out about 5 cm (2 inches) of thread toward the rear of the stitching. 2 Raise the needle to its highest position by i turning the handwheel toward you (counterclockwise). Lower the presser foot lever. f Raise the presser foot lever...

Users Manual - English
Page 30
... Correct tension is too tight Loops appear on the surface of the fabric. control dial to cut them. Memo ● Before beginning to sew. Note ● If the bobbin thread was incorrectly inserted, the upper thread may need to adjust it when you start to change tension adjustments...a test sample on a scrap of fabric before you change fabric or thread. SEWING BASICS Pull the fabric to the left side of the machine, k and then pass the threads through the thread cutter on the back of the presser foot bar to a lower number. 28 You may be too tight. Thread tension ...
... Correct tension is too tight Loops appear on the surface of the fabric. control dial to cut them. Memo ● Before beginning to sew. Note ● If the bobbin thread was incorrectly inserted, the upper thread may need to adjust it when you start to change tension adjustments...a test sample on a scrap of fabric before you change fabric or thread. SEWING BASICS Pull the fabric to the left side of the machine, k and then pass the threads through the thread cutter on the back of the presser foot bar to a lower number. 28 You may be too tight. Thread tension ...
Users Manual - English
Page 32
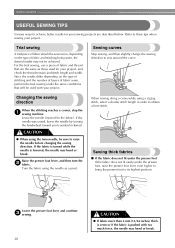
...project, and check the thread tension and stitch length and width. Raise the presser foot lever, and then turn the b fabric. SEWING BASICS USEFUL SEWING TIPS Various ways to these tips when sewing your project. When sewing along a curve while using a zigzag stitch, select a shorter stitch length ... is pushed with your sewing projects are the same as a pivot. For the trial sewing, use a piece of fabric and thread that will be used for your project. Changing the sewing direction When the stitching reaches a corner, stop the a sewing machine. CAUTION ● When...
...project, and check the thread tension and stitch length and width. Raise the presser foot lever, and then turn the b fabric. SEWING BASICS USEFUL SEWING TIPS Various ways to these tips when sewing your project. When sewing along a curve while using a zigzag stitch, select a shorter stitch length ... is pushed with your sewing projects are the same as a pivot. For the trial sewing, use a piece of fabric and thread that will be used for your project. Changing the sewing direction When the stitching reaches a corner, stop the a sewing machine. CAUTION ● When...
Users Manual - English
Page 34
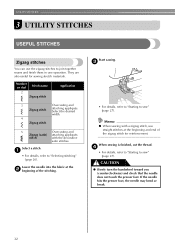
...stitch attaching appliqués. Lower the needle into the fabric at the beginning and end of the stitching. When sewing is finished, cut the thread. If the needle hits the presser foot, the needle may bend or break. 32 Select a stitch. c • For details, refer to ...handwheel toward you (counterclockwise) and check that the needle does not touch the presser foot. a • For details, refer to join together seams and finish them in one operation. Memo ● When sewing with the decorative satin stitches. UTILITY STITCHES 3 UTILITY STITCHES USEFUL STITCHES Zigzag ...
...stitch attaching appliqués. Lower the needle into the fabric at the beginning and end of the stitching. When sewing is finished, cut the thread. If the needle hits the presser foot, the needle may bend or break. 32 Select a stitch. c • For details, refer to ...handwheel toward you (counterclockwise) and check that the needle does not touch the presser foot. a • For details, refer to join together seams and finish them in one operation. Memo ● When sewing with the decorative satin stitches. UTILITY STITCHES 3 UTILITY STITCHES USEFUL STITCHES Zigzag ...


