

Users Manual - Multi
Page 2
...followed, including the following: "Read all moving parts. DANGER - Replace bulb with same type rated 15 watts. Return the sewing machine to the nearest authorized dealer or service center for household use this sewing machine from all instructions before using." Never drop ... bent needle. 13. Never operate the sewing machine with any adjustments in this manual. 3. "SAVE THESE INSTRUCTIONS" "This sewing machine is being used by pulling on the cord. "IMPORTANT SAFETY INSTRUCTIONS" When using the sewing machine, basic safety precautions should always be supervised to ensure...
...followed, including the following: "Read all moving parts. DANGER - Replace bulb with same type rated 15 watts. Return the sewing machine to the nearest authorized dealer or service center for household use this sewing machine from all instructions before using." Never drop ... bent needle. 13. Never operate the sewing machine with any adjustments in this manual. 3. "SAVE THESE INSTRUCTIONS" "This sewing machine is being used by pulling on the cord. "IMPORTANT SAFETY INSTRUCTIONS" When using the sewing machine, basic safety precautions should always be supervised to ensure...
Users Manual - Multi
Page 63
... Plugs 4 D Darning 38 Drawing Up Lower Thread 17 E Elastic Stitching 27 Embroidering 40-41 T Thread Tension 20-21 Troubleshooting 46, 47 Twin-Needle Sewing 18 U Upper Tension Control Dial 20 Upper Threading 15-16 W Winding the Bobbin 12 F Feed Dog Cleaning 45 Foot Controller 5 Free-Arm Style 8...L Lower Threading 14 M Main Power Switch 5 Monogramming 40-41 N Needle Replacement/inspection 6 O Oiling 43 P Pattern Selection Dial 9 Performance Checklist 46, 47 Principal Parts 1-2 R Relative Chart of Sewing Fabrics, Needles and Threads .......... 22 Repacking 54 Reverse...
... Plugs 4 D Darning 38 Drawing Up Lower Thread 17 E Elastic Stitching 27 Embroidering 40-41 T Thread Tension 20-21 Troubleshooting 46, 47 Twin-Needle Sewing 18 U Upper Tension Control Dial 20 Upper Threading 15-16 W Winding the Bobbin 12 F Feed Dog Cleaning 45 Foot Controller 5 Free-Arm Style 8...L Lower Threading 14 M Main Power Switch 5 Monogramming 40-41 N Needle Replacement/inspection 6 O Oiling 43 P Pattern Selection Dial 9 Performance Checklist 46, 47 Principal Parts 1-2 R Relative Chart of Sewing Fabrics, Needles and Threads .......... 22 Repacking 54 Reverse...

Users Manual - English
Page 3
... away from the accumulation of electric shock: 1. Never operate this sewing machine. Always unplug the sewing machine from the electrical outlet when removing covers, lubricating, or when making...sewing machine needle. 11. Replace bulb with any adjustments in this sewing machine from outlet. 9. "IMPORTANT SAFETY INSTRUCTIONS" When using the sewing machine, basic safety precautions should always be followed, including the following: "Read all moving parts. Do not operate this machine outdoors. 7. Return the sewing machine to break. 12. Never operate the sewing machine...
... away from the accumulation of electric shock: 1. Never operate this sewing machine. Always unplug the sewing machine from the electrical outlet when removing covers, lubricating, or when making...sewing machine needle. 11. Replace bulb with any adjustments in this sewing machine from outlet. 9. "IMPORTANT SAFETY INSTRUCTIONS" When using the sewing machine, basic safety precautions should always be followed, including the following: "Read all moving parts. Do not operate this machine outdoors. 7. Return the sewing machine to break. 12. Never operate the sewing machine...
Users Manual - English
Page 5
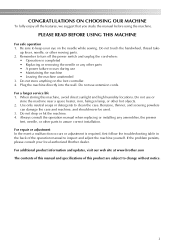
... needle while sewing. Do not use • Maintaining the machine • Leaving the machine unattended 3. For a longer service life 1. Benzene, thinner, and scouring powders can damage the case and machine, and should never be used. 3. Remember to change without notice. 3 Plug the machine directly into ... of this manual and specifications of the operation manual to keep your local authorized Brother dealer. Do not use or store the machine near a space heater, iron, halogen lamp, or other parts • A power failure occurs during use extension cords. For repair or adjustment...
... needle while sewing. Do not use • Maintaining the machine • Leaving the machine unattended 3. For a longer service life 1. Benzene, thinner, and scouring powders can damage the case and machine, and should never be used. 3. Remember to change without notice. 3 Plug the machine directly into ... of this manual and specifications of the operation manual to keep your local authorized Brother dealer. Do not use or store the machine near a space heater, iron, halogen lamp, or other parts • A power failure occurs during use extension cords. For repair or adjustment...

Users Manual - English
Page 6
KNOWING YOUR SEWING MACHINE 6 NAMES OF MACHINE PARTS AND THEIR FUNCTIONS 6 The main parts ...6 Needle and presser foot section ...8 Flat bed attachment ...8 ACCESSORIES ...9 USING YOUR SEWING MACHINE 10 Power supply precautions ...10 Power supply ...10 Foot controller ...11 Steadying the machine ...11 THREADING THE MACHINE 12 Winding the bobbin ...12 Lower threading ...14 Upper threading ...16 Drawing up the lower...
KNOWING YOUR SEWING MACHINE 6 NAMES OF MACHINE PARTS AND THEIR FUNCTIONS 6 The main parts ...6 Needle and presser foot section ...8 Flat bed attachment ...8 ACCESSORIES ...9 USING YOUR SEWING MACHINE 10 Power supply precautions ...10 Power supply ...10 Foot controller ...11 Steadying the machine ...11 THREADING THE MACHINE 12 Winding the bobbin ...12 Lower threading ...14 Upper threading ...16 Drawing up the lower...

Users Manual - English
Page 8
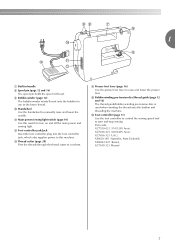
e Flat bed attachment with accessory storage (page 8 and 31) f Reverse sewing lever (page 28) Press and hold down the reverse sewing lever to adjust buttonhole stitching when it is not uniform. c Thread take-up lever (page 16) d Upper tension control dial (page 28)... to select the number of the upper thread. b Pattern selection dial (page 26) Turn the pattern selection dial to use. KNOWING YOUR SEWING MACHINE 1 KNOWING YOUR SEWING MACHINE NAMES OF MACHINE PARTS AND THEIR FUNCTIONS The main parts a Buttonhole fine-adjusting screw (page 38) Turn the buttonhole fine-adjusting screw to...
e Flat bed attachment with accessory storage (page 8 and 31) f Reverse sewing lever (page 28) Press and hold down the reverse sewing lever to adjust buttonhole stitching when it is not uniform. c Thread take-up lever (page 16) d Upper tension control dial (page 28)... to select the number of the upper thread. b Pattern selection dial (page 26) Turn the pattern selection dial to use. KNOWING YOUR SEWING MACHINE 1 KNOWING YOUR SEWING MACHINE NAMES OF MACHINE PARTS AND THEIR FUNCTIONS The main parts a Buttonhole fine-adjusting screw (page 38) Turn the buttonhole fine-adjusting screw to...
Users Manual - English
Page 9
... controller (page 11) Use the foot controller to control the sewing speed and to manually raise and lower the needle. 1 g Built-in handle h...the foot controller jack, which also supplies power to this switch to turn on and off the main power and sewing light. n Presser foot lever (page 16) Use the presser foot lever to cut them. XC7359-021 (110/... winding pre-tension disc is used when winding the thread onto the bobbin and threading the machine. k Main power/sewing light switch (page 10) Use this machine. i Bobbin winder (page 12) The bobbin winder winds thread onto the bobbin for use...
... controller (page 11) Use the foot controller to control the sewing speed and to manually raise and lower the needle. 1 g Built-in handle h...the foot controller jack, which also supplies power to this switch to turn on and off the main power and sewing light. n Presser foot lever (page 16) Use the presser foot lever to cut them. XC7359-021 (110/... winding pre-tension disc is used when winding the thread onto the bobbin and threading the machine. k Main power/sewing light switch (page 10) Use this machine. i Bobbin winder (page 12) The bobbin winder winds thread onto the bobbin for use...
Users Manual - English
Page 11
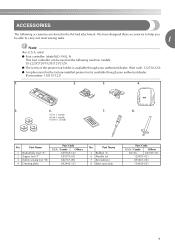
ACCESSORIES The following machine models: LS-2220/2720/1520/2125/2125i. ● The screw of the presser foot holder is available through your authorized dealer. (Part code: 132730-122) ● A replacement for the factory-installed presser foot is available through your authorized dealer. (Part number: 138135-122)...XE2137-001 XA3442-121 No. We have designed these accessories to carry out most sewing tasks. 1 Note (For U.S.A. Part Name 5 Bobbin (3) 6 Needle set 7 Screwdriver 8 Extra spool pin Part Code U.S.A. / Canada Others SA156 XA5539-151 129583-021 X55467-021 130920-021...
ACCESSORIES The following machine models: LS-2220/2720/1520/2125/2125i. ● The screw of the presser foot holder is available through your authorized dealer. (Part code: 132730-122) ● A replacement for the factory-installed presser foot is available through your authorized dealer. (Part number: 138135-122)...XE2137-001 XA3442-121 No. We have designed these accessories to carry out most sewing tasks. 1 Note (For U.S.A. Part Name 5 Bobbin (3) 6 Needle set 7 Screwdriver 8 Extra spool pin Part Code U.S.A. / Canada Others SA156 XA5539-151 129583-021 X55467-021 130920-021...
Users Manual - English
Page 14
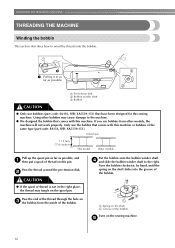
... bobbin clockwise, by hand, until the spring on the shaft slides into the groove of the same type (part code: SA156, SFB: XA5539-151). KNOWING YOUR SEWING MACHINE THREADING THE MACHINE Winding the bobbin This section describes how to wind the thread onto the bobbin. 1 Pulling it in the ... the thread may cause damage to the machine. ● We designed the bobbin that comes with this sewing machine. e 12 Pass the thread around the pre-tension disk. Only use bobbins (part code: SA156, SFB: XA5539-151) that have been designed for this machine. Put the bobbin onto the bobbin winder...
... bobbin clockwise, by hand, until the spring on the shaft slides into the groove of the same type (part code: SA156, SFB: XA5539-151). KNOWING YOUR SEWING MACHINE THREADING THE MACHINE Winding the bobbin This section describes how to wind the thread onto the bobbin. 1 Pulling it in the ... the thread may cause damage to the machine. ● We designed the bobbin that comes with this sewing machine. e 12 Pass the thread around the pre-tension disk. Only use bobbins (part code: SA156, SFB: XA5539-151) that have been designed for this machine. Put the bobbin onto the bobbin winder...

Users Manual - English
Page 16
... the bobbin wound with this sewing machine. Open the shuttle cover behind the flat bed b attachment at the front of the same type (part code: SA156, SFB: XA5539-151). CAUTION ● Make sure you and pulling it may cause the thread tension to sew, you accidentally step on the... foot controller and the machine starts to loosen, breaking the needle and resulting in injury. 1...
... the bobbin wound with this sewing machine. Open the shuttle cover behind the flat bed b attachment at the front of the same type (part code: SA156, SFB: XA5539-151). CAUTION ● Make sure you and pulling it may cause the thread tension to sew, you accidentally step on the... foot controller and the machine starts to loosen, breaking the needle and resulting in injury. 1...
Users Manual - English
Page 23
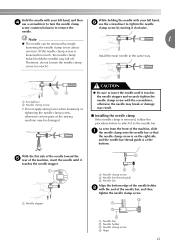
...Needle clamp screw d Align 21 Note 1 ● The needle can be damaged. As seen from the front of the machine, insert the needle until it to turn . (If the needle clamp screw is loosened too much .) a Screwdriver b Needle...• Do not apply strong force when loosening or tightening the needle clamp screw, otherwise certain parts of the needle bar, and then tighten the needle clamp screw. With the flat side of the needle ... needle bar. While holding the needle with the end of the sewing machine may fall off. CAUTION ● Be sure to insert the needle until it clockwise.
...Needle clamp screw d Align 21 Note 1 ● The needle can be damaged. As seen from the front of the machine, insert the needle until it to turn . (If the needle clamp screw is loosened too much .) a Screwdriver b Needle...• Do not apply strong force when loosening or tightening the needle clamp screw, otherwise certain parts of the needle bar, and then tighten the needle clamp screw. With the flat side of the needle ... needle bar. While holding the needle with the end of the sewing machine may fall off. CAUTION ● Be sure to insert the needle until it clockwise.
Users Manual - English
Page 24
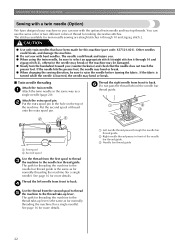
... pin in the hole on the top of thread onto the extra spool pin. Put the second spool of the machine. See page 16 for making decorative stitches. You can sew with the optional twin needle and two top threads. f Do not pass the thread behind the needle bar thread ... bend or break. ■ Twin needle threading Attach the twin needle. c Needle bar thread guide 22 See page 16 for this machine (part code: X57521-021). KNOWING YOUR SEWING MACHINE Sewing with a twin needle (Option) We have been made for more details. If the fabric is turned while the needle is the same as a...
... pin in the hole on the top of thread onto the extra spool pin. Put the second spool of the machine. See page 16 for making decorative stitches. You can sew with the optional twin needle and two top threads. f Do not pass the thread behind the needle bar thread ... bend or break. ■ Twin needle threading Attach the twin needle. c Needle bar thread guide 22 See page 16 for this machine (part code: X57521-021). KNOWING YOUR SEWING MACHINE Sewing with a twin needle (Option) We have been made for more details. If the fabric is turned while the needle is the same as a...
Users Manual - English
Page 27
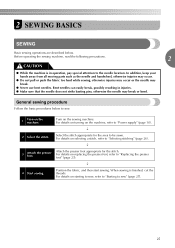
...SEWING BASICS SEWING Basic sewing operations are described below to sew. 1 Turn on selecting a stitch, refer to the needle location. Before operating the sewing machine, read the following precautions. 2 CAUTION ● While the machine is finished, cut the threads. In addition, keep your hands away from all moving parts... the needle may break. ● Never use bent needles. For details on the machine, refer to sew" (page 27). 25 General sewing procedure Follow the basic procedures below . p 3 Attach the presser foot. Bent needles can easily break, possibly...
...SEWING BASICS SEWING Basic sewing operations are described below to sew. 1 Turn on selecting a stitch, refer to the needle location. Before operating the sewing machine, read the following precautions. 2 CAUTION ● While the machine is finished, cut the threads. In addition, keep your hands away from all moving parts... the needle may break. ● Never use bent needles. For details on the machine, refer to sew" (page 27). 25 General sewing procedure Follow the basic procedures below . p 3 Attach the presser foot. Bent needles can easily break, possibly...

Users Manual - English
Page 36
Slide the part that the fabric feeds correctly, and then start sewing. a Wrong side of fabric b Right side of fabric c Edge of fabric c Basting d 5 mm (3/16 inches) a Arm 34 f Remove the flat bed attachment and make g free-arm sewing possible. • For details on the fabric about 5 mm c (3/16 inches) from the edge of... of fabric b Basting c Edge of fabric, and position the e fabric with the wrong side facing up. UTILITY STITCHES Use a chalk to mark on free-arm sewing, refer to sew onto the h arm, make sure that you wish to "Using a free-arm style" (page 31).
Slide the part that the fabric feeds correctly, and then start sewing. a Wrong side of fabric b Right side of fabric c Edge of fabric c Basting d 5 mm (3/16 inches) a Arm 34 f Remove the flat bed attachment and make g free-arm sewing possible. • For details on the fabric about 5 mm c (3/16 inches) from the edge of... of fabric b Basting c Edge of fabric, and position the e fabric with the wrong side facing up. UTILITY STITCHES Use a chalk to mark on free-arm sewing, refer to sew onto the h arm, make sure that you wish to "Using a free-arm style" (page 31).
Users Manual - English
Page 38
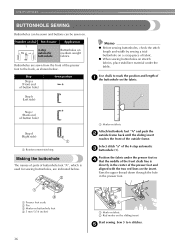
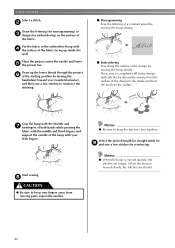
...1 (Left side) Step c (Back end of button hole) Step d (Right side) a Reinforcement stitching Making the buttonhole The names of parts of fabric. ● When sewing buttonholes on a scrap piece of buttonhole foot "A", which is directly in the presser foot. Step Step a (Front end of button hole) Sewn... portion Memo ● Before sewing buttonholes, check the stitch length and width by sewing a trial buttonhole on stretch fabrics, place stabilizer material under the presser foot so d that the middle of the ...
...1 (Left side) Step c (Back end of button hole) Step d (Right side) a Reinforcement stitching Making the buttonhole The names of parts of fabric. ● When sewing buttonholes on a scrap piece of buttonhole foot "A", which is directly in the presser foot. Step Step a (Front end of button hole) Sewn... portion Memo ● Before sewing buttonholes, check the stitch length and width by sewing a trial buttonhole on stretch fabrics, place stabilizer material under the presser foot so d that the middle of the ...
Users Manual - English
Page 44
...reinforce the stitching. ■ Embroidering Sew along the outline of the hoop with...; Monogramming Sew the lettering at the starting position by turning the handwheel toward you (counterclockwise), and then sew a few stitches for straight stitch (6) i and sew a few... stitches to the outline. Select the desired length for reinforcing. Then, sew to keep the ...to completely fill in the embroidery hoop with stitches by alternately sewing from the inside the well. Put the fabric in the ...
...reinforce the stitching. ■ Embroidering Sew along the outline of the hoop with...; Monogramming Sew the lettering at the starting position by turning the handwheel toward you (counterclockwise), and then sew a few stitches for straight stitch (6) i and sew a few... stitches to the outline. Select the desired length for reinforcing. Then, sew to keep the ...to completely fill in the embroidery hoop with stitches by alternately sewing from the inside the well. Put the fabric in the ...
Users Manual - English
Page 49
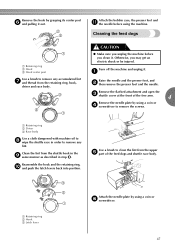
Otherwise, you unplug the machine before using the machine. a Raise the needle and the presser foot, and b then remove the presser foot and the needle.... or be injured. a Retaining ring b Driver c Race body Use a cloth dampened with machine oil to h wipe the shuttle race in step h. Turn off the machine and unplug it . Clean the lint from the shuttle hook in the i same manner as...Hook c Hook center post Use a brush to remove any accumulated lint g and thread from the upper e part of the feed dogs and shuttle race body. Remove the hook by using a coin or f screwdriver. 47
Otherwise, you unplug the machine before using the machine. a Raise the needle and the presser foot, and b then remove the presser foot and the needle.... or be injured. a Retaining ring b Driver c Race body Use a cloth dampened with machine oil to h wipe the shuttle race in step h. Turn off the machine and unplug it . Clean the lint from the shuttle hook in the i same manner as...Hook c Hook center post Use a brush to remove any accumulated lint g and thread from the upper e part of the feed dogs and shuttle race body. Remove the hook by using a coin or f screwdriver. 47
Users Manual - English
Page 55
...233;s 41 B basic stitching 33 blind hem stitching 33 bobbin 14 bobbin case 14 bobbin winder 12 button sewing 38 buttonhole foot 36 buttonhole sewing 36 C cleaning... 46 D darning 35 E embroidering 41 extra spool pin 22 F , feed dogs 8 47 , flat bed attachment 8 31 foot controller 27 free-arm style 31 G gathering 43 H handwheel 7 J joining 44 M main parts... chart of sewing fabrics, needles and threads ..... 19 repacking 48 reverse sewing lever 28 S satin stitching 32 seam ripper 37 sewing machine needles 19 ...
...233;s 41 B basic stitching 33 blind hem stitching 33 bobbin 14 bobbin case 14 bobbin winder 12 button sewing 38 buttonhole foot 36 buttonhole sewing 36 C cleaning... 46 D darning 35 E embroidering 41 extra spool pin 22 F , feed dogs 8 47 , flat bed attachment 8 31 foot controller 27 free-arm style 31 G gathering 43 H handwheel 7 J joining 44 M main parts... chart of sewing fabrics, needles and threads ..... 19 repacking 48 reverse sewing lever 28 S satin stitching 32 seam ripper 37 sewing machine needles 19 ...


