

Users Manual - Multi
Page 2
...10. Young children should be followed, including the following: "Read all moving parts. To reduce the risk of lint, dust and loose cloth. 5. Always unplug this sewing machine from the electrical outlet immediately after using and before changing the light bulb. ...around the sewing machine needle. 11. Keep fingers away from outlet. 9. Special care is being administered. 8. "IMPORTANT SAFETY INSTRUCTIONS" When using the sewing machine, basic safety precautions should always be supervised to ensure that they do not play with this sewing machine. The sewing machine should never...
...10. Young children should be followed, including the following: "Read all moving parts. To reduce the risk of lint, dust and loose cloth. 5. Always unplug this sewing machine from the electrical outlet immediately after using and before changing the light bulb. ...around the sewing machine needle. 11. Keep fingers away from outlet. 9. Special care is being administered. 8. "IMPORTANT SAFETY INSTRUCTIONS" When using the sewing machine, basic safety precautions should always be supervised to ensure that they do not play with this sewing machine. The sewing machine should never...

Users Manual - English
Page 3
... being used by young children or impaired persons without supervision. 17. "IMPORTANT SAFETY INSTRUCTIONS" When using the sewing machine, basic safety precautions should always be followed, including the following: "Read all moving parts. To reduce the risk of burns, fire, electric shock, or injury to ensure that they do not play with same type...
... being used by young children or impaired persons without supervision. 17. "IMPORTANT SAFETY INSTRUCTIONS" When using the sewing machine, basic safety precautions should always be followed, including the following: "Read all moving parts. To reduce the risk of burns, fire, electric shock, or injury to ensure that they do not play with same type...
Users Manual - English
Page 5
...removing the needle or any other moving parts. 2. When storing this product are subject to keep your local authorized Brother dealer. Use only neutral soaps or detergents to inspect and adjust the machine yourself. For additional product information and updates...brother.com The contents of this manual and specifications of the operation manual to clean the case. CONGRATULATIONS ON CHOOSING OUR MACHINE To fully enjoy all the features, we suggest that you study the manual before using the machine. Be sure to change without notice. 3 Do not store anything on the needle while sewing...
...removing the needle or any other moving parts. 2. When storing this product are subject to keep your local authorized Brother dealer. Use only neutral soaps or detergents to inspect and adjust the machine yourself. For additional product information and updates...brother.com The contents of this manual and specifications of the operation manual to clean the case. CONGRATULATIONS ON CHOOSING OUR MACHINE To fully enjoy all the features, we suggest that you study the manual before using the machine. Be sure to change without notice. 3 Do not store anything on the needle while sewing...

Users Manual - English
Page 6
KNOWING YOUR SEWING MACHINE 6 NAMES OF MACHINE PARTS AND THEIR FUNCTIONS 6 The main parts ...6 Needle and presser foot section ...8 Flat bed attachment ...8 ACCESSORIES ...9 USING YOUR SEWING MACHINE 10 Power supply precautions ...10 Power supply ...10 Foot controller ...11 Steadying the machine ...11 THREADING THE MACHINE 12 Winding the bobbin ...12 Lower threading ...14 Upper threading ...16 Drawing up the lower...
KNOWING YOUR SEWING MACHINE 6 NAMES OF MACHINE PARTS AND THEIR FUNCTIONS 6 The main parts ...6 Needle and presser foot section ...8 Flat bed attachment ...8 ACCESSORIES ...9 USING YOUR SEWING MACHINE 10 Power supply precautions ...10 Power supply ...10 Foot controller ...11 Steadying the machine ...11 THREADING THE MACHINE 12 Winding the bobbin ...12 Lower threading ...14 Upper threading ...16 Drawing up the lower...

Users Manual - English
Page 8
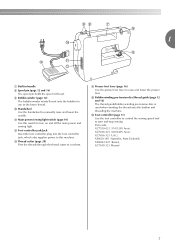
...) d Upper tension control dial (page 28) This controls the tension of the stitch that you want to sew in the opposite direction. 6 KNOWING YOUR SEWING MACHINE 1 KNOWING YOUR SEWING MACHINE NAMES OF MACHINE PARTS AND THEIR FUNCTIONS The main parts a Buttonhole fine-adjusting screw (page 38) Turn the buttonhole fine-adjusting screw to adjust buttonhole stitching when it...
...) d Upper tension control dial (page 28) This controls the tension of the stitch that you want to sew in the opposite direction. 6 KNOWING YOUR SEWING MACHINE 1 KNOWING YOUR SEWING MACHINE NAMES OF MACHINE PARTS AND THEIR FUNCTIONS The main parts a Buttonhole fine-adjusting screw (page 38) Turn the buttonhole fine-adjusting screw to adjust buttonhole stitching when it...
Users Manual - English
Page 9
...) The bobbin winder winds thread onto the bobbin for use as the lower thread. k Main power/sewing light switch (page 10) Use this machine. p Foot controller (page 11) Use the foot controller to control the sewing speed and to raise and lower the presser foot. n Presser foot lever (page 16) Use the... disc is used when winding the thread onto the bobbin and threading the machine. 1 g Built-in handle h Spool pin (page 12 and 16) The spool pin holds the spool of thread. j Handwheel Use the handwheel to cut them. Part code; l Foot controller jack/jack Insert the foot controller plug into the...
...) The bobbin winder winds thread onto the bobbin for use as the lower thread. k Main power/sewing light switch (page 10) Use this machine. p Foot controller (page 11) Use the foot controller to control the sewing speed and to raise and lower the presser foot. n Presser foot lever (page 16) Use the... disc is used when winding the thread onto the bobbin and threading the machine. 1 g Built-in handle h Spool pin (page 12 and 16) The spool pin holds the spool of thread. j Handwheel Use the handwheel to cut them. Part code; l Foot controller jack/jack Insert the foot controller plug into the...
Users Manual - English
Page 11
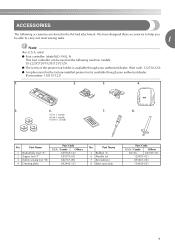
ACCESSORIES The following machine models: LS-2220/2720/1520/2125/2125i. ● The screw of the presser foot holder is available through your authorized dealer. (Part code: 132730-122) ● A replacement for the factory-installed presser foot is available through your authorized dealer. (Part number: 138135-122) 1. ... help you be used on the following accessories are stored in the flat bed attachment. Part Name 1 Buttonhole foot "A" 2 Zipper foot "I" 3 Button sewing foot "M" 4 Darning plate Part Code U.S.A. / Canada Others X59369-321 X59370-021 XE2137-001 XA3442-121 No. No....
ACCESSORIES The following machine models: LS-2220/2720/1520/2125/2125i. ● The screw of the presser foot holder is available through your authorized dealer. (Part code: 132730-122) ● A replacement for the factory-installed presser foot is available through your authorized dealer. (Part number: 138135-122) 1. ... help you be used on the following accessories are stored in the flat bed attachment. Part Name 1 Buttonhole foot "A" 2 Zipper foot "I" 3 Button sewing foot "M" 4 Darning plate Part Code U.S.A. / Canada Others X59369-321 X59370-021 XE2137-001 XA3442-121 No. No....
Users Manual - English
Page 14
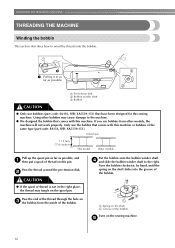
..., the thread may cause damage to the machine. ● We designed the bobbin that comes with this sewing machine. Only use bobbins (part code: SA156, SFB: XA5539-151) that have been designed for this machine. Pass the thread around the pre-tension disk. KNOWING YOUR SEWING MACHINE THREADING THE MACHINE Winding the bobbin This section describes how to...
..., the thread may cause damage to the machine. ● We designed the bobbin that comes with this sewing machine. Only use bobbins (part code: SA156, SFB: XA5539-151) that have been designed for this machine. Pass the thread around the pre-tension disk. KNOWING YOUR SEWING MACHINE THREADING THE MACHINE Winding the bobbin This section describes how to...

Users Manual - English
Page 16
... Use only the enclosed bobbin or bobbins of the machine. KNOWING YOUR SEWING MACHINE Lower threading Install the bobbin wound with this sewing machine. Raise the needle to be injured. Open the shuttle cover behind the flat bed b attachment at the front of the same type (part code: SA156, SFB: XA5539-151). CAUTION ● ... direction, it out from a full bobbin, and then insert the bobbin into the bobbin case. • Only use bobbins that were designed to sew, you turn the power off while threading the machine. If you accidentally step on the foot controller and the...
... Use only the enclosed bobbin or bobbins of the machine. KNOWING YOUR SEWING MACHINE Lower threading Install the bobbin wound with this sewing machine. Raise the needle to be injured. Open the shuttle cover behind the flat bed b attachment at the front of the same type (part code: SA156, SFB: XA5539-151). CAUTION ● ... direction, it out from a full bobbin, and then insert the bobbin into the bobbin case. • Only use bobbins that were designed to sew, you turn the power off while threading the machine. If you accidentally step on the foot controller and the...
Users Manual - English
Page 23
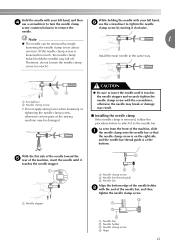
..., follow the procedure below to attach it to the needle bar. With the flat side of the needle toward the e rear of the machine, insert the needle until it touches the needle stopper and securely tighten the needle clamp screw with the end of the needle bar, and ... too much .) a Screwdriver b Needle clamp screw • Do not apply strong force when loosening or tightening the needle clamp screw, otherwise certain parts of the sewing machine may be removed by turning it clockwise. While holding the needle with your left hand, and then d use the screwdriver to tighten the needle...
..., follow the procedure below to attach it to the needle bar. With the flat side of the needle toward the e rear of the machine, insert the needle until it touches the needle stopper and securely tighten the needle clamp screw with the end of the needle bar, and ... too much .) a Screwdriver b Needle clamp screw • Do not apply strong force when loosening or tightening the needle clamp screw, otherwise certain parts of the sewing machine may be removed by turning it clockwise. While holding the needle with your left hand, and then d use the screwdriver to tighten the needle...
Users Manual - English
Page 24
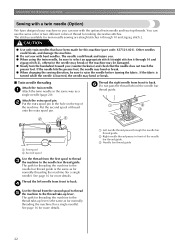
.... See page 16 for more details. KNOWING YOUR SEWING MACHINE Sewing with a twin needle (Option) We have designed your machine so you (counterclockwise) and check that have been made for this machine (part code: X57521-021). The path for threading the machine to back. CAUTION ● Use only twin needles...a single needle). d Use the thread from the first spool to thread c the machine to the needle bar thread guide is lowered, the needle may bend or break. ● When changing the sewing direction, be damaged. ● Slowly turn the handwheel toward you can use the ...
.... See page 16 for more details. KNOWING YOUR SEWING MACHINE Sewing with a twin needle (Option) We have designed your machine so you (counterclockwise) and check that have been made for this machine (part code: X57521-021). The path for threading the machine to back. CAUTION ● Use only twin needles...a single needle). d Use the thread from the first spool to thread c the machine to the needle bar thread guide is lowered, the needle may bend or break. ● When changing the sewing direction, be damaged. ● Slowly turn the handwheel toward you can use the ...
Users Manual - English
Page 27
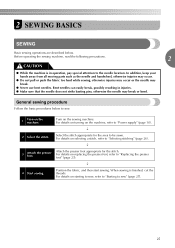
In addition, keep your hands away from all moving parts such as the needle and handwheel, otherwise injuries may occur. ● Do not pull or push the fabric too hard while sewing, otherwise injuries may occur or the needle may break ... pay special attention to be sewn. Select the stitch appropriate for the stitch. p 4 Start sewing. 2 SEWING BASICS SEWING Basic sewing operations are described below to sew. 1 Turn on selecting a stitch, refer to "Selecting stitching" (page 26). Before operating the sewing machine, read the following precautions. 2 CAUTION ● While the...
In addition, keep your hands away from all moving parts such as the needle and handwheel, otherwise injuries may occur. ● Do not pull or push the fabric too hard while sewing, otherwise injuries may occur or the needle may break ... pay special attention to be sewn. Select the stitch appropriate for the stitch. p 4 Start sewing. 2 SEWING BASICS SEWING Basic sewing operations are described below to sew. 1 Turn on selecting a stitch, refer to "Selecting stitching" (page 26). Before operating the sewing machine, read the following precautions. 2 CAUTION ● While the...
Users Manual - English
Page 55
...233;s 41 B basic stitching 33 blind hem stitching 33 bobbin 14 bobbin case 14 bobbin winder 12 button sewing 38 buttonhole foot 36 buttonhole sewing 36 C cleaning... 46 D darning 35 E embroidering 41 extra spool pin 22 F , feed dogs 8 47 , flat bed attachment 8 31 foot controller 27 free-arm style 31 G gathering 43 H handwheel 7 J joining 44 M main parts... chart of sewing fabrics, needles and threads ..... 19 repacking 48 reverse sewing lever 28 S satin stitching 32 seam ripper 37 sewing machine needles 19 ...
...233;s 41 B basic stitching 33 blind hem stitching 33 bobbin 14 bobbin case 14 bobbin winder 12 button sewing 38 buttonhole foot 36 buttonhole sewing 36 C cleaning... 46 D darning 35 E embroidering 41 extra spool pin 22 F , feed dogs 8 47 , flat bed attachment 8 31 foot controller 27 free-arm style 31 G gathering 43 H handwheel 7 J joining 44 M main parts... chart of sewing fabrics, needles and threads ..... 19 repacking 48 reverse sewing lever 28 S satin stitching 32 seam ripper 37 sewing machine needles 19 ...


