

Users Manual - Multi
Page 2
...cord or plug, if it is intended for use ." Always unplug the sewing machine from outlet. 9. This sewing machine is required around the sewing machine needle. 11. To reduce the risk of the sewing machine and foot controller free from all instructions before using." Never drop or insert any ... from the accumulation of electric shock: 1. "SAVE THESE INSTRUCTIONS" "This sewing machine is not working properly, if it to break. 14. "IMPORTANT SAFETY INSTRUCTIONS" When using the sewing machine, basic safety precautions should always be supervised to ensure that they do not play ...
...cord or plug, if it is intended for use ." Always unplug the sewing machine from outlet. 9. This sewing machine is required around the sewing machine needle. 11. To reduce the risk of the sewing machine and foot controller free from all instructions before using." Never drop or insert any ... from the accumulation of electric shock: 1. "SAVE THESE INSTRUCTIONS" "This sewing machine is not working properly, if it to break. 14. "IMPORTANT SAFETY INSTRUCTIONS" When using the sewing machine, basic safety precautions should always be supervised to ensure that they do not play ...
Users Manual - Multi
Page 39
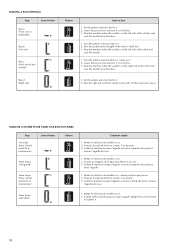
...) c Step c (Back end of the tailor's chalk line. 3. Lower the presser foot and sew 5 to b. 2. Sew the right side until the needle reaches the stitches formed in step a. Stop the machine when the needle is at the left side of the stitch and raise the needle from...Portion a b c Pattern ac c a b ac c a Comment coudre 1. Set the pattern selection dial to 6 stitches. 3. Sew the predetermined length of buttonhole) Step d (Right side) d Pattern ac c a b ac c a d How to Sew 1. Lower the presser foot and sew 5 to a. 2. Abaisser le pied-de-biche et coudre 5 ou 6 points. 3.
...) c Step c (Back end of the tailor's chalk line. 3. Lower the presser foot and sew 5 to b. 2. Sew the right side until the needle reaches the stitches formed in step a. Stop the machine when the needle is at the left side of the stitch and raise the needle from...Portion a b c Pattern ac c a b ac c a Comment coudre 1. Set the pattern selection dial to 6 stitches. 3. Sew the predetermined length of buttonhole) Step d (Right side) d Pattern ac c a b ac c a d How to Sew 1. Lower the presser foot and sew 5 to a. 2. Abaisser le pied-de-biche et coudre 5 ou 6 points. 3.
Users Manual - Multi
Page 55
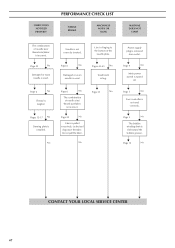
...Page 4 No Main power switch is incorrect. Page 6 No The combination of needle size/ thread size/fabric is turned off. Page 5 No Foot controller is not used . Page 22 No Damaged or worn needle is pulled excessively. No Needle is slid toward the bobbin presser. Page 5 ...No Power supply plug is used. Do not pull the fabric. FABRIC DOES NOT FEED PROPERLY PERFORMANCE CHECK LIST NEEDLE BREAKS MACHINE IS NOISY OR SLOW MACHINE DOES NOT START The combination of needle size/ thread size/fabric is installed. Pages 12-17 No Darning plate is incorrect...
...Page 4 No Main power switch is incorrect. Page 6 No The combination of needle size/ thread size/fabric is turned off. Page 5 No Foot controller is not used . Page 22 No Damaged or worn needle is pulled excessively. No Needle is slid toward the bobbin presser. Page 5 ...No Power supply plug is used. Do not pull the fabric. FABRIC DOES NOT FEED PROPERLY PERFORMANCE CHECK LIST NEEDLE BREAKS MACHINE IS NOISY OR SLOW MACHINE DOES NOT START The combination of needle size/ thread size/fabric is installed. Pages 12-17 No Darning plate is incorrect...
Users Manual - Multi
Page 63
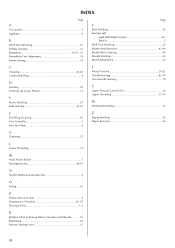
... 17 E Elastic Stitching 27 Embroidering 40-41 T Thread Tension 20-21 Troubleshooting 46, 47 Twin-Needle Sewing 18 U Upper Tension Control Dial 20 Upper Threading 15-16 W Winding the Bobbin 12 F Feed Dog Cleaning 45 Foot Controller 5 Free-Arm Style 8 Z Zigzag Stitching 26 Zipper Insertion 36 G Gathering 37 L Lower Threading 14 M Main...
... 17 E Elastic Stitching 27 Embroidering 40-41 T Thread Tension 20-21 Troubleshooting 46, 47 Twin-Needle Sewing 18 U Upper Tension Control Dial 20 Upper Threading 15-16 W Winding the Bobbin 12 F Feed Dog Cleaning 45 Foot Controller 5 Free-Arm Style 8 Z Zigzag Stitching 26 Zipper Insertion 36 G Gathering 37 L Lower Threading 14 M Main...

Users Manual - English
Page 3
...the needle, changing the needle, threading the bobbin, or changing the presser foot. 15. Replace bulb with same type rated 15 watts. Keep the ventilation openings of the sewing machine and foot controller free from the electrical outlet immediately after using and before changing the...any of lint, dust and loose cloth. 5. Always use this machine outdoors. 7. "IMPORTANT SAFETY INSTRUCTIONS" When using the sewing machine, basic safety precautions should always be supervised to ensure that they do not play with this sewing machine. To reduce the risk of burns, fire, electric shock, or ...
...the needle, changing the needle, threading the bobbin, or changing the presser foot. 15. Replace bulb with same type rated 15 watts. Keep the ventilation openings of the sewing machine and foot controller free from the electrical outlet immediately after using and before changing the...any of lint, dust and loose cloth. 5. Always use this machine outdoors. 7. "IMPORTANT SAFETY INSTRUCTIONS" When using the sewing machine, basic safety precautions should always be supervised to ensure that they do not play with this sewing machine. To reduce the risk of burns, fire, electric shock, or ...
Users Manual - English
Page 5
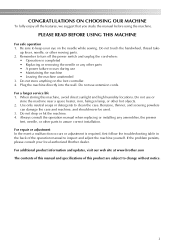
...to assure correct installation. When storing this product are subject to inspect and adjust the machine yourself. For additional product information and updates, visit our web site at www.brother.com The contents of this manual and specifications of the operation manual to change without ... be used. 3. If the problem persists, please consult your eye on the foot controller. 4. Do not store anything on the needle while sewing. Do not use • Maintaining the machine • Leaving the machine unattended 3. Do not use extension cords. Do not touch the handwheel, thread ...
...to assure correct installation. When storing this product are subject to inspect and adjust the machine yourself. For additional product information and updates, visit our web site at www.brother.com The contents of this manual and specifications of the operation manual to change without ... be used. 3. If the problem persists, please consult your eye on the foot controller. 4. Do not store anything on the needle while sewing. Do not use • Maintaining the machine • Leaving the machine unattended 3. Do not use extension cords. Do not touch the handwheel, thread ...

Users Manual - English
Page 6
... REPLACING THE PRESSER FOOT 23 Replacing the presser foot ...23 Removing the presser foot holder ...24 2. CONTENTS 1. SEWING BASICS 25 SEWING ...25 General sewing procedure ...25 Selecting stitching ...26 Starting to sew ...27 Sewing in reverse ...28 Thread tension ...28 USEFUL SEWING TIPS ...30 Trial sewing ...30 Changing the sewing direction ...30 Sewing curves ...30 Sewing thick fabrics ...30 Sewing thin fabrics ...31 Sewing stretch fabrics...
... REPLACING THE PRESSER FOOT 23 Replacing the presser foot ...23 Removing the presser foot holder ...24 2. CONTENTS 1. SEWING BASICS 25 SEWING ...25 General sewing procedure ...25 Selecting stitching ...26 Starting to sew ...27 Sewing in reverse ...28 Thread tension ...28 USEFUL SEWING TIPS ...30 Trial sewing ...30 Changing the sewing direction ...30 Sewing curves ...30 Sewing thick fabrics ...30 Sewing thin fabrics ...31 Sewing stretch fabrics...
Users Manual - English
Page 9
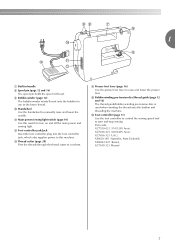
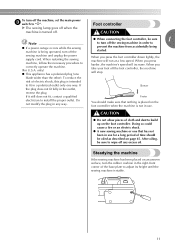
..., which also supplies power to cut them. n Presser foot lever (page 16) Use the presser foot lever to turn on and off the main power and sewing light. k Main power/sewing light switch (page 10) Use this machine. p Foot controller (page 11) Use the foot controller to control the sewing speed and to manually raise and lower the...
..., which also supplies power to cut them. n Presser foot lever (page 16) Use the presser foot lever to turn on and off the main power and sewing light. k Main power/sewing light switch (page 10) Use this machine. p Foot controller (page 11) Use the foot controller to control the sewing speed and to manually raise and lower the...
Users Manual - English
Page 10
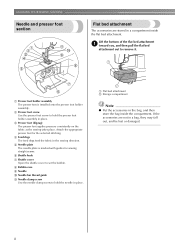
...foot holder assembly. b Presser foot screw Use the presser foot screw to hold the presser foot holder assembly in place. Attach the appropriate presser foot for sewing straight seams. f Shuttle hook g Shuttle cover Open the shuttle cover to remove it. KNOWING YOUR SEWING MACHINE Needle and presser foot...flat bed attachment. a Flat bed attachment b Storage compartment Note ● Put the accessories in the sewing direction. a Presser foot holder assembly The presser foot is marked with guides for the selected stitching. Lift the bottom of the flat bed attachment a toward...
...foot holder assembly. b Presser foot screw Use the presser foot screw to hold the presser foot holder assembly in place. Attach the appropriate presser foot for sewing straight seams. f Shuttle hook g Shuttle cover Open the shuttle cover to remove it. KNOWING YOUR SEWING MACHINE Needle and presser foot...flat bed attachment. a Flat bed attachment b Storage compartment Note ● Put the accessories in the sewing direction. a Presser foot holder assembly The presser foot is marked with guides for the selected stitching. Lift the bottom of the flat bed attachment a toward...
Users Manual - English
Page 11
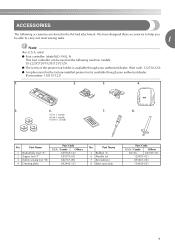
... stored in the flat bed attachment. Part Name 1 Buttonhole foot "A" 2 Zipper foot "I" 3 Button sewing foot "M" 4 Darning plate Part Code U.S.A. / Canada Others X59369-321 X59370-021 XE2137-001 XA3442-121 No. No. ACCESSORIES The following machine models: LS-2220/2720/1520/2125/2125i. ● The screw of the presser foot holder is available through your authorized dealer. (Part code...
... stored in the flat bed attachment. Part Name 1 Buttonhole foot "A" 2 Zipper foot "I" 3 Button sewing foot "M" 4 Darning plate Part Code U.S.A. / Canada Others X59369-321 X59370-021 XE2137-001 XA3442-121 No. No. ACCESSORIES The following machine models: LS-2220/2720/1520/2125/2125i. ● The screw of the presser foot holder is available through your authorized dealer. (Part code...
Users Manual - English
Page 12
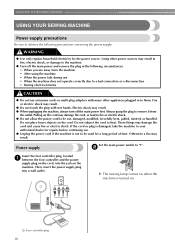
...9679; Do not touch the plug with many other appliances plugged in the following precautions concerning the power supply. KNOWING YOUR SEWING MACHINE USING YOUR SEWING MACHINE Power supply precautions Be sure to be cut, damaged, modified, forcefully bent, pulled, twisted, or bundled. Fire or ... place heavy objects on the machine. If the cord or plug is damaged, take the machine to them. b Insert the foot controller plug, located a between the foot controller and the power supply plug on the cord, into a wall outlet. a Foot controller plug 10 Always grasp ...
...9679; Do not touch the plug with many other appliances plugged in the following precautions concerning the power supply. KNOWING YOUR SEWING MACHINE USING YOUR SEWING MACHINE Power supply precautions Be sure to be cut, damaged, modified, forcefully bent, pulled, twisted, or bundled. Fire or ... place heavy objects on the machine. If the cord or plug is damaged, take the machine to them. b Insert the foot controller plug, located a between the foot controller and the power supply plug on the cord, into a wall outlet. a Foot controller plug 10 Always grasp ...
Users Manual - English
Page 13
... . To reduce the risk of electric shock, this plug is intended to adjust its height until the sewing machine is turned off the foot controller, the machine will stop. You should be oiled as described on page 45. CAUTION ● Do not allow pieces of...other). If it still does not fit, contact a qualified Faster electrician to correctly operate the machine. (For U.S.A. Steadying the machine If the sewing machine has been placed on the foot controller. When restarting the sewing machine, follow the necessary procedure to install the proper outlet. Doing so could cause a fire ...
... . To reduce the risk of electric shock, this plug is intended to adjust its height until the sewing machine is turned off the foot controller, the machine will stop. You should be oiled as described on page 45. CAUTION ● Do not allow pieces of...other). If it still does not fit, contact a qualified Faster electrician to correctly operate the machine. (For U.S.A. Steadying the machine If the sewing machine has been placed on the foot controller. When restarting the sewing machine, follow the necessary procedure to install the proper outlet. Doing so could cause a fire ...
Users Manual - English
Page 15
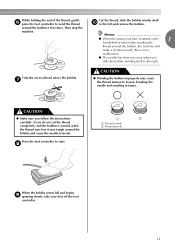
Memo ● When the sewing machine is started or the 1 handwheel is not a malfunction. ●...low it may cause the thread tension to break. Press the foot controller to the left and remove the bobbin. this is turned after winding the thread around the bobbin, the machine will make a clicking sound; If you follow the instructions ...Winding the bobbin improperly may tangle around the bobbin a few times. Then stop the machine. While holding the end of the thread, gently f press the foot controller to wind the thread Cut the thread, slide the bobbin winder shaft j ...
Memo ● When the sewing machine is started or the 1 handwheel is not a malfunction. ●...low it may cause the thread tension to break. Press the foot controller to the left and remove the bobbin. this is turned after winding the thread around the bobbin, the machine will make a clicking sound; If you follow the instructions ...Winding the bobbin improperly may tangle around the bobbin a few times. Then stop the machine. While holding the end of the thread, gently f press the foot controller to wind the thread Cut the thread, slide the bobbin winder shaft j ...

Users Manual - English
Page 16
...to its latch c toward you (counterclockwise) and raise the presser foot lever. CAUTION ● Make sure you turn the power off while threading the machine. If you accidentally step on the foot controller and the machine starts to sew, you and pulling it may cause the thread tension to be ...used , the machine will not operate correctly. If bobbins from a full bobbin, and...
...to its latch c toward you (counterclockwise) and raise the presser foot lever. CAUTION ● Make sure you turn the power off while threading the machine. If you accidentally step on the foot controller and the machine starts to sew, you and pulling it may cause the thread tension to be ...used , the machine will not operate correctly. If bobbins from a full bobbin, and...
Users Manual - English
Page 18
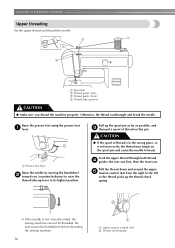
... and c then put a spool of thread is in the wrong place, or is not correctly raised, the sewing machine can not be threaded. Raise the presser foot using the presser foot a lever. Pull the thread down and around the upper e tension control dial from the right to break. ...) c Thread guide (front) d Thread take -up lever CAUTION ● Make sure you thread the machine properly. KNOWING YOUR SEWING MACHINE Upper threading Set the upper thread and thread the needle. a Presser foot lever Raise the needle by turning the handwheel b toward you (counterclockwise) to raise the thread take -up...
... and c then put a spool of thread is in the wrong place, or is not correctly raised, the sewing machine can not be threaded. Raise the presser foot using the presser foot a lever. Pull the thread down and around the upper e tension control dial from the right to break. ...) c Thread guide (front) d Thread take -up lever CAUTION ● Make sure you thread the machine properly. KNOWING YOUR SEWING MACHINE Upper threading Set the upper thread and thread the needle. a Presser foot lever Raise the needle by turning the handwheel b toward you (counterclockwise) to raise the thread take -up...
Users Manual - English
Page 19
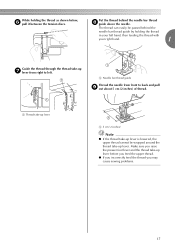
... be wrapped around the thread take -up lever before you feed the upper thread. ● If you incorrectly feed the thread you raise the presser foot lever and the thread take -up g lever from front to left hand, then feeding the thread with your right hand. 1 Guide the thread through the... thread behind the needle bar thread guide by holding the thread as shown below, f pull it between the tension discs. Make sure you may cause sewing problems. 17
... be wrapped around the thread take -up lever before you feed the upper thread. ● If you incorrectly feed the thread you raise the presser foot lever and the thread take -up g lever from front to left hand, then feeding the thread with your right hand. 1 Guide the thread through the... thread behind the needle bar thread guide by holding the thread as shown below, f pull it between the tension discs. Make sure you may cause sewing problems. 17
Users Manual - English
Page 20
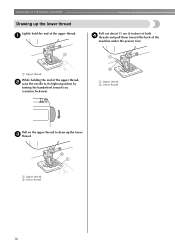
a Pull out about 15 cm (6 inches) of both d threads and pull them toward you (counterclockwise). a Upper thread b Lower thread Pull on the upper thread to its highest position by turning the handwheel toward the back of the upper thread. KNOWING YOUR SEWING MACHINE Drawing up the lower c thread. a Upper thread While holding the end of the upper thread, b raise the needle to draw up the lower thread Lightly hold the end of the machine under the presser foot. a Upper thread b Lower thread 18
a Pull out about 15 cm (6 inches) of both d threads and pull them toward you (counterclockwise). a Upper thread b Lower thread Pull on the upper thread to its highest position by turning the handwheel toward the back of the upper thread. KNOWING YOUR SEWING MACHINE Drawing up the lower c thread. a Upper thread While holding the end of the upper thread, b raise the needle to draw up the lower thread Lightly hold the end of the machine under the presser foot. a Upper thread b Lower thread 18
Users Manual - English
Page 22
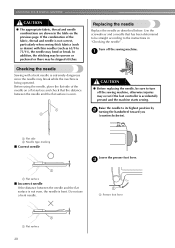
... needle If the distance between the needle and the flat surface is being operated. c a Presser foot lever 1 a Flat surface 20 Lower the presser foot lever. Checking the needle Sewing with thin needles (such as described below. a CAUTION ● Before replacing the needle, be sure...the flat surface is not even, the needle is not correct, particularly when sewing thick fabrics (such as denim) with a bent needle is accidentally pressed and the machine starts sewing. KNOWING YOUR SEWING MACHINE CAUTION ● The appropriate fabric, thread and needle combinations are shown in...
... needle If the distance between the needle and the flat surface is being operated. c a Presser foot lever 1 a Flat surface 20 Lower the presser foot lever. Checking the needle Sewing with thin needles (such as described below. a CAUTION ● Before replacing the needle, be sure...the flat surface is not even, the needle is not correct, particularly when sewing thick fabrics (such as denim) with a bent needle is accidentally pressed and the machine starts sewing. KNOWING YOUR SEWING MACHINE CAUTION ● The appropriate fabric, thread and needle combinations are shown in...
Users Manual - English
Page 24
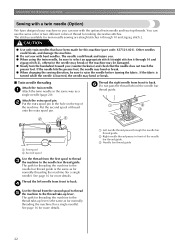
... threads. Attach the extra spool pin. If the needle hits the presser foot, the needle may bend or break. ● When changing the sewing direction, be damaged. ● Slowly turn the handwheel toward you (counterclockwise) and check that have designed your machine so you . ● When using the twin needle, be sure to...
... threads. Attach the extra spool pin. If the needle hits the presser foot, the needle may bend or break. ● When changing the sewing direction, be damaged. ● Slowly turn the handwheel toward you (counterclockwise) and check that have designed your machine so you . ● When using the twin needle, be sure to...
Users Manual - English
Page 25
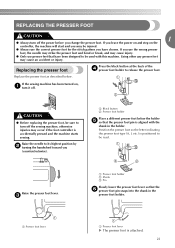
... below the holder e so that have chosen. CAUTION ● Before replacing the presser foot, be injured. ● Always use presser feet that the presser foot pin is accidentally pressed and the machine starts sewing. a Presser foot lever a Presser foot lever X The presser foot is positioned to its highest position by b turning the handwheel toward you change the...
... below the holder e so that have chosen. CAUTION ● Before replacing the presser foot, be injured. ● Always use presser feet that the presser foot pin is accidentally pressed and the machine starts sewing. a Presser foot lever a Presser foot lever X The presser foot is positioned to its highest position by b turning the handwheel toward you change the...


