
Brother International LS-2125i Support Question
Brother International LS-2125i Support Question
Find answers below for this question about Brother International LS-2125i - Basic Sewing And Mending Machine.Need a Brother International LS-2125i manual? We have 2 online manuals for this item!
Question posted by 139merritt on August 27th, 2013
How Do You Remove The Extension Cover?
The person who posted this question about this Brother International product did not include a detailed explanation. Please use the "Request More Information" button to the right if more details would help you to answer this question.
Current Answers
Related Brother International LS-2125i Manual Pages
Users Manual - Multi - Page 2

.... 8. Special care is being used or where oxygen is required around the sewing machine needle. 11. Always use a bent needle. 13. Always unplug the sewing machine from the electrical outlet when removing covers, lubricating, or when making any other user service adjustments mentioned in this sewing machine from the accumulation of burns, fire, electric shock, or injury to...
Users Manual - Multi - Page 6
... of this equipment, it should be destroyed as marked on 2 Turn off and an appropriate three pin plug fitted. When servicing the sewing machine, or when removing covers or changing lamps, the machine or the electrical set must be connected to the terminal which is marked with bared flexible cords is not suitable for the...
Users Manual - English - Page 1
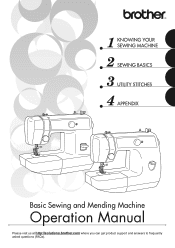
KNOWING YOUR SEWING MACHINE SEWING BASICS UTILITY STITCHES APPENDIX
Basic Sewing and Mending Machine
Operation Manual
Please visit us at http://solutions.brother.com where you can get product support and answers to frequently
asked questions (FAQs).
Users Manual - English - Page 3

...sewing machine to break. 14.
Do not allow this sewing machine. Use only accessories recommended by pulling on the cord. Never operate the sewing machine with same type rated 15 watts. "IMPORTANT SAFETY INSTRUCTIONS"
When using the sewing machine, basic...ventilation openings of the sewing machine and foot controller free from the electrical outlet when removing covers, lubricating, or ...
Users Manual - English - Page 5
... malfunction occurs or adjustment is completed • Replacing or removing the needle or any assemblies, the presser feet, needle,...take- Do not store anything on the needle while sewing.
PLEASE READ BEFORE USING THIS MACHINE
For safe operation 1. If the problem persists, ... parts. 2.
Do not use extension cords. For a longer service life 1. Plug the machine directly into the wall. For ...
Users Manual - English - Page 6

... foot ...23 Removing the presser foot holder ...24
2. CONTENTS
1. SEWING BASICS 25
SEWING ...25
General sewing procedure ...25 Selecting stitching ...26 Starting to sew ...27 Sewing in reverse ...28 Thread tension ...28
USEFUL SEWING TIPS ...30
Trial sewing ...30 Changing the sewing direction ...30 Sewing curves ...30 Sewing thick fabrics ...30 Sewing thin fabrics ...31 Sewing stretch fabrics...
Users Manual - English - Page 10
...the fabric as the sewing takes place. Attach the appropriate presser foot for sewing straight seams.
f Shuttle hook
g Shuttle cover Open the shuttle cover to hold the needle in the sewing direction. a Flat ...screw Use the presser foot screw to set the bobbin.
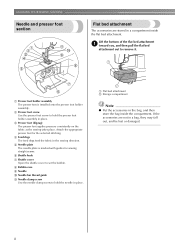
KNOWING YOUR SEWING MACHINE
Needle and presser foot section
Flat bed attachment
The accessories are not in... to remove it.
Users Manual - English - Page 12
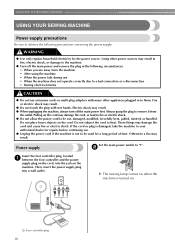
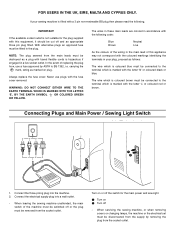
...extension cords or multi-plug adapters with wet hands. b
Insert the foot controller plug, located a between the foot controller and the power
supply plug on the cord, into a wall outlet. X The sewing lamp comes on when the machine is not to the machine... to remove it from the machine • After using the machine • When the power fails during use • When the machine does not...
Users Manual - English - Page 15
Press the foot controller to the right. Memo
● When the sewing machine is started or the
1
handwheel is wound, when the thread runs low ... g
CAUTION
● Winding the bobbin improperly may tangle around the bobbin and cause the needle to the left and remove the bobbin. this is not a
malfunction.
● The needle bar does not move when you follow the instructions carefully...
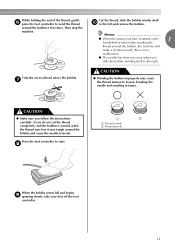
Users Manual - English - Page 16

... b Wound poorly
● The bobbin was designed specifically for this machine. CAUTION
● Make sure you (counterclockwise)
and raise the presser foot lever. CAUTION
● Winding the bobbin improperly may cause the thread tension to be injured. a Flat bed attachment b Shuttle cover
Remove the bobbin case by pulling its highest position by turning...
Users Manual - English - Page 17
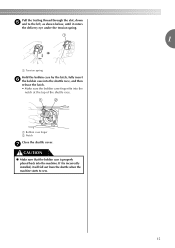
...sew.
1
15 a Tension spring
Hold the bobbin case by the latch, fully insert f the bobbin case into the shuttle race, and then
release the latch. • Make sure the bobbin case finger fits into the machine....
If it enters
the delivery eye under the tension spring. a Bobbin case finger b Notch
Close the shuttle cover.
g
CAUTION
● Make sure ...
Users Manual - English - Page 23
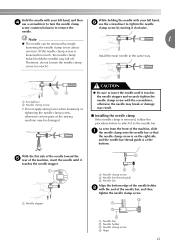
...; Installing the needle clamp If the needle clamp is at the bottom. With the flat side of the needle toward the e rear of the sewing machine may be removed by turning it clockwise.
While holding the needle with your left hand, and then d use the screwdriver to tighten the needle
clamp screw by...
Users Manual - English - Page 26
... foot.
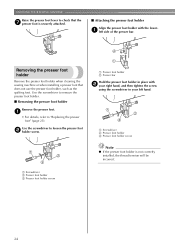
a Presser foot holder b Presser bar
Hold the presser foot holder in your left side of the presser bar.
Removing the presser foot holder
Remove the presser foot holder when cleaning the sewing machine or when installing a presser foot that the g presser foot is not correctly installed, the thread tension will be incorrect. KNOWING...
Users Manual - English - Page 27
... 10). Before operating the sewing machine, read the following precautions.
2
CAUTION
● While the machine is finished, cut the threads.
For details on starting to sew, refer to "Starting to "Selecting stitching" (page 26).
Turn on the machine, refer to "Replacing the presser foot" (page 23).
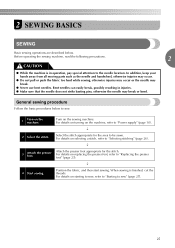
2 SEWING BASICS
SEWING
Basic sewing operations are described below to...
Users Manual - English - Page 30

...fabric before you change fabric or thread.
Press and hold down the reverse sewing lever a while sewing.
■ Correct tension Correct tension is important as too much or ...sew.
To sew forward, release the reverse sewing b lever. Thread tension
The thread tension will weaken your seams or cause puckers on your stitches.
SEWING BASICS
Pull the fabric to the left side of the machine...
Users Manual - English - Page 32
...described below. SEWING BASICS
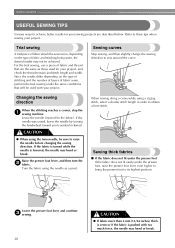
USEFUL SEWING TIPS
Various ways to achieve better results for your project, and check the thread tension and stitch length and width. Trial sewing
A trial ...sure to raise the needle before changing the sewing direction. Changing the sewing direction
When the stitching reaches a corner, stop the a sewing machine.
When sewing along a curve while using the needle ...
Users Manual - English - Page 47
... it more than an hour a day.
If you use it may occur. Note
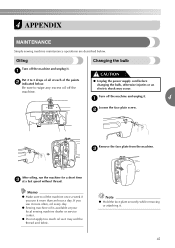
● Hold the face plate securely while removing or attaching it more often, oil every day.
● Sewing machine oil is available at a fast speed without thread. 4 APPENDIX
MAINTENANCE
Simple sewing machine maintenance operations are described below .
a
4
Loosen the face plate screw...
Users Manual - English - Page 48
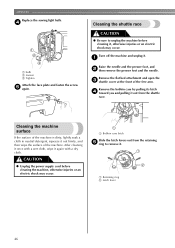
... attachment and open the c shuttle cover at the front of the machine is dirty, lightly soak a cloth in neutral detergent, squeeze it again with a wet cloth, wipe it out firmly, and then wipe the surface of the machine.
APPENDIX
Replace the sewing light bulb. a Retaining ring b Latch lever
46
Remove the bobbin case by pulling...
Users Manual - English - Page 54
...clean the shuttle race.
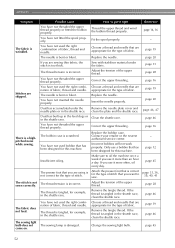
Remove the needle plate cover and clean the plate and the shuttle race. Clean the shuttle race. Only use a bobbin that has been designed for this machine. Attach the presser foot ... is tangled, for example, in the shuttle race.
The stitch is bent or blunt. The sewing light bulb does not come on. You have not inserted the needle properly. You have not ...
Users Manual - English - Page 55
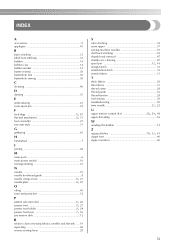
... 9 appliqués 41
B
basic stitching 33 blind hem stitching 33 bobbin 14 bobbin case 14 bobbin winder 12 button sewing 38 buttonhole foot 36 buttonhole sewing 36
C
cleaning 46
D
darning... sewing fabrics, needles and threads ..... 19 repacking 48 reverse sewing lever 28
S
satin stitching 32 seam ripper 37 sewing machine needles 19 shell tuck stitching 43 shuttle hook removal ...
Similar Questions

How To Put A Pressure Foot Back Together On A Brother Sewing Machine Ls-2125
(Posted by bigboshorel 10 years ago)

How To Remove Front Cover On My Brother Lx-3125 Sewing Machine
(Posted by ecabCLVA 10 years ago)

Removing Case Cover From A Brother Cs80 Sewing Machine - International Cs 80
(Posted by rzainc 10 years ago)
How To Place The Needle On A Brother Sewing Machine Ls 2125
(Posted by alhinLaszl 10 years ago)