
Users Manual - English
Page 3
When you have turned off the power switch and unplugged the printer from the AC power outlet. Before you clean the inside the printer. Doing this might cause an electrical shock. Always make sure that you have just used the printer, some internal parts of the printer will be extremely hot. After you open...
When you have turned off the power switch and unplugged the printer from the AC power outlet. Before you clean the inside the printer. Doing this might cause an electrical shock. Always make sure that you have just used the printer, some internal parts of the printer will be extremely hot. After you open...

Users Manual - English
Page 4
... scattered toner. Doing this may cause a fire or electrical shock. iii DO NOT use cleaning materials that you have unplugged the printer from the AC power outlet. • Use neutral detergents. Cleaning with a dry, lint-free cloth and dispose of it according to ignite inside or outside surface of the machine...
... scattered toner. Doing this may cause a fire or electrical shock. iii DO NOT use cleaning materials that you have unplugged the printer from the AC power outlet. • Use neutral detergents. Cleaning with a dry, lint-free cloth and dispose of it according to ignite inside or outside surface of the machine...
Users Manual - English
Page 6
...Contents 1 About this Printer 1 What is in the box? ...1 Interface cable ...1 Front view ...2 Back view ...3 Positioning the printer ...4 Power supply ...4 Environment ...4 2 Printing Methods 5 About paper ...5 Type and size of paper ...5 Recommended paper ...6 Unprintable area ...8 Printing methods...Server® 2003 45 Printer driver for Macintosh® ...45 Software ...46 Software for network models (HL-2150N / HL-2170W only 46 Automatic interface selection (HL-2150N / HL-2170W only 47 Remote Printer Console ...47 4 Control Panel 48 LEDs (Light Emitting Diodes)...48 Service call ...
...Contents 1 About this Printer 1 What is in the box? ...1 Interface cable ...1 Front view ...2 Back view ...3 Positioning the printer ...4 Power supply ...4 Environment ...4 2 Printing Methods 5 About paper ...5 Type and size of paper ...5 Recommended paper ...6 Unprintable area ...8 Printing methods...Server® 2003 45 Printer driver for Macintosh® ...45 Software ...46 Software for network models (HL-2150N / HL-2170W only 46 Automatic interface selection (HL-2150N / HL-2170W only 47 Remote Printer Console ...47 4 Control Panel 48 LEDs (Light Emitting Diodes)...48 Service call ...
Users Manual - English
Page 9
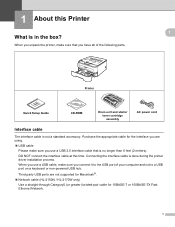
... for the interface you connect it to a USB port on a keyboard or non-powered USB hub. Third party USB ports are using. „ USB cable Please make sure you are not supported for Macintosh®. „ Network cable (HL-2150N / HL-2170W only) Use a straight-through Category5 (or greater) twisted-pair cable for 10BASE... computer and not to the USB port of the following parts. 1 1 Printer Quick Setup Guide CD-ROM Drum unit and starter toner cartridge assembly AC power cord Interface cable 1 The interface cable is no longer than 6 feet (2 meters).
... for the interface you connect it to a USB port on a keyboard or non-powered USB hub. Third party USB ports are using. „ USB cable Please make sure you are not supported for Macintosh®. „ Network cable (HL-2150N / HL-2170W only) Use a straight-through Category5 (or greater) twisted-pair cable for 10BASE... computer and not to the USB port of the following parts. 1 1 Printer Quick Setup Guide CD-ROM Drum unit and starter toner cartridge assembly AC power cord Interface cable 1 The interface cable is no longer than 6 feet (2 meters).

Users Manual - English
Page 10
Front view 1 2 3 4 5 6 1 Face-down output tray support flap 2 (support flap 2) 1 2 Face-down output tray support flap 1 (support flap 1) 3 Control panel 2 4 Manual feed paper guide 5 Manual feed slot 6 Manual feed slot cover 7 Paper tray 8 Front cover 9 Power switch 10 Ventilation hole 11 Face-down output tray 1 For details about the support flap 2, see page 96. 2 For details about the control panel, see Chapter 4. About this Printer 1 1 11 10 9 8 7 2
Front view 1 2 3 4 5 6 1 Face-down output tray support flap 2 (support flap 2) 1 2 Face-down output tray support flap 1 (support flap 1) 3 Control panel 2 4 Manual feed paper guide 5 Manual feed slot 6 Manual feed slot cover 7 Paper tray 8 Front cover 9 Power switch 10 Ventilation hole 11 Face-down output tray 1 For details about the support flap 2, see page 96. 2 For details about the control panel, see Chapter 4. About this Printer 1 1 11 10 9 8 7 2
Users Manual - English
Page 11
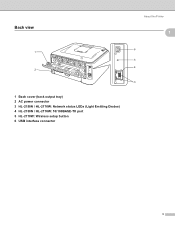
Back view About this Printer 1 1 6 1 5 4 2 3 1 Back cover (back output tray) 2 AC power connector 3 HL-2150N / HL-2170W: Network status LEDs (Light Emitting Diodes) 4 HL-2150N / HL-2170W: 10/100BASE-TX port 5 HL-2170W: Wireless setup button 6 USB interface connector 3
Back view About this Printer 1 1 6 1 5 4 2 3 1 Back cover (back output tray) 2 AC power connector 3 HL-2150N / HL-2170W: Network status LEDs (Light Emitting Diodes) 4 HL-2150N / HL-2170W: 10/100BASE-TX port 5 HL-2170W: Wireless setup button 6 USB interface connector 3

Users Manual - English
Page 12
...; DO NOT put objects on top of the printer is an emergency. „ Only use the printer within the recommended power range. Use a voltage regulator if the power source is free of vibration and shocks. „ Put the printer near devices that you carry it can be easily unplugged...or refrigerators. „ Keep the printer horizontal when you use the printer. Environment 1 „ Put your printer on . Do not share the same power circuit with these appliances, we recommend that contain magnets or produce magnetic fields. „ DO NOT expose the printer to open/naked flames or salty...
...; DO NOT put objects on top of the printer is an emergency. „ Only use the printer within the recommended power range. Use a voltage regulator if the power source is free of vibration and shocks. „ Put the printer near devices that you carry it can be easily unplugged...or refrigerators. „ Keep the printer horizontal when you use the printer. Environment 1 „ Put your printer on . Do not share the same power circuit with these appliances, we recommend that contain magnets or produce magnetic fields. „ DO NOT expose the printer to open/naked flames or salty...

Users Manual - English
Page 20
You can clear this error indication by pressing Go. 2 • When printing on before you put paper or transparencies in the tray. Note • The Error LED on the control panel will light up to indicate No paper if the power switch is turned on transparencies, remove each transparency as soon as it has been printed. Printing Methods g Send the print data to curl. 12 Stacking the printed transparencies may cause a paper jam or the transparency to the printer.
You can clear this error indication by pressing Go. 2 • When printing on before you put paper or transparencies in the tray. Note • The Error LED on the control panel will light up to indicate No paper if the power switch is turned on transparencies, remove each transparency as soon as it has been printed. Printing Methods g Send the print data to curl. 12 Stacking the printed transparencies may cause a paper jam or the transparency to the printer.
Users Manual - English
Page 43
... will save a page of time, it were turned off . Intelligent Sleep Mode automatically adjusts to the most suitable timeout setting depending on for power saving. „ Macro (HL-2150N / HL-2170W only) You can use . This will be available in the quick print setting. • Multiple Page • Manual Duplex • Toner Save Mode...
... will save a page of time, it were turned off . Intelligent Sleep Mode automatically adjusts to the most suitable timeout setting depending on for power saving. „ Macro (HL-2150N / HL-2170W only) You can use . This will be available in the quick print setting. • Multiple Page • Manual Duplex • Toner Save Mode...
Users Manual - English
Page 45
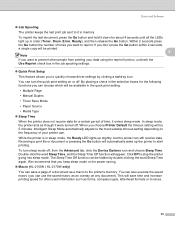
... fails to receive the information, the screen will display Note The Auto Detect function is not available under the following printer conditions: • The printer power switch is off. • The printer is in an error state. • The printer is in the Tray Settings tab as follows. 3 1 2 „ Paper Source...
... fails to receive the information, the screen will display Note The Auto Detect function is not available under the following printer conditions: • The printer power switch is off. • The printer is in an error state. • The printer is in the Tray Settings tab as follows. 3 1 2 „ Paper Source...
Users Manual - English
Page 57
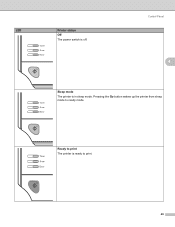
Pressing the Go button wakes up the printer from sleep mode to print. 49 Ready to print The printer is ready to ready mode. LED Printer status Off The power switch is in sleep mode. Control Panel 4 Sleep mode The printer is off.
Pressing the Go button wakes up the printer from sleep mode to print. 49 Ready to print The printer is ready to ready mode. LED Printer status Off The power switch is in sleep mode. Control Panel 4 Sleep mode The printer is off.
Users Manual - English
Page 61
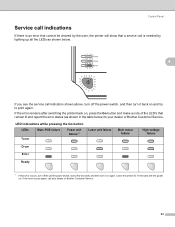
... failure Drum Error Ready 1 If this error occurs, turn off the power switch, and then turn it back on and try to your dealer or Brother Customer Service. 53 If the error occurs again, call your dealer or Brother Customer Service. If the error remains after switching the printer back on,...table below . 4 If you see the service call indication shown above, turn off the printer power switch, wait a few seconds, and then turn it on again. Leave the printer for 10 minutes with the power on. Control Panel Service call indications 4 If there is an error that cannot be cleared ...
... failure Drum Error Ready 1 If this error occurs, turn off the power switch, and then turn it back on and try to your dealer or Brother Customer Service. 53 If the error occurs again, call your dealer or Brother Customer Service. If the error remains after switching the printer back on,...table below . 4 If you see the service call indication shown above, turn off the printer power switch, wait a few seconds, and then turn it on again. Leave the printer for 10 minutes with the power on. Control Panel Service call indications 4 If there is an error that cannot be cleared ...
Users Manual - English
Page 64
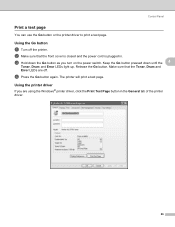
... down until the 4 Toner, Drum and Error LEDs light up. d Press the Go button again. Make sure that the front cover is closed and the power cord is plugged in the General tab of the printer driver. 56 b Make sure that the Toner, Drum and Error LEDs are using the Windows...® printer driver, click the Print Test Page button in . Using the printer driver 4 If you turn on the power switch. Release the Go button. Keep the Go button pressed down the Go button as you are off the printer. Using the Go button 4 a Turn...
... down until the 4 Toner, Drum and Error LEDs light up. d Press the Go button again. Make sure that the front cover is closed and the power cord is plugged in the General tab of the printer driver. 56 b Make sure that the Toner, Drum and Error LEDs are using the Windows...® printer driver, click the Print Test Page button in . Using the printer driver 4 If you turn on the power switch. Release the Go button. Keep the Go button pressed down the Go button as you are off the printer. Using the Go button 4 a Turn...
Users Manual - English
Page 65
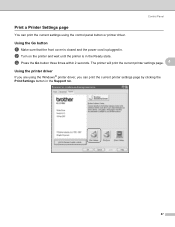
... the Ready state. c Press the Go button three times within 2 seconds. Using the Go button 4 a Make sure that the front cover is closed and the power cord is in . Control Panel Print a Printer Settings page 4 You can print the current printer settings page by clicking the Print Settings button in the...
... the Ready state. c Press the Go button three times within 2 seconds. Using the Go button 4 a Make sure that the front cover is closed and the power cord is in . Control Panel Print a Printer Settings page 4 You can print the current printer settings page by clicking the Print Settings button in the...
Users Manual - English
Page 66
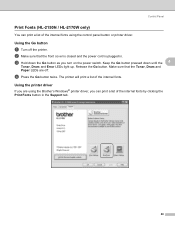
... light up. Keep the Go button pressed down the Go button as you can print a list of the internal fonts using the Brother's Windows® printer driver, you turn on the power switch. d Press the Go button twice. Release the Go button. Using the printer driver 4 If you ...Drum and Paper LEDs are using the control panel button or printer driver. The printer will print a list of the internal fonts. Using the Go button 4 a Turn off . Control Panel Print Fonts (HL-2150N / HL-2170W only) 4 You can print a list of the internal fonts by clicking the Print Fonts button in .
... light up. Keep the Go button pressed down the Go button as you can print a list of the internal fonts using the Brother's Windows® printer driver, you turn on the power switch. d Press the Go button twice. Release the Go button. Using the printer driver 4 If you ...Drum and Paper LEDs are using the control panel button or printer driver. The printer will print a list of the internal fonts. Using the Go button 4 a Turn off . Control Panel Print Fonts (HL-2150N / HL-2170W only) 4 You can print a list of the internal fonts by clicking the Print Fonts button in .
Users Manual - English
Page 67
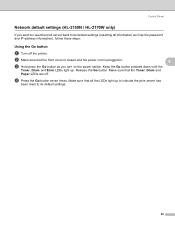
... and Paper LEDs are off the printer. Make sure that all the LEDs light up . b Make sure that the front cover is closed and the power cord is plugged in. 4 c Hold down until the Toner, Drum and Error LEDs light up to indicate the print server has been reset to its... default settings (resetting all information such as you want to reset the print server back to its default settings. 59 Control Panel Network default settings (HL-2150N / HL-2170W only) 4 If you turn on the power switch.
... and Paper LEDs are off the printer. Make sure that all the LEDs light up . b Make sure that the front cover is closed and the power cord is plugged in. 4 c Hold down until the Toner, Drum and Error LEDs light up to indicate the print server has been reset to its... default settings (resetting all information such as you want to reset the print server back to its default settings. 59 Control Panel Network default settings (HL-2150N / HL-2170W only) 4 If you turn on the power switch.
Users Manual - English
Page 75
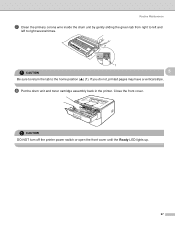
Close the front cover. If you do not, printed pages may have a vertical stripe. CAUTION 1 5 Be sure to return the tab to right several times. CAUTION DO NOT turn off the printer power switch or open the front cover until the Ready LED lights up. 67 h Put the drum unit and toner cartridge assembly back in the printer. Routine Maintenance g Clean the primary corona wire inside the drum unit by gently sliding the green tab from right to left and left to the home position (a) (1).
Close the front cover. If you do not, printed pages may have a vertical stripe. CAUTION 1 5 Be sure to return the tab to right several times. CAUTION DO NOT turn off the printer power switch or open the front cover until the Ready LED lights up. 67 h Put the drum unit and toner cartridge assembly back in the printer. Routine Maintenance g Clean the primary corona wire inside the drum unit by gently sliding the green tab from right to left and left to the home position (a) (1).
Users Manual - English
Page 81
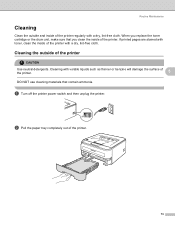
When you clean the inside of the printer. a Turn off the printer power switch and then unplug the printer. Cleaning the outside and inside of the printer with volatile liquids such as thinner or benzine will damage the ...
When you clean the inside of the printer. a Turn off the printer power switch and then unplug the printer. Cleaning the outside and inside of the printer with volatile liquids such as thinner or benzine will damage the ...
Users Manual - English
Page 82
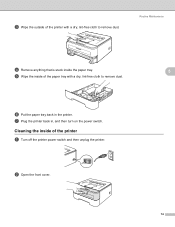
g Plug the printer back in the printer. Routine Maintenance d Remove anything that is stuck inside of the paper tray with a dry, lint-free cloth to remove dust. e Wipe the inside the paper tray. Cleaning the inside of the printer a Turn off the printer power switch and then unplug the printer. f Put the paper tray back in , and then turn on the power switch. b Open the front cover. 5 5 74 c Wipe the outside of the printer with a dry, lint-free cloth to remove dust.
g Plug the printer back in the printer. Routine Maintenance d Remove anything that is stuck inside of the paper tray with a dry, lint-free cloth to remove dust. e Wipe the inside the paper tray. Cleaning the inside of the printer a Turn off the printer power switch and then unplug the printer. f Put the paper tray back in , and then turn on the power switch. b Open the front cover. 5 5 74 c Wipe the outside of the printer with a dry, lint-free cloth to remove dust.
Users Manual - English
Page 84
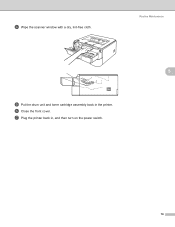
Routine Maintenance 5 e Put the drum unit and toner cartridge assembly back in , and then turn on the power switch. 76 g Plug the printer back in the printer. d Wipe the scanner window with a dry, lint-free cloth. f Close the front cover.
Routine Maintenance 5 e Put the drum unit and toner cartridge assembly back in , and then turn on the power switch. 76 g Plug the printer back in the printer. d Wipe the scanner window with a dry, lint-free cloth. f Close the front cover.


