Users Manual - English
Page 5
... not be adequately insured with the carrier. We recommend that you must ship your printer, carefully package the printer to the publication. © 2007 Brother Industries Ltd. iv Hewlett Packard is a registered trademark and HP LaserJet 6P, 6L, 5P, 5L, 4, 4L 4P, III, IIIP, II,...Pentium are trademarks of Red Hat. AMD, AMD Athlon, AMD Opteron and combinations thereof, are subject to its proprietary programs. All other errors relating to avoid any damage during transit. SuSE is a registered trade mark of Mandrake Soft SA. Compilation and Publication Notice Under the ...
... not be adequately insured with the carrier. We recommend that you must ship your printer, carefully package the printer to the publication. © 2007 Brother Industries Ltd. iv Hewlett Packard is a registered trademark and HP LaserJet 6P, 6L, 5P, 5L, 4, 4L 4P, III, IIIP, II,...Pentium are trademarks of Red Hat. AMD, AMD Athlon, AMD Opteron and combinations thereof, are subject to its proprietary programs. All other errors relating to avoid any damage during transit. SuSE is a registered trade mark of Mandrake Soft SA. Compilation and Publication Notice Under the ...
Users Manual - English
Page 7
... problem ...79 Error messages in the Status Monitor ...80 Error message printout ...82 Paper handling ...83 Paper jams and how to 240 volt model only 118 Internal laser radiation ...119 IMPORTANT - for your paper 104 Symbol and character sets (HL-2150N / HL-2170W only 107 How...bar code control commands (HL-2150N / HL-2170W only) ...110 Print bar codes or expanded characters 110 B Appendix (for Europe and Other Countries) 117 Brother numbers ...117 Important information: regulations ...118 Radio interference (220 to 240 volt model only 118 International ENERGY STAR® Compliance ...
... problem ...79 Error messages in the Status Monitor ...80 Error message printout ...82 Paper handling ...83 Paper jams and how to 240 volt model only 118 Internal laser radiation ...119 IMPORTANT - for your paper 104 Symbol and character sets (HL-2150N / HL-2170W only 107 How...bar code control commands (HL-2150N / HL-2170W only) ...110 Print bar codes or expanded characters 110 B Appendix (for Europe and Other Countries) 117 Brother numbers ...117 Important information: regulations ...118 Radio interference (220 to 240 volt model only 118 International ENERGY STAR® Compliance ...

Users Manual - English
Page 20
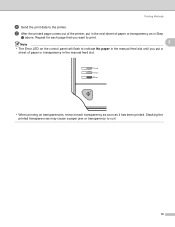
Stacking the printed transparencies may cause a paper jam or the transparency to indicate No paper if the power switch is turned on before you put paper or transparencies in the tray. Note • The Error LED on transparencies, remove each transparency as soon as it has been printed. You can clear this error indication by pressing Go. 2 • When printing on the control panel will light up to curl. 12 Printing Methods g Send the print data to the printer.
Stacking the printed transparencies may cause a paper jam or the transparency to indicate No paper if the power switch is turned on before you put paper or transparencies in the tray. Note • The Error LED on transparencies, remove each transparency as soon as it has been printed. You can clear this error indication by pressing Go. 2 • When printing on the control panel will light up to curl. 12 Printing Methods g Send the print data to the printer.
Users Manual - English
Page 24
g After the printed page comes out of the printer, put a sheet of paper or transparency as it has been printed. Stacking the printed transparencies may cause a paper jam or transparency to the printer. Printing Methods f Send the print data to curl. 16 Repeat for each page that you want to print. 2 Note • The Error LED on the control panel will flash to indicate No paper in the manual feed slot until you put in the next sheet of paper or transparency in the manual feed slot. • When printing on transparencies, remove each transparency as soon as in Step d above.
g After the printed page comes out of the printer, put a sheet of paper or transparency as it has been printed. Stacking the printed transparencies may cause a paper jam or transparency to the printer. Printing Methods f Send the print data to curl. 16 Repeat for each page that you want to print. 2 Note • The Error LED on the control panel will flash to indicate No paper in the manual feed slot until you put in the next sheet of paper or transparency in the manual feed slot. • When printing on transparencies, remove each transparency as soon as in Step d above.

Users Manual - English
Page 28
g After the printed page comes out of the printer, put a sheet of paper or envelope as shown in the manual feed slot. • Remove each sheet or envelope as soon as it has been printed. Repeat for each page that you want to print. 2 Note • The Error LED on the control panel will flash to indicate No paper in the manual feed slot until you put in the next sheet of paper or envelope in Step d. Stacking sheets or envelopes may cause the paper to the printer. Printing Methods f Send the print data to jam or curl. 20
g After the printed page comes out of the printer, put a sheet of paper or envelope as shown in the manual feed slot. • Remove each sheet or envelope as soon as it has been printed. Repeat for each page that you want to print. 2 Note • The Error LED on the control panel will flash to indicate No paper in the manual feed slot until you put in the next sheet of paper or envelope in Step d. Stacking sheets or envelopes may cause the paper to the printer. Printing Methods f Send the print data to jam or curl. 20
Users Manual - English
Page 36
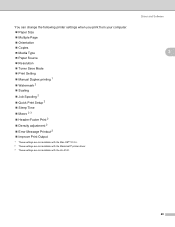
... printing 1 „ Watermark 2 „ Scaling „ Job Spooling 2 „ Quick Print Setup 2 „ Sleep Time „ Macro 2 3 „ Header-Footer Print 2 „ Density adjustment 2 „ Error Message Printout 2 „ Improve Print Output 1 These settings are not available with the Mac OS® 10.2.4. 2 These settings are not available with the Macintosh...
... printing 1 „ Watermark 2 „ Scaling „ Job Spooling 2 „ Quick Print Setup 2 „ Sleep Time „ Macro 2 3 „ Header-Footer Print 2 „ Density adjustment 2 „ Error Message Printout 2 „ Improve Print Output 1 These settings are not available with the Mac OS® 10.2.4. 2 These settings are not available with the Macintosh...
Users Manual - English
Page 42
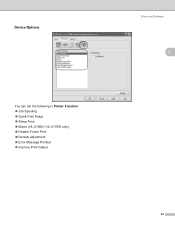
Device Options You can set the following in Printer Function: „ Job Spooling „ Quick Print Setup „ Sleep Time „ Macro (HL-2150N / HL-2170W only) „ Header-Footer Print „ Density adjustment „ Error Message Printout „ Improve Print Output Driver and Software 3 3 34
Device Options You can set the following in Printer Function: „ Job Spooling „ Quick Print Setup „ Sleep Time „ Macro (HL-2150N / HL-2170W only) „ Header-Footer Print „ Density adjustment „ Error Message Printout „ Improve Print Output Driver and Software 3 3 34
Users Manual - English
Page 43
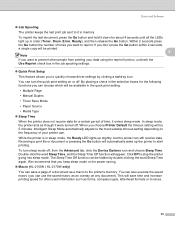
... in order (Toner, Drum, Error, Ready), and then release the Go button. Intelligent Sleep Mode automatically adjusts to reprint. The Sleep Time Off function can still receive data. Within 2 seconds press the Go button the number of time, it down for power saving. „ Macro (HL-2150N / HL-2170W only) You can turn sleep...
... in order (Toner, Drum, Error, Ready), and then release the Go button. Intelligent Sleep Mode automatically adjusts to reprint. The Sleep Time Off function can still receive data. Within 2 seconds press the Go button the number of time, it down for power saving. „ Macro (HL-2150N / HL-2170W only) You can turn sleep...

Users Manual - English
Page 44
... Increase or decrease the print density. Selections are printing only a few pages, you do not need to choose this setting. For details, see Error message printout on paper may be improved. If you are Printer Default (ON), ON and OFF. „ Improve Print Output This feature allows you... 36 Driver and Software „ Header-Footer Print When this feature is not available when you set the resolution to HQ 1200. „ Error Message Printout You can customize the information. • ID Print If you select Login User Name, your computer's system clock and the PC login...
... Increase or decrease the print density. Selections are printing only a few pages, you do not need to choose this setting. For details, see Error message printout on paper may be improved. If you are Printer Default (ON), ON and OFF. „ Improve Print Output This feature allows you... 36 Driver and Software „ Header-Footer Print When this feature is not available when you set the resolution to HQ 1200. „ Error Message Printout You can customize the information. • ID Print If you select Login User Name, your computer's system clock and the PC login...
Users Manual - English
Page 45
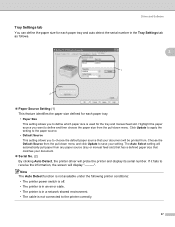
... The Auto Detect function is not available under the following printer conditions: • The printer power switch is off. • The printer is in an error state. • The printer is in the Tray Settings tab as follows. 3 1 2 „ Paper Source Setting (1) This feature identifies the paper size defined for each...
... The Auto Detect function is not available under the following printer conditions: • The printer power switch is off. • The printer is in an error state. • The printer is in the Tray Settings tab as follows. 3 1 2 „ Paper Source Setting (1) This feature identifies the paper size defined for each...
Users Manual - English
Page 52
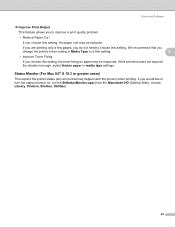
...on paper may happen with the printer) when printing. Status Monitor (For Mac OS® X 10.3 or greater users) 3 This reports the printer status (any errors that you change the printer driver setting in media type settings. If you would like to choose this setting, the toner fixing on , run the... BrStatusMonitor.app (from the Macintosh HD (Startup Disk), choose Library, Printers, Brother, Utilities). 44 We recommend that may be reduced. If you are printing only a few pages, you choose this setting.
...on paper may happen with the printer) when printing. Status Monitor (For Mac OS® X 10.3 or greater users) 3 This reports the printer status (any errors that you change the printer driver setting in media type settings. If you would like to choose this setting, the toner fixing on , run the... BrStatusMonitor.app (from the Macintosh HD (Startup Disk), choose Library, Printers, Brother, Utilities). 44 We recommend that may be reduced. If you are printing only a few pages, you choose this setting.
Users Manual - English
Page 56
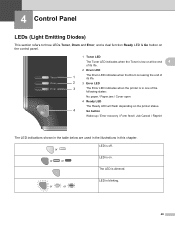
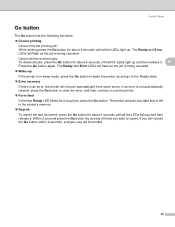
... 4 LEDs (Light Emitting Diodes) 4 This section refers to three LEDs Toner, Drum and Error, and a dual function Ready LED & Go button on the control panel. 1 Toner LED...2 Drum LED 1 The Drum LED indicates when the Drum is nearing the end of its life. 2 3 Error LED 3 The Error LED indicates when the printer is in this chapter. or or LED is dimmed. The LED is blinking. 48... or or or LED is off. LED is on the printer status. 4 Go button Wake-up / Error recovery / Form feed / Job Cancel / Reprint The LED indications shown in the table below are used in the...
... 4 LEDs (Light Emitting Diodes) 4 This section refers to three LEDs Toner, Drum and Error, and a dual function Ready LED & Go button on the control panel. 1 Toner LED...2 Drum LED 1 The Drum LED indicates when the Drum is nearing the end of its life. 2 3 Error LED 3 The Error LED indicates when the printer is in this chapter. or or LED is dimmed. The LED is blinking. 48... or or or LED is off. LED is on the printer status. 4 Go button Wake-up / Error recovery / Form feed / Job Cancel / Reprint The LED indications shown in the table below are used in the...
Users Manual - English
Page 58
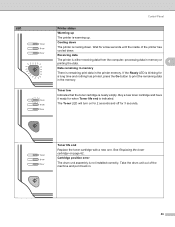
... The printer is either receiving data from the computer, processing data in memory or printing the data. 4 Data remaining in the printer memory. Cartridge position error The drum unit assembly is remaining print data in memory There is not installed correctly. Toner low Indicates that the toner cartridge is warming up...
... The printer is either receiving data from the computer, processing data in memory or printing the data. 4 Data remaining in the printer memory. Cartridge position error The drum unit assembly is remaining print data in memory There is not installed correctly. Toner low Indicates that the toner cartridge is warming up...

Users Manual - English
Page 60
Put in a new drum unit. See Cleaning the corona wire on page 69. 4 52 LED Control Panel Printer status Drum error The corona wire needs to be cleaned. See Replacing the drum unit on page 77.
Put in a new drum unit. See Cleaning the corona wire on page 69. 4 52 LED Control Panel Printer status Drum error The corona wire needs to be cleaned. See Replacing the drum unit on page 77.
Users Manual - English
Page 61
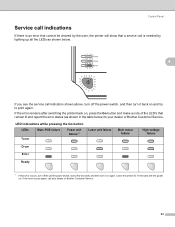
... and then turn it back on again. Control Panel Service call indications 4 If there is an error that cannot be cleared by lighting up all the LEDs as shown in the table below . 4...off the printer power switch, wait a few seconds, and then turn it on and try to your dealer or Brother Customer Service. 53 Leave the printer for 10 minutes with the power on , press the Go button and make... a note of the LED's that a service call your dealer or Brother Customer Service. If the error occurs again, call is needed by the user, the printer will show that remain lit and report...
... and then turn it back on again. Control Panel Service call indications 4 If there is an error that cannot be cleared by lighting up all the LEDs as shown in the table below . 4...off the printer power switch, wait a few seconds, and then turn it on and try to your dealer or Brother Customer Service. 53 Leave the printer for 10 minutes with the power on , press the Go button and make... a note of the LED's that a service call your dealer or Brother Customer Service. If the error occurs again, call is needed by the user, the printer will show that remain lit and report...
Users Manual - English
Page 62
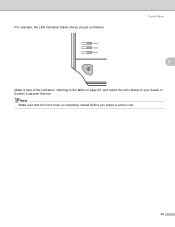
Note Make sure that the front cover is completely closed before you report a service call. 54 For example, the LED indication below shows a fuser unit failure. Control Panel 4 Make a note of the indication, referring to the table on page 53, and report the error status to your dealer or Brother Customer Service.
Note Make sure that the front cover is completely closed before you report a service call. 54 For example, the LED indication below shows a fuser unit failure. Control Panel 4 Make a note of the indication, referring to the table on page 53, and report the error status to your dealer or Brother Customer Service.
Users Manual - English
Page 63
... the printing job: While printing press the Go button for about 4 seconds until all the LEDs light up and then release it . The Ready and Error LEDs will print any data that is being canceled. „ Wake-up If the printer is in the printer's memory. „ Reprint To reprint the... . Within 2 seconds press the Go button the number of times you don't press the Go button within 2 seconds, a single copy will recover automatically from some errors. If you want to use the printer. „ Form feed If the blue Ready LED blinks for about 4 seconds until all jobs, press the Go...
... the printing job: While printing press the Go button for about 4 seconds until all the LEDs light up and then release it . The Ready and Error LEDs will print any data that is being canceled. „ Wake-up If the printer is in the printer's memory. „ Reprint To reprint the... . Within 2 seconds press the Go button the number of times you don't press the Go button within 2 seconds, a single copy will recover automatically from some errors. If you want to use the printer. „ Form feed If the blue Ready LED blinks for about 4 seconds until all jobs, press the Go...
Users Manual - English
Page 64
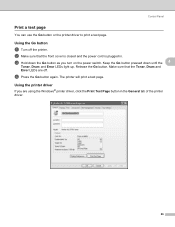
... tab of the printer driver. 56 The printer will print a test page. Using the Go button 4 a Turn off . c Hold down until the 4 Toner, Drum and Error LEDs light up. Using the printer driver 4 If you turn on the power switch. b Make sure that the Toner, Drum and... Error LEDs are using the Windows® printer driver, click the Print Test Page button in . d Press the Go button again. Control Panel Print a test page 4 ...
... tab of the printer driver. 56 The printer will print a test page. Using the Go button 4 a Turn off . c Hold down until the 4 Toner, Drum and Error LEDs light up. Using the printer driver 4 If you turn on the power switch. b Make sure that the Toner, Drum and... Error LEDs are using the Windows® printer driver, click the Print Test Page button in . d Press the Go button again. Control Panel Print a test page 4 ...
Users Manual - English
Page 66
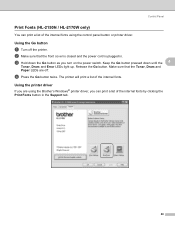
... will print a list of the internal fonts using the Brother's Windows® printer driver, you turn on the power switch. b Make sure that the Toner, Drum and Paper LEDs are using the control panel button or printer driver. c Hold down until the 4 Toner, Drum and Error LEDs light up. d Press the... Go button twice. Keep the Go button pressed down the Go button as you can print a list of the internal fonts. Release the Go button. Control Panel Print Fonts (HL-2150N / HL-2170W only) 4 You can print a list of the...
... will print a list of the internal fonts using the Brother's Windows® printer driver, you turn on the power switch. b Make sure that the Toner, Drum and Paper LEDs are using the control panel button or printer driver. c Hold down until the 4 Toner, Drum and Error LEDs light up. d Press the... Go button twice. Keep the Go button pressed down the Go button as you can print a list of the internal fonts. Release the Go button. Control Panel Print Fonts (HL-2150N / HL-2170W only) 4 You can print a list of the...
Users Manual - English
Page 67
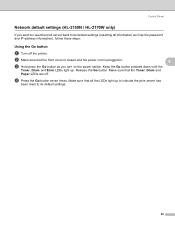
... the Go button. Make sure that the front cover is closed and the power cord is plugged in. 4 c Hold down until the Toner, Drum and Error LEDs light up to indicate the print server has been reset to its default settings. 59 d Press the Go button seven times. b Make sure that... button as you want to reset the print server back to its default settings (resetting all the LEDs light up . Control Panel Network default settings (HL-2150N / HL-2170W only) 4 If you turn on the power switch.
... the Go button. Make sure that the front cover is closed and the power cord is plugged in. 4 c Hold down until the Toner, Drum and Error LEDs light up to indicate the print server has been reset to its default settings. 59 d Press the Go button seven times. b Make sure that... button as you want to reset the print server back to its default settings (resetting all the LEDs light up . Control Panel Network default settings (HL-2150N / HL-2170W only) 4 If you turn on the power switch.


