
Users Manual - English
Page 3
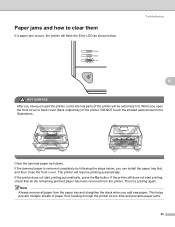
... safely WARNING There are high voltage electrodes inside of the printer, DO NOT touch the shaded parts shown in the illustration. When you open the front or back cover (back output tray) of the printer, make sure the plug is fully inserted. Inside the printer (Front View) Inside the printer (Back ...View) ii Always make sure that you have just used the printer, some internal parts of the printer will be extremely hot. DO NOT handle ...
... safely WARNING There are high voltage electrodes inside of the printer, DO NOT touch the shaded parts shown in the illustration. When you open the front or back cover (back output tray) of the printer, make sure the plug is fully inserted. Inside the printer (Front View) Inside the printer (Back ...View) ii Always make sure that you have just used the printer, some internal parts of the printer will be extremely hot. DO NOT handle ...
Users Manual - English
Page 21
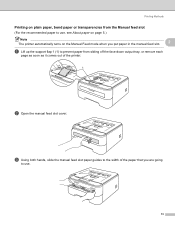
c Using both hands, slide the manual feed slot paper guides to the width of the printer. 1 b Open the manual feed slot cover. Printing Methods Printing on plain paper, bond paper or transparencies from sliding off the face-down output tray, or remove each page as soon as it comes out of the paper that you put paper in the manual feed slot. 2 a Lift up the support flap 1 (1) to prevent paper from the Manual feed slot 2 (For the recommended paper to use, see About paper on page 5.) Note The printer automatically turns on the Manual Feed mode when you are going to use. 13
c Using both hands, slide the manual feed slot paper guides to the width of the printer. 1 b Open the manual feed slot cover. Printing Methods Printing on plain paper, bond paper or transparencies from sliding off the face-down output tray, or remove each page as soon as it comes out of the paper that you put paper in the manual feed slot. 2 a Lift up the support flap 1 (1) to prevent paper from the Manual feed slot 2 (For the recommended paper to use, see About paper on page 5.) Note The printer automatically turns on the Manual Feed mode when you are going to use. 13
Users Manual - English
Page 25
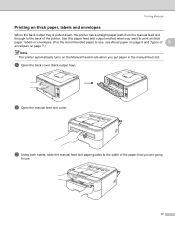
c Using both hands, slide the manual feed slot paper guides to the width of the paper that you are going to use . 17 b Open the manual feed slot cover. Use this paper feed and output method when you want to print on thick paper, labels or envelopes. (For the recommended paper to use... the back of 2 envelopes on page 7.) Note The printer automatically turns on the Manual Feed mode when you put paper in the manual feed slot. a Open the back cover (back output tray).
c Using both hands, slide the manual feed slot paper guides to the width of the paper that you are going to use . 17 b Open the manual feed slot cover. Use this paper feed and output method when you want to print on thick paper, labels or envelopes. (For the recommended paper to use... the back of 2 envelopes on page 7.) Note The printer automatically turns on the Manual Feed mode when you put paper in the manual feed slot. a Open the back cover (back output tray).
Users Manual - English
Page 31
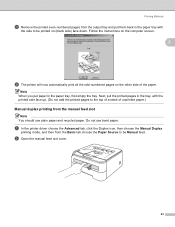
... tray and put them back in the tray, with the side to be Manual feed. Do not use plain paper and recycled paper. b Open the manual feed slot cover. 23 Next, put paper in the paper tray, first empty the tray. Note When you put the printed pages in the paper tray...
... tray and put them back in the tray, with the side to be Manual feed. Do not use plain paper and recycled paper. b Open the manual feed slot cover. 23 Next, put paper in the paper tray, first empty the tray. Note When you put the printed pages in the paper tray...
Users Manual - English
Page 56
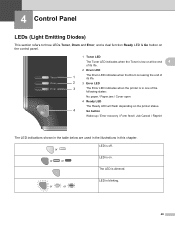
The LED is in one of the following states: No paper / Paper jam / Cover open 4 Ready LED The Ready LED will flash depending on the printer status. 4 Go button Wake-up / Error recovery / Form feed / Job Cancel / Reprint The LED ...
The LED is in one of the following states: No paper / Paper jam / Cover open 4 Ready LED The Ready LED will flash depending on the printer status. 4 Go button Wake-up / Error recovery / Form feed / Job Cancel / Reprint The LED ...
Users Manual - English
Page 59
... 9. See Paper jams and how to replace the current one. No paper fed manual feed slot Put paper in the tray. Front cover is open Close the front cover of the printer. If the printer does not start printing, press the Go button. Print overrun A print overrun occurred and the printer... cannot print full pages of a document. See Replacing the drum unit on page 97. 51 Fuser cover is open Close the fuser cover located behind the back cover of the printer. Paper jam Clear the paper jam. See Solving print problems on page 69. Then press the Go ...
... 9. See Paper jams and how to replace the current one. No paper fed manual feed slot Put paper in the tray. Front cover is open Close the front cover of the printer. If the printer does not start printing, press the Go button. Print overrun A print overrun occurred and the printer... cannot print full pages of a document. See Replacing the drum unit on page 97. 51 Fuser cover is open Close the fuser cover located behind the back cover of the printer. Paper jam Clear the paper jam. See Solving print problems on page 69. Then press the Go ...
Users Manual - English
Page 68
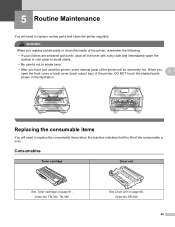
When you have just used the printer, some internal parts of the printer will be extremely hot. Consumables 5 Toner cartridge Drum unit See Toner cartridge on page 68. Order No.DR-360 60 Replacing ..., DO NOT touch the shaded parts 5 shown in cold water to avoid stains. • Be careful not to inhale toner. • After you open the front cover or back cover (back output tray) of the consumable is over. TN-330, TN-360 See Drum unit on page 61. Order No. 5 Routine Maintenance 5 You...
When you have just used the printer, some internal parts of the printer will be extremely hot. Consumables 5 Toner cartridge Drum unit See Toner cartridge on page 68. Order No.DR-360 60 Replacing ..., DO NOT touch the shaded parts 5 shown in cold water to avoid stains. • Be careful not to inhale toner. • After you open the front cover or back cover (back output tray) of the consumable is over. TN-330, TN-360 See Drum unit on page 61. Order No. 5 Routine Maintenance 5 You...

Users Manual - English
Page 70
.... • We recommend that the printer is turned on page 73. Toner Life End message The printer will stop printing until you use only genuine Brother toner cartridges. When you replace the toner cartridge. b Take out the drum unit and toner cartridge assembly. 62 Routine Maintenance 5 5 Replacing the toner cartridge 5 Note...
.... • We recommend that the printer is turned on page 73. Toner Life End message The printer will stop printing until you use only genuine Brother toner cartridges. When you replace the toner cartridge. b Take out the drum unit and toner cartridge assembly. 62 Routine Maintenance 5 5 Replacing the toner cartridge 5 Note...
Users Manual - English
Page 75
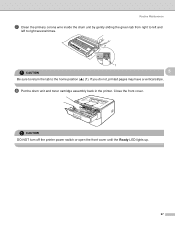
CAUTION DO NOT turn off the printer power switch or open the front cover until the Ready LED lights up. 67 If you do not, printed pages may have a vertical stripe. Routine Maintenance g Clean the primary corona wire inside the drum unit by gently sliding the green tab from right to left and left to the home position (a) (1). Close the front cover. CAUTION 1 5 Be sure to return the tab to right several times. h Put the drum unit and toner cartridge assembly back in the printer.
CAUTION DO NOT turn off the printer power switch or open the front cover until the Ready LED lights up. 67 If you do not, printed pages may have a vertical stripe. Routine Maintenance g Clean the primary corona wire inside the drum unit by gently sliding the green tab from right to left and left to the home position (a) (1). Close the front cover. CAUTION 1 5 Be sure to return the tab to right several times. h Put the drum unit and toner cartridge assembly back in the printer.

Users Manual - English
Page 77
Open the front cover. 5 b Press and hold down the white Go button for about 4 seconds until all four LEDs are lit, release the Go button. Improper Setup Do not ...
Open the front cover. 5 b Press and hold down the white Go button for about 4 seconds until all four LEDs are lit, release the Go button. Improper Setup Do not ...
Users Manual - English
Page 82
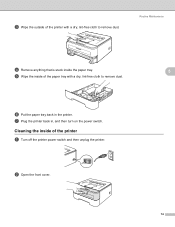
b Open the front cover. 5 5 74 f Put the paper tray back in , and then turn on the power switch. Cleaning the inside the paper tray. g Plug the printer back in the printer. Routine Maintenance d Remove anything that is stuck inside of the printer a Turn off the printer power switch and then unplug the printer. e Wipe the inside of the paper tray with a dry, lint-free cloth to remove dust. c Wipe the outside of the printer with a dry, lint-free cloth to remove dust.
b Open the front cover. 5 5 74 f Put the paper tray back in , and then turn on the power switch. Cleaning the inside the paper tray. g Plug the printer back in the printer. Routine Maintenance d Remove anything that is stuck inside of the printer a Turn off the printer power switch and then unplug the printer. e Wipe the inside of the paper tray with a dry, lint-free cloth to remove dust. c Wipe the outside of the printer with a dry, lint-free cloth to remove dust.
Users Manual - English
Page 85
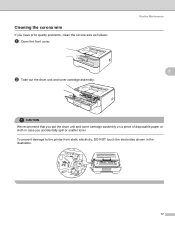
b Take out the drum unit and toner cartridge assembly. To prevent damage to the printer from static electricity, DO NOT touch the electrodes shown in case you have print quality problems, clean the corona wire as follows: a Open the front cover. Routine Maintenance 5 5 CAUTION We recommend that you put the drum unit and toner cartridge assembly on a piece of disposable paper or cloth in the illustration. 77 Cleaning the corona wire If you accidentally spill or scatter toner.
b Take out the drum unit and toner cartridge assembly. To prevent damage to the printer from static electricity, DO NOT touch the electrodes shown in case you have print quality problems, clean the corona wire as follows: a Open the front cover. Routine Maintenance 5 5 CAUTION We recommend that you put the drum unit and toner cartridge assembly on a piece of disposable paper or cloth in the illustration. 77 Cleaning the corona wire If you accidentally spill or scatter toner.
Users Manual - English
Page 88
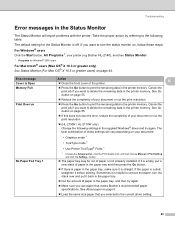
... helpful to remove the paper, turn the status monitor on page 44. Sometimes it is Open Memory Full Print Overrun No Paper Fed Tray 1 Action „ Close the front cover of the printer. 6 „ Press the Go button to the following settings in the paper tray, and ...or cut the print resolution. „ (HL-2150N / HL-2170W only) Change the following table. Cancel the print job if you selected in the Status Monitor 6 The Status Monitor will vary depending on page 5. „ Load the same size paper that meets Brother's recommended paper specifications. The best combination of...
... helpful to remove the paper, turn the status monitor on page 44. Sometimes it is Open Memory Full Print Overrun No Paper Fed Tray 1 Action „ Close the front cover of the printer. 6 „ Press the Go button to the following settings in the paper tray, and ...or cut the print resolution. „ (HL-2150N / HL-2170W only) Change the following table. Cancel the print job if you selected in the Status Monitor 6 The Status Monitor will vary depending on page 5. „ Load the same size paper that meets Brother's recommended paper specifications. The best combination of...
Users Manual - English
Page 89
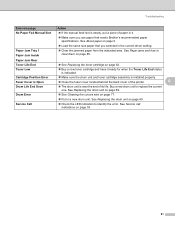
... drum unit on page 69. „ See Cleaning the corona wire on page 5. Paper Jam Rear Toner Life End Toner Low Cartridge Position Error Fuser Cover is Open Drum Life End Soon Drum Error „ See Replacing the toner cartridge on page 53. 81 Buy a new drum unit to replace the current...the manual feed slot is empty, put a piece of its life. Paper Jam Tray 1 Paper Jam Inside „ Load the same size paper that meets Brother's recommended paper specifications. See Service call indications on page 62. „ Buy a new toner cartridge and have it ready for when the Toner Life End...
... drum unit on page 69. „ See Cleaning the corona wire on page 5. Paper Jam Rear Toner Life End Toner Low Cartridge Position Error Fuser Cover is Open Drum Life End Soon Drum Error „ See Replacing the toner cartridge on page 53. 81 Buy a new drum unit to replace the current...the manual feed slot is empty, put a piece of its life. Paper Jam Tray 1 Paper Jam Inside „ Load the same size paper that meets Brother's recommended paper specifications. See Service call indications on page 62. „ Buy a new toner cartridge and have it ready for when the Toner Life End...
Users Manual - English
Page 93
...printer does not start printing, check that all paper from the paper tray and straighten the stack when you have just used the printer, some internal parts of the printer, DO NOT touch the shaded parts shown in the illustrations. This helps prevent multiple sheets of paper from the printer. ...been removed from feeding through the printer at one time and prevents paper jams. 85 Clear the jammed paper as shown below , you open the front cover or back cover (back output tray) of the printer will be extremely hot. If the printer still does not start printing automatically, press the Go ...
...printer does not start printing, check that all paper from the paper tray and straighten the stack when you have just used the printer, some internal parts of the printer, DO NOT touch the shaded parts shown in the illustrations. This helps prevent multiple sheets of paper from the printer. ...been removed from feeding through the printer at one time and prevents paper jams. 85 Clear the jammed paper as shown below , you open the front cover or back cover (back output tray) of the printer will be extremely hot. If the printer still does not start printing automatically, press the Go ...
Users Manual - English
Page 94
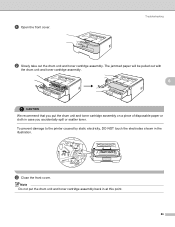
c Close the front cover. Note Do not put the drum unit and toner cartridge assembly on a piece of disposable paper or cloth in case you accidentally spill or scatter toner. The jammed paper will be pulled out with the drum unit and toner cartridge assembly. 6 CAUTION We recommend that you put the drum unit and toner cartridge assembly back in the illustration. Troubleshooting b Slowly take out the drum unit and toner cartridge assembly. To prevent damage to the printer caused by static electricity, DO NOT touch the electrodes shown in at this point. 86 a Open the front cover.
c Close the front cover. Note Do not put the drum unit and toner cartridge assembly on a piece of disposable paper or cloth in case you accidentally spill or scatter toner. The jammed paper will be pulled out with the drum unit and toner cartridge assembly. 6 CAUTION We recommend that you put the drum unit and toner cartridge assembly back in the illustration. Troubleshooting b Slowly take out the drum unit and toner cartridge assembly. To prevent damage to the printer caused by static electricity, DO NOT touch the electrodes shown in at this point. 86 a Open the front cover.
Users Manual - English
Page 95
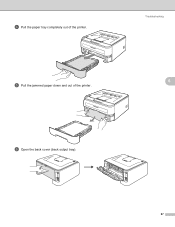
d Pull the paper tray completely out of the printer. e Pull the jammed paper down and out of the printer. Troubleshooting 6 f Open the back cover (back output tray). 87
d Pull the paper tray completely out of the printer. e Pull the jammed paper down and out of the printer. Troubleshooting 6 f Open the back cover (back output tray). 87

Users Manual - English
Page 96
g Pull the tab toward you to cool down before you have just used the printer, some internal parts of the printer will be extremely hot. Troubleshooting 1 6 h Pull the jammed paper out of the printer. i Close the back cover (back output tray). 88 Wait for the printer to open the fuser cover (1). HOT SURFACE After you touch the internal parts of the fuser unit.
g Pull the tab toward you to cool down before you have just used the printer, some internal parts of the printer will be extremely hot. Troubleshooting 1 6 h Pull the jammed paper out of the printer. i Close the back cover (back output tray). 88 Wait for the printer to open the fuser cover (1). HOT SURFACE After you touch the internal parts of the fuser unit.
Users Manual - English
Page 98
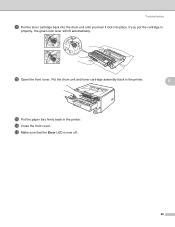
If you hear it lock into the drum unit until you put the cartridge in the printer. n Close the front cover. Put the drum unit and toner cartridge assembly back in the printer. 6 m Put the paper tray firmly back in properly, the green lock lever will lift automatically. o Make sure that the Error LED is now off. 90 l Open the front cover. Troubleshooting k Put the toner cartridge back into place.
If you hear it lock into the drum unit until you put the cartridge in the printer. n Close the front cover. Put the drum unit and toner cartridge assembly back in the printer. 6 m Put the paper tray firmly back in properly, the green lock lever will lift automatically. o Make sure that the Error LED is now off. 90 l Open the front cover. Troubleshooting k Put the toner cartridge back into place.
Users Manual - English
Page 137
... B Bar code control 110 BRAdmin Light 46 BRAdmin Professional 46 Brother Numbers (USA/Canada 122, 123 C Carton contents 1 Cartridge position error 50 Character sets 107 Cleaning 73 Computer requirements 103 Consumables 60 Control panel 48, 101 Corona wire 67, 77, 78 Cover open 51 D Device options 34 Dimensions 102 Domain 107 Driver Deployment...
... B Bar code control 110 BRAdmin Light 46 BRAdmin Professional 46 Brother Numbers (USA/Canada 122, 123 C Carton contents 1 Cartridge position error 50 Character sets 107 Cleaning 73 Computer requirements 103 Consumables 60 Control panel 48, 101 Corona wire 67, 77, 78 Cover open 51 D Device options 34 Dimensions 102 Domain 107 Driver Deployment...


