Users Manual - English
Page 43
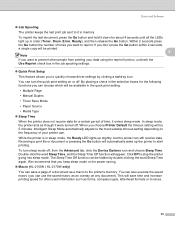
... off , from printing your printer use the saved macro as an overlay on for power saving. „ Macro (HL-2150N / HL-2170W only) You can still receive data. While the printer is in the quick print setting. • Multiple Page &#...of times you can use . By placing a check in the selection boxes for about 4 seconds until all the LEDs light up in memory. Within 2 seconds press the Go button the number of a document as forms, company logos, letterhead formats... The printer keeps the last print job sent to it in order (Toner, Drum, Error, Ready), and then release the Go button.
... off , from printing your printer use the saved macro as an overlay on for power saving. „ Macro (HL-2150N / HL-2170W only) You can still receive data. While the printer is in the quick print setting. • Multiple Page &#...of times you can use . By placing a check in the selection boxes for about 4 seconds until all the LEDs light up in memory. Within 2 seconds press the Go button the number of a document as forms, company logos, letterhead formats... The printer keeps the last print job sent to it in order (Toner, Drum, Error, Ready), and then release the Go button.
Users Manual - English
Page 56
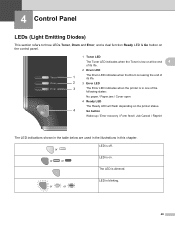
...in one of its life. 2 3 Error LED 3 The Error LED indicates when the printer is dimmed. 4 Control Panel 4 LEDs (Light Emitting Diodes) 4 This section refers to three LEDs Toner, Drum and Error, and a dual function Ready LED & Go button on the control panel. 1 Toner LED The Toner LED indicates when the... Toner is low or at the end 4 of its life. 2 Drum LED 1 The Drum LED indicates when the Drum is nearing the end of the following states: No paper / Paper jam / Cover open 4 Ready LED The Ready LED will flash ...
...in one of its life. 2 3 Error LED 3 The Error LED indicates when the printer is dimmed. 4 Control Panel 4 LEDs (Light Emitting Diodes) 4 This section refers to three LEDs Toner, Drum and Error, and a dual function Ready LED & Go button on the control panel. 1 Toner LED The Toner LED indicates when the... Toner is low or at the end 4 of its life. 2 Drum LED 1 The Drum LED indicates when the Drum is nearing the end of the following states: No paper / Paper jam / Cover open 4 Ready LED The Ready LED will flash ...
Users Manual - English
Page 61
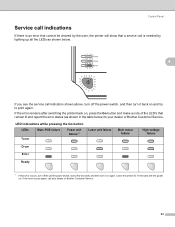
... button and make a note of the LED's that a service call is needed by lighting up all the LEDs as shown in the table below . 4 If you see the service call your dealer or Brother Customer Service. LED indications while pressing the Go button LEDs Toner Main PCB failure Fuser... unit failure 1 Laser unit failure Main motor failure High voltage failure Drum Error Ready 1 If this error occurs, turn off the power switch...
... button and make a note of the LED's that a service call is needed by lighting up all the LEDs as shown in the table below . 4 If you see the service call your dealer or Brother Customer Service. LED indications while pressing the Go button LEDs Toner Main PCB failure Fuser... unit failure 1 Laser unit failure Main motor failure High voltage failure Drum Error Ready 1 If this error occurs, turn off the power switch...
Users Manual - English
Page 64
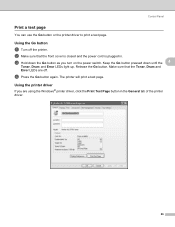
... Panel Print a test page 4 You can use the Go button or the printer driver to print a test page. c Hold down until the 4 Toner, Drum and Error LEDs light up. Make sure that the front cover is closed and the power cord is plugged in the General tab of the printer driver. 56... b Make sure that the Toner, Drum and Error LEDs are using the Windows® printer driver, click the Print Test Page button in . Using the...
... Panel Print a test page 4 You can use the Go button or the printer driver to print a test page. c Hold down until the 4 Toner, Drum and Error LEDs light up. Make sure that the front cover is closed and the power cord is plugged in the General tab of the printer driver. 56... b Make sure that the Toner, Drum and Error LEDs are using the Windows® printer driver, click the Print Test Page button in . Using the...
Users Manual - English
Page 66
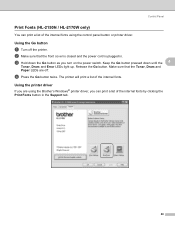
...HL-2150N / HL-2170W only) 4 You can print a list of the internal fonts by clicking the Print Fonts button in . d Press the Go button twice. Using the Go button 4 a Turn off . Using the printer driver 4 If you are off the printer. The printer will print a list of the internal fonts using the Brother...'s Windows® printer driver, you turn on the power switch. Keep the Go button pressed down the Go button as you can print a list of the internal fonts. c Hold down until the 4 Toner, Drum and Error LEDs light up.
...HL-2150N / HL-2170W only) 4 You can print a list of the internal fonts by clicking the Print Fonts button in . d Press the Go button twice. Using the Go button 4 a Turn off . Using the printer driver 4 If you are off the printer. The printer will print a list of the internal fonts using the Brother...'s Windows® printer driver, you turn on the power switch. Keep the Go button pressed down the Go button as you can print a list of the internal fonts. c Hold down until the 4 Toner, Drum and Error LEDs light up.
Users Manual - English
Page 67
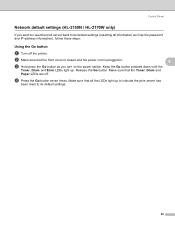
...address information), follow these steps: Using the Go button 4 a Turn off . d Press the Go button seven times. Make sure that the Toner, Drum and Paper LEDs are off the printer. Make sure that the front cover is closed and the power cord is plugged in. 4 c Hold down until... the Toner, Drum and Error LEDs light up to indicate the print server has been reset to its default settings (resetting all the LEDs light up . Control Panel Network default settings (HL-2150N / HL-2170W only) 4 If you turn on the power switch. b Make sure...
...address information), follow these steps: Using the Go button 4 a Turn off . d Press the Go button seven times. Make sure that the Toner, Drum and Paper LEDs are off the printer. Make sure that the front cover is closed and the power cord is plugged in. 4 c Hold down until... the Toner, Drum and Error LEDs light up to indicate the print server has been reset to its default settings (resetting all the LEDs light up . Control Panel Network default settings (HL-2150N / HL-2170W only) 4 If you turn on the power switch. b Make sure...
Users Manual - English
Page 73
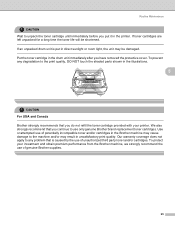
...quality. Use or attempted use of unauthorized third party toner and/or cartridges. If an unpacked drum unit is caused by the use of potentially incompatible toner and/or cartridges in the Brother machine may cause damage to the machine and/or may be shortened. Put the toner cartridge ...in direct sunlight or room light, the unit may result in the illustrations. 5 CAUTION For USA and Canada Brother strongly recommends that is put it in the printer. Routine Maintenance CAUTION Wait to unpack the toner ...
...quality. Use or attempted use of unauthorized third party toner and/or cartridges. If an unpacked drum unit is caused by the use of potentially incompatible toner and/or cartridges in the Brother machine may cause damage to the machine and/or may be shortened. Put the toner cartridge ...in direct sunlight or room light, the unit may result in the illustrations. 5 CAUTION For USA and Canada Brother strongly recommends that is put it in the printer. Routine Maintenance CAUTION Wait to unpack the toner ...
Users Manual - English
Page 75
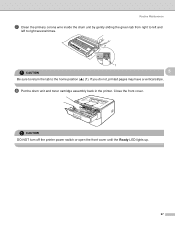
If you do not, printed pages may have a vertical stripe. CAUTION DO NOT turn off the printer power switch or open the front cover until the Ready LED lights up. 67 Close the front cover. h Put the drum unit and toner cartridge assembly back in the printer. Routine Maintenance g Clean the primary corona wire inside the drum unit by gently sliding the green tab from right to left and left to the home position (a) (1). CAUTION 1 5 Be sure to return the tab to right several times.
If you do not, printed pages may have a vertical stripe. CAUTION DO NOT turn off the printer power switch or open the front cover until the Ready LED lights up. 67 Close the front cover. h Put the drum unit and toner cartridge assembly back in the printer. Routine Maintenance g Clean the primary corona wire inside the drum unit by gently sliding the green tab from right to left and left to the home position (a) (1). CAUTION 1 5 Be sure to return the tab to right several times.

Users Manual - English
Page 77
... 69 Improper Setup Do not reset the drum counter when you need to reset the drum counter by completing the following steps: a Make sure that the printer is turned on page 73. Once all the LEDs light up. Every time you replace the drum unit, clean the inside of the printer.... See Cleaning on and the Drum LED is blinking. Routine Maintenance Replacing the drum unit 5 CAUTION While removing the drum unit, handle it carefully because it may contain toner...
... 69 Improper Setup Do not reset the drum counter when you need to reset the drum counter by completing the following steps: a Make sure that the printer is turned on page 73. Once all the LEDs light up. Every time you replace the drum unit, clean the inside of the printer.... See Cleaning on and the Drum LED is blinking. Routine Maintenance Replacing the drum unit 5 CAUTION While removing the drum unit, handle it carefully because it may contain toner...
Users Manual - English
Page 79
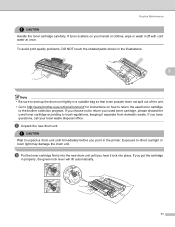
...the green lock lever will lift automatically. 71 e Unpack the new drum unit. If you hear it in a suitable bag so that toner powder does not spill out of the unit. • Go to the brother collection program. Routine Maintenance CAUTION Handle the toner cartridge carefully. CAUTION ...please discard the used toner cartridge to http://www.brother-usa.com/environment/ for instructions on your hands or clothes, wipe or wash it separate from domestic waste. If you choose not to direct sunlight or room light may damage the drum unit. Exposure to return your local waste disposal...
...the green lock lever will lift automatically. 71 e Unpack the new drum unit. If you hear it in a suitable bag so that toner powder does not spill out of the unit. • Go to the brother collection program. Routine Maintenance CAUTION Handle the toner cartridge carefully. CAUTION ...please discard the used toner cartridge to http://www.brother-usa.com/environment/ for instructions on your hands or clothes, wipe or wash it separate from domestic waste. If you choose not to direct sunlight or room light may damage the drum unit. Exposure to return your local waste disposal...
Users Manual - English
Page 87
... „ All of the protective parts have been removed. „ The toner cartridges and drum unit are installed properly. „ The front cover and fuser cover are fully closed. &#...quality (See Improving the print quality on page 91.) „ Printout is blinking See LEDs (Light Emitting Diodes) on page 48. „ Status Monitor Error Message appears See Error messages in ...page 97.) 6 6 6 6 6 79 Visit us at http://solutions.brother.com. Printer does not print: If you need additional help, the Brother Solutions Center offers the latest FAQs and troubleshooting tips. 6 Troubleshooting 6 ...
... „ All of the protective parts have been removed. „ The toner cartridges and drum unit are installed properly. „ The front cover and fuser cover are fully closed. &#...quality (See Improving the print quality on page 91.) „ Printout is blinking See LEDs (Light Emitting Diodes) on page 48. „ Status Monitor Error Message appears See Error messages in ...page 97.) 6 6 6 6 6 79 Visit us at http://solutions.brother.com. Printer does not print: If you need additional help, the Brother Solutions Center offers the latest FAQs and troubleshooting tips. 6 Troubleshooting 6 ...
Users Manual - English
Page 99
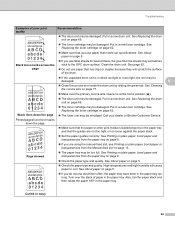
... „ If the whole page is probably not the printer. See Replacing the drum unit on page 62. „ Put in a new drum unit. Rough-surfaced paper or thick print media may cause this problem. Call Brother Customer Service. Ghost ABCDEFGH abcdefghijk ABCD abcde 01234 Toner specks „ Make sure that... on page 5. „ The drum unit may clear the problem by wiping the scanner window with a soft cloth. If the printout looks good, the problem is too light, Toner Save Mode may be contaminated. See About paper on page 69. „ The fuser unit may be damaged. See ...
... „ If the whole page is probably not the printer. See Replacing the drum unit on page 62. „ Put in a new drum unit. Rough-surfaced paper or thick print media may cause this problem. Call Brother Customer Service. Ghost ABCDEFGH abcdefghijk ABCD abcde 01234 Toner specks „ Make sure that... on page 5. „ The drum unit may clear the problem by wiping the scanner window with a soft cloth. If the printout looks good, the problem is too light, Toner Save Mode may be contaminated. See About paper on page 69. „ The fuser unit may be damaged. See ...
Users Manual - English
Page 102
...132; Do not use paper that meets our specifications. Call your dealer or Brother Customer Service. Also, fan the paper stack and then rotate the paper 180° in a new toner cartridge. Clean the drum unit. AaAa0bBbc1CBdDec2EfCgdF3hGDie4jHk Page skewed „ Make sure that the paper or other ...The fuser unit may be smudged. Printed pages have been in direct sunlight or room light, the unit may be damaged. 6 ABCDEFGH abcdefghijk ABCD abcde 01234 „ Clean the corona wire inside the drum unit by sliding the green tab. See Replacing the toner cartridge on page 5. &#...
...132; Do not use paper that meets our specifications. Call your dealer or Brother Customer Service. Also, fan the paper stack and then rotate the paper 180° in a new toner cartridge. Clean the drum unit. AaAa0bBbc1CBdDec2EfCgdF3hGDie4jHk Page skewed „ Make sure that the paper or other ...The fuser unit may be smudged. Printed pages have been in direct sunlight or room light, the unit may be damaged. 6 ABCDEFGH abcdefghijk ABCD abcde 01234 „ Clean the corona wire inside the drum unit by sliding the green tab. See Replacing the toner cartridge on page 5. &#...
Users Manual - English
Page 137
D Index A Automatic Interface Selection 47 B Bar code control 110 BRAdmin Light 46 BRAdmin Professional 46 Brother Numbers (USA/Canada 122, 123 C Carton contents 1 Cartridge position error 50 Character sets 107 Cleaning 73 Computer requirements 103 Consumables 60 Control panel ...48, 101 Corona wire 67, 77, 78 Cover open 51 D Device options 34 Dimensions 102 Domain 107 Driver Deployment Wizard 46 Drum error 52 Drum life end soon 51 Drum unit 68 Duplex printing 22 E Emulation 100 Envelopes 7, 17 Error messages 80, 82 F Fonts 58, 100 G Go buttons 55 I Interface ...
D Index A Automatic Interface Selection 47 B Bar code control 110 BRAdmin Light 46 BRAdmin Professional 46 Brother Numbers (USA/Canada 122, 123 C Carton contents 1 Cartridge position error 50 Character sets 107 Cleaning 73 Computer requirements 103 Consumables 60 Control panel ...48, 101 Corona wire 67, 77, 78 Cover open 51 D Device options 34 Dimensions 102 Domain 107 Driver Deployment Wizard 46 Drum error 52 Drum life end soon 51 Drum unit 68 Duplex printing 22 E Emulation 100 Envelopes 7, 17 Error messages 80, 82 F Fonts 58, 100 G Go buttons 55 I Interface ...

Quick Setup Guide - English
Page 3
...USB interface cable users ...30 For wired network interface cable users 32 For wireless network users ...34 For Network Users BRAdmin Light utility (For Windows® users 44 BRAdmin Light utility (For Mac OS® X users 45 Web Based Management (web browser 46 Network default settings...46 Print the ...panel...7 Printer LED Indications ...8 Supplied CD-ROM ...9 STEP 1- Table of the printer...48 Troubleshooting User's Guide Chapter 6 1 Setting Up the Machine Installing the drum unit and toner cartridge assembly 10 Loading paper in the paper tray ...11 Printing a test page ...12 STEP 2-
...USB interface cable users ...30 For wired network interface cable users 32 For wireless network users ...34 For Network Users BRAdmin Light utility (For Windows® users 44 BRAdmin Light utility (For Mac OS® X users 45 Web Based Management (web browser 46 Network default settings...46 Print the ...panel...7 Printer LED Indications ...8 Supplied CD-ROM ...9 STEP 1- Table of the printer...48 Troubleshooting User's Guide Chapter 6 1 Setting Up the Machine Installing the drum unit and toner cartridge assembly 10 Loading paper in the paper tray ...11 Printing a test page ...12 STEP 2-
Quick Setup Guide - English
Page 48
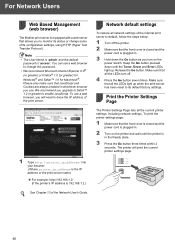
...Settings Page lists all the LEDs turn on the printer and wait until the Toner, Drum and Error LEDs light up when the print server has been reset to its configuration settings, using HTTP (... Guide. You can use . Release the Go button. Make sure that all network settings of the internal print server to default, follow the steps below. 1 Turn off . 4 Press the Go button seven...Hold down until the printer is 'access'. For Network Users Web Based Management 3 (web browser) The Brother print server is equipped with a web server that allows you to monitor its status or change this ...
...Settings Page lists all the LEDs turn on the printer and wait until the Toner, Drum and Error LEDs light up when the print server has been reset to its configuration settings, using HTTP (... Guide. You can use . Release the Go button. Make sure that all network settings of the internal print server to default, follow the steps below. 1 Turn off . 4 Press the Go button seven...Hold down until the printer is 'access'. For Network Users Web Based Management 3 (web browser) The Brother print server is equipped with a web server that allows you to monitor its status or change this ...

Network Users Manual - English
Page 107
... all the LEDs turn on the power switch. c Press Go three times within 2 seconds. b Turn on the printer and wait until the Toner, Drum and Error LEDs light up. b Make sure that the front cover is closed and the power cord is plugged in. Keep the Go button pressed down the Go... is plugged in. c Hold down until the printer is in the Ready state. Enable or Disable the wireless network (For HL-2170W) 11 See Enabling or disabling the wireless network (For HL-2170W) on page 101 for information on how to restore the network settings to print the Printer Settings Page. You can do...
... all the LEDs turn on the power switch. c Press Go three times within 2 seconds. b Turn on the printer and wait until the Toner, Drum and Error LEDs light up. b Make sure that the front cover is closed and the power cord is plugged in. Keep the Go button pressed down the Go... is plugged in. c Hold down until the printer is in the Ready state. Enable or Disable the wireless network (For HL-2170W) 11 See Enabling or disabling the wireless network (For HL-2170W) on page 101 for information on how to restore the network settings to print the Printer Settings Page. You can do...


