Users Manual - English
Page 1
Please visit us at http://solutions.brother.com where you use the printer. You can find a printed copy in all countries. Please use the Quick Setup Guide to set up the printer. Version A EN-US You must set up the hardware and ...) and technical questions. Keep the CD-ROM in a convenient place so you can use it quickly if you can use the printer. Brother Laser Printer USER'S GUIDE HL-2140 HL-2150N HL-2170W For visually-impaired users You can read this manual with Screen Reader 'text-to-speech' software. Note: Not all models are available...
Please visit us at http://solutions.brother.com where you use the printer. You can find a printed copy in all countries. Please use the Quick Setup Guide to set up the printer. Version A EN-US You must set up the hardware and ...) and technical questions. Keep the CD-ROM in a convenient place so you can use it quickly if you can use the printer. Brother Laser Printer USER'S GUIDE HL-2140 HL-2150N HL-2170W For visually-impaired users You can read this manual with Screen Reader 'text-to-speech' software. Note: Not all models are available...
Users Manual - English
Page 6
... Software for network models (HL-2150N / HL-2170W only 46 Automatic interface selection (HL-2150N / HL-2170W only 47 Remote Printer Console ...47 4 Control Panel 48 LEDs (Light Emitting Diodes)...48 Service call indications ...53 Go button ...55 Print a test page ...56 Print a Printer Settings page...57 Print Fonts (HL-2150N / HL-2170W only 58 Network default settings (HL-2150N / HL-2170W only 59 5 Routine...
... Software for network models (HL-2150N / HL-2170W only 46 Automatic interface selection (HL-2150N / HL-2170W only 47 Remote Printer Console ...47 4 Control Panel 48 LEDs (Light Emitting Diodes)...48 Service call indications ...53 Go button ...55 Print a test page ...56 Print a Printer Settings page...57 Print Fonts (HL-2150N / HL-2170W only 58 Network default settings (HL-2150N / HL-2170W only 59 5 Routine...
Users Manual - English
Page 7
...Brother numbers ...117 Important information: regulations ...118 Radio interference (220 to 240 volt model only 118 International ENERGY STAR® Compliance Statement 118 IEC 60825-1 specification (220 to use Web Based Management (web browser 107 Symbol and character sets list...108 Quick reference for bar code control commands (HL-2150N / HL-2170W only) ...110 Print... handling ...83 Paper jams and how to clear them ...85 Improving the print quality...91 Solving print problems ...97 Network problems (HL-2150N / HL-2170W only 98 Other problems ...98 For Macintosh® with USB...98 A ...
...Brother numbers ...117 Important information: regulations ...118 Radio interference (220 to 240 volt model only 118 International ENERGY STAR® Compliance Statement 118 IEC 60825-1 specification (220 to use Web Based Management (web browser 107 Symbol and character sets list...108 Quick reference for bar code control commands (HL-2150N / HL-2170W only) ...110 Print... handling ...83 Paper jams and how to clear them ...85 Improving the print quality...91 Solving print problems ...97 Network problems (HL-2150N / HL-2170W only 98 Other problems ...98 For Macintosh® with USB...98 A ...
Users Manual - English
Page 13
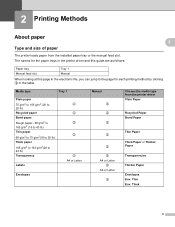
...this guide are as follows: 2 2 2 Paper tray Manual feed slot Tray 1 Manual When looking at this page in the table. 2 Printing Methods 2 About paper Type and size of paper The printer loads paper from the printer driver Plain Paper Recycled Paper Bond Paper Thin Paper Thick... Paper or Thicker Paper Transparencies Thicker Paper Envelopes Env. The names for each printing method by clicking p in the electronic file, you can jump to 43 lb) Transparency Labels p p p p p A4 or Letter Envelopes Manual p p p p p p A4...
...this guide are as follows: 2 2 2 Paper tray Manual feed slot Tray 1 Manual When looking at this page in the table. 2 Printing Methods 2 About paper Type and size of paper The printer loads paper from the printer driver Plain Paper Recycled Paper Bond Paper Thin Paper Thick... Paper or Thicker Paper Transparencies Thicker Paper Envelopes Env. The names for each printing method by clicking p in the electronic file, you can jump to 43 lb) Transparency Labels p p p p p A4 or Letter Envelopes Manual p p p p p p A4...
Users Manual - English
Page 14
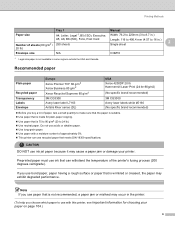
... printer, see Important information for plain-paper copying. „ Use paper that is 75 to 90 g/m2 (20 to 24 lb). „ Use neutral paper. Printing Methods Tray 1 Manual Paper size A4, Letter, Legal 1, B5 (ISO), Executive, Width: 76.2 to 220mm (3 to 8.7 in.) A5, A6, B6 (ISO), Folio, Post... Business 80 g/m2 Xerox Recycled Supreme 80 g/m2 3M CG3300 Avery laser label L7163 Antalis River series (DL) USA Xerox 4200DP 20 lb Hammermill Laser Print (24 lb=90g/m2) (No specific brand recommended) 3M CG3300 Avery laser labels white #5160 (No specific brand recommended) „ Before you use...
... printer, see Important information for plain-paper copying. „ Use paper that is 75 to 90 g/m2 (20 to 24 lb). „ Use neutral paper. Printing Methods Tray 1 Manual Paper size A4, Letter, Legal 1, B5 (ISO), Executive, Width: 76.2 to 220mm (3 to 8.7 in.) A5, A6, B6 (ISO), Folio, Post... Business 80 g/m2 Xerox Recycled Supreme 80 g/m2 3M CG3300 Avery laser label L7163 Antalis River series (DL) USA Xerox 4200DP 20 lb Hammermill Laser Print (24 lb=90g/m2) (No specific brand recommended) 3M CG3300 Avery laser labels white #5160 (No specific brand recommended) „ Before you use...
Users Manual - English
Page 15
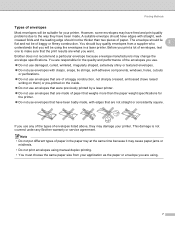
...paper tray at the same time because it may have feed and print quality problems due to make sure that the print results are what you want. This damage is not covered under any of the types of paper. Brother does not recommend a particular envelope because envelope manufacturers may damage ... construction. Before you will be suitable for the printer. „ Do not use envelopes that have raised writing on them) or pre-printed on the inside. „ Do not use envelopes that were previously printed by a laser printer. „ Do not use any Brother warranty or service agreement.
...paper tray at the same time because it may have feed and print quality problems due to make sure that the print results are what you want. This damage is not covered under any of the types of paper. Brother does not recommend a particular envelope because envelope manufacturers may damage ... construction. Before you will be suitable for the printer. „ Do not use envelopes that have raised writing on them) or pre-printed on the inside. „ Do not use envelopes that were previously printed by a laser printer. „ Do not use any Brother warranty or service agreement.
Users Manual - English
Page 16
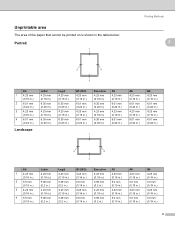
Unprintable area The area of the paper that cannot be printed on is shown in the table below: Portrait 1 Printing Methods 2 2 2 2 4 3 A4 1 4.23 mm (0.16 in.) 2 6.01 mm (0.24 in.) 3 4.23 mm (0.16 in.) 4 6.01 mm (0.24 in.) Landscape Letter 4.23 mm (0.16 in.) 6.35 ...
Unprintable area The area of the paper that cannot be printed on is shown in the table below: Portrait 1 Printing Methods 2 2 2 2 4 3 A4 1 4.23 mm (0.16 in.) 2 6.01 mm (0.24 in.) 3 4.23 mm (0.16 in.) 4 6.01 mm (0.24 in.) Landscape Letter 4.23 mm (0.16 in.) 6.35 ...

Users Manual - English
Page 17
Printing Methods Printing methods Printing on plain paper, bond paper and transparencies Printing on plain paper, bond paper and transparencies from the paper tray (For the recommended paper to use, see About paper on page 5.) a Pull the paper tray completely out of the printer. 2 2 2 2 b While pressing the green paper-guide release lever, slide the paper guides to fit the paper size. Make sure that the guides are firmly in the slots. 9
Printing Methods Printing methods Printing on plain paper, bond paper and transparencies Printing on plain paper, bond paper and transparencies from the paper tray (For the recommended paper to use, see About paper on page 5.) a Pull the paper tray completely out of the printer. 2 2 2 2 b While pressing the green paper-guide release lever, slide the paper guides to fit the paper size. Make sure that the guides are firmly in the slots. 9

Users Manual - English
Page 18
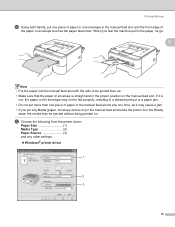
The side to prevent paper from sliding off the face-down . 1 d Put the paper tray firmly back in the tray, and make sure that it is completely inserted into the printer. e Lift up the support flap 1 (1) to be printed on must be face down output tray. 1 10 Make sure that the paper is below the maximum paper mark (1). Printing Methods Note For Legal size paper, press in the inside latches and pull out the back of the paper tray. (Legal size paper is not available in some regions.) 2 c Put paper in the printer.
The side to prevent paper from sliding off the face-down . 1 d Put the paper tray firmly back in the tray, and make sure that it is completely inserted into the printer. e Lift up the support flap 1 (1) to be printed on must be face down output tray. 1 10 Make sure that the paper is below the maximum paper mark (1). Printing Methods Note For Legal size paper, press in the inside latches and pull out the back of the paper tray. (Legal size paper is not available in some regions.) 2 c Put paper in the printer.

Users Manual - English
Page 19
f Choose the following from the printer driver: Paper Size 1) Media Type 2) Paper Source 3) and any other settings. „ Windows® printer driver 1 2 3 „ Macintosh® printer driver 1 2 Printing Methods 2 3 11
f Choose the following from the printer driver: Paper Size 1) Media Type 2) Paper Source 3) and any other settings. „ Windows® printer driver 1 2 3 „ Macintosh® printer driver 1 2 Printing Methods 2 3 11

Users Manual - English
Page 20
You can clear this error indication by pressing Go. 2 • When printing on before you put paper or transparencies in the tray. Note • The Error LED on the control panel will light up to curl. 12 Stacking the printed transparencies may cause a paper jam or the transparency to indicate No paper if the power switch is turned on transparencies, remove each transparency as soon as it has been printed. Printing Methods g Send the print data to the printer.
You can clear this error indication by pressing Go. 2 • When printing on before you put paper or transparencies in the tray. Note • The Error LED on the control panel will light up to curl. 12 Stacking the printed transparencies may cause a paper jam or the transparency to indicate No paper if the power switch is turned on transparencies, remove each transparency as soon as it has been printed. Printing Methods g Send the print data to the printer.
Users Manual - English
Page 21
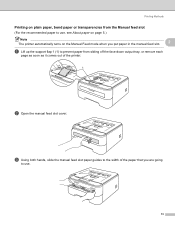
Printing Methods Printing on plain paper, bond paper or transparencies from sliding off the face-down output tray, or remove each page as soon as it comes out of the paper that you put paper in the manual feed slot. 2 a Lift up the support flap 1 (1) to use , see About paper on page 5.) Note The printer automatically turns on the Manual Feed mode when you are going to prevent paper from the Manual feed slot 2 (For the recommended paper to use . 13 c Using both hands, slide the manual feed slot paper guides to the width of the printer. 1 b Open the manual feed slot cover.
Printing Methods Printing on plain paper, bond paper or transparencies from sliding off the face-down output tray, or remove each page as soon as it comes out of the paper that you put paper in the manual feed slot. 2 a Lift up the support flap 1 (1) to use , see About paper on page 5.) Note The printer automatically turns on the Manual Feed mode when you are going to prevent paper from the Manual feed slot 2 (For the recommended paper to use . 13 c Using both hands, slide the manual feed slot paper guides to the width of the printer. 1 b Open the manual feed slot cover.
Users Manual - English
Page 22
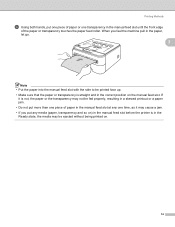
Printing Methods d Using both hands, put more than one piece of the paper or transparency touches the paper feed roller. When you put any one transparency... you feel the machine pull in the paper, let go. 2 Note • Put the paper into the manual feed slot with the side to be printed face up. • Make sure that the paper or transparency is straight and in the manual feed slot until the front edge of paper in... (paper, transparency and so on) in the manual feed slot before the printer is in the Ready state, the media may be ejected without being printed on the manual feed slot.
Printing Methods d Using both hands, put more than one piece of the paper or transparency touches the paper feed roller. When you put any one transparency... you feel the machine pull in the paper, let go. 2 Note • Put the paper into the manual feed slot with the side to be printed face up. • Make sure that the paper or transparency is straight and in the manual feed slot until the front edge of paper in... (paper, transparency and so on) in the manual feed slot before the printer is in the Ready state, the media may be ejected without being printed on the manual feed slot.

Users Manual - English
Page 23
e Choose the following from the printer driver: Paper Size 1) Media Type 2) Paper Source 3) and any other settings. „ Windows® printer driver 1 2 3 „ Macintosh® printer driver 1 2 Printing Methods 2 3 15
e Choose the following from the printer driver: Paper Size 1) Media Type 2) Paper Source 3) and any other settings. „ Windows® printer driver 1 2 3 „ Macintosh® printer driver 1 2 Printing Methods 2 3 15
Users Manual - English
Page 24
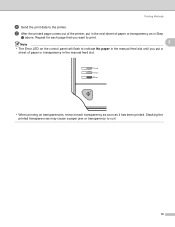
Printing Methods f Send the print data to curl. 16 Stacking the printed transparencies may cause a paper jam or transparency to the printer. g After the printed page comes out of the printer, put in the next sheet of paper or transparency in the manual feed slot. • When printing on the control panel will flash to print. 2 Note • The Error LED on transparencies, remove each transparency as soon as in the manual feed slot until you want to indicate No paper in Step d above. Repeat for each page that you put a sheet of paper or transparency as it has been printed.
Printing Methods f Send the print data to curl. 16 Stacking the printed transparencies may cause a paper jam or transparency to the printer. g After the printed page comes out of the printer, put in the next sheet of paper or transparency in the manual feed slot. • When printing on the control panel will flash to print. 2 Note • The Error LED on transparencies, remove each transparency as soon as in the manual feed slot until you want to indicate No paper in Step d above. Repeat for each page that you put a sheet of paper or transparency as it has been printed.
Users Manual - English
Page 25
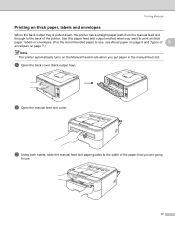
Use this paper feed and output method when you want to print on thick paper, labels or envelopes. (For the recommended paper to use . 17 Printing Methods Printing on thick paper, labels and envelopes 2 When the back output tray is pulled down, the printer has a straight paper path from the manual feed slot ...
Use this paper feed and output method when you want to print on thick paper, labels or envelopes. (For the recommended paper to use . 17 Printing Methods Printing on thick paper, labels and envelopes 2 When the back output tray is pulled down, the printer has a straight paper path from the manual feed slot ...
Users Manual - English
Page 26
... Type 2) Paper Source 3) and any one envelope in the proper position on the manual feed slot. Printing Methods d Using both hands, put one piece of paper or one time, as it may be ejected without being... printed on. When you put any Media (paper, envelope and so on) in the manual feed slot ...in the paper, let go. 2 Note • Put the paper into the manual feed slot with the side to be printed face up. • Make sure that the paper or envelope is not, the paper or the envelope may not be fed ...
... Type 2) Paper Source 3) and any one envelope in the proper position on the manual feed slot. Printing Methods d Using both hands, put one piece of paper or one time, as it may be ejected without being... printed on. When you put any Media (paper, envelope and so on) in the manual feed slot ...in the paper, let go. 2 Note • Put the paper into the manual feed slot with the side to be printed face up. • Make sure that the paper or envelope is not, the paper or the envelope may not be fed ...

Users Manual - English
Page 27
Printing Methods Note • When you use Envelope #10, choose Com-10 for the Paper Size. • For other envelopes which are not listed in the printer driver, such as Envelope #9 or Envelope C6, choose User Defined... (For more information on envelope sizes, see Paper size on page 106.) 2 „ Macintosh® printer driver Paper Size 1) Media Type 2) Paper Source 3) and any other settings. 3 1 2 19
Printing Methods Note • When you use Envelope #10, choose Com-10 for the Paper Size. • For other envelopes which are not listed in the printer driver, such as Envelope #9 or Envelope C6, choose User Defined... (For more information on envelope sizes, see Paper size on page 106.) 2 „ Macintosh® printer driver Paper Size 1) Media Type 2) Paper Source 3) and any other settings. 3 1 2 19

Users Manual - English
Page 28
g After the printed page comes out of the printer, put a sheet of paper or envelope as shown in the manual feed slot. • Remove each page that you want to print. 2 Note • The Error LED on the control panel will flash to indicate No paper in the manual feed slot until you put in the next sheet of paper or envelope in Step d. Stacking sheets or envelopes may cause the paper to the printer. Repeat for each sheet or envelope as soon as it has been printed. Printing Methods f Send the print data to jam or curl. 20
g After the printed page comes out of the printer, put a sheet of paper or envelope as shown in the manual feed slot. • Remove each page that you want to print. 2 Note • The Error LED on the control panel will flash to indicate No paper in the manual feed slot until you put in the next sheet of paper or envelope in Step d. Stacking sheets or envelopes may cause the paper to the printer. Repeat for each sheet or envelope as soon as it has been printed. Printing Methods f Send the print data to jam or curl. 20

Users Manual - English
Page 29
...the printer driver choose the Advanced tab, select Page Setting, and check the Reverse Print box. Printing Methods Note • If an envelope is printed, turn the next one around 180° when you can change the printing direction in your software application. 2 • If the DL size double flap ...new DL size double-flap envelope in the manual feed slot with the longest edge of the envelope in first, then print again. • If envelopes get smudged during printing set the Media Type to Thick Paper or Thicker Paper to increase the fixing temperature. • Envelope joints that are...
...the printer driver choose the Advanced tab, select Page Setting, and check the Reverse Print box. Printing Methods Note • If an envelope is printed, turn the next one around 180° when you can change the printing direction in your software application. 2 • If the DL size double flap ...new DL size double-flap envelope in the manual feed slot with the longest edge of the envelope in first, then print again. • If envelopes get smudged during printing set the Media Type to Thick Paper or Thicker Paper to increase the fixing temperature. • Envelope joints that are...


