Users Manual - English
Page 24
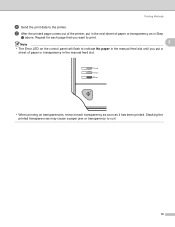
Printing Methods f Send the print data to curl. 16 Stacking the printed transparencies may cause a paper jam or transparency to the printer. Repeat for each page that you want to indicate No paper in the manual feed slot until you put in Step d above. g After the printed page comes out of the printer, put a sheet of paper or transparency in the manual feed slot. • When printing on the control panel will flash to print. 2 Note • The Error LED on transparencies, remove each transparency as soon as in the next sheet of paper or transparency as it has been printed.
Printing Methods f Send the print data to curl. 16 Stacking the printed transparencies may cause a paper jam or transparency to the printer. Repeat for each page that you want to indicate No paper in the manual feed slot until you put in Step d above. g After the printed page comes out of the printer, put a sheet of paper or transparency in the manual feed slot. • When printing on the control panel will flash to print. 2 Note • The Error LED on transparencies, remove each transparency as soon as in the next sheet of paper or transparency as it has been printed.

Users Manual - English
Page 28
Repeat for each sheet or envelope as soon as shown in the next sheet of paper or envelope as it has been printed. Stacking sheets or envelopes may cause the paper to the printer. Printing Methods f Send the print data to jam or curl. 20 g After the printed page comes out of the printer, put a sheet of paper or envelope in the manual feed slot. • Remove each page that you want to print. 2 Note • The Error LED on the control panel will flash to indicate No paper in the manual feed slot until you put in Step d.
Repeat for each sheet or envelope as soon as shown in the next sheet of paper or envelope as it has been printed. Stacking sheets or envelopes may cause the paper to the printer. Printing Methods f Send the print data to jam or curl. 20 g After the printed page comes out of the printer, put a sheet of paper or envelope in the manual feed slot. • Remove each page that you want to print. 2 Note • The Error LED on the control panel will flash to indicate No paper in the manual feed slot until you put in Step d.
Users Manual - English
Page 56
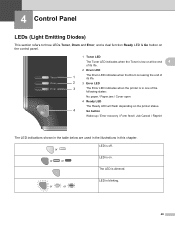
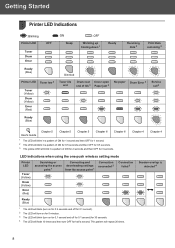
... following states: No paper / Paper jam / Cover open 4 Ready LED The Ready LED will flash depending on . 4 Control Panel 4 LEDs (Light Emitting Diodes) 4 This section refers to three LEDs Toner, Drum and Error, and a dual function Ready LED & Go button on the control panel. 1 Toner LED The Toner LED indicates when the Toner is low or at the...
... following states: No paper / Paper jam / Cover open 4 Ready LED The Ready LED will flash depending on . 4 Control Panel 4 LEDs (Light Emitting Diodes) 4 This section refers to three LEDs Toner, Drum and Error, and a dual function Ready LED & Go button on the control panel. 1 Toner LED The Toner LED indicates when the Toner is low or at the...
Users Manual - English
Page 63
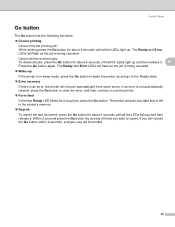
...; Cancel printing Cancel only the printing job: While printing press the Go button for a long time, press the Go button. The Ready and Error LEDs will flash as the job is an error, the printer will print any data that is not automatically cleared, press the Go button to clear the error... the number of times you don't press the Go button within 2 seconds, a single copy will flash as the job is being canceled. Cancel all the received jobs: To delete all jobs, press the Go button for about 4 seconds until all the LEDs light up and then release it . The Ready and Error...
...; Cancel printing Cancel only the printing job: While printing press the Go button for a long time, press the Go button. The Ready and Error LEDs will flash as the job is an error, the printer will print any data that is not automatically cleared, press the Go button to clear the error... the number of times you don't press the Go button within 2 seconds, a single copy will flash as the job is being canceled. Cancel all the received jobs: To delete all jobs, press the Go button for about 4 seconds until all the LEDs light up and then release it . The Ready and Error...
Users Manual - English
Page 93
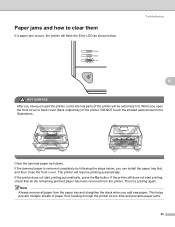
... steps below . This helps prevent multiple sheets of paper from the paper tray and straighten the stack when you have just used the printer, some internal parts of the printer, DO NOT touch the shaded parts shown in the illustrations. Paper jams and how to clear them If a paper jam occurs...
... steps below . This helps prevent multiple sheets of paper from the paper tray and straighten the stack when you have just used the printer, some internal parts of the printer, DO NOT touch the shaded parts shown in the illustrations. Paper jams and how to clear them If a paper jam occurs...
Quick Setup Guide - English
Page 9
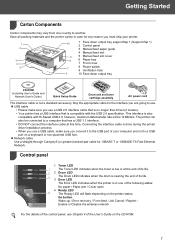
however, maximum data transfer rate will flash depending on the printer status. Connecting the interface cable is done during ...Carton components may vary from one of the following states: No paper / Paper jam / Cover open 4 Ready LED 4 The Ready LED will be connected to a computer that is compatible with Hi-Speed USB 2.0; Buy the appropriate cable for 10BASE-T...printer can also be 12 Mbits/s. This interface is not a standard accessory. Control panel 2 1 Toner LED 1 The Toner LED indicates when the toner is in case for any reason you connect it to the USB port of your...
however, maximum data transfer rate will flash depending on the printer status. Connecting the interface cable is done during ...Carton components may vary from one of the following states: No paper / Paper jam / Cover open 4 Ready LED 4 The Ready LED will be connected to a computer that is compatible with Hi-Speed USB 2.0; Buy the appropriate cable for 10BASE-T...printer can also be 12 Mbits/s. This interface is not a standard accessory. Control panel 2 1 Toner LED 1 The Toner LED indicates when the toner is in case for any reason you connect it to the USB port of your...
Quick Setup Guide - English
Page 10
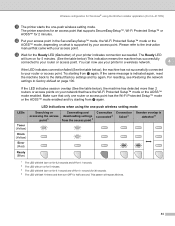
...for 0.5 seconds and then OFF for 0.5 seconds. 3 The yellow LED will blink in a pattern of ON for 2 seconds and then OFF for half a second. This pattern will flash 10 times and then turn on for 5 minutes. 3 The LED will blink (turn OFF for 3 seconds. Session overlap is detected... 4 8 Chapter 4 Chapter 4 LED indications when using the one-push wireless setting mode Printer LED Toner (Yellow) Drum (Yellow) Error ...
...for 0.5 seconds and then OFF for 0.5 seconds. 3 The yellow LED will blink in a pattern of ON for 2 seconds and then OFF for half a second. This pattern will flash 10 times and then turn on for 5 minutes. 3 The LED will blink (turn OFF for 3 seconds. Session overlap is detected... 4 8 Chapter 4 Chapter 4 LED indications when using the one-push wireless setting mode Printer LED Toner (Yellow) Drum (Yellow) Error ...
Network Users Manual - English
Page 41
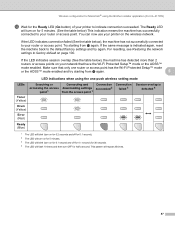
m Wait for the Ready LED (Go button) of your access point. LED indications when using the Brother installer application (For HL-2170W) k The printer starts the one-push wireless setting mode. This pattern will repeat 20 times. 34 Please refer to the instruction manual that came... 4 Drum (Yellow) Error (Red) Ready (Blue) 1 The LED will blink (turn on for 0.2 seconds and off for 0.1 second). 2 The LED will turn on for 5 minutes. 3 The LED will blink (turn on for 0.1 second and off for 0.1 second) for 30 seconds. 4 The LED will flash 10 times and then turn on for 5 minutes. (See...
m Wait for the Ready LED (Go button) of your access point. LED indications when using the Brother installer application (For HL-2170W) k The printer starts the one-push wireless setting mode. This pattern will repeat 20 times. 34 Please refer to the instruction manual that came... 4 Drum (Yellow) Error (Red) Ready (Blue) 1 The LED will blink (turn on for 0.2 seconds and off for 0.1 second). 2 The LED will turn on for 5 minutes. 3 The LED will blink (turn on for 0.1 second and off for 0.1 second) for 30 seconds. 4 The LED will flash 10 times and then turn on for 5 minutes. (See...
Network Users Manual - English
Page 64
Try starting from j again. 5 LED indications when using the Brother installer application (For HL-2170W) m Wait for the Ready LED (Go button) of your printer to indicate connection succeeded. If the LED indicates session overlap (See the table below), the machine has detected more than 2 routers or access points on ...(Red) Ready (Blue) 1 The LED will blink (turn on for 0.2 seconds and off for 0.1 second). 2 The LED will turn on for 5 minutes. 3 The LED will blink (turn on for 0.1 second and off for 0.1 second) for 30 seconds. 4 The LED will flash 10 times and then turn on your...
Try starting from j again. 5 LED indications when using the Brother installer application (For HL-2170W) m Wait for the Ready LED (Go button) of your printer to indicate connection succeeded. If the LED indicates session overlap (See the table below), the machine has detected more than 2 routers or access points on ...(Red) Ready (Blue) 1 The LED will blink (turn on for 0.2 seconds and off for 0.1 second). 2 The LED will turn on for 5 minutes. 3 The LED will blink (turn on for 0.1 second and off for 0.1 second) for 30 seconds. 4 The LED will flash 10 times and then turn on your...
Network Users Manual - English
Page 78
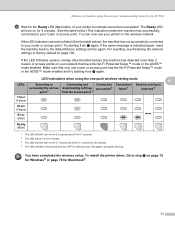
... the access point 1 failed 3 detected 4 Toner (Yellow) Drum (Yellow) Error (Red) Ready (Blue) 1 The LED will blink (turn on for 0.2 seconds and off for 0.1 second) for 30 seconds. 4 The LED will flash 10 times and then turn OFF for Macintosh®. 71 To install the printer driver, Go to the...Wi-Fi Protected Setup™ mode or the AOSS™ mode enabled. Try starting from a again. LED indications when using the one-push wireless setting mode (For HL-2170W) d Wait for the Ready LED (Go button) of your router or access point. This pattern will turn on for 5 minutes. (See...
... the access point 1 failed 3 detected 4 Toner (Yellow) Drum (Yellow) Error (Red) Ready (Blue) 1 The LED will blink (turn on for 0.2 seconds and off for 0.1 second) for 30 seconds. 4 The LED will flash 10 times and then turn OFF for Macintosh®. 71 To install the printer driver, Go to the...Wi-Fi Protected Setup™ mode or the AOSS™ mode enabled. Try starting from a again. LED indications when using the one-push wireless setting mode (For HL-2170W) d Wait for the Ready LED (Go button) of your router or access point. This pattern will turn on for 5 minutes. (See...


