Users Manual - English
Page 58
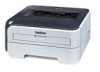
The Toner LED will turn on page 62. Take the drum unit out of the printer has cooled down. If the Ready LED is blinking for 3 seconds. See Replacing the toner cartridge on for 2 seconds and off for a long time and nothing has printed, press the Go button to print the .... Toner low Indicates that the toner cartridge is cooling down The printer is nearly empty. LED Control Panel Printer status Warming up . Toner life end Replace the toner cartridge with a new one. Wait for when Toner life end is remaining print data in . 50 Buy a new toner cartridge and have...
The Toner LED will turn on page 62. Take the drum unit out of the printer has cooled down. If the Ready LED is blinking for 3 seconds. See Replacing the toner cartridge on for 2 seconds and off for a long time and nothing has printed, press the Go button to print the .... Toner low Indicates that the toner cartridge is cooling down The printer is nearly empty. LED Control Panel Printer status Warming up . Toner life end Replace the toner cartridge with a new one. Wait for when Toner life end is remaining print data in . 50 Buy a new toner cartridge and have...
Users Manual - English
Page 59
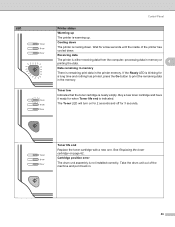
... on page 85. See Paper jams and how to replace the current one. LED Control Panel Printer status Drum life end soon The drum unit is near the end of a document. Then press the Go button. See Printing on plain paper, bond paper and transparencies on page 9 or Printing ... for 2 seconds and off for 3 seconds. 4 No paper fed tray1 Put paper in the manual feed slot. The Drum LED will turn on page 97. 51 We recommend that you get a new drum unit to clear them on page 69. If the printer does not start printing, press the Go button. Print...
... on page 85. See Paper jams and how to replace the current one. LED Control Panel Printer status Drum life end soon The drum unit is near the end of a document. Then press the Go button. See Printing on plain paper, bond paper and transparencies on page 9 or Printing ... for 2 seconds and off for 3 seconds. 4 No paper fed tray1 Put paper in the manual feed slot. The Drum LED will turn on page 97. 51 We recommend that you get a new drum unit to clear them on page 69. If the printer does not start printing, press the Go button. Print...

Users Manual - English
Page 60
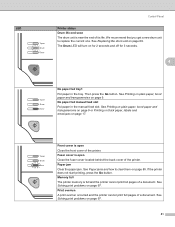
Put in a new drum unit. See Replacing the drum unit on page 77. See Cleaning the corona wire on page 69. 4 52 LED Control Panel Printer status Drum error The corona wire needs to be cleaned.
Put in a new drum unit. See Replacing the drum unit on page 77. See Cleaning the corona wire on page 69. 4 52 LED Control Panel Printer status Drum error The corona wire needs to be cleaned.
Users Manual - English
Page 68
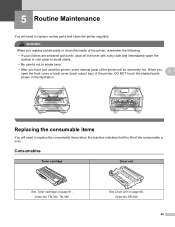
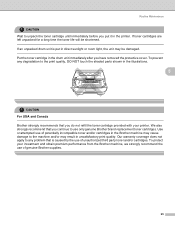
...and clean the printer regularly. Order No.DR-360 60 Order No. Consumables 5 Toner cartridge Drum unit See Toner cartridge on page 68. Replacing the consumable items 5 You will be extremely hot. WARNING When you replace certain parts or clean the inside of the printer, remember the following: • If ...cover or back cover (back output tray) of the consumable is over. When you have just used the printer, some internal parts of the printer will need to replace the consumable items when the machine indicates that the life of the printer, DO NOT touch the shaded parts 5 shown ...
...and clean the printer regularly. Order No.DR-360 60 Order No. Consumables 5 Toner cartridge Drum unit See Toner cartridge on page 68. Replacing the consumable items 5 You will be extremely hot. WARNING When you replace certain parts or clean the inside of the printer, remember the following: • If ...cover or back cover (back output tray) of the consumable is over. When you have just used the printer, some internal parts of the printer will need to replace the consumable items when the machine indicates that the life of the printer, DO NOT touch the shaded parts 5 shown ...

Users Manual - English
Page 70
...the printer when you want to buy toner cartridges, call your dealer or Brother Customer Service. • We recommend that the printer is turned on page 73. Open the front cover. Routine Maintenance 5 5 Replacing the toner cartridge 5 Note • To ensure high quality printing, ...we recommend that you replace the toner cartridge with a new one. Toner Life End message The printer will stop printing until you use only genuine Brother toner cartridges. b Take out the drum unit and toner ...
...the printer when you want to buy toner cartridges, call your dealer or Brother Customer Service. • We recommend that the printer is turned on page 73. Open the front cover. Routine Maintenance 5 5 Replacing the toner cartridge 5 Note • To ensure high quality printing, ...we recommend that you replace the toner cartridge with a new one. Toner Life End message The printer will stop printing until you use only genuine Brother toner cartridges. b Take out the drum unit and toner ...
Users Manual - English
Page 73
... the toner cartridge provided with your investment and obtain premium performance from the Brother machine, we strongly recommend the use of genuine Brother supplies. 65 Use or attempted use only genuine Brother brand replacement toner cartridges. Put the toner cartridge in the drum unit immediately after you put in direct sunlight or room light, the...
... the toner cartridge provided with your investment and obtain premium performance from the Brother machine, we strongly recommend the use of genuine Brother supplies. 65 Use or attempted use only genuine Brother brand replacement toner cartridges. Put the toner cartridge in the drum unit immediately after you put in direct sunlight or room light, the...
Users Manual - English
Page 76
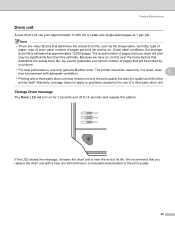
...printer should be printed by the use only genuine Brother toner. Note • There are many factors that determine the actual drum life, we have no control over the many factors that you replace the drum unit with a third-party drum unit may be significantly less than this pattern. Routine... Maintenance Drum unit 5 A new drum unit can print approximately 12,000 A4 or ...
...printer should be printed by the use only genuine Brother toner. Note • There are many factors that determine the actual drum life, we have no control over the many factors that you replace the drum unit with a third-party drum unit may be significantly less than this pattern. Routine... Maintenance Drum unit 5 A new drum unit can print approximately 12,000 A4 or ...

Users Manual - English
Page 77
... by completing the following steps: a Make sure that the printer is turned on page 73. Improper Setup Do not reset the drum counter when you replace the drum unit, clean the inside of the printer. Open the front cover. 5 b Press and hold down the white Go button for about 4 ...seconds until all four LEDs are lit, release the Go button. See Cleaning on and the Drum LED is blinking. Routine Maintenance Replacing the drum unit 5 CAUTION While removing the drum unit, handle it carefully because it may contain toner. Once all the LEDs light up. Every time you ...
... by completing the following steps: a Make sure that the printer is turned on page 73. Improper Setup Do not reset the drum counter when you replace the drum unit, clean the inside of the printer. Open the front cover. 5 b Press and hold down the white Go button for about 4 ...seconds until all four LEDs are lit, release the Go button. See Cleaning on and the Drum LED is blinking. Routine Maintenance Replacing the drum unit 5 CAUTION While removing the drum unit, handle it carefully because it may contain toner. Once all the LEDs light up. Every time you ...
Users Manual - English
Page 81
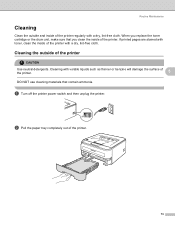
... the printer. 5 DO NOT use cleaning materials that you clean the inside of the printer regularly with a dry, lint-free cloth. When you replace the toner cartridge or the drum unit, make sure that contain ammonia. Cleaning with a dry, lint-free cloth. Cleaning the outside and inside of the printer. b Pull the...
... the printer. 5 DO NOT use cleaning materials that you clean the inside of the printer regularly with a dry, lint-free cloth. When you replace the toner cartridge or the drum unit, make sure that contain ammonia. Cleaning with a dry, lint-free cloth. Cleaning the outside and inside of the printer. b Pull the...
Users Manual - English
Page 89
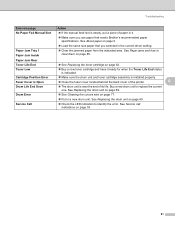
...; Clear the jammed paper from the indicated area. Paper Jam Tray 1 Paper Jam Inside „ Load the same size paper that meets Brother's recommended paper specifications. Troubleshooting Error message No Paper Fed Manual Slot Action „ If the manual feed slot is near the end of...Toner Low Cartridge Position Error Fuser Cover is Open Drum Life End Soon Drum Error „ See Replacing the toner cartridge on page 69. „ Check the LED indication to replace the current one. Buy a new drum unit to identify the error. See Replacing the drum unit on page 62. „ Buy a...
...; Clear the jammed paper from the indicated area. Paper Jam Tray 1 Paper Jam Inside „ Load the same size paper that meets Brother's recommended paper specifications. Troubleshooting Error message No Paper Fed Manual Slot Action „ If the manual feed slot is near the end of...Toner Low Cartridge Position Error Fuser Cover is Open Drum Life End Soon Drum Error „ See Replacing the toner cartridge on page 69. „ Check the LED indication to replace the current one. Buy a new drum unit to identify the error. See Replacing the drum unit on page 62. „ Buy a...
Users Manual - English
Page 99
... have a print quality problem, print a test page first (see Print a test page on page 62. „ Put in a new drum unit. See Replacing the toner cartridge on page 56). Call Brother Customer Service. Call Brother Customer Service. 91 Check the interface cable or try the printer on the following topics. Examples of the driver...
... have a print quality problem, print a test page first (see Print a test page on page 62. „ Put in a new drum unit. See Replacing the toner cartridge on page 56). Call Brother Customer Service. Call Brother Customer Service. 91 Check the interface cable or try the printer on the following topics. Examples of the driver...
Users Manual - English
Page 100
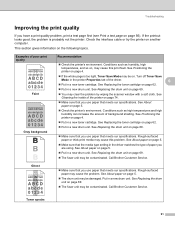
...; Check the printer's environment. See About paper on page 69. „ The fuser unit may be damaged. Call Brother Customer Service. See Replacing the drum 6 unit on page 5. „ Choose Thick paper mode in a new drum unit. See Cleaning on page 69. „ Clean the inside of poor print quality Recommendation „ Make sure...
...; Check the printer's environment. See About paper on page 69. „ The fuser unit may be damaged. Call Brother Customer Service. See Replacing the drum 6 unit on page 5. „ Choose Thick paper mode in a new drum unit. See Cleaning on page 69. „ Clean the inside of poor print quality Recommendation „ Make sure...

Users Manual - English
Page 101
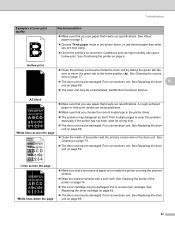
...the surface of the photosensitive drum with a sharp object. „ The drum unit may have found the mark on the drum that matches the print sample, wipe the surface of the OPC drum with a dry cotton swab until the dust or glue on page 69. 93 See Replacing the drum unit on the surface ...comes off. Clean the drum unit as follows: 6 a Put the print sample in a new drum unit. Put in front of the drum unit, and find the exact position of the poor print. Troubleshooting Examples ...
...the surface of the photosensitive drum with a sharp object. „ The drum unit may have found the mark on the drum that matches the print sample, wipe the surface of the OPC drum with a dry cotton swab until the dust or glue on page 69. 93 See Replacing the drum unit on the surface ...comes off. Clean the drum unit as follows: 6 a Put the print sample in a new drum unit. Put in front of the drum unit, and find the exact position of the poor print. Troubleshooting Examples ...
Users Manual - English
Page 102
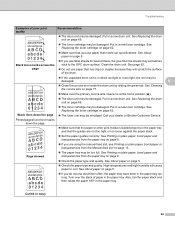
Put in a new drum unit. See About paper on page 13. „ The paper tray may be too full. Call your dealer or Brother Customer Service. See Replacing the toner cartridge on page 62. „ Make sure that you use label sheets for laser printers, the glue from the Manual feed slot on ... 5. „ If you do not use paper that the paper or other print media is loaded properly in a new toner cartridge. Put in a new drum unit. See Replacing the toner cartridge on page 5. „ Check the paper type and quality. Printed pages have been in the paper tray too long. See Printing...
Put in a new drum unit. See About paper on page 13. „ The paper tray may be too full. Call your dealer or Brother Customer Service. See Replacing the toner cartridge on page 62. „ Make sure that you use label sheets for laser printers, the glue from the Manual feed slot on ... 5. „ If you do not use paper that the paper or other print media is loaded properly in a new toner cartridge. Put in a new drum unit. See Replacing the toner cartridge on page 5. „ Check the paper type and quality. Printed pages have been in the paper tray too long. See Printing...
Quick Setup Guide - English
Page 49
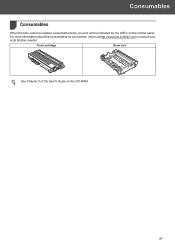
Consumables 1 Consumables 1 When the time comes to replace consumable items, an error will be indicated by the LED's on the CD-ROM. 47 For more information about the consumables for your printer, visit us at http://solutions.brother.com or contact your local Brother reseller. Toner cartridge Drum unit See Chapter 5 of the User's Guide on the control panel.
Consumables 1 Consumables 1 When the time comes to replace consumable items, an error will be indicated by the LED's on the CD-ROM. 47 For more information about the consumables for your printer, visit us at http://solutions.brother.com or contact your local Brother reseller. Toner cartridge Drum unit See Chapter 5 of the User's Guide on the control panel.


