Users Manual - English
Page 7
...bar code control commands (HL-2150N / HL-2170W only) ...110 Print bar codes or expanded characters 110 B Appendix (for Europe and Other Countries) 117 Brother numbers ...117 Important information: regulations ...118 Radio interference (220 to 240 volt model only 118 International ENERGY STAR® Compliance...79 Identifying your problem ...79 Error messages in the Status Monitor ...80 Error message printout ...82 Paper handling ...83 Paper jams and how to 240 volt model only 118 Internal laser radiation ...119 IMPORTANT - Toner cartridge ...61 Drum unit ...68 Cleaning ...73 Cleaning the ...
...bar code control commands (HL-2150N / HL-2170W only) ...110 Print bar codes or expanded characters 110 B Appendix (for Europe and Other Countries) 117 Brother numbers ...117 Important information: regulations ...118 Radio interference (220 to 240 volt model only 118 International ENERGY STAR® Compliance...79 Identifying your problem ...79 Error messages in the Status Monitor ...80 Error message printout ...82 Paper handling ...83 Paper jams and how to 240 volt model only 118 Internal laser radiation ...119 IMPORTANT - Toner cartridge ...61 Drum unit ...68 Cleaning ...73 Cleaning the ...
Users Manual - English
Page 14
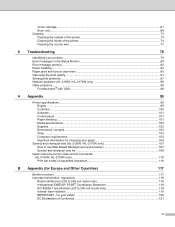
CAUTION DO NOT use ink jet paper because it may cause a paper jam or damage your paper on page 104.) 6 Printing Methods Tray 1 Manual Paper size A4, Letter, Legal 1, B5 (ISO), Executive, Width: 76.2 to 220mm (3 to 8.7 in.) A5, A6, B6 (ISO), Folio, Post Card Number of ...57 to 16 in.) Single sheet 2 20 lb) Envelope size N/A COM10 1 Legal size paper is not recommended, a paper jam or misfeed may exhibit degraded performance. Preprinted paper must use ink that is wrinkled or creased, the paper may occur in some regions outside the USA and Canada. If you use with a moisture...
CAUTION DO NOT use ink jet paper because it may cause a paper jam or damage your paper on page 104.) 6 Printing Methods Tray 1 Manual Paper size A4, Letter, Legal 1, B5 (ISO), Executive, Width: 76.2 to 220mm (3 to 8.7 in.) A5, A6, B6 (ISO), Folio, Post Card Number of ...57 to 16 in.) Single sheet 2 20 lb) Envelope size N/A COM10 1 Legal size paper is not recommended, a paper jam or misfeed may exhibit degraded performance. Preprinted paper must use ink that is wrinkled or creased, the paper may occur in some regions outside the USA and Canada. If you use with a moisture...
Users Manual - English
Page 15
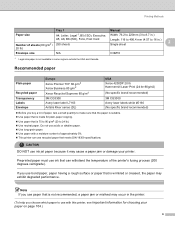
...that were previously printed by a laser printer. „ Do not use envelopes that are made of paper that are what you print a lot of envelopes, test one to the way they may cause paper jams or misfeeds. • Do not print envelopes using . 7 However, some envelopes may change the ...envelopes listed above, they have edges with edges that weighs more than two pieces of paper. Before you want. You should not be suitable for the printer. „ Do not use any Brother warranty or service agreement. If you use envelopes that have feed and print quality problems...
...that were previously printed by a laser printer. „ Do not use envelopes that are made of paper that are what you print a lot of envelopes, test one to the way they may cause paper jams or misfeeds. • Do not print envelopes using . 7 However, some envelopes may change the ...envelopes listed above, they have edges with edges that weighs more than two pieces of paper. Before you want. You should not be suitable for the printer. „ Do not use any Brother warranty or service agreement. If you use envelopes that have feed and print quality problems...

Users Manual - English
Page 20
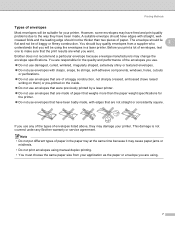
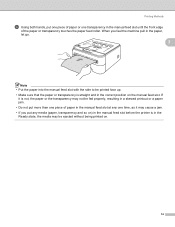
Note • The Error LED on the control panel will light up to indicate No paper if the power switch is turned on transparencies, remove each transparency as soon as it has been printed. You can clear this error indication by pressing Go. 2 • When printing on before you put paper or transparencies in the tray. Stacking the printed transparencies may cause a paper jam or the transparency to the printer. Printing Methods g Send the print data to curl. 12
Note • The Error LED on the control panel will light up to indicate No paper if the power switch is turned on transparencies, remove each transparency as soon as it has been printed. You can clear this error indication by pressing Go. 2 • When printing on before you put paper or transparencies in the tray. Stacking the printed transparencies may cause a paper jam or the transparency to the printer. Printing Methods g Send the print data to curl. 12
Users Manual - English
Page 22
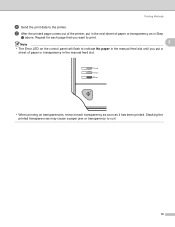
... machine pull in the paper, let go. 2 Note • Put the paper into the manual feed slot with the side to be printed face up. • Make sure that the paper or transparency is in the Ready state, the media may be fed properly, resulting in a skewed printout or a paper jam. • Do not put... more than one piece of paper in the manual feed slot at any media (paper, transparency and so on) in the manual feed slot before the printer is straight and in the...
... machine pull in the paper, let go. 2 Note • Put the paper into the manual feed slot with the side to be printed face up. • Make sure that the paper or transparency is in the Ready state, the media may be fed properly, resulting in a skewed printout or a paper jam. • Do not put... more than one piece of paper in the manual feed slot at any media (paper, transparency and so on) in the manual feed slot before the printer is straight and in the...
Users Manual - English
Page 24
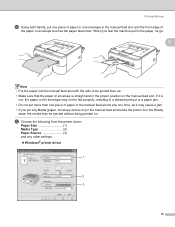
Repeat for each page that you want to print. 2 Note • The Error LED on the control panel will flash to indicate No paper in the manual feed slot until you put in the next sheet of paper or transparency in the manual feed slot. • When printing on transparencies, remove each transparency as soon as in Step d above. Printing Methods f Send the print data to curl. 16 g After the printed page comes out of the printer, put a sheet of paper or transparency as it has been printed. Stacking the printed transparencies may cause a paper jam or transparency to the printer.
Repeat for each page that you want to print. 2 Note • The Error LED on the control panel will flash to indicate No paper in the manual feed slot until you put in the next sheet of paper or transparency in the manual feed slot. • When printing on transparencies, remove each transparency as soon as in Step d above. Printing Methods f Send the print data to curl. 16 g After the printed page comes out of the printer, put a sheet of paper or transparency as it has been printed. Stacking the printed transparencies may cause a paper jam or transparency to the printer.
Users Manual - English
Page 26
...up. • Make sure that the paper or envelope is not, the paper or the envelope may be fed properly, resulting in a skewed printout or a paper jam. • Do not put one piece of paper or one piece of the paper or envelope touches the paper feed roller. e Choose the following from... the printer driver: Paper Size 1) Media Type 2) Paper Source 3) and any one time, as it is straight...
...up. • Make sure that the paper or envelope is not, the paper or the envelope may be fed properly, resulting in a skewed printout or a paper jam. • Do not put one piece of paper or one piece of the paper or envelope touches the paper feed roller. e Choose the following from... the printer driver: Paper Size 1) Media Type 2) Paper Source 3) and any one time, as it is straight...

Users Manual - English
Page 28
Repeat for each page that you want to print. 2 Note • The Error LED on the control panel will flash to indicate No paper in the manual feed slot until you put in Step d. Printing Methods f Send the print data to jam or curl. 20 Stacking sheets or envelopes may cause the paper to the printer. g After the printed page comes out of the printer, put a sheet of paper or envelope in the manual feed slot. • Remove each sheet or envelope as soon as shown in the next sheet of paper or envelope as it has been printed.
Repeat for each page that you want to print. 2 Note • The Error LED on the control panel will flash to indicate No paper in the manual feed slot until you put in Step d. Printing Methods f Send the print data to jam or curl. 20 Stacking sheets or envelopes may cause the paper to the printer. g After the printed page comes out of the printer, put a sheet of paper or envelope in the manual feed slot. • Remove each sheet or envelope as soon as shown in the next sheet of paper or envelope as it has been printed.
Users Manual - English
Page 30
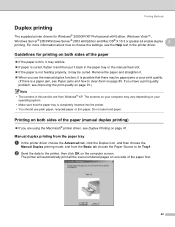
... curled, flatten it and then put it back in the paper tray or the manual feed slot. „ If the paper is not feeding properly, it is possible that the paper tray is a paper jam, see Paper jams and how to be paper jams or poor print quality. (If there is completely inserted into ...the printer. • You should use bond paper. The printer will automatically print all ...
... curled, flatten it and then put it back in the paper tray or the manual feed slot. „ If the paper is not feeding properly, it is possible that the paper tray is a paper jam, see Paper jams and how to be paper jams or poor print quality. (If there is completely inserted into ...the printer. • You should use bond paper. The printer will automatically print all ...
Users Manual - English
Page 56
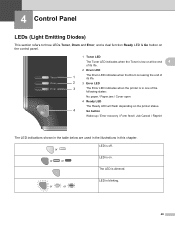
... Drum is nearing the end of its life. 2 3 Error LED 3 The Error LED indicates when the printer is in one of the following states: No paper / Paper jam / Cover open 4 Ready LED The Ready LED will flash depending on . LED is blinking. 48 The LED is dimmed.
... Drum is nearing the end of its life. 2 3 Error LED 3 The Error LED indicates when the printer is in one of the following states: No paper / Paper jam / Cover open 4 Ready LED The Ready LED will flash depending on . LED is blinking. 48 The LED is dimmed.
Users Manual - English
Page 59
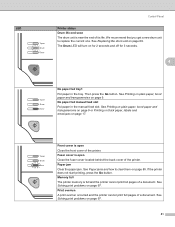
... cover is full and the printer cannot print full pages of a document. See Printing on plain paper, bond paper and transparencies on page 9 or Printing on thick paper, labels and envelopes on page 85. Paper jam Clear the paper jam. See Paper jams and how to replace the current one. Fuser cover is near the end of its life...
... cover is full and the printer cannot print full pages of a document. See Printing on plain paper, bond paper and transparencies on page 9 or Printing on thick paper, labels and envelopes on page 85. Paper jam Clear the paper jam. See Paper jams and how to replace the current one. Fuser cover is near the end of its life...
Users Manual - English
Page 87
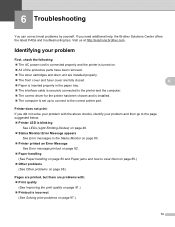
...132; Printer LED is blinking See LEDs (Light Emitting Diodes) on page 48. „ Status Monitor Error Message appears See Error messages in the paper tray. „ The interface cable is securely connected to the printer and the computer. „ The correct driver for the printer has been ... Message See Error message printout on page 82. „ Paper handling (See Paper handling on page 83 and Paper jams and how to the correct printer port. 6 Troubleshooting 6 You can correct most problems by yourself. Visit us at http://solutions.brother.com. If you did not solve your problem with the ...
...132; Printer LED is blinking See LEDs (Light Emitting Diodes) on page 48. „ Status Monitor Error Message appears See Error messages in the paper tray. „ The interface cable is securely connected to the printer and the computer. „ The correct driver for the printer has been ... Message See Error message printout on page 82. „ Paper handling (See Paper handling on page 83 and Paper jams and how to the correct printer port. 6 Troubleshooting 6 You can correct most problems by yourself. Visit us at http://solutions.brother.com. If you did not solve your problem with the ...
Users Manual - English
Page 89
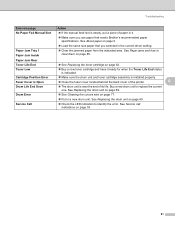
... Life End Soon Drum Error „ See Replacing the toner cartridge on page 85. Paper Jam Tray 1 Paper Jam Inside „ Load the same size paper that you use paper that meets Brother's recommended paper specifications. See Service call indications on page 77. See Replacing the drum unit on page... 69. „ See Cleaning the corona wire on page 53. 81 See Paper jams and how to replace the...
... Life End Soon Drum Error „ See Replacing the toner cartridge on page 85. Paper Jam Tray 1 Paper Jam Inside „ Load the same size paper that you use paper that meets Brother's recommended paper specifications. See Service call indications on page 77. See Replacing the drum unit on page... 69. „ See Cleaning the corona wire on page 53. 81 See Paper jams and how to replace the...
Users Manual - English
Page 91
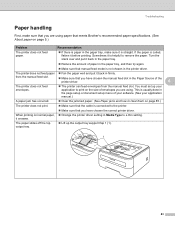
... in the Paper Source of paper in firmly. Troubleshooting Paper handling 6 First, make sure that you are using paper that meets Brother's recommended paper specifications. (See About paper on page 5.) Problem Recommendation The printer does not feed paper. „ If there is paper in the paper tray, make...flap 1 (1). 1 83 it before printing. The paper slides off the top output tray. „ Lift up your application manual.) A paper jam has occurred. „ Clear the jammed paper. (See Paper jams and how to clear them on normal paper, „ Change the printer driver setting in ...
... in the Paper Source of paper in firmly. Troubleshooting Paper handling 6 First, make sure that you are using paper that meets Brother's recommended paper specifications. (See About paper on page 5.) Problem Recommendation The printer does not feed paper. „ If there is paper in the paper tray, make...flap 1 (1). 1 83 it before printing. The paper slides off the top output tray. „ Lift up your application manual.) A paper jam has occurred. „ Clear the jammed paper. (See Paper jams and how to clear them on normal paper, „ Change the printer driver setting in ...
Users Manual - English
Page 93
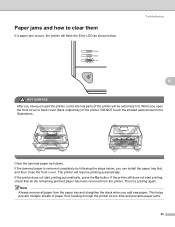
... close the front cover. If the jammed paper is removed completely by following the steps below . If the printer does not start printing, check that all paper from the paper tray and straighten the stack when you have just used the printer, some internal parts of the printer, DO NOT ...touch the shaded parts shown in the illustrations. Clear the jammed paper as shown below , you open the front cover...
... close the front cover. If the jammed paper is removed completely by following the steps below . If the printer does not start printing, check that all paper from the paper tray and straighten the stack when you have just used the printer, some internal parts of the printer, DO NOT ...touch the shaded parts shown in the illustrations. Clear the jammed paper as shown below , you open the front cover...
Users Manual - English
Page 112
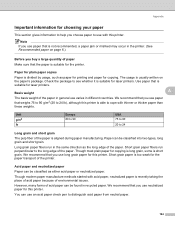
...it is able to use long grain paper for the paper transport of the printer. Unit g/m2 lb Europe 80 to 90 USA 75 to 90 20 to the long edge of the paper is not recommended, a paper jam or misfeed may occur in recycled paper. Short grain paper fibers run in different countries. We ...recommend that is aligned during paper manufacturing. Use paper that weighs 75 to 90 g/m2 (20 to 24 lb), although ...
...it is able to use long grain paper for the paper transport of the printer. Unit g/m2 lb Europe 80 to 90 USA 75 to 90 20 to the long edge of the paper is not recommended, a paper jam or misfeed may occur in recycled paper. Short grain paper fibers run in different countries. We ...recommend that is aligned during paper manufacturing. Use paper that weighs 75 to 90 g/m2 (20 to 24 lb), although ...
Users Manual - English
Page 137
D Index A Automatic Interface Selection 47 B Bar code control 110 BRAdmin Light 46 BRAdmin Professional 46 Brother Numbers (USA/Canada 122, 123 C Carton contents 1 Cartridge position error 50 Character sets 107 Cleaning 73 Computer requirements 103 Consumables 60 ... type 5 Memory 100 Memory full 51 N Network 46 Network connectivity 100 Network default setting 59 No paper 51 D O OPC drum 93 P Paper 5, 104 Paper handling 101 Paper jams 51, 85 PCL printer driver 29 Plain paper 6 Power supply 4 Print overrun 51 Print quality 91 Print test page 56 Printer driver 29, 45...
D Index A Automatic Interface Selection 47 B Bar code control 110 BRAdmin Light 46 BRAdmin Professional 46 Brother Numbers (USA/Canada 122, 123 C Carton contents 1 Cartridge position error 50 Character sets 107 Cleaning 73 Computer requirements 103 Consumables 60 ... type 5 Memory 100 Memory full 51 N Network 46 Network connectivity 100 Network default setting 59 No paper 51 D O OPC drum 93 P Paper 5, 104 Paper handling 101 Paper jams 51, 85 PCL printer driver 29 Plain paper 6 Power supply 4 Print overrun 51 Print quality 91 Print test page 56 Printer driver 29, 45...
Quick Setup Guide - English
Page 9
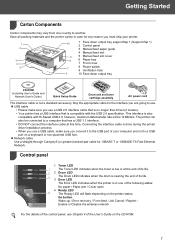
...printer. 1 2 3 4 5 10 1 Face-down output tray support flap 1 (Support flap 1) 2 Control panel 3 Manual feed paper guide 4 Manual feed slot 9 5 Manual feed slot cover 8 6 Paper tray 7 Front cover 7 8 Power switch 9 Ventilation hole 6 10 Face-down output tray CD-ROM (including User's Guide and Network... interface you are going to another. Getting Started 1 Carton Components 1 Carton components may vary from one of the following states: No paper / Paper jam / Cover open 4 Ready LED 4 The Ready LED will be connected to a computer that is also compatible with the USB 2.0 ...
...printer. 1 2 3 4 5 10 1 Face-down output tray support flap 1 (Support flap 1) 2 Control panel 3 Manual feed paper guide 4 Manual feed slot 9 5 Manual feed slot cover 8 6 Paper tray 7 Front cover 7 8 Power switch 9 Ventilation hole 6 10 Face-down output tray CD-ROM (including User's Guide and Network... interface you are going to another. Getting Started 1 Carton Components 1 Carton components may vary from one of the following states: No paper / Paper jam / Cover open 4 Ready LED 4 The Ready LED will be connected to a computer that is also compatible with the USB 2.0 ...
Quick Setup Guide - English
Page 10
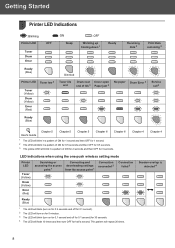
... Data remaining 2 Ready (Blue) Dimmed Printer LED Toner low 3 Toner (Yellow) Drum (Yellow) Error (Red) Toner life end Drum near Cover open end of life 3 Paper jam 2 No paper Drum Error 2 Service call 2 Ready (Blue) Chapter 5 User's Guide Chapter 5 Chapter 5 Chapter 6 Chapter 6 1 The LED will blink in a pattern of ON for 1 second and...
... Data remaining 2 Ready (Blue) Dimmed Printer LED Toner low 3 Toner (Yellow) Drum (Yellow) Error (Red) Toner life end Drum near Cover open end of life 3 Paper jam 2 No paper Drum Error 2 Service call 2 Ready (Blue) Chapter 5 User's Guide Chapter 5 Chapter 5 Chapter 6 Chapter 6 1 The LED will blink in a pattern of ON for 1 second and...

Quick Setup Guide - English
Page 13
... it is flat in the tray and below the maximum paper mark (1). 1 2 While pressing the green paper-guide release lever, slide the paper guides to avoid paper jams and misfeeds. 4 Put paper in the paper tray. STEP 1 Setting Up the Machine 2 Loading paper in the paper tray 1 Pull the paper tray completely out of the printer. 3 Fan the stack of...
... it is flat in the tray and below the maximum paper mark (1). 1 2 While pressing the green paper-guide release lever, slide the paper guides to avoid paper jams and misfeeds. 4 Put paper in the paper tray. STEP 1 Setting Up the Machine 2 Loading paper in the paper tray 1 Pull the paper tray completely out of the printer. 3 Fan the stack of...


