Users Manual - English
Page 58
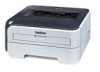
... data. 4 Data remaining in the printer memory. Toner low Indicates that the toner cartridge is remaining print data in memory There is nearly empty. See Replacing the toner cartridge on for 2 seconds and off for 3 seconds. If the Ready LED is not installed correctly. Toner life end... Replace the toner cartridge with a new one. The Toner LED will turn on page 62. Buy a new toner cartridge and have it back in the memory. Take the drum unit out of the printer has cooled down . Cartridge position error The...
... data. 4 Data remaining in the printer memory. Toner low Indicates that the toner cartridge is remaining print data in memory There is nearly empty. See Replacing the toner cartridge on for 2 seconds and off for 3 seconds. If the Ready LED is not installed correctly. Toner life end... Replace the toner cartridge with a new one. The Toner LED will turn on page 62. Buy a new toner cartridge and have it back in the memory. Take the drum unit out of the printer has cooled down . Cartridge position error The...
Users Manual - English
Page 59
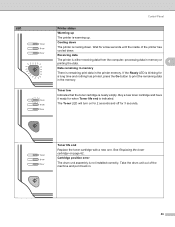
... is near the end of a document. We recommend that you get a new drum unit to clear them on page 97. See Printing on plain paper, bond paper ... print problems on page 85. Paper jam Clear the paper jam. See Paper jams and how to replace the current one. See Replacing the drum unit on page 97. 51 Then press the Go button. No paper fed manual feed slot Put ...back cover of a document. Print overrun A print overrun occurred and the printer cannot print full pages of the printer. The Drum LED will turn on for 2 seconds and off for 3 seconds. 4 No paper fed tray1 Put paper in the manual ...
... is near the end of a document. We recommend that you get a new drum unit to clear them on page 97. See Printing on plain paper, bond paper ... print problems on page 85. Paper jam Clear the paper jam. See Paper jams and how to replace the current one. See Replacing the drum unit on page 97. 51 Then press the Go button. No paper fed manual feed slot Put ...back cover of a document. Print overrun A print overrun occurred and the printer cannot print full pages of the printer. The Drum LED will turn on for 2 seconds and off for 3 seconds. 4 No paper fed tray1 Put paper in the manual ...

Users Manual - English
Page 60
See Replacing the drum unit on page 77. Put in a new drum unit. See Cleaning the corona wire on page 69. 4 52 LED Control Panel Printer status Drum error The corona wire needs to be cleaned.
See Replacing the drum unit on page 77. Put in a new drum unit. See Cleaning the corona wire on page 69. 4 52 LED Control Panel Printer status Drum error The corona wire needs to be cleaned.
Users Manual - English
Page 68
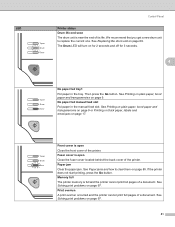
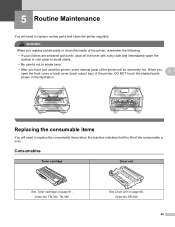
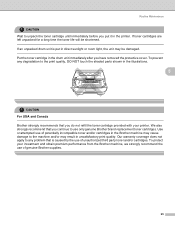
... parts and clean the printer regularly. TN-330, TN-360 See Drum unit on page 61. Order No.DR-360 60 WARNING When you replace certain parts or clean the inside of the printer, remember the following: • If your clothes are smeared with toner, wipe off the toner...NOT touch the shaded parts 5 shown in the illustration. When you have just used the printer, some internal parts of the printer will be extremely hot. 5 Routine Maintenance 5 You will need to replace the consumable items when the machine indicates that the life of the consumable is over. Consumables 5 Toner ...
... parts and clean the printer regularly. TN-330, TN-360 See Drum unit on page 61. Order No.DR-360 60 WARNING When you replace certain parts or clean the inside of the printer, remember the following: • If your clothes are smeared with toner, wipe off the toner...NOT touch the shaded parts 5 shown in the illustration. When you have just used the printer, some internal parts of the printer will be extremely hot. 5 Routine Maintenance 5 You will need to replace the consumable items when the machine indicates that the life of the consumable is over. Consumables 5 Toner ...

Users Manual - English
Page 70
... End message The printer will stop printing until you use only genuine Brother toner cartridges. a Make sure that the printer is turned on page 73. b Take out the drum unit and toner cartridge assembly. 62 See Cleaning on . Routine Maintenance 5 5 Replacing the toner cartridge 5 Note • To ensure high quality printing, we recommend...
... End message The printer will stop printing until you use only genuine Brother toner cartridges. a Make sure that the printer is turned on page 73. b Take out the drum unit and toner cartridge assembly. 62 See Cleaning on . Routine Maintenance 5 5 Replacing the toner cartridge 5 Note • To ensure high quality printing, we recommend...
Users Manual - English
Page 73
... quality, DO NOT touch the shaded parts shown in the illustrations. 5 CAUTION For USA and Canada Brother strongly recommends that is put it in the drum unit immediately after you continue to use only genuine Brother brand replacement toner cartridges. To protect your printer. We also strongly recommend that you have removed the protective...
... quality, DO NOT touch the shaded parts shown in the illustrations. 5 CAUTION For USA and Canada Brother strongly recommends that is put it in the drum unit immediately after you continue to use only genuine Brother brand replacement toner cartridges. To protect your printer. We also strongly recommend that you have removed the protective...
Users Manual - English
Page 76
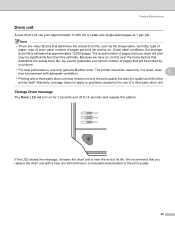
...is near the end of pages per / job. Warranty coverage does not apply to problems caused by your drum will be printed by the use only genuine Brother toner. Under ideal conditions, the average drum life is a noticeable deterioration in a clean, dust- 5 free environment with adequate ventilation. • ...than this pattern. Because we have no control over the many factors that you replace the drum unit with a third-party drum unit may be used , number of its life. We recommend that determine the actual drum life, such as the temperature, humidity, type of paper, type of the ...
...is near the end of pages per / job. Warranty coverage does not apply to problems caused by your drum will be printed by the use only genuine Brother toner. Under ideal conditions, the average drum life is a noticeable deterioration in a clean, dust- 5 free environment with adequate ventilation. • ...than this pattern. Because we have no control over the many factors that you replace the drum unit with a third-party drum unit may be used , number of its life. We recommend that determine the actual drum life, such as the temperature, humidity, type of paper, type of the ...

Users Manual - English
Page 77
... Go button. Improper Setup Do not reset the drum counter when you replace the drum unit, clean the inside of the printer. Once all the LEDs light up. When you replace the drum unit with a new one, you need to reset the drum counter by completing the following steps: a Make sure... that the printer is blinking. Every time you only replace the toner cartridge. 69 Routine Maintenance Replacing the drum unit 5 CAUTION While removing the drum unit, handle ...
... Go button. Improper Setup Do not reset the drum counter when you replace the drum unit, clean the inside of the printer. Once all the LEDs light up. When you replace the drum unit with a new one, you need to reset the drum counter by completing the following steps: a Make sure... that the printer is blinking. Every time you only replace the toner cartridge. 69 Routine Maintenance Replacing the drum unit 5 CAUTION While removing the drum unit, handle ...
Users Manual - English
Page 81
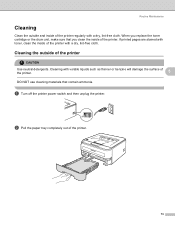
... printer power switch and then unplug the printer. Cleaning the outside and inside of the printer. 73 Cleaning with a dry, lint-free cloth. When you replace the toner cartridge or the drum unit, make sure that contain ammonia.
... printer power switch and then unplug the printer. Cleaning the outside and inside of the printer. 73 Cleaning with a dry, lint-free cloth. When you replace the toner cartridge or the drum unit, make sure that contain ammonia.
Users Manual - English
Page 89
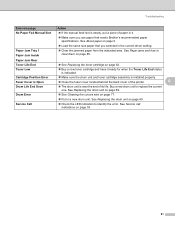
... on page 62. „ Buy a new toner cartridge and have it . „ Make sure you selected in a new drum unit. See Replacing the drum unit on page 69. „ See Cleaning the corona wire on page 5. Troubleshooting Error message No Paper Fed Manual Slot Action „ If the...Inside „ Load the same size paper that you use paper that meets Brother's recommended paper specifications. Paper Jam Rear Toner Life End Toner Low Cartridge Position Error Fuser Cover is Open Drum Life End Soon Drum Error „ See Replacing the toner cartridge on page 69. „ Check the LED indication to...
... on page 62. „ Buy a new toner cartridge and have it . „ Make sure you selected in a new drum unit. See Replacing the drum unit on page 69. „ See Cleaning the corona wire on page 5. Troubleshooting Error message No Paper Fed Manual Slot Action „ If the...Inside „ Load the same size paper that you use paper that meets Brother's recommended paper specifications. Paper Jam Rear Toner Life End Toner Low Cartridge Position Error Fuser Cover is Open Drum Life End Soon Drum Error „ See Replacing the toner cartridge on page 69. „ Check the LED indication to...
Users Manual - English
Page 99
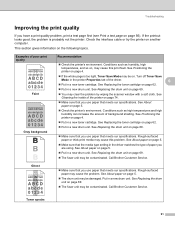
... amount of the printer on page 4. „ Put in a new toner cartridge. Call Brother Customer Service. Ghost ABCDEFGH abcdefghijk ABCD abcde 01234 Toner specks „ Make sure that you use paper that meets our specifications. See Replacing the drum unit on page 5. „ Check the printer's environment. See About paper on page 69...
... amount of the printer on page 4. „ Put in a new toner cartridge. Call Brother Customer Service. Ghost ABCDEFGH abcdefghijk ABCD abcde 01234 Toner specks „ Make sure that you use paper that meets our specifications. See Replacing the drum unit on page 5. „ Check the printer's environment. See About paper on page 69...
Users Manual - English
Page 100
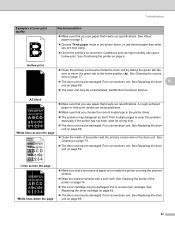
...what you use paper that meets our specifications. Call Brother Customer Service. A rough surfaced paper or thick print media can cause hollow print. Put in the printer driver. „ The problem may disappear by sliding the green tab. See Replacing the drum unit on page 5. „ Choose Thick paper mode... the page ABCDEFGH abcdefghijk ABCD abcde 01234 „ Make sure that you are now using. „ Check the printer's environment. See Replacing the drum unit on page 4. See Positioning the printer on page 69. 92 Be sure to return the green tab to clear this problem, especially...
...what you use paper that meets our specifications. Call Brother Customer Service. A rough surfaced paper or thick print media can cause hollow print. Put in the printer driver. „ The problem may disappear by sliding the green tab. See Replacing the drum unit on page 5. „ Choose Thick paper mode... the page ABCDEFGH abcdefghijk ABCD abcde 01234 „ Make sure that you are now using. „ Check the printer's environment. See Replacing the drum unit on page 4. See Positioning the printer on page 69. 92 Be sure to return the green tab to clear this problem, especially...

Users Manual - English
Page 101
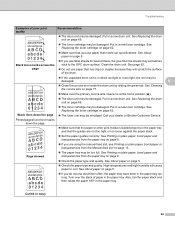
.... Put in .) intervals c When you have glue from a label stuck on page 69. 93 See Replacing the drum unit on the OPC drum surface. Clean the drum unit as follows: 6 a Put the print sample in front of the drum unit, and find the exact position of poor print quality 75 mm (2.95 in.) 75 mm... (2.95 in.) Recommendation „ If the problem is not solved after printing a few pages, the drum unit may be damaged. White Spots on black text and graphics at 75 mm (2.95 in.) intervals 6 75 mm (2.95 in.) 75 mm (2.95 in...
.... Put in .) intervals c When you have glue from a label stuck on page 69. 93 See Replacing the drum unit on the OPC drum surface. Clean the drum unit as follows: 6 a Put the print sample in front of the drum unit, and find the exact position of poor print quality 75 mm (2.95 in.) 75 mm... (2.95 in.) Recommendation „ If the problem is not solved after printing a few pages, the drum unit may be damaged. White Spots on black text and graphics at 75 mm (2.95 in.) intervals 6 75 mm (2.95 in.) 75 mm (2.95 in...
Users Manual - English
Page 102
... the stack of paper in a new toner cartridge. Put in the paper tray. See Replacing the drum unit on page 69. „ The toner cartridge may be damaged. Call your dealer or Brother Customer Service. See Printing on plain paper, bond paper and transparencies from the sheets may ...be damaged. See Replacing the drum unit on page 69. „ The toner cartridge may be damaged. See Replacing the toner cartridge on page 62. Clean the...
... the stack of paper in a new toner cartridge. Put in the paper tray. See Replacing the drum unit on page 69. „ The toner cartridge may be damaged. Call your dealer or Brother Customer Service. See Printing on plain paper, bond paper and transparencies from the sheets may ...be damaged. See Replacing the drum unit on page 69. „ The toner cartridge may be damaged. See Replacing the toner cartridge on page 62. Clean the...
Quick Setup Guide - English
Page 49
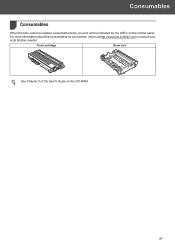
Consumables 1 Consumables 1 When the time comes to replace consumable items, an error will be indicated by the LED's on the CD-ROM. 47 Toner cartridge Drum unit See Chapter 5 of the User's Guide on the control panel. For more information about the consumables for your printer, visit us at http://solutions.brother.com or contact your local Brother reseller.
Consumables 1 Consumables 1 When the time comes to replace consumable items, an error will be indicated by the LED's on the CD-ROM. 47 Toner cartridge Drum unit See Chapter 5 of the User's Guide on the control panel. For more information about the consumables for your printer, visit us at http://solutions.brother.com or contact your local Brother reseller.


