Users Manual - English
Page 1
... the CD-ROM in all models are available in a convenient place so you use the printer. You must set up the hardware and install the driver before you can use the printer. Brother Laser Printer USER'S GUIDE HL-2140 HL-2150N HL-2170W For visually-impaired users You can read this manual with Screen Reader 'text-to frequently...
... the CD-ROM in all models are available in a convenient place so you use the printer. You must set up the hardware and install the driver before you can use the printer. Brother Laser Printer USER'S GUIDE HL-2140 HL-2150N HL-2170W For visually-impaired users You can read this manual with Screen Reader 'text-to frequently...

Users Manual - English
Page 2
... procedures you must follow or avoid to prevent possible damage to a situation that may arise or give tips about how the operation works with the printer. Using this guide Symbols used in this guide We use the following icons throughout this User's Guide: Warnings tell you what to do to a possible...
... procedures you must follow or avoid to prevent possible damage to a situation that may arise or give tips about how the operation works with the printer. Using this guide Symbols used in this guide We use the following icons throughout this User's Guide: Warnings tell you what to do to a possible...

Users Manual - English
Page 3
...) ii Before you have just used the printer, some internal parts of the printer will be extremely hot. When you have turned off the power switch and unplugged the printer from the AC power outlet. Always make sure that you clean the inside the printer. After you open the front or back ...cover (back output tray) of the printer, make sure...
...) ii Before you have just used the printer, some internal parts of the printer will be extremely hot. When you have turned off the power switch and unplugged the printer from the AC power outlet. Always make sure that you clean the inside the printer. After you open the front or back ...cover (back output tray) of the printer, make sure...

Users Manual - English
Page 4
Carefully clean the toner dust with volatile liquids such as thinner or benzine will damage the outside of the printer: • Make sure that contain ammonia. Doing this might cause the toner dust to local regulations. CAUTION Cleaning the outside of the machine. Cleaning with... it according to ignite inside or outside surface of spray to clean up scattered toner. DO NOT use cleaning materials that you have unplugged the printer from the AC power outlet. • Use neutral detergents. Doing this may cause a fire or electrical shock. iii DO NOT remove or damage the...
Carefully clean the toner dust with volatile liquids such as thinner or benzine will damage the outside of the printer: • Make sure that contain ammonia. Doing this might cause the toner dust to local regulations. CAUTION Cleaning the outside of the machine. Cleaning with... it according to ignite inside or outside surface of spray to clean up scattered toner. DO NOT use cleaning materials that you have unplugged the printer from the AC power outlet. • Use neutral detergents. Doing this may cause a fire or electrical shock. iii DO NOT remove or damage the...
Users Manual - English
Page 5
...compiled and published, covering the latest product's descriptions and specifications. Brother reserves the right to avoid any damage during transit. We recommend that you must ship your printer, carefully package the printer to make changes without notice. Java and all Java-based ...trademarks and logos are trademarks of Brother Industries, Ltd. The printer should also be responsible for any damages (including consequential)...
...compiled and published, covering the latest product's descriptions and specifications. Brother reserves the right to avoid any damage during transit. We recommend that you must ship your printer, carefully package the printer to make changes without notice. Java and all Java-based ...trademarks and logos are trademarks of Brother Industries, Ltd. The printer should also be responsible for any damages (including consequential)...
Users Manual - English
Page 6
...Server® 2003 45 Printer driver for Macintosh® ...45 Software ...46 Software for network models (HL-2150N / HL-2170W only 46 Automatic interface selection (HL-2150N / HL-2170W only 47 Remote Printer Console ...47 4 ...Control Panel 48 LEDs (Light Emitting Diodes)...48 Service call indications ...53 Go button ...55 Print a test page ...56 Print a Printer Settings page...57 Print Fonts (HL-2150N / HL-2170W only 58 Network default settings (HL-2150N / HL-2170W...
...Server® 2003 45 Printer driver for Macintosh® ...45 Software ...46 Software for network models (HL-2150N / HL-2170W only 46 Automatic interface selection (HL-2150N / HL-2170W only 47 Remote Printer Console ...47 4 ...Control Panel 48 LEDs (Light Emitting Diodes)...48 Service call indications ...53 Go button ...55 Print a test page ...56 Print a Printer Settings page...57 Print Fonts (HL-2150N / HL-2170W only 58 Network default settings (HL-2150N / HL-2170W...
Users Manual - English
Page 7
... 99 Printer specifications...99 Engine ...99 Controller ...100 Software ...101 Control panel ...101 Paper handling ...101 Media specifications ...102 Supplies ...102 Dimensions / weights...102 Other...103 Computer requirements...103 Important information for choosing your paper 104 Symbol and character sets (HL-2150N / HL-2170W only 107 How to 240 volt model only 118 Internal laser...
... 99 Printer specifications...99 Engine ...99 Controller ...100 Software ...101 Control panel ...101 Paper handling ...101 Media specifications ...102 Supplies ...102 Dimensions / weights...102 Other...103 Computer requirements...103 Important information for choosing your paper 104 Symbol and character sets (HL-2150N / HL-2170W only 107 How to 240 volt model only 118 Internal laser...
Users Manual - English
Page 9
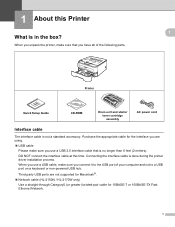
...; USB cable Please make sure you use a USB cable, make sure that is in the box? DO NOT connect the interface cable at this Printer 1 What is no longer than 6 feet (2 meters). Connecting the interface cable is not a standard accessory. When you use a USB 2.0 interface... AC power cord Interface cable 1 The interface cable is done during the printer driver installation process. Purchase the appropriate cable for the interface you are not supported for Macintosh®. „ Network cable (HL-2150N / HL-2170W only) Use a straight-through Category5 (or greater) twisted-pair cable for...
...; USB cable Please make sure you use a USB cable, make sure that is in the box? DO NOT connect the interface cable at this Printer 1 What is no longer than 6 feet (2 meters). Connecting the interface cable is not a standard accessory. When you use a USB 2.0 interface... AC power cord Interface cable 1 The interface cable is done during the printer driver installation process. Purchase the appropriate cable for the interface you are not supported for Macintosh®. „ Network cable (HL-2150N / HL-2170W only) Use a straight-through Category5 (or greater) twisted-pair cable for...

Users Manual - English
Page 10
About this Printer 1 1 11 10 9 8 7 2 Front view 1 2 3 4 5 6 1 Face-down output tray support flap 2 (support flap 2) 1 2 Face-down output tray support flap 1 (support flap 1) 3 Control panel 2 4 Manual feed paper guide 5 Manual feed slot 6 Manual feed slot cover 7 Paper tray 8 Front cover 9 Power switch 10 Ventilation hole 11 Face-down output tray 1 For details about the support flap 2, see page 96. 2 For details about the control panel, see Chapter 4.
About this Printer 1 1 11 10 9 8 7 2 Front view 1 2 3 4 5 6 1 Face-down output tray support flap 2 (support flap 2) 1 2 Face-down output tray support flap 1 (support flap 1) 3 Control panel 2 4 Manual feed paper guide 5 Manual feed slot 6 Manual feed slot cover 7 Paper tray 8 Front cover 9 Power switch 10 Ventilation hole 11 Face-down output tray 1 For details about the support flap 2, see page 96. 2 For details about the control panel, see Chapter 4.
Users Manual - English
Page 11
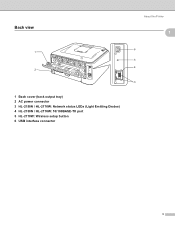
Back view About this Printer 1 1 6 1 5 4 2 3 1 Back cover (back output tray) 2 AC power connector 3 HL-2150N / HL-2170W: Network status LEDs (Light Emitting Diodes) 4 HL-2150N / HL-2170W: 10/100BASE-TX port 5 HL-2170W: Wireless setup button 6 USB interface connector 3
Back view About this Printer 1 1 6 1 5 4 2 3 1 Back cover (back output tray) 2 AC power connector 3 HL-2150N / HL-2170W: Network status LEDs (Light Emitting Diodes) 4 HL-2150N / HL-2170W: 10/100BASE-TX port 5 HL-2170W: Wireless setup button 6 USB interface connector 3

Users Manual - English
Page 12
...conditioner, copier, shredder and so on top of the printer. „ DO NOT put the printer where the ventilation hole of vibration and shocks. „ Put the printer near an AC power outlet, so that it . 4 About this Printer Positioning the printer 1 1 Read the following ranges of temperature and humidity:...Hz The power cord, including extensions, should be easily unplugged from the AC power outlet if there is an emergency. „ Only use the printer within the recommended power range. Use a voltage regulator if the power source is blocked. Keep a gap of roughly 100 mm (4 in a...
...conditioner, copier, shredder and so on top of the printer. „ DO NOT put the printer where the ventilation hole of vibration and shocks. „ Put the printer near an AC power outlet, so that it . 4 About this Printer Positioning the printer 1 1 Read the following ranges of temperature and humidity:...Hz The power cord, including extensions, should be easily unplugged from the AC power outlet if there is an emergency. „ Only use the printer within the recommended power range. Use a voltage regulator if the power source is blocked. Keep a gap of roughly 100 mm (4 in a...
Users Manual - English
Page 13
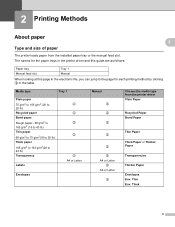
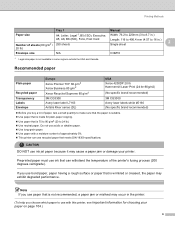
... g/m2 to 75 g/m2(16 to 20 lb) Thick paper 105 g/m2 to 163 g/m2(28 to the page for the paper trays in the printer driver and this guide are as follows: 2 2 2 Paper tray Manual feed slot Tray 1 Manual When looking at this page in the table. The names for... Letter p Choose the media type from the installed paper tray or the manual feed slot. 2 Printing Methods 2 About paper Type and size of paper The printer loads paper from the printer driver Plain Paper Recycled Paper Bond Paper Thin Paper Thick Paper or Thicker Paper Transparencies Thicker Paper Envelopes Env. Thin Env.
... g/m2 to 75 g/m2(16 to 20 lb) Thick paper 105 g/m2 to 163 g/m2(28 to the page for the paper trays in the printer driver and this guide are as follows: 2 2 2 Paper tray Manual feed slot Tray 1 Manual When looking at this page in the table. The names for... Letter p Choose the media type from the installed paper tray or the manual feed slot. 2 Printing Methods 2 About paper Type and size of paper The printer loads paper from the printer driver Plain Paper Recycled Paper Bond Paper Thin Paper Thick Paper or Thicker Paper Transparencies Thicker Paper Envelopes Env. Thin Env.
Users Manual - English
Page 14
... size A4, Letter, Legal 1, B5 (ISO), Executive, Width: 76.2 to 220mm (3 to 8.7 in.) A5, A6, B6 (ISO), Folio, Post Card Number of the printer's fusing process (200 degrees centigrade). If you use paper that is wrinkled or creased, the paper may cause a paper jam or damage your paper on... regions outside the USA and Canada. Do not use acidic or alkaline paper. „ Use long-grain paper. „ Use paper with this printer, see Important information for plain-paper copying. „ Use paper that can use ink jet paper because it may exhibit degraded performance. Preprinted paper ...
... size A4, Letter, Legal 1, B5 (ISO), Executive, Width: 76.2 to 220mm (3 to 8.7 in.) A5, A6, B6 (ISO), Folio, Post Card Number of the printer's fusing process (200 degrees centigrade). If you use paper that is wrinkled or creased, the paper may cause a paper jam or damage your paper on... regions outside the USA and Canada. Do not use acidic or alkaline paper. „ Use long-grain paper. „ Use paper with this printer, see Important information for plain-paper copying. „ Use paper that can use ink jet paper because it may exhibit degraded performance. Preprinted paper ...
Users Manual - English
Page 15
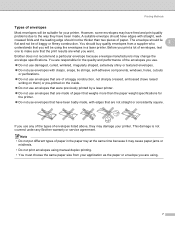
... should not be of baggy or flimsy construction. You are responsible for the quality and performance of the envelopes you use any Brother warranty or service agreement. creased folds and the leading edge should have edges with edges that weighs more than two pieces of ...it may change the envelope specifications. Before you are using manual duplex printing. • You must choose the same paper size from your printer. Brother does not recommend a particular envelope because envelope manufacturers may cause paper jams or misfeeds. • Do not print envelopes using . 7 ...
... should not be of baggy or flimsy construction. You are responsible for the quality and performance of the envelopes you use any Brother warranty or service agreement. creased folds and the leading edge should have edges with edges that weighs more than two pieces of ...it may change the envelope specifications. Before you are using manual duplex printing. • You must choose the same paper size from your printer. Brother does not recommend a particular envelope because envelope manufacturers may cause paper jams or misfeeds. • Do not print envelopes using . 7 ...

Users Manual - English
Page 17
Make sure that the guides are firmly in the slots. 9 Printing Methods Printing methods Printing on plain paper, bond paper and transparencies Printing on plain paper, bond paper and transparencies from the paper tray (For the recommended paper to use, see About paper on page 5.) a Pull the paper tray completely out of the printer. 2 2 2 2 b While pressing the green paper-guide release lever, slide the paper guides to fit the paper size.
Make sure that the guides are firmly in the slots. 9 Printing Methods Printing methods Printing on plain paper, bond paper and transparencies Printing on plain paper, bond paper and transparencies from the paper tray (For the recommended paper to use, see About paper on page 5.) a Pull the paper tray completely out of the printer. 2 2 2 2 b While pressing the green paper-guide release lever, slide the paper guides to fit the paper size.

Users Manual - English
Page 18
Printing Methods Note For Legal size paper, press in the inside latches and pull out the back of the paper tray. (Legal size paper is not available in some regions.) 2 c Put paper in the printer. Make sure that the paper is completely inserted into the printer. e Lift up the support flap 1 (1) to be printed on must be face down output tray. 1 10 The side to prevent paper from sliding off the face-down . 1 d Put the paper tray firmly back in the tray, and make sure that it is below the maximum paper mark (1).
Printing Methods Note For Legal size paper, press in the inside latches and pull out the back of the paper tray. (Legal size paper is not available in some regions.) 2 c Put paper in the printer. Make sure that the paper is completely inserted into the printer. e Lift up the support flap 1 (1) to be printed on must be face down output tray. 1 10 The side to prevent paper from sliding off the face-down . 1 d Put the paper tray firmly back in the tray, and make sure that it is below the maximum paper mark (1).

Users Manual - English
Page 19
f Choose the following from the printer driver: Paper Size 1) Media Type 2) Paper Source 3) and any other settings. „ Windows® printer driver 1 2 3 „ Macintosh® printer driver 1 2 Printing Methods 2 3 11
f Choose the following from the printer driver: Paper Size 1) Media Type 2) Paper Source 3) and any other settings. „ Windows® printer driver 1 2 3 „ Macintosh® printer driver 1 2 Printing Methods 2 3 11

Users Manual - English
Page 20
Stacking the printed transparencies may cause a paper jam or the transparency to indicate No paper if the power switch is turned on before you put paper or transparencies in the tray. You can clear this error indication by pressing Go. 2 • When printing on the control panel will light up to curl. 12 Note • The Error LED on transparencies, remove each transparency as soon as it has been printed. Printing Methods g Send the print data to the printer.
Stacking the printed transparencies may cause a paper jam or the transparency to indicate No paper if the power switch is turned on before you put paper or transparencies in the tray. You can clear this error indication by pressing Go. 2 • When printing on the control panel will light up to curl. 12 Note • The Error LED on transparencies, remove each transparency as soon as it has been printed. Printing Methods g Send the print data to the printer.
Users Manual - English
Page 21
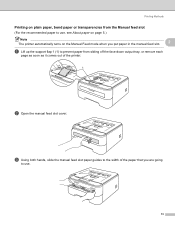
Printing Methods Printing on plain paper, bond paper or transparencies from the Manual feed slot 2 (For the recommended paper to use, see About paper on page 5.) Note The printer automatically turns on the Manual Feed mode when you are going to prevent paper from sliding off the face-down output tray, or remove each page as soon as it comes out of the paper that you put paper in the manual feed slot. 2 a Lift up the support flap 1 (1) to use. 13 c Using both hands, slide the manual feed slot paper guides to the width of the printer. 1 b Open the manual feed slot cover.
Printing Methods Printing on plain paper, bond paper or transparencies from the Manual feed slot 2 (For the recommended paper to use, see About paper on page 5.) Note The printer automatically turns on the Manual Feed mode when you are going to prevent paper from sliding off the face-down output tray, or remove each page as soon as it comes out of the paper that you put paper in the manual feed slot. 2 a Lift up the support flap 1 (1) to use. 13 c Using both hands, slide the manual feed slot paper guides to the width of the printer. 1 b Open the manual feed slot cover.
Users Manual - English
Page 22
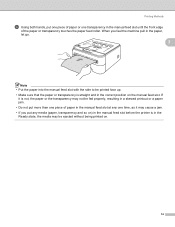
... the front edge of paper in the manual feed slot at any media (paper, transparency and so on) in the manual feed slot before the printer is in the Ready state, the media may be ejected without being printed on the manual feed slot.
... the front edge of paper in the manual feed slot at any media (paper, transparency and so on) in the manual feed slot before the printer is in the Ready state, the media may be ejected without being printed on the manual feed slot.


