Service Guide
Page 7
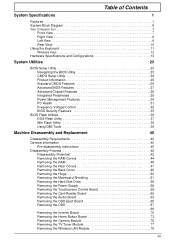
... Removing the RAM 46 Removing the Rear Covers 47 Removing the Back Cover 48 Removing the Hinge 50 Removing the Mainboard Shielding 51 Removing the Hard Disk Drive 55 Removing the Power Supply 58 Removing the Touchscreen Control Board 59 Removing the Card Reader Board 62 Removing the Audio Board 63 Removing...
... Removing the RAM 46 Removing the Rear Covers 47 Removing the Back Cover 48 Removing the Hinge 50 Removing the Mainboard Shielding 51 Removing the Hard Disk Drive 55 Removing the Power Supply 58 Removing the Touchscreen Control Board 59 Removing the Card Reader Board 62 Removing the Audio Board 63 Removing...
Service Guide
Page 12
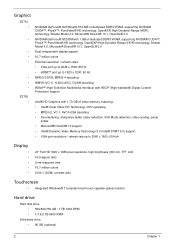
Graphics Z5710 • • • • • • • • Z5700 • NVIDIA® GeForce® G210M with 512 MB of dedicated DDR3 VRAM, supporting NVIDIA® CUDA™, PhysX™, PureVideo® HD technology, OpenEXR ... LCD 16:9 aspect ratio 5 ms response time 16.7 million colors 1000:1 (ACM) contrast ratio Touchscreen • Integrated Windows® 7 compliant multi-touch capable optical solution Hard drive Hard disk drive • 500/640/750 GB / 1 TB 7200 RPM • 1/1.5/2 TB 5400 RPM Solid state...
Graphics Z5710 • • • • • • • • Z5700 • NVIDIA® GeForce® G210M with 512 MB of dedicated DDR3 VRAM, supporting NVIDIA® CUDA™, PhysX™, PureVideo® HD technology, OpenEXR ... LCD 16:9 aspect ratio 5 ms response time 16.7 million colors 1000:1 (ACM) contrast ratio Touchscreen • Integrated Windows® 7 compliant multi-touch capable optical solution Hard drive Hard disk drive • 500/640/750 GB / 1 TB 7200 RPM • 1/1.5/2 TB 5400 RPM Solid state...
Service Guide
Page 20
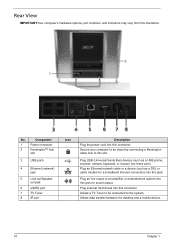
... as a DSL or cable modem for sound output. Allows a TV Tuner to be connected to an amplifier or entertainment system into this connector. Plug external hard drives into this jack. Secure your computer to an object by connecting a Kensington cable lock to this illustration. Component 1 Power connector 2 Kensington™ lock slot 3 USB...
... as a DSL or cable modem for sound output. Allows a TV Tuner to be connected to an amplifier or entertainment system into this connector. Plug external hard drives into this jack. Secure your computer to an object by connecting a Kensington cable lock to this illustration. Component 1 Power connector 2 Kensington™ lock slot 3 USB...
Service Guide
Page 26
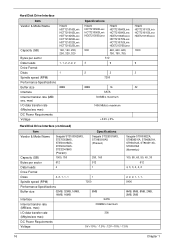
Hitachi HDT721010SLxxx HCT721010SLxxx HDE721010SLxxx 1000 6 3 32 Hard Disk Drive Interface (continued) Item Vendor & Model Name Capacity (GB) Bytes per sector Data heads Drive Format Disks Spindle speed (RPM) Performance Specifications Buffer size Interface... 2 2, 2, 2, 1, 1, 1, 5400 8MB, 8MB, 8MB, 2MB, 2MB, 2MB 5V +10% / -7.5% -.12V +10% / -7.5% 16 Chapter 1 Hard Disk Drive Interface Item Vendor & Model Name Capacity (GB) Bytes per sector Seagate ST31000528AS, ST3750528AS, ST3500418AS, ST3500410AS, ST3320418AS (Pharaoh) 1000, 750 512 Specifications Seagate ST3250318AS, ST3160318AS ...
Hitachi HDT721010SLxxx HCT721010SLxxx HDE721010SLxxx 1000 6 3 32 Hard Disk Drive Interface (continued) Item Vendor & Model Name Capacity (GB) Bytes per sector Data heads Drive Format Disks Spindle speed (RPM) Performance Specifications Buffer size Interface... 2 2, 2, 2, 1, 1, 1, 5400 8MB, 8MB, 8MB, 2MB, 2MB, 2MB 5V +10% / -7.5% -.12V +10% / -7.5% 16 Chapter 1 Hard Disk Drive Interface Item Vendor & Model Name Capacity (GB) Bytes per sector Seagate ST31000528AS, ST3750528AS, ST3500418AS, ST3500410AS, ST3320418AS (Pharaoh) 1000, 750 512 Specifications Seagate ST3250318AS, ST3160318AS ...

Service Guide
Page 27
Hard Disk Drive Interface (continued) Item Vendor & Model Name Capacity (GB) Bytes per sector Data heads Drive Format Disks Spindle speed (RPM) Performance Specifications Buffer size Interface Internal transfer rate (MB/ sec) I/O data transfer rate (Mbytes/sec max) DC Power Requirements Western ...
Hard Disk Drive Interface (continued) Item Vendor & Model Name Capacity (GB) Bytes per sector Data heads Drive Format Disks Spindle speed (RPM) Performance Specifications Buffer size Interface Internal transfer rate (MB/ sec) I/O data transfer rate (Mbytes/sec max) DC Power Requirements Western ...
Service Guide
Page 37
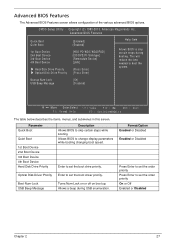
... a beep during booting. Advanced BIOS Features Quick Boot Quiet Boot 1st Boot Device 2nd Boot Device 3rd Boot Device 4th Boot Device Hard Disk Drive Priority Optical Disk Drive Priority [Enabled] [Enabled] [HDD PO-WDC WD20FAD] [CD/DVD:P1-Slimtype] [Removable Device] [LAN] [Press Enter] [Press Enter] ... steps during USB enumeration. Parameter Quick Boot Quiet Boot 1st Boot Device 2nd Boot Device 3rd Boot Device 4th Boot Device Hard Disk Drive Priority Description Allows BIOS to change display parameters while booting changing boot speed. Enter to set the boot...
... a beep during booting. Advanced BIOS Features Quick Boot Quiet Boot 1st Boot Device 2nd Boot Device 3rd Boot Device 4th Boot Device Hard Disk Drive Priority Optical Disk Drive Priority [Enabled] [Enabled] [HDD PO-WDC WD20FAD] [CD/DVD:P1-Slimtype] [Removable Device] [LAN] [Press Enter] [Press Enter] ... steps during USB enumeration. Parameter Quick Boot Quiet Boot 1st Boot Device 2nd Boot Device 3rd Boot Device 4th Boot Device Hard Disk Drive Priority Description Allows BIOS to change display parameters while booting changing boot speed. Enter to set the boot...
Service Guide
Page 47
... Menu. 4. Chapter 2 37 Advanced BIOS Features Quick Boot Quiet Boot 1st Boot Device 2nd Boot Device 3rd Boot Device 4th Boot Device Hard Disk Drive Priority Optical Disk Drive Priority [Enabled] [Enabled] [HDD PO-WDC WD20FAD] [CD/DVD:P1-Slimtype] [Removable Device] [LAN] [Press Enter] [Press Enter] Help Item Allows BIOS...
... Menu. 4. Chapter 2 37 Advanced BIOS Features Quick Boot Quiet Boot 1st Boot Device 2nd Boot Device 3rd Boot Device 4th Boot Device Hard Disk Drive Priority Optical Disk Drive Priority [Enabled] [Enabled] [HDD PO-WDC WD20FAD] [CD/DVD:P1-Slimtype] [Removable Device] [LAN] [Press Enter] [Press Enter] Help Item Allows BIOS...
Service Guide
Page 65
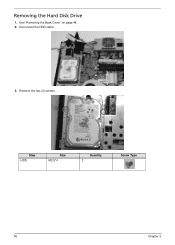
Removing the Hard Disk Drive 1. Step HDD Size M2.5*4 Quantity 2 Screw Type 55 Chapter 3 Disconnect the HDD cable. 3. Remove the two (2) screws. See "Removing the Back Cover" on page 48. 2.
Removing the Hard Disk Drive 1. Step HDD Size M2.5*4 Quantity 2 Screw Type 55 Chapter 3 Disconnect the HDD cable. 3. Remove the two (2) screws. See "Removing the Back Cover" on page 48. 2.
Service Guide
Page 177
... replace any FRU. 3. Follow these procedures to isolate the failing FRU (do the following devices: • Non-Acer devices • Printer, mouse, and other external devices • Hard disk drive • DIMM • CD-ROM/Diskette drive Module 4. Visually check for the system board in loop mode at a time until you find the failing...
... replace any FRU. 3. Follow these procedures to isolate the failing FRU (do the following devices: • Non-Acer devices • Printer, mouse, and other external devices • Hard disk drive • DIMM • CD-ROM/Diskette drive Module 4. Visually check for the system board in loop mode at a time until you find the failing...


