
Service Guide
Page 3
...change without the prior written permission of Acer Incorporated. All rights reserved. No part of this publication may be reproduced, transmitted, transcribed, stored in a retrieval system, or translated into any language or computer language, in this manual is sold or licensed "as is ...subject to the contents hereof and specifically disclaims any warranties of Acer Corporation. Disclaimer The information in any form or by Acer Incorporated. Intel is a registered trademark of merchantability or...
...change without the prior written permission of Acer Incorporated. All rights reserved. No part of this publication may be reproduced, transmitted, transcribed, stored in a retrieval system, or translated into any language or computer language, in this manual is sold or licensed "as is ...subject to the contents hereof and specifically disclaims any warranties of Acer Corporation. Disclaimer The information in any form or by Acer Incorporated. Intel is a registered trademark of merchantability or...
Service Guide
Page 4
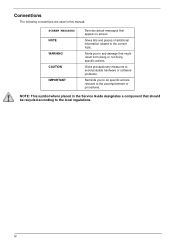
... in the Service Guide designates a component that should be recycled according to any damage that appear on screen. NOTE: This symbol where placed in this manual: SCREEN MESSAGES NOTE WARNING CAUTION IMPORTANT Denotes actual messages that might result from doing or not doing specific actions. Alerts you to do specific actions...
... in the Service Guide designates a component that should be recycled according to any damage that appear on screen. NOTE: This symbol where placed in this manual: SCREEN MESSAGES NOTE WARNING CAUTION IMPORTANT Denotes actual messages that might result from doing or not doing specific actions. Alerts you to do specific actions...
Service Guide
Page 47
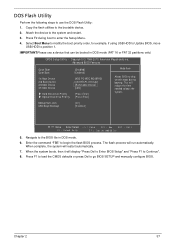
... or press Del to the bootable device. 2. When the system boots, then it will run automatically. Copy the flash utilities to go BIOS SETUP and manually configure BIOS. Press F2 during booting. Bootup Num-Lock USB Beep Message [On] [Disabled] :Move Enter:Select - / + / Va:lu e F 1 0 : vSea E S C : E x i t F 1 : G e n earl H e l p F 9 : O p t i m i zeedf aDu l t s 5. The flash...
... or press Del to the bootable device. 2. When the system boots, then it will run automatically. Copy the flash utilities to go BIOS SETUP and manually configure BIOS. Press F2 during booting. Bootup Num-Lock USB Beep Message [On] [Disabled] :Move Enter:Select - / + / Va:lu e F 1 0 : vSea E S C : E x i t F 1 : G e n earl H e l p F 9 : O p t i m i zeedf aDu l t s 5. The flash...

Service Guide
Page 48
... defaults or press Del to restart. 4. Once the flash process has finished, shutdown the system and press the power button to go BIOS SETUP and manually configure BIOS. 38 Chapter 2 Open the Start menu and type CMD to flash BIOS. When the system boots, then it will not function. 3. The process...
... defaults or press Del to restart. 4. Once the flash process has finished, shutdown the system and press the power button to go BIOS SETUP and manually configure BIOS. 38 Chapter 2 Open the Start menu and type CMD to flash BIOS. When the system boots, then it will not function. 3. The process...
Service Guide
Page 166
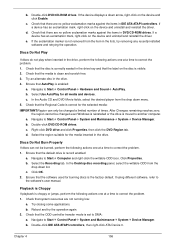
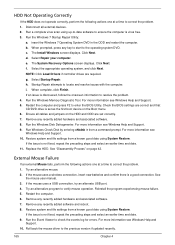
... not be changed even Windows is reinstalled or the drive is choppy or jumps, perform the following actions one at a time to the software's user manual. b. If using different software, refer to correct the problem. 1. Try closing some applications.
... not be changed even Windows is reinstalled or the drive is choppy or jumps, perform the following actions one at a time to the software's user manual. b. If using different software, refer to correct the problem. 1. Try closing some applications.
Service Guide
Page 173
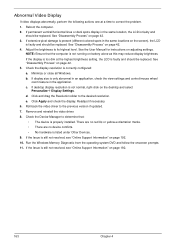
... not normal, right-click on page 42. 3. Check the display resolution is listed under Other Devices. 9. Remove and reinstall the video driver. 8. See the User Manual for instructions on adjusting settings. There are no red Xs or yellow exclamation marks. • There are no device conflicts. • No hardware is correctly...
... not normal, right-click on page 42. 3. Check the display resolution is listed under Other Devices. 9. Remove and reinstall the video driver. 8. See the User Manual for instructions on adjusting settings. There are no red Xs or yellow exclamation marks. • There are no device conflicts. • No hardware is correctly...
Service Guide
Page 175
... displays. f. Startup Repair attempts to check the events log for errors. Ensure all external devices. 2. If the issue is set correctly. 7. See the mouse user manual. 3. Remove any recently added hardware and associated software. 8. Restore system and file settings from a known good date using System Restore. b. Click Next. For more information...
... displays. f. Startup Repair attempts to check the events log for errors. Ensure all external devices. 2. If the issue is set correctly. 7. See the mouse user manual. 3. Remove any recently added hardware and associated software. 8. Restore system and file settings from a known good date using System Restore. b. Click Next. For more information...
Service Guide
Page 179
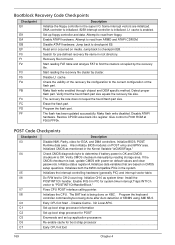
... file cluster by the recovery file. Detect proper flash part. Restore CPUID value back into register. Also initialize BIOS modules on KBC. Verify CMOS checksum manually by reading storage area. Do R/W test to F000 ROM at F000:FFF0h. Enable IRQ-0 in PIC for EGA, and DMA controllers. Initializes the CPU. The...
... file cluster by the recovery file. Detect proper flash part. Restore CPUID value back into register. Also initialize BIOS modules on KBC. Verify CMOS checksum manually by reading storage area. Do R/W test to F000 ROM at F000:FFF0h. Enable IRQ-0 in PIC for EGA, and DMA controllers. Initializes the CPU. The...
Service Guide
Page 182
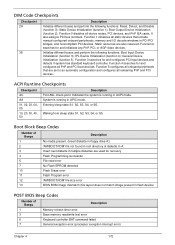
... present. (Insert diskette in floppy drive A:) 'AMIBOOT.ROM' file not found in APIC mode. IPL Device Initialization (function 4); Function 0 disables all onboard peripherals that include manual configured onboard peripherals, memory and I/O decode windows in A: Insert next diskette if multiple diskettes are used for and configures PCI input devices and detects if...
... present. (Insert diskette in floppy drive A:) 'AMIBOOT.ROM' file not found in APIC mode. IPL Device Initialization (function 4); Function 0 disables all onboard peripherals that include manual configured onboard peripherals, memory and I/O decode windows in A: Insert next diskette if multiple diskettes are used for and configures PCI input devices and detects if...
Service Guide
Page 202
...our technical material. Online Support Information Appendix C This section describes online technical support services available to help you repair your Acer Systems. If you are a distributor, dealer, ASP or TPM, please refer your technical queries to your technical queries. ... some information sources will require a user i.d. These can download information on Acer's International Traveler's Warranty (ITW) • Returned material authorization procedures • An overview of all models • User's manuals • Bios updates • Software utilities • Spare parts lists ...
...our technical material. Online Support Information Appendix C This section describes online technical support services available to help you repair your Acer Systems. If you are a distributor, dealer, ASP or TPM, please refer your technical queries to your technical queries. ... some information sources will require a user i.d. These can download information on Acer's International Traveler's Warranty (ITW) • Returned material authorization procedures • An overview of all models • User's manuals • Bios updates • Software utilities • Spare parts lists ...


