Quick Start Guide
Page 8
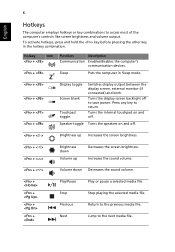
...Turns the internal touchpad on and off . Stop playing the selected media file. To activate hotkeys, press and hold the key before pressing the other key in Sleep mode. + + + + Display toggle Screen blank Touchpad toggle Switches display output between the display screen, ...and off . + < > Brightness up Decreases the screen brightness. Return to save power. English 6 Hotkeys The computer employs hotkeys or key combinations to access most of the computer's controls like screen brightness and volume output. Increases the sound volume. + < > Volume down ...
...Turns the internal touchpad on and off . Stop playing the selected media file. To activate hotkeys, press and hold the key before pressing the other key in Sleep mode. + + + + Display toggle Screen blank Touchpad toggle Switches display output between the display screen, ...and off . + < > Brightness up Decreases the screen brightness. Return to save power. English 6 Hotkeys The computer employs hotkeys or key combinations to access most of the computer's controls like screen brightness and volume output. Increases the sound volume. + < > Volume down ...
Quick Start Guide
Page 10
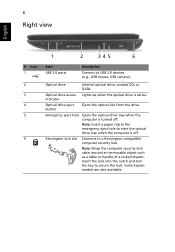
... Ejects the optical drive tray when the computer is active. Some keyless models are also available. Insert the lock into the notch and turn the key to eject the optical drive tray when the computer is off . Note: Insert a paper clip to the emergency eject hole to secure the lock. indicator...
... Ejects the optical drive tray when the computer is active. Some keyless models are also available. Insert the lock into the notch and turn the key to eject the optical drive tray when the computer is off . Note: Insert a paper clip to the emergency eject hole to secure the lock. indicator...

Service Guide
Page 7
...nVidia 7 Discrete (ATI 8 Your Acer Notebook tour 9 Top View 9 Rear view 10 Left View 11 Right View 12 Base view 13 Indicators 14 Touch Pad Basics 15 Using the Keyboard 16 Lock Keys and embedded numeric keypad 16 Windows Keys 17 Hot Keys 18 Hardware Specifications and Configurations 19 ...System Utilities 31 BIOS Setup Utility 31 Navigating the BIOS Utility 31 Aspire 5742/5742G/5742Z/5742ZG BIOS 32 Information 32 Main ...
...nVidia 7 Discrete (ATI 8 Your Acer Notebook tour 9 Top View 9 Rear view 10 Left View 11 Right View 12 Base view 13 Indicators 14 Touch Pad Basics 15 Using the Keyboard 16 Lock Keys and embedded numeric keypad 16 Windows Keys 17 Hot Keys 18 Hardware Specifications and Configurations 19 ...System Utilities 31 BIOS Setup Utility 31 Navigating the BIOS Utility 31 Aspire 5742/5742G/5742Z/5742ZG BIOS 32 Information 32 Main ...
Service Guide
Page 14
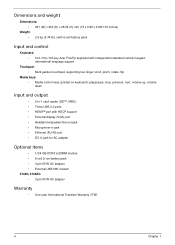
...) Weight: • 2.6 kg (5.74 lbs.) with 6-cell battery pack Input and control Keyboard: • 103-/104-/107-key Acer FineTip keyboard with independent standard numeric keypad, international language support Touchpad: • Multi-gesture touchpad, supporting two-finger scroll, pinch, rotate, flip Media... keys: • Media control keys (printed on keyboard): play/pause, stop, previous, next, volume up, volume down Input and output • 2-in-1...
...) Weight: • 2.6 kg (5.74 lbs.) with 6-cell battery pack Input and control Keyboard: • 103-/104-/107-key Acer FineTip keyboard with independent standard numeric keypad, international language support Touchpad: • Multi-gesture touchpad, supporting two-finger scroll, pinch, rotate, flip Media... keys: • Media control keys (printed on keyboard): play/pause, stop, previous, next, volume up, volume down Input and output • 2-in-1...
Service Guide
Page 15
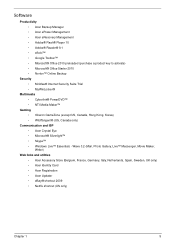
... • Acer Backup Manager • Acer ePower Management • Acer eRecovery Management • Adobe® Flash® Player 10 • Adobe® Reader® 9.1 • eSobi™ • Google Toolbar™ • Microsoft® Office 2010 preloaded (purchase a product key to activate)... • Oberon GameZone (except US, Canada, Hong Kong, Korea) • WildTangent® (US, Canada only) Communication and ISP • Acer Crystal Eye • Microsoft® Silverlight™ • Skype™ • Windows Live™ Essentials - Wave 3.2 (Mail, Photo Gallery...
... • Acer Backup Manager • Acer ePower Management • Acer eRecovery Management • Adobe® Flash® Player 10 • Adobe® Reader® 9.1 • eSobi™ • Google Toolbar™ • Microsoft® Office 2010 preloaded (purchase a product key to activate)... • Oberon GameZone (except US, Canada, Hong Kong, Korea) • WildTangent® (US, Canada only) Communication and ISP • Acer Crystal Eye • Microsoft® Silverlight™ • Skype™ • Windows Live™ Essentials - Wave 3.2 (Mail, Photo Gallery...

Service Guide
Page 22
... computer security lock cable around an immovable object such as a table or handle of a locked drawer. Insert the lock into the notch and turn the key to a Kensington-compatible computer security lock. Some keyless models are also available. 12 Chapter 1 Ejects the optical drive tray when the computer is off . Note...
... computer security lock cable around an immovable object such as a table or handle of a locked drawer. Insert the lock into the notch and turn the key to a Kensington-compatible computer security lock. Some keyless models are also available. 12 Chapter 1 Ejects the optical drive tray when the computer is off . Note...
Service Guide
Page 26
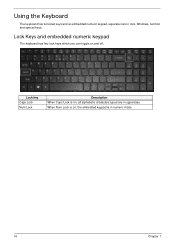
When Num Lock is on, the embedded keypad is on and off. Lock Keys and embedded numeric keypad The keyboard has two lock keys which you can toggle on , all alphabetic characters typed are in numeric mode. 16 Chapter 1 Using the Keyboard The keyboard has full-sized keys and an embedded numeric keypad, separate cursor, lock, Windows, function and special keys. Lock key Caps Lock Num Lock Description When Caps Lock is in uppercase.
When Num Lock is on, the embedded keypad is on and off. Lock Keys and embedded numeric keypad The keyboard has two lock keys which you can toggle on , all alphabetic characters typed are in numeric mode. 16 Chapter 1 Using the Keyboard The keyboard has full-sized keys and an embedded numeric keypad, separate cursor, lock, Windows, function and special keys. Lock key Caps Lock Num Lock Description When Caps Lock is in uppercase.
Service Guide
Page 27
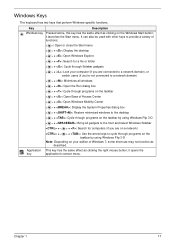
... < > + : Bring all gadgets to the front and select Windows Sidebar + < > + : Search for computers (if you are on a network) + < > + : Use the arrow keys to cycle through Sidebar gadgets < > + : Lock your edition of functions: < >: Open or close the Start menu < > + : Display the desktop < > + : Open Windows Explore <... the Windows Start button; It can also be used with other keys to provide a variety of Windows 7, some shortcuts may not function as clicking the right mouse button; Application This key has the same effect as described. it launches the Start menu....
... < > + : Bring all gadgets to the front and select Windows Sidebar + < > + : Search for computers (if you are on a network) + < > + : Use the arrow keys to cycle through Sidebar gadgets < > + : Lock your edition of functions: < >: Open or close the Start menu < > + : Display the desktop < > + : Open Windows Explore <... the Windows Start button; It can also be used with other keys to provide a variety of Windows 7, some shortcuts may not function as clicking the right mouse button; Application This key has the same effect as described. it launches the Start menu....

Service Guide
Page 28
...+ + + + Icon Function Communication Sleep Description Enables/disables the computer's communication devices. Next Jump to return. To activate hot keys, press and hold the key before pressing the other key in Sleep mode. Turns the display screen backlight off . Decreases the screen brightness. Decreases the sound volume. Puts the computer in... the hotkey combination. Turns the speakers on and off. Hot Keys The computer employs hotkeys or key combinations to the previous media file. Play or pause a selected media file. Return to access...
...+ + + + Icon Function Communication Sleep Description Enables/disables the computer's communication devices. Next Jump to return. To activate hot keys, press and hold the key before pressing the other key in Sleep mode. Turns the display screen backlight off . Decreases the screen brightness. Decreases the sound volume. Puts the computer in... the hotkey combination. Turns the speakers on and off. Hot Keys The computer employs hotkeys or key combinations to the previous media file. Play or pause a selected media file. Return to access...
Service Guide
Page 31
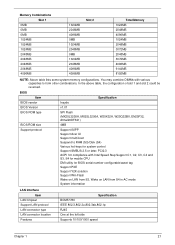
...utility for system control Support SMBUS 2.5 or later, PCI2.3 ACPI 3.0 compliance with various capacities to RAM (S3)/Disk (S4) Various hot-keys for BIOS serial number configurable/asset tag Support PXE Support Y2K solution Support Win Flash Wake on LAN from S3, Wake on LAN from ...BIOS ROM type BIOS ROM size Support protocol v1.01 SPI Flash (MX25L3205A, MX25L3206A, W25X32A, W25Q32BV, EN25F32, Atmel26DF321) 4MB Support ISIPP Support Acer UI Support multi-boot Suspend to form other combinations. Memory Combinations Slot 1 0MB 0MB 0MB 1024MB 1024MB 1024MB 2048MB 2048MB 2048MB 2048MB 4096MB ...
...utility for system control Support SMBUS 2.5 or later, PCI2.3 ACPI 3.0 compliance with various capacities to RAM (S3)/Disk (S4) Various hot-keys for BIOS serial number configurable/asset tag Support PXE Support Y2K solution Support Win Flash Wake on LAN from S3, Wake on LAN from ...BIOS ROM type BIOS ROM size Support protocol v1.01 SPI Flash (MX25L3205A, MX25L3206A, W25X32A, W25Q32BV, EN25F32, Atmel26DF321) 4MB Support ISIPP Support Acer UI Support multi-boot Suspend to form other combinations. Memory Combinations Slot 1 0MB 0MB 0MB 1024MB 1024MB 1024MB 2048MB 2048MB 2048MB 2048MB 4096MB ...
Service Guide
Page 32
... work simultaneously Features Specification AC7T-A10B 103-US/104-UK keys Yes Plug USB keyboard to the USB port directly: Yes • Phantom key auto detect • Overlay numeric keypad • Support independent pgdn/pgup/pgup/home/end keys • Support reverse T cursor keys • Factory configurable different languages by OEM customer Hard Disk...
... work simultaneously Features Specification AC7T-A10B 103-US/104-UK keys Yes Plug USB keyboard to the USB port directly: Yes • Phantom key auto detect • Overlay numeric keypad • Support independent pgdn/pgup/pgup/home/end keys • Support reverse T cursor keys • Factory configurable different languages by OEM customer Hard Disk...
Service Guide
Page 41
... utility. However, if you encounter configuration problems, you are shown on the bottom of F12 Boot Menu is subject to parameter values. Navigation keys for parameters are five menu options: Information, Main, Security, Boot, and Exit. Chapter 2 31 Please also refer to "disabled". The default...Input/ Output System). Follow these instructions: • To choose a menu, use the left and right arrow keys. • To choose an item, use the up and down arrow keys. • To change boot device without entering BIOS SETUP Utility. NOTE: You can change the value of ...
... utility. However, if you encounter configuration problems, you are shown on the bottom of F12 Boot Menu is subject to parameter values. Navigation keys for parameters are five menu options: Information, Main, Security, Boot, and Exit. Chapter 2 31 Please also refer to "disabled". The default...Input/ Output System). Follow these instructions: • To choose a menu, use the left and right arrow keys. • To choose an item, use the up and down arrow keys. • To change boot device without entering BIOS SETUP Utility. NOTE: You can change the value of ...
Service Guide
Page 45
...Follow these steps: 1. Type a password in the "Confirm New Password" field. Use the ↑ and ↓ keys to highlight the Set Supervisor Password parameter and press the Enter key. When you set the user or the supervisor password: 1. Retype the password in the "Enter New Password" field. ...Use the ↑ and ↓ keys to highlight the Set Supervisor Password parameter and press the Enter key. Press Enter. Removing a Password Follow these steps as you have changed the settings, press u to enable the...
...Follow these steps: 1. Type a password in the "Confirm New Password" field. Use the ↑ and ↓ keys to highlight the Set Supervisor Password parameter and press the Enter key. When you set the user or the supervisor password: 1. Retype the password in the "Enter New Password" field. ...Use the ↑ and ↓ keys to highlight the Set Supervisor Password parameter and press the Enter key. Press Enter. Removing a Password Follow these steps as you have changed the settings, press u to enable the...
Service Guide
Page 46
Use the ↑ and ↓ keys to "Set". 5. The Set Password box appears. Type a password in the Enter Current Password field and press Enter. 3. If desired, you are done, press F10 ... on boot parameter. 6. After setting the password, the computer sets the User Password parameter to highlight the Set Supervisor Password parameter and press the Enter key. Re-enter password. [Continue] 36 Chapter 2
Use the ↑ and ↓ keys to "Set". 5. The Set Password box appears. Type a password in the Enter Current Password field and press Enter. 3. If desired, you are done, press F10 ... on boot parameter. 6. After setting the password, the computer sets the User Password parameter to highlight the Set Supervisor Password parameter and press the Enter key. Re-enter password. [Continue] 36 Chapter 2
Service Guide
Page 52
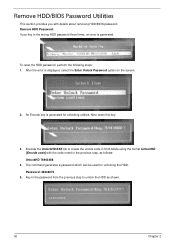
... Password Utilities This section provides you key in the wrong HDD password three times, an error is displayed, select the Enter Unlock Password option on the screen. 2. The command generates a password which can be used for unlocking utilities. Key in the previous step, as shown.... 42 Chapter 2 After the error is generated. An Encode key is generated for unlocking the HDD. Password: 46548274 5. Note down this key. 3. To reset the HDD password, perform the following steps...
... Password Utilities This section provides you key in the wrong HDD password three times, an error is displayed, select the Enter Unlock Password option on the screen. 2. The command generates a password which can be used for unlocking utilities. Key in the previous step, as shown.... 42 Chapter 2 After the error is generated. An Encode key is generated for unlocking the HDD. Password: 46548274 5. Note down this key. 3. To reset the HDD password, perform the following steps...
Service Guide
Page 178
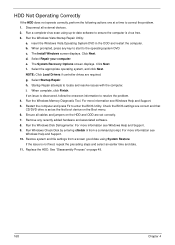
... Utility. Ensure all external devices. 2. For more information see Windows Help and Support. 10. If the issue is virus free. 3. Replace the HDD. Remove any key to start to resolve the problem. 4. If an issue is set as the first boot device on the HDD and ODD are required. Select the...
... Utility. Ensure all external devices. 2. For more information see Windows Help and Support. 10. If the issue is virus free. 3. Replace the HDD. Remove any key to start to resolve the problem. 4. If an issue is set as the first boot device on the HDD and ODD are required. Select the...
Service Guide
Page 205
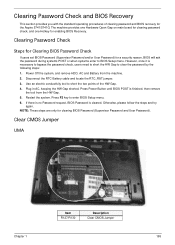
... Jumper UMA Item R127/R130 Description Clear CMOS Jumper Chapter 1 195 Disconnect the RTC Battery cable and locate the RTC_RST jumper. 3. Press F2 key to short the two points of clearing password and BIOS recovery for enabling BIOS Recovery. However, once it is cleared. Clearing Password Check and BIOS... procedures of the HW Gap. 4. The machine provides one Hardware Open Gap on main board for clearing password check, and one Hotkey for the Aspire 5741/5741G. Power Off the system, and remove HDD, AC and Battery from the HW Gap. 5. Use an electric conductivity tool to enter ...
... Jumper UMA Item R127/R130 Description Clear CMOS Jumper Chapter 1 195 Disconnect the RTC Battery cable and locate the RTC_RST jumper. 3. Press F2 key to short the two points of clearing password and BIOS recovery for enabling BIOS Recovery. However, once it is cleared. Clearing Password Check and BIOS... procedures of the HW Gap. 4. The machine provides one Hardware Open Gap on main board for clearing password check, and one Hotkey for the Aspire 5741/5741G. Power Off the system, and remove HDD, AC and Battery from the HW Gap. 5. Use an electric conductivity tool to enter ...
Service Guide
Page 207
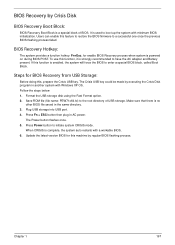
When CRISIS is used to enter a special BIOS block, called Boot Block. If this , prepare the Crisis USB key. Press Power button to a successful one once the previous BIOS flashing process failed. Press Fn + ESC button then plug in AC power. Steps for BIOS ... is enabled, the system will force the BIOS to boot up the system with minimum BIOS initialization. The Power button flashes once. 5. The Crisis USB key could be made by executing the Crisis Disk program in another system with a workable BIOS. 6. To use this machine by regular BIOS flashing process. Plug...
When CRISIS is used to enter a special BIOS block, called Boot Block. If this , prepare the Crisis USB key. Press Power button to a successful one once the previous BIOS flashing process failed. Press Fn + ESC button then plug in AC power. Steps for BIOS ... is enabled, the system will force the BIOS to boot up the system with minimum BIOS initialization. The Power button flashes once. 5. The Crisis USB key could be made by executing the Crisis Disk program in another system with a workable BIOS. 6. To use this machine by regular BIOS flashing process. Plug...


