
Service Guide
Page 49
... has auto-execution function. Fellow the steps below to finish BIOS Flash, you use the Flash. Prepare a bootable diskette. 2. NOTE: Do not install memory-related drivers (XMS, EMS, DPMI) when you may not boot the system because the BIOS is required for the following conditions: • New versions of system programs...
... has auto-execution function. Fellow the steps below to finish BIOS Flash, you use the Flash. Prepare a bootable diskette. 2. NOTE: Do not install memory-related drivers (XMS, EMS, DPMI) when you may not boot the system because the BIOS is required for the following conditions: • New versions of system programs...

Service Guide
Page 101
... the CPU from the socket. NOTE: Circuit boards >10 cm² have been highlighted with a yellow rectangle as shown. 3. Chapter 3 91 Using a flat-bladed screw driver, rotate the CPU locking screw 180° counter-clockwise as shown in the previous image. Place the CPU on page 89. 2. Please detach the Circuit...
... the CPU from the socket. NOTE: Circuit boards >10 cm² have been highlighted with a yellow rectangle as shown. 3. Chapter 3 91 Using a flat-bladed screw driver, rotate the CPU locking screw 180° counter-clockwise as shown in the previous image. Place the CPU on page 89. 2. Please detach the Circuit...

Service Guide
Page 136
2. Using a flat-bladed screw driver, rotate the CPU locking screw 180° clockwise to secure the CPU in place. 126 Chapter 3
2. Using a flat-bladed screw driver, rotate the CPU locking screw 180° clockwise to secure the CPU in place. 126 Chapter 3
Service Guide
Page 172
... loss, disconnect and reconnect the power and data cables between devices. Remove and reinstall the video driver. 8. If the Issue is still not resolved, see "Online Support Information" on page 279. Roll back the video driver to correct the problem. 1. If the computer is only abnormal in an application, check the view...
... loss, disconnect and reconnect the power and data cables between devices. Remove and reinstall the video driver. 8. If the Issue is still not resolved, see "Online Support Information" on page 279. Roll back the video driver to correct the problem. 1. If the computer is only abnormal in an application, check the view...

Service Guide
Page 175
...to configure the speakers. 8. Follow the onscreen prompts to start Speaker Setup. If the Issue is not muted. Roll back the audio driver to Start´ Control Panel´ Hardware and Sound´ Sound. Click the volume icon on the Playback tab and select Show ...the problem. 1. If the issue is listed under Other Devices. 3. Remove and recently installed hardware or software. 9. Remove and reinstall the audio driver. 5. Sound Problems If sound problems are set mid range: a. Click Mixer to 50. Ensure that other audio applications are experienced, perform the following...
...to configure the speakers. 8. Follow the onscreen prompts to start Speaker Setup. If the Issue is not muted. Roll back the audio driver to Start´ Control Panel´ Hardware and Sound´ Sound. Click the volume icon on the Playback tab and select Show ...the problem. 1. If the issue is listed under Other Devices. 3. Remove and recently installed hardware or software. 9. Remove and reinstall the audio driver. 5. Sound Problems If sound problems are set mid range: a. Click Mixer to 50. Ensure that other audio applications are experienced, perform the following...
Service Guide
Page 178
Run the Windows Vista Startup Repair Utility: a. The Install Windows screen displays. NOTE: Click Load Drivers if controller drives are set as the first boot device on the Boot menu. 6. Startup Repair attempts to enter the BIOS Utility. For more information ...
Run the Windows Vista Startup Repair Utility: a. The Install Windows screen displays. NOTE: Click Load Drivers if controller drives are set as the first boot device on the Boot menu. 6. Startup Repair attempts to enter the BIOS Utility. For more information ...
Service Guide
Page 180
... for burning discs is visible. 2. If a device has an exclamation mark, right-click on the device and uninstall and reinstall the driver. Try an alternate disc in the drive. b. Select the Recording tab. Ensure that the media is record enabled: a. Try closing some... software and retrying the operation. e. c. a. If a device has an exclamation mark, right-click on the device and uninstall and reinstall the driver. Click Properties. Check that the Regional Code is choppy or jumps, perform the following actions one at a time to correct the problem. 1....
... for burning discs is visible. 2. If a device has an exclamation mark, right-click on the device and uninstall and reinstall the driver. Try an alternate disc in the drive. b. Select the Recording tab. Ensure that the media is record enabled: a. Try closing some... software and retrying the operation. e. c. a. If a device has an exclamation mark, right-click on the device and uninstall and reinstall the driver. Click Properties. Check that the Regional Code is choppy or jumps, perform the following actions one at a time to correct the problem. 1....
Service Guide
Page 184
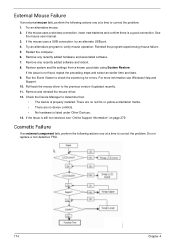
.... 7. Restore system and file settings from a known good date using System Restore. If the issue is a good connection. Roll back the mouse driver to verify mouse operation. If the Issue is still not resolved, see Windows Help and Support. 10. If the mouse uses a wireless connection, ... new batteries and confirm there is not fixed, repeat the preceding steps and select an earlier time and date. 9. Remove and reinstall the mouse driver. 12. Cosmetic Failure If an external component fails, perform the following actions one at a time to correct the problem. 1. Try an alternative ...
.... 7. Restore system and file settings from a known good date using System Restore. If the issue is a good connection. Roll back the mouse driver to verify mouse operation. If the Issue is still not resolved, see Windows Help and Support. 10. If the mouse uses a wireless connection, ... new batteries and confirm there is not fixed, repeat the preceding steps and select an earlier time and date. 9. Remove and reinstall the mouse driver. 12. Cosmetic Failure If an external component fails, perform the following actions one at a time to correct the problem. 1. Try an alternative ...

Service Guide
Page 189
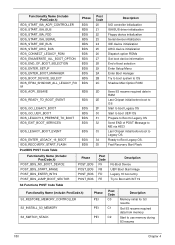
...1B BDS 1C BDS 1D BDS 1E BDS 1F Description MTC Initial CPU Middle Initialization Multi-processor MiddleInitialization SMBUS Driver Initialization 8259 Initialization RTC Initialization SATA Controller earlyInitialization Setup SMM Control service Setup Legacy Interrupt service Relocate SMM ... Video device initialization Error report device initialization USB host controller initialization USB BUS driver initialization USB device driver initialization Console device initial fail Display logo or system information IDE controller initialization SATA controller initialization Chapter 4...
...1B BDS 1C BDS 1D BDS 1E BDS 1F Description MTC Initial CPU Middle Initialization Multi-processor MiddleInitialization SMBUS Driver Initialization 8259 Initialization RTC Initialization SATA Controller earlyInitialization Setup SMM Control service Setup Legacy Interrupt service Relocate SMM ... Video device initialization Error report device initialization USB host controller initialization USB BUS driver initialization USB device driver initialization Console device initial fail Display logo or system information IDE controller initialization SATA controller initialization Chapter 4...
Service Guide
Page 190
... 23 24 25 26 27 28 29 2A 2B 2C 2D 2E 2F 30 31 32 33 34 35 Description SIO controller initialization ISA BUS driver initialization Floppy device initialization Serial device initialization IDE device initialization AHCI device initialization Dispatch option ROMs Get boot device information End of boot selection Enter...
... 23 24 25 26 27 28 29 2A 2B 2C 2D 2E 2F 30 31 32 33 34 35 Description SIO controller initialization ISA BUS driver initialization Floppy device initialization Serial device initialization IDE device initialization AHCI device initialization Dispatch option ROMs Get boot device information End of boot selection Enter...


