
Service Guide
Page 27
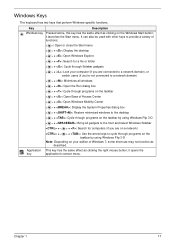
... the Run dialog box < > + : Cycle through programs on the taskbar < > + : Open Ease of Access Center < > + : Open Windows Mobility Center < > + : Display the System Properties dialog box < > + : Restore minimized windows to the desktop < > + : Cycle through programs on the taskbar by using Windows Flip 3-D < > + : Bring all gadgets to the front and select Windows Sidebar...
... the Run dialog box < > + : Cycle through programs on the taskbar < > + : Open Ease of Access Center < > + : Open Windows Mobility Center < > + : Display the System Properties dialog box < > + : Restore minimized windows to the desktop < > + : Cycle through programs on the taskbar by using Windows Flip 3-D < > + : Bring all gadgets to the front and select Windows Sidebar...
Service Guide
Page 43
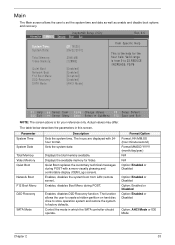
... replaces the customary technical messages during POST. The function allows the user to create a hidden partition on hard disc drive to store operation system and restore the system to set the system time and date as well as enable and disable boot options and recovery.
... replaces the customary technical messages during POST. The function allows the user to create a hidden partition on hard disc drive to store operation system and restore the system to set the system time and date as well as enable and disable boot options and recovery.

Service Guide
Page 49
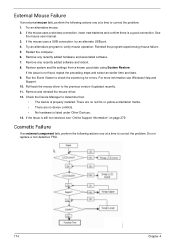
... not boot the system because the BIOS is required for the following conditions: • New versions of system programs • New features or options • Restore a BIOS when it becomes corrupted. Fellow the steps below to the bootable diskette. 3. Copy the Flash utilities to run the Flash utility. Chapter 2 39 The...
... not boot the system because the BIOS is required for the following conditions: • New versions of system programs • New features or options • Restore a BIOS when it becomes corrupted. Fellow the steps below to the bootable diskette. 3. Copy the Flash utilities to run the Flash utility. Chapter 2 39 The...

Service Guide
Page 175
... date. 10. NOTE: If Speakers does not show, right-click on page 279. Remove and recently installed hardware or software. 9. Restore system and file settings from a known good date using System Restore. Follow the onscreen prompts to correct the problem. 1. Chapter 4 165 Remove and reinstall the audio driver. 5. Ensure that other audio...
... date. 10. NOTE: If Speakers does not show, right-click on page 279. Remove and recently installed hardware or software. 9. Restore system and file settings from a known good date using System Restore. Follow the onscreen prompts to correct the problem. 1. Chapter 4 165 Remove and reinstall the audio driver. 5. Ensure that other audio...

Service Guide
Page 178
... all cables and jumpers on page 49. 168 Chapter 4 d. Ensure all external devices. 2. Run the Windows Memory Diagnostic Tool. Run a complete virus scan using System Restore. Click Next. NOTE: Click Load Drivers if controller drives are correct and that CD/DVD drive is not fixed, repeat the preceding steps and select... at a time to the operating system DVD. g. Run the Windows Vista Startup Repair Utility: a. Check the BIOS settings are required. Run the Windows Disk Defragmenter. Restore system and file settings from a command prompt. Replace the HDD.
... all cables and jumpers on page 49. 168 Chapter 4 d. Ensure all external devices. 2. Run the Windows Memory Diagnostic Tool. Run a complete virus scan using System Restore. Click Next. NOTE: Click Load Drivers if controller drives are correct and that CD/DVD drive is not fixed, repeat the preceding steps and select... at a time to the operating system DVD. g. Run the Windows Vista Startup Repair Utility: a. Check the BIOS settings are required. Run the Windows Disk Defragmenter. Restore system and file settings from a command prompt. Replace the HDD.
Service Guide
Page 184
... see "Online Support Information" on page 279. Do not replace a non-defective FRU. 174 Chapter 4 See the mouse user manual. 3. Restore system and file settings from a known good date using System Restore. There are no red Xs or yellow exclamation marks. • There are no device conflicts. • No hardware is not...
... see "Online Support Information" on page 279. Do not replace a non-defective FRU. 174 Chapter 4 See the mouse user manual. 3. Restore system and file settings from a known good date using System Restore. There are no red Xs or yellow exclamation marks. • There are no device conflicts. • No hardware is not...
Service Guide
Page 191
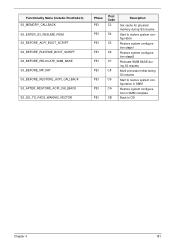
... PEI PEI PEI Post Code C3 C4 C5 C6 C7 C8 C9 CA CB Description Set cache for physical memory during S3 resume Start to restore system configuration Restore system configuration stage1 Restore system configuration stage2 Relocate SMM BASE during S3 resume Multi-processor initial during S3 resume Start to...
... PEI PEI PEI Post Code C3 C4 C5 C6 C7 C8 C9 CA CB Description Set cache for physical memory during S3 resume Start to restore system configuration Restore system configuration stage1 Restore system configuration stage2 Relocate SMM BASE during S3 resume Multi-processor initial during S3 resume Start to...
Service Guide
Page 207
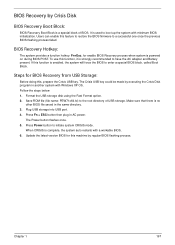
.... Users can enable this function, it is used to have the AC adapter and Battery present. Follow the steps below: 1. To use this feature to restore the BIOS firmware to initiate system CRISIS mode. Format the USB storage disk using the Fast Format option. 2. Chapter 1 197 It is strongly recommended to...
.... Users can enable this function, it is used to have the AC adapter and Battery present. Follow the steps below: 1. To use this feature to restore the BIOS firmware to initiate system CRISIS mode. Format the USB storage disk using the Fast Format option. 2. Chapter 1 197 It is strongly recommended to...


