
Service Guide
Page 7
... Features 1 System Block Diagram 6 UMA 6 Discrete (nVidia 7 Discrete (ATI 8 Your Acer Notebook tour 9 Top View 9 Rear view 10 Left View 11 Right View 12 Base...Aspire 5742/5742G/5742Z/5742ZG BIOS 32 Information 32 Main 33 Security 34 Boot 37 Exit 38 BIOS Flash Utilities 39 DOS Flash Utility 40 WinFlash Utility 41 Remove HDD/BIOS Password Utilities 42 Machine Disassembly and Replacement...53 Removing the Logic Lower Door 55 Removing the 3G Cover (Discrete Only 56 Removing the RTC Battery (UMA Only 57 Removing the DIMM Module 59 Removing the WLAN Module 60 Removing the HDD ...
... Features 1 System Block Diagram 6 UMA 6 Discrete (nVidia 7 Discrete (ATI 8 Your Acer Notebook tour 9 Top View 9 Rear view 10 Left View 11 Right View 12 Base...Aspire 5742/5742G/5742Z/5742ZG BIOS 32 Information 32 Main 33 Security 34 Boot 37 Exit 38 BIOS Flash Utilities 39 DOS Flash Utility 40 WinFlash Utility 41 Remove HDD/BIOS Password Utilities 42 Machine Disassembly and Replacement...53 Removing the Logic Lower Door 55 Removing the 3G Cover (Discrete Only 56 Removing the RTC Battery (UMA Only 57 Removing the DIMM Module 59 Removing the WLAN Module 60 Removing the HDD ...
Service Guide
Page 8
... Speaker Module 141 Replacing the Upper Cover 142 Replacing the RTC Battery (UMA Only 146 Replacing the HDD Module 147 Replacing the WLAN Module 149 Replacing the DIMM Modules 151 Replacing the 3G Cover (Discrete Only 152 Replacing the Lower Logic Door 153 Replacing the ODD Module 154 Replacing the Keyboard 156 Replacing the SD Dummy Card 157 Replacing the Battery 158 VIII
... Speaker Module 141 Replacing the Upper Cover 142 Replacing the RTC Battery (UMA Only 146 Replacing the HDD Module 147 Replacing the WLAN Module 149 Replacing the DIMM Modules 151 Replacing the 3G Cover (Discrete Only 152 Replacing the Lower Logic Door 153 Replacing the ODD Module 154 Replacing the Keyboard 156 Replacing the SD Dummy Card 157 Replacing the Battery 158 VIII
Service Guide
Page 155
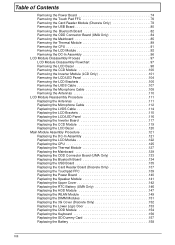
7. Screw Type Chapter 3 145 Turn the computer over. Replace the seven (7) screws securing the upper cover top the lower cover. Replace the ten (11) screws on the lower cover and four (4) screws on your model. Step Upper Cover (red callout) Size M2.5*8 Battery Bay (green callout) M2*3 Quantity 11 4 NOTE: The lower cover may vary depending on the battery bay. Step Upper Cover Size M2.5*5 Quantity 7 Screw Type 8.
7. Screw Type Chapter 3 145 Turn the computer over. Replace the seven (7) screws securing the upper cover top the lower cover. Replace the ten (11) screws on the lower cover and four (4) screws on your model. Step Upper Cover (red callout) Size M2.5*8 Battery Bay (green callout) M2*3 Quantity 11 4 NOTE: The lower cover may vary depending on the battery bay. Step Upper Cover Size M2.5*5 Quantity 7 Screw Type 8.

Service Guide
Page 156
Place the RTC battery into the mainboard connector. 146 Chapter 3 Replacing the RTC Battery (UMA Only) 1.
Place the RTC battery into the mainboard connector. 146 Chapter 3 Replacing the RTC Battery (UMA Only) 1.
Service Guide
Page 168
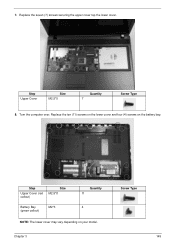
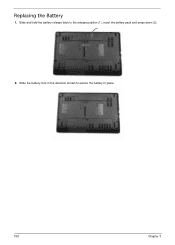
Slide the battery lock in the direction shown to the release position (1), insert the battery pack and press down (2). 1 2 2. Slide and hold the battery release latch to secure the battery in place. 158 Chapter 3 Replacing the Battery 1.
Slide the battery lock in the direction shown to the release position (1), insert the battery pack and press down (2). 1 2 2. Slide and hold the battery release latch to secure the battery in place. 158 Chapter 3 Replacing the Battery 1.
Service Guide
Page 171
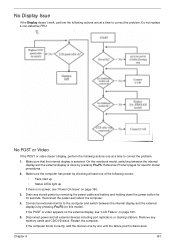
...+F5 (on page 163. 5. Disconnect power and all external devices including port replicators or docking stations. Reconnect the power and reboot the computer. 4. Do not replace a non-defective FRU: No POST or Video If the POST or video doesn't display, perform the following actions one of the following actions one until... model). Connect an external monitor to correct the problem. 1. Reference Product pages for 10 seconds. Remove any stored power by removing the power cable and battery and holding down the power button for specific model procedures. 2.
...+F5 (on page 163. 5. Disconnect power and all external devices including port replicators or docking stations. Reconnect the power and reboot the computer. 4. Do not replace a non-defective FRU: No POST or Video If the POST or video doesn't display, perform the following actions one of the following actions one until... model). Connect an external monitor to correct the problem. 1. Reference Product pages for 10 seconds. Remove any stored power by removing the power cable and battery and holding down the power button for specific model procedures. 2.
Service Guide
Page 172
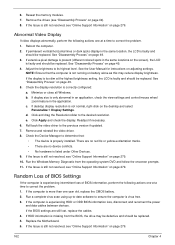
...Online Support Information" on the screen), the LCD is still not resolved, see "Online Support Information" on battery alone as this may be defective and should be replaced. Abnormal Video Display If video displays abnormally, perform the following actions one at the highest brightness setting, the...is virus free. 3. If the display is experiencing intermittent loss of BIOS information, perform the following actions one year old, replace the CMOS battery. 2. Remove and reinstall the video driver. 8. Run a complete virus scan using up-to-date software to the previous version if ...
...Online Support Information" on the screen), the LCD is still not resolved, see "Online Support Information" on battery alone as this may be defective and should be replaced. Abnormal Video Display If video displays abnormally, perform the following actions one at the highest brightness setting, the...is virus free. 3. If the display is experiencing intermittent loss of BIOS information, perform the following actions one year old, replace the CMOS battery. 2. Remove and reinstall the video driver. 8. Run a complete virus scan using up-to-date software to the previous version if ...
Service Guide
Page 184
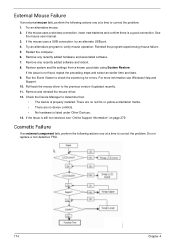
... events log for errors. If the Issue is not fixed, repeat the preceding steps and select an earlier time and date. 9. Do not replace a non-defective FRU. 174 Chapter 4 If the mouse uses a USB connection, try an alternate USB port. 4. If the issue is still...Reinstall the program experiencing mouse failure. 5. Remove any recently added hardware and associated software. 7. If the mouse uses a wireless connection, insert new batteries and confirm there is listed under Other Devices. 13. Try an alternative mouse. 2. Try an alternative program to determine that: • The device...
... events log for errors. If the Issue is not fixed, repeat the preceding steps and select an earlier time and date. 9. Do not replace a non-defective FRU. 174 Chapter 4 If the mouse uses a USB connection, try an alternate USB port. 4. If the issue is still...Reinstall the program experiencing mouse failure. 5. Remove any recently added hardware and associated software. 7. If the mouse uses a wireless connection, insert new batteries and confirm there is listed under Other Devices. 13. Try an alternative mouse. 2. Try an alternative program to determine that: • The device...
Service Guide
Page 186
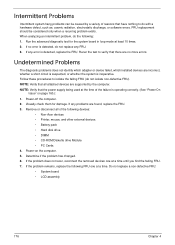
... the computer. When analyzing an intermittent problem, do not isolate non-defective FRU). NOTE: Verify that have nothing to do not replace any error is detected, do with a hardware defect, such as: cosmic radiation, electrostatic discharge, or software errors. Visually check them... is operating correctly. (See "Power On Issue" on the computer. 5. If the problem remains, replace the following devices: • Non-Acer devices • Printer, mouse, and other external devices • Battery pack • Hard disk drive • DIMM • CD-ROM/Diskette drive Module • PC...
... the computer. When analyzing an intermittent problem, do not isolate non-defective FRU). NOTE: Verify that have nothing to do not replace any error is detected, do with a hardware defect, such as: cosmic radiation, electrostatic discharge, or software errors. Visually check them... is operating correctly. (See "Power On Issue" on the computer. 5. If the problem remains, replace the following devices: • Non-Acer devices • Printer, mouse, and other external devices • Battery pack • Hard disk drive • DIMM • CD-ROM/Diskette drive Module • PC...


