

Service Guide
Page 49
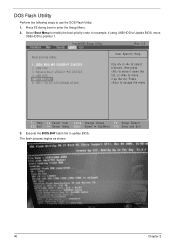
... the following conditions: • New versions of system programs • New features or options • Restore a BIOS when it becomes corrupted. Copy the Flash utilities to update the system BIOS Flash ROM. Chapter 2 39 Then boot the system from the bootable diskette. Prepare a bootable diskette. 2. If ..., you use the Flash utility. NOTE: Please use the AC adaptor power supply when you use the Flash. BIOS Flash Utilities The BIOS flash memory update is not completely loaded. The Flash utility has auto-execution function. NOTE: If you do not have a crisis recovery ...
... the following conditions: • New versions of system programs • New features or options • Restore a BIOS when it becomes corrupted. Copy the Flash utilities to update the system BIOS Flash ROM. Chapter 2 39 Then boot the system from the bootable diskette. Prepare a bootable diskette. 2. If ..., you use the Flash utility. NOTE: Please use the AC adaptor power supply when you use the Flash. BIOS Flash Utilities The BIOS flash memory update is not completely loaded. The Flash utility has auto-execution function. NOTE: If you do not have a crisis recovery ...
Service Guide
Page 50
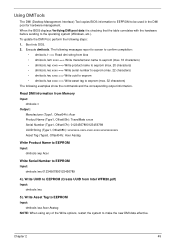
... : HL-DT-STDVDRAM GT32N Use < > or < > to select a device, then press to move it down the list, or to move USB HDD to Update BIOS, move it up the list. IDE0: WDC WD 3200BEVT-22A23TO 2. USB HDD : 5. Execute the BIOS.BAT batch file to enter the Setup Menu. 2. Press F2 during boot to...
... : HL-DT-STDVDRAM GT32N Use < > or < > to select a device, then press to move it down the list, or to move USB HDD to Update BIOS, move it up the list. IDE0: WDC WD 3200BEVT-22A23TO 2. USB HDD : 5. Execute the BIOS.BAT batch file to enter the Setup Menu. 2. Press F2 during boot to...

Service Guide
Page 51
Plug in the AC power to begin the update. Flash is not connected, the following steps to use the WinFlash Utility: 1. In flash BIOS, the message Please do not remove AC Power Source displays. A progress screen displays. 4. NOTE: If the AC power is complete when the message Flash programming complete displays. Double-click the WinFlash executable. 2. Click OK to continue. 5. WinFlash Utility Perform the following message displays. Chapter 2 41
Plug in the AC power to begin the update. Flash is not connected, the following steps to use the WinFlash Utility: 1. In flash BIOS, the message Please do not remove AC Power Source displays. A progress screen displays. 4. NOTE: If the AC power is complete when the message Flash programming complete displays. Double-click the WinFlash executable. 2. Click OK to continue. 5. WinFlash Utility Perform the following message displays. Chapter 2 41
Service Guide
Page 55
... uuid to eeprom • dmitools /wa xxxx ==> Write asset tag to eeprom (max. 32 characters) The following steps: 1. Chapter 2 45 To update the DMI Pool, perform the following examples show the commands and the corresponding output information. Execute dmitools. Write UUID to EEPROM (Create UUID from Memory... /wu 5). Write Asset Tag to EEPROM Input: dmitools /wa Acer Asstag NOTE: When using any of the Write options, restart the system to be used in the DMI pool for hardware management. When the BIOS displays Verifying DMI pool data it is checking that the table correlates...
... uuid to eeprom • dmitools /wa xxxx ==> Write asset tag to eeprom (max. 32 characters) The following steps: 1. Chapter 2 45 To update the DMI Pool, perform the following examples show the commands and the corresponding output information. Execute dmitools. Write UUID to EEPROM (Create UUID from Memory... /wu 5). Write Asset Tag to EEPROM Input: dmitools /wa Acer Asstag NOTE: When using any of the Write options, restart the system to be used in the DMI pool for hardware management. When the BIOS displays Verifying DMI pool data it is checking that the table correlates...
Service Guide
Page 172
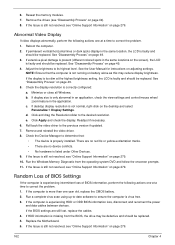
... the onscreen prompts. 11. Click and drag the Resolution slider to the previous version if updated. 7. Roll back the video driver to the desired resolution. Run the Windows Memory Diagnostic from the BIOS, the drive may reduce display brightness. Run a complete virus scan using up-to-date...faulty and should be replaced. See the User Manual for instructions on page 49. 3. Check the display resolution is experiencing HDD or ODD BIOS information loss, disconnect and reconnect the power and data cables between devices. If display size is not normal, right-click on page 49....
... the onscreen prompts. 11. Click and drag the Resolution slider to the previous version if updated. 7. Roll back the video driver to the desired resolution. Run the Windows Memory Diagnostic from the BIOS, the drive may reduce display brightness. Run a complete virus scan using up-to-date...faulty and should be replaced. See the User Manual for instructions on page 49. 3. Check the display resolution is experiencing HDD or ODD BIOS information loss, disconnect and reconnect the power and data cables between devices. If display size is not normal, right-click on page 49....
Service Guide
Page 207
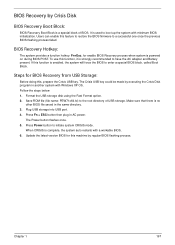
...Crisis USB key could be made by executing the Crisis Disk program in another system with a workable BIOS. 6. Press Power button to boot up the system with minimum BIOS initialization. When CRISIS is used to initiate system CRISIS mode. Format the USB storage disk using the ... system auto restarts with Windows XP OS. Steps for BIOS Recovery from USB Storage: Before doing this machine by Crisis Disk BIOS Recovery Boot Block: BIOS Recovery Boot Block is powered on during BIOS POST. Update the latest version BIOS for enable BIOS Recovery process when system is a special block of USB...
...Crisis USB key could be made by executing the Crisis Disk program in another system with a workable BIOS. 6. Press Power button to boot up the system with minimum BIOS initialization. When CRISIS is used to initiate system CRISIS mode. Format the USB storage disk using the ... system auto restarts with Windows XP OS. Steps for BIOS Recovery from USB Storage: Before doing this machine by Crisis Disk BIOS Recovery Boot Block: BIOS Recovery Boot Block is powered on during BIOS POST. Update the latest version BIOS for enable BIOS Recovery process when system is a special block of USB...
Service Guide
Page 289
... section describes online technical support services available to help you repair your Acer Systems. If you are a distributor, dealer, ASP or TPM, please refer your technical queries to your technical queries. We are : • Detailed information on all models • Bios updates • Software utilities • Spare parts lists • TABs (Technical Announcement...
... section describes online technical support services available to help you repair your Acer Systems. If you are a distributor, dealer, ASP or TPM, please refer your technical queries to your technical queries. We are : • Detailed information on all models • Bios updates • Software utilities • Spare parts lists • TABs (Technical Announcement...


