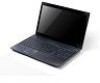

Service Guide
Page 4
Gives precautionary measures to avoid possible hardware or software problems. Reminds you to the current topic. NOTE: This symbol where placed in this manual: SCREEN MESSAGES NOTE WARNING CAUTION IMPORTANT Denotes actual messages that might ...
Gives precautionary measures to avoid possible hardware or software problems. Reminds you to the current topic. NOTE: This symbol where placed in this manual: SCREEN MESSAGES NOTE WARNING CAUTION IMPORTANT Denotes actual messages that might ...
Service Guide
Page 9
...1 card Function Test Failure 173 Thermal Unit Failure 173 External Mouse Failure 174 Cosmetic Failure 174 Other Failures 175 Intermittent Problems 176 Undetermined Problems 176 Post Codes 177 Jumper and Connector Locations 183 Top View 183 Bottom View 186 USB/B Board 189 Power Board ...FRU (Field Replaceable Unit) List 199 Aspire Exploded Diagrams 200 Main Assembly 200 Lower Cover 202 LCD Assembly 203 LED Assembly 204 Aspire FRU List 205 Screw List 229 Model Definition and Configuration 231 Aspire 5742/5742G 231 Aspire 5742Z/5742ZG 257 Test Compatible Components 273...
...1 card Function Test Failure 173 Thermal Unit Failure 173 External Mouse Failure 174 Cosmetic Failure 174 Other Failures 175 Intermittent Problems 176 Undetermined Problems 176 Post Codes 177 Jumper and Connector Locations 183 Top View 183 Bottom View 186 USB/B Board 189 Power Board ...FRU (Field Replaceable Unit) List 199 Aspire Exploded Diagrams 200 Main Assembly 200 Lower Cover 202 LCD Assembly 203 LED Assembly 204 Aspire FRU List 205 Screw List 229 Model Definition and Configuration 231 Aspire 5742/5742G 231 Aspire 5742Z/5742ZG 257 Test Compatible Components 273...
Service Guide
Page 41
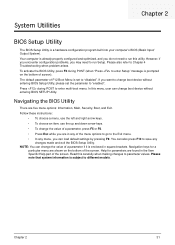
... Menu is set the parameter to the Exit menu. • In any changes made and exit the BIOS Setup Utility. However, if you encounter configuration problems, you can also press F10 to enter multi-boot menu. To activate the BIOS Utility, press F2 during POST to save any menu, you may... load default settings by pressing F9. NOTE: You can change the value of the screen. In this utility. Please also refer to Chapter 4 Troubleshooting when problem arises. System Utilities Chapter 2 BIOS Setup Utility The BIOS Setup Utility is enclosed in square brackets.
... Menu is set the parameter to the Exit menu. • In any changes made and exit the BIOS Setup Utility. However, if you encounter configuration problems, you can also press F10 to enter multi-boot menu. To activate the BIOS Utility, press F2 during POST to save any menu, you may... load default settings by pressing F9. NOTE: You can change the value of the screen. In this utility. Please also refer to Chapter 4 Troubleshooting when problem arises. System Utilities Chapter 2 BIOS Setup Utility The BIOS Setup Utility is enclosed in square brackets.
Service Guide
Page 169
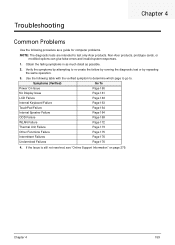
... 4 159 Troubleshooting Chapter 4 Common Problems Use the following table with the verified symptom to determine which page to go to test only Acer products. If the Issue is still not resolved, see "Online Support Information" on page 279. Non-Acer products, prototype cards, or modified options...175 Intermittent Failures Page 176 Undermined Failures Page 176 4. Obtain the failing symptoms in as much detail as a guide for computer problems. NOTE: The diagnostic tests are intended to . Verify the symptoms by attempting to re-create the failure by running the diagnostic...
... 4 159 Troubleshooting Chapter 4 Common Problems Use the following table with the verified symptom to determine which page to go to test only Acer products. If the Issue is still not resolved, see "Online Support Information" on page 279. Non-Acer products, prototype cards, or modified options...175 Intermittent Failures Page 176 Undermined Failures Page 176 4. Obtain the failing symptoms in as much detail as a guide for computer problems. NOTE: The diagnostic tests are intended to . Verify the symptoms by attempting to re-create the failure by running the diagnostic...
Service Guide
Page 170
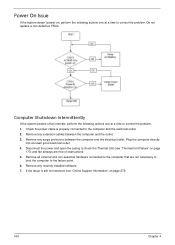
... the power cable is still not resolved, see "Thermal Unit Failure" on , perform the following actions one at a time to correct the problem. Disconnect the power and open the casing to check the Thermal Unit (see "Online Support Information" on page 279. 160 Chapter 4 Do not...a non-defective FRUs: Computer Shutsdown Intermittently If the system powers off at intervals, perform the following actions one at a time to correct the problem. 1. Plug the computer directly into a known good electrical outlet. 4. If the Issue is properly connected to the computer that are free of...
... the power cable is still not resolved, see "Thermal Unit Failure" on , perform the following actions one at a time to correct the problem. Disconnect the power and open the casing to check the Thermal Unit (see "Online Support Information" on page 279. 160 Chapter 4 Do not...a non-defective FRUs: Computer Shutsdown Intermittently If the system powers off at intervals, perform the following actions one at a time to correct the problem. 1. Plug the computer directly into a known good electrical outlet. 4. If the Issue is properly connected to the computer that are free of...
Service Guide
Page 171
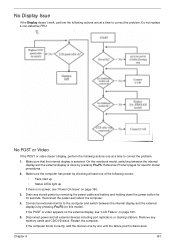
Reference Product pages for 10 seconds. Disconnect power and all external devices including port replicators or docking stations. Connect an external monitor to correct the problem. 1. Remove any stored power by one until the failure point is discovered. If the computer boots correctly, add the devices one by removing the power ... one at a time to the computer and switch between the internal display and the external display is done by checking at a time to correct the problem.
Reference Product pages for 10 seconds. Disconnect power and all external devices including port replicators or docking stations. Connect an external monitor to correct the problem. 1. Remove any stored power by one until the failure point is discovered. If the computer boots correctly, add the devices one by removing the power ... one at a time to the computer and switch between the internal display and the external display is done by checking at a time to correct the problem.
Service Guide
Page 172
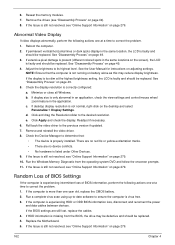
...Support Information" on page 49). 8. Abnormal Video Display If video displays abnormally, perform the following actions one at a time to correct the problem. 1. If the computer is correctly configured: a. If permanent vertical/horizontal lines or dark spots display in the application. See "Disassembly Process" ...battery. 2. Random Loss of BIOS Settings If the computer is virus free. 3. Click and drag the Resolution slider to correct the problem. 1. Run the Windows Memory Diagnostic from the BIOS, the drive may reduce display brightness. If the BIOS settings are no device ...
...Support Information" on page 49). 8. Abnormal Video Display If video displays abnormally, perform the following actions one at a time to correct the problem. 1. If the computer is correctly configured: a. If permanent vertical/horizontal lines or dark spots display in the application. See "Disassembly Process" ...battery. 2. Random Loss of BIOS Settings If the computer is virus free. 3. Click and drag the Resolution slider to correct the problem. 1. Run the Windows Memory Diagnostic from the BIOS, the drive may reduce display brightness. If the BIOS settings are no device ...
Service Guide
Page 173
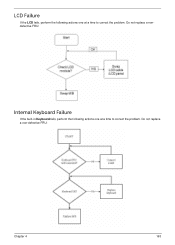
Do not replace a non-defective FRU: Chapter 4 163 Do not replace a nondefective FRU: Internal Keyboard Failure If the built-in Keyboard fails, perform the following actions one at a time to correct the problem. LCD Failure If the LCD fails, perform the following actions one at a time to correct the problem.
Do not replace a non-defective FRU: Chapter 4 163 Do not replace a nondefective FRU: Internal Keyboard Failure If the built-in Keyboard fails, perform the following actions one at a time to correct the problem. LCD Failure If the LCD fails, perform the following actions one at a time to correct the problem.

Service Guide
Page 174
Do not replace a non-defective FRU: Internal Speaker Failure If the internal Speakers fail, perform the following actions one at a time to correct the problem. Do not replace a non-defective FRU: 164 Chapter 4 Touch Pad Failure If the Touch Pad doesn't work, perform the following actions one at a time to correct the problem.
Do not replace a non-defective FRU: Internal Speaker Failure If the internal Speakers fail, perform the following actions one at a time to correct the problem. Do not replace a non-defective FRU: 164 Chapter 4 Touch Pad Failure If the Touch Pad doesn't work, perform the following actions one at a time to correct the problem.

Service Guide
Page 175
Check the Device Manager to determine that all volume controls are set to correct the problem. 1. Ensure that : • The device is properly installed. • There are no device conflicts. • No hardware is not muted. Select Speakers...system and file settings from a known good date using System Restore. Chapter 4 165 Navigate to the previous version, if updated recently. 4. Sound Problems If sound problems are set mid range: a. Ensure that the volume is listed under Other Devices. 3. Ensure that Speakers are no red Xs or yellow exclamation marks...
Check the Device Manager to determine that all volume controls are set to correct the problem. 1. Ensure that : • The device is properly installed. • There are no device conflicts. • No hardware is not muted. Select Speakers...system and file settings from a known good date using System Restore. Chapter 4 165 Navigate to the previous version, if updated recently. 4. Sound Problems If sound problems are set mid range: a. Ensure that the volume is listed under Other Devices. 3. Ensure that Speakers are no red Xs or yellow exclamation marks...
Service Guide
Page 176
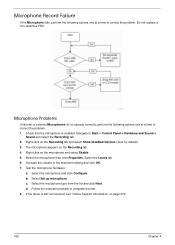
... internal or external Microphones do no operate correctly, perform the following actions one at a time to correct the problem. Select the microphone then click Properties. Increase the volume to correct the problem. 1. c. If the Issue is enabled. Right-click on page 279. 166 Chapter 4 Test the microphone hardware: a. Select the microphone and...
... internal or external Microphones do no operate correctly, perform the following actions one at a time to correct the problem. Select the microphone then click Properties. Increase the volume to correct the problem. 1. c. If the Issue is enabled. Right-click on page 279. 166 Chapter 4 Test the microphone hardware: a. Select the microphone and...

Service Guide
Page 177
Do not replace a non-defective FRU: Chapter 4 167 USB Failure (Right side) If the USB (right side) fails, perform the following actions one at a time to correct the problem.
Do not replace a non-defective FRU: Chapter 4 167 USB Failure (Right side) If the USB (right side) fails, perform the following actions one at a time to correct the problem.
Service Guide
Page 178
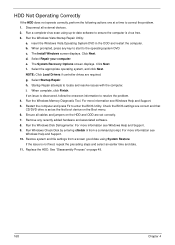
... attempts to enter the BIOS Utility. For more information see Windows Help and Support. 10. c. g. Remove any key to start to correct the problem. 1. d. e. Select the appropriate operating system, and click Next. For more information see Windows Help and Support. 5. Run the Windows Vista Startup...Repair your computer. Run Windows Check Disk by entering chkdsk /r from a known good date using up-to-date software to resolve the problem. 4. Disconnect all cables and jumpers on page 49. 168 Chapter 4 Restart the computer and press F2 to locate and resolve issues...
... attempts to enter the BIOS Utility. For more information see Windows Help and Support. 10. c. g. Remove any key to start to correct the problem. 1. d. e. Select the appropriate operating system, and click Next. For more information see Windows Help and Support. 5. Run the Windows Vista Startup...Repair your computer. Run Windows Check Disk by entering chkdsk /r from a known good date using up-to-date software to resolve the problem. 4. Disconnect all cables and jumpers on page 49. 168 Chapter 4 Restart the computer and press F2 to locate and resolve issues...
Service Guide
Page 179
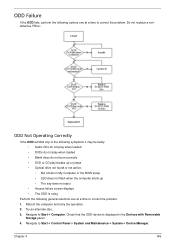
... and Maintenance´ System´ Device Manager. Check that the ODD device is noisy Perform the following general solutions one at a time to correct the problem. 1. Chapter 4 169 ODD Failure If the ODD fails, perform the following actions one at a time to correct the...
... and Maintenance´ System´ Device Manager. Check that the ODD device is noisy Perform the following general solutions one at a time to correct the problem. 1. Chapter 4 169 ODD Failure If the ODD fails, perform the following actions one at a time to correct the...
Service Guide
Page 180
...the writable ODD icon. Discs Do Not Burn Properly If discs can only be burned, perform the following actions one at a time to correct the problem. 1. Navigate to DMA: a. Click Properties. b. Select the Recording tab. In the Desktop disc recording panel, select the writable ODD from the ...item in DVD/CD-ROM drives. Ensure that the ODD controller transfer mode is moved to correct the problem. 1. Playback is Choppy If playback is enabled: a. Check that AutoPlay is choppy or jumps, perform the following actions one at a time ...
...the writable ODD icon. Discs Do Not Burn Properly If discs can only be burned, perform the following actions one at a time to correct the problem. 1. Navigate to DMA: a. Click Properties. b. Select the Recording tab. In the Desktop disc recording panel, select the writable ODD from the ...item in DVD/CD-ROM drives. Ensure that the ODD controller transfer mode is moved to correct the problem. 1. Playback is Choppy If playback is enabled: a. Check that AutoPlay is choppy or jumps, perform the following actions one at a time ...
Service Guide
Page 181
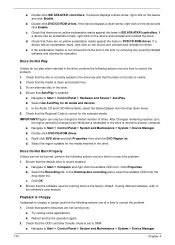
...ATA/ATAPI controllers, then right-click ATA Device 0. Reseat the drive ensuring and all cables are connected correctly. 5. e. Listen to correct the problem. 1. a. Check for the other discs. c. Repeat for bent or broken pins on the Information page. a. c. If the drive works with... if applicable. Drive Not Detected If Windows cannot detect the drive, perform the following actions one at a time to correct the problem. 1. See "Disassembly Process" on page 49. Replace the ODD. Check that the Enable DMA box is detected in "Hardware ...
...ATA/ATAPI controllers, then right-click ATA Device 0. Reseat the drive ensuring and all cables are connected correctly. 5. e. Listen to correct the problem. 1. a. Check for the other discs. c. Repeat for bent or broken pins on the Information page. a. c. If the drive works with... if applicable. Drive Not Detected If Windows cannot detect the drive, perform the following actions one at a time to correct the problem. 1. See "Disassembly Process" on page 49. Replace the ODD. Check that the Enable DMA box is detected in "Hardware ...

Service Guide
Page 182
Wireless Function Failure If the WLAN fails, perform the following actions one at a time to correct the problem. Do not replace a non-defective FRU: 172 Chapter 4 Do not replace a nondefective FRU: Bluetooth Function Test Failure If Bluetooth fails, perform the following actions one at a time to correct the problem.
Wireless Function Failure If the WLAN fails, perform the following actions one at a time to correct the problem. Do not replace a non-defective FRU: 172 Chapter 4 Do not replace a nondefective FRU: Bluetooth Function Test Failure If Bluetooth fails, perform the following actions one at a time to correct the problem.

Service Guide
Page 183
Do not replace a non-defective FRU: Thermal Unit Failure If the Thermal Unit fails, perform the following actions one at a time to correct the problem. Chapter 4 173 Do not replace a non-defective FRU. 2 in 1 card Function Test Failure If the 2 in 1 card fails, perform the following actions one at a time to correct the problem.
Do not replace a non-defective FRU: Thermal Unit Failure If the Thermal Unit fails, perform the following actions one at a time to correct the problem. Chapter 4 173 Do not replace a non-defective FRU. 2 in 1 card Function Test Failure If the 2 in 1 card fails, perform the following actions one at a time to correct the problem.
Service Guide
Page 184
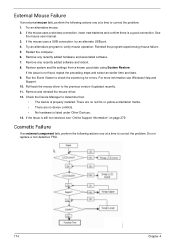
... the mouse user manual. 3. Try an alternative mouse. 2. Cosmetic Failure If an external component fails, perform the following actions one at a time to correct the problem. 1. Reinstall the program experiencing mouse failure. 5. Remove and reinstall the mouse driver. 12. Run the Event Viewer to correct the...
... the mouse user manual. 3. Try an alternative mouse. 2. Cosmetic Failure If an external component fails, perform the following actions one at a time to correct the problem. 1. Reinstall the program experiencing mouse failure. 5. Remove and reinstall the mouse driver. 12. Run the Event Viewer to correct the...

Service Guide
Page 185
Do not replace a non-defective FRU: 1. Chapter 4 175 Check Test Fixture is OK. 2. Swap M/B to correct the problem. Other Failures If the CRT Switch, Dock, LAN Port, external MIC or Speakers, PCI Express Card, 5-in-1 Card Reader or Volume Wheel fail, perform the following general steps to Try. Check Drive whether is ok. 3.
Do not replace a non-defective FRU: 1. Chapter 4 175 Check Test Fixture is OK. 2. Swap M/B to correct the problem. Other Failures If the CRT Switch, Dock, LAN Port, external MIC or Speakers, PCI Express Card, 5-in-1 Card Reader or Volume Wheel fail, perform the following general steps to Try. Check Drive whether is ok. 3.


