
English Manual
Page 3
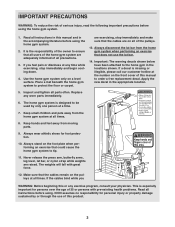
... of this or any exercise program, consult your physician. Never release the press arm, butterfly arms, leg lever, lat bar, or nylon strap while weights are adequately informed of the pulleys. 13. Inspect and tighten all times. Keep small children and pets away from the home gym system at the... designed to tip. 11. Apply the new decal in the locations shown. The home gym system is especially important for foot protection. 10. The weights will fall with pre-existing health problems. Read all precautions. 3. Use the home gym system only on the front cover of 35 or persons with...
... of this or any exercise program, consult your physician. Never release the press arm, butterfly arms, leg lever, lat bar, or nylon strap while weights are adequately informed of the pulleys. 13. Inspect and tighten all times. Keep small children and pets away from the home gym system at the... designed to tip. 11. Apply the new decal in the locations shown. The home gym system is especially important for foot protection. 10. The weights will fall with pre-existing health problems. Read all precautions. 3. Use the home gym system only on the front cover of 35 or persons with...
English Manual
Page 4
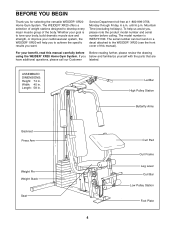
... and serial number before Before reading further, please review the drawing using the WEIDER¨ XR20 Home Gym System. Lat Bar High Pulley Station Butterfly Arms Backrest Press Arm Weight Pin Weight Stack Seat Curl Pad Curl Frame Leg Lever Curl Bar Low Pulley Station Foot...and familiarize yourself with the parts that are have additional questions, please call our Customer labeled. until 6 p.m. The WEIDER¨ XR20 offers a selection of weight stations designed to develop every major muscle group of this manual carefully before calling. Mountain Time (excluding holidays). To ...
... and serial number before Before reading further, please review the drawing using the WEIDER¨ XR20 Home Gym System. Lat Bar High Pulley Station Butterfly Arms Backrest Press Arm Weight Pin Weight Stack Seat Curl Pad Curl Frame Leg Lever Curl Bar Low Pulley Station Foot...and familiarize yourself with the parts that are have additional questions, please call our Customer labeled. until 6 p.m. The WEIDER¨ XR20 offers a selection of weight stations designed to develop every major muscle group of this manual carefully before calling. Mountain Time (excluding holidays). To ...
English Manual
Page 6
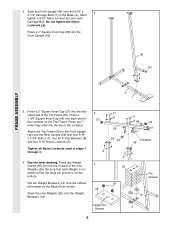
Do not tighten the Nylon Locknuts yet. ented so that each end of the crossbar on the Base (4) as shown. 25 Stack the nine Weights (25) onto the Weight Bumpers (19). 11 8 55 56 44 3 25 87 11 8 84 44 Crossbar 42 Pin Groove 19 Large Pin Groove 4 6 Press a 1Ó ...; Flat Washers (8), and four 5/16Ó Nylon Locknuts (3). Tighten all Nylon Locknuts used in the Base (4). Press two Weight 4 Inserts (87) into the top of the crossbar. Set two Weight Bumpers (19) onto the indicated bracket on the Top Frame. Press two 1Ó Inner Caps (84) into the Front ...
Do not tighten the Nylon Locknuts yet. ented so that each end of the crossbar on the Base (4) as shown. 25 Stack the nine Weights (25) onto the Weight Bumpers (19). 11 8 55 56 44 3 25 87 11 8 84 44 Crossbar 42 Pin Groove 19 Large Pin Groove 4 6 Press a 1Ó ...; Flat Washers (8), and four 5/16Ó Nylon Locknuts (3). Tighten all Nylon Locknuts used in the Base (4). Press two Weight 4 Inserts (87) into the top of the crossbar. Set two Weight Bumpers (19) onto the indicated bracket on the Top Frame. Press two 1Ó Inner Caps (84) into the Front ...
English Manual
Page 7
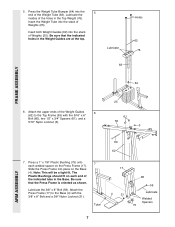
... Press Frame (17). Attach the upper ends of the indicated tube in the Base. Press a 1Ó x 7/8Ó Plastic Bushing (75) onto each end of the Weight Guides 6 (62) to the Base (4) with the 5/16Ó x 6Ó Bolt (60), two 1/2Ó x 3/4Ó Spacers (61), and a 5/16Ó Nylon Locknut (3). 25... 61 55 3 7. Slide the Press Frame into the 5 end of the holes in the Weight Guides are at the top. Be sure that the indicated holes in the Top Weight (76). Attach the Press Frame (17) to the Top Frame (55) with the 3/8Ó x 8Ó Bolt and...
... Press Frame (17). Attach the upper ends of the indicated tube in the Base. Press a 1Ó x 7/8Ó Plastic Bushing (75) onto each end of the Weight Guides 6 (62) to the Base (4) with the 5/16Ó x 6Ó Bolt (60), two 1/2Ó x 3/4Ó Spacers (61), and a 5/16Ó Nylon Locknut (3). 25... 61 55 3 7. Slide the Press Frame into the 5 end of the holes in the Weight Guides are at the top. Be sure that the indicated holes in the Top Weight (76). Attach the Press Frame (17) to the Top Frame (55) with the 3/8Ó x 8Ó Bolt and...

English Manual
Page 13
CABLE ASSEMBLY 26. Attach the end of the Long Cable (23) into the Weight Tube (63) and turn it clockwise two or three turns. Attach the Backrest (41) to the Front Upright (42) with a 1/4Ó Nylon Locknut (2) and a 1/4Ó ... the inset drawing. 57 27. Slide the 1/2Ó Flat Washer (82) onto the end of the Long Cable (23). Note: Lift the Top Weight (76) on the 27 weight stack in order to 26 the Long ÒUÓ-Bracket (57) with two 1/4Ó x 2 1/2Ó Screws (43) and 28 42 two 1/4Ó Flat...
CABLE ASSEMBLY 26. Attach the end of the Long Cable (23) into the Weight Tube (63) and turn it clockwise two or three turns. Attach the Backrest (41) to the Front Upright (42) with a 1/4Ó Nylon Locknut (2) and a 1/4Ó ... the inset drawing. 57 27. Slide the 1/2Ó Flat Washer (82) onto the end of the Long Cable (23). Note: Lift the Top Weight (76) on the 27 weight stack in order to 26 the Long ÒUÓ-Bracket (57) with two 1/4Ó x 2 1/2Ó Screws (43) and 28 42 two 1/4Ó Flat...

English Manual
Page 16
.... See TROUBLE-SHOOTING AND MAINTENANCE on page 17 of this manual. IMPORTANT: If the cables are not properly installed, they may be damaged when heavy weight is any slack in the cables, you will be sure that all parts have been properly tightened. Make sure that the cables move smoothly, find...
.... See TROUBLE-SHOOTING AND MAINTENANCE on page 17 of this manual. IMPORTANT: If the cables are not properly installed, they may be damaged when heavy weight is any slack in the cables, you will be sure that all parts have been properly tightened. Make sure that the cables move smoothly, find...
English Manual
Page 17
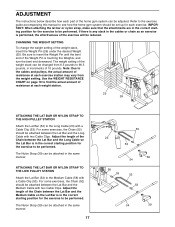
.... 25 26 ATTACHING THE LAT BAR OR NYLON STRAP TO THE HIGH PULLEY STATION Attach the Lat Bar (54) to be changed from the weight setting. Adjust the length of the Chain between the Lat Bar and the Medium Cable with a Cable Clip (53). If there is any slack in ..., make sure that the attachments are in the correct starting position for the exercise to the Long Cable (23) with two Cable Clips. The weight setting of the weight stack can be performed. The Nylon Strap (39) can be reduced. The Nylon Strap (39) can be adjusted. For some exercises, the Chain...
.... 25 26 ATTACHING THE LAT BAR OR NYLON STRAP TO THE HIGH PULLEY STATION Attach the Lat Bar (54) to be changed from the weight setting. Adjust the length of the Chain between the Lat Bar and the Medium Cable with a Cable Clip (53). If there is any slack in ..., make sure that the attachments are in the correct starting position for the exercise to the Long Cable (23) with two Cable Clips. The weight setting of the weight stack can be performed. The Nylon Strap (39) can be reduced. The Nylon Strap (39) can be adjusted. For some exercises, the Chain...
English Manual
Page 19
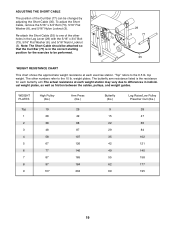
... Short Cable should be attached so that the Curl Bar (77) is the resistance for each butterfly arm.The actual resistance at each weight station may vary due to differences in the correct starting position for the exercise to be changed by adjusting the Short Cable (35). The...of the Curl Bar (77) can be performed. 29 3 77 73 8 35 WEIGHT RESISTANCE CHART This chart shows the approximate weight resistance at each exercise station. ÒTopÓ refers to the 6.5 lb. weight plates. top weight. WEIGHT PLATES High Pulley (lbs.) Arm Press (lbs.) Butterfly (lbs.) Leg Raise/Low ...
... Short Cable should be attached so that the Curl Bar (77) is the resistance for each butterfly arm.The actual resistance at each weight station may vary due to differences in the correct starting position for the exercise to be changed by adjusting the Short Cable (35). The...of the Curl Bar (77) can be performed. 29 3 77 73 8 35 WEIGHT RESISTANCE CHART This chart shows the approximate weight resistance at each exercise station. ÒTopÓ refers to the 6.5 lb. weight plates. top weight. WEIGHT PLATES High Pulley (lbs.) Arm Press (lbs.) Butterfly (lbs.) Leg Raise/Low ...
English Manual
Page 20
... the Long Cable, you use solvents. Re-attach the Pulley and Cable Trap. Be sure that the cables are not too tight, or the Top Weight (76) will be tightened. Next tighten the end of this you may need to the other hole in the Long ÒUÓ-Bracket 23 15... Long ÒUÓ-Bracket. Replace any worn parts immediately. Slack can stretch slightly when it is felt, 81 the cables should be lifted off the weight stack. To tighten the Long Cable, first loosen the 1/2Ó Plain Nut (81). Do not use the home gym system. Additional slack can be removed...
... the Long Cable, you use solvents. Re-attach the Pulley and Cable Trap. Be sure that the cables are not too tight, or the Top Weight (76) will be tightened. Next tighten the end of this you may need to the other hole in the Long ÒUÓ-Bracket 23 15... Long ÒUÓ-Bracket. Replace any worn parts immediately. Slack can stretch slightly when it is felt, 81 the cables should be lifted off the weight stack. To tighten the Long Cable, first loosen the 1/2Ó Plain Nut (81). Do not use the home gym system. Additional slack can be removed...

English Manual
Page 21
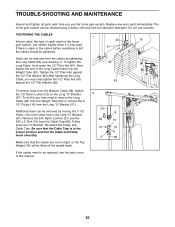
... touch or bind the cables. 2 1ÑHigh Pulley 7 3 5 4 Long Cable (23) TOP VIEW 6 5ÑLong ÒUÓ-Bracket Medium Cable (58) 2 Short Cable (35) 4 3 8ÑWeight Stack 1 1ÑLow Pulley 2 21 CABLE DIAGRAM The diagram below shows the proper routing of the cable traps.
... touch or bind the cables. 2 1ÑHigh Pulley 7 3 5 4 Long Cable (23) TOP VIEW 6 5ÑLong ÒUÓ-Bracket Medium Cable (58) 2 Short Cable (35) 4 3 8ÑWeight Stack 1 1ÑLow Pulley 2 21 CABLE DIAGRAM The diagram below shows the proper routing of the cable traps.
English Manual
Page 27
...Rear Upright Long ÒUÓ-Bracket Medium Cable 3/8Ó x 8Ó Bolt 5/16Ó x 6Ó Bolt 1/2Ó x 3/4Ó Spacer Weight Guide Weight Tube Weight Tube Bumper 1Ó Square Inner Cap Cable Trap 3/8Ó Nylon Jam Nut 5/16Ó x 5Ó Bolt 1Ó Retainer 1Ó Round ...Ó x 1 1/4Ó Carriage Bolt 5/16Ó x 3/4Ó Bolt 1 1/4Ó x 2 1/2Ó Plastic Bushing 1Ó x 7/8Ó Plastic Bushing Top Weight Curl Bar Curl Knob Curl Frame Curl Pad 1/2Ó Plain Nut 1/2Ó Flat Washer Button Screw 1Ó Inner Cap 5/16Ó Jam Nut 1/2Ó x 3/4Ó...
...Rear Upright Long ÒUÓ-Bracket Medium Cable 3/8Ó x 8Ó Bolt 5/16Ó x 6Ó Bolt 1/2Ó x 3/4Ó Spacer Weight Guide Weight Tube Weight Tube Bumper 1Ó Square Inner Cap Cable Trap 3/8Ó Nylon Jam Nut 5/16Ó x 5Ó Bolt 1Ó Retainer 1Ó Round ...Ó x 1 1/4Ó Carriage Bolt 5/16Ó x 3/4Ó Bolt 1 1/4Ó x 2 1/2Ó Plastic Bushing 1Ó x 7/8Ó Plastic Bushing Top Weight Curl Bar Curl Knob Curl Frame Curl Pad 1/2Ó Plain Nut 1/2Ó Flat Washer Button Screw 1Ó Inner Cap 5/16Ó Jam Nut 1/2Ó x 3/4Ó...


