Weider Cjxt 3 Support and Manuals
Get Help and Manuals for this Weider item

View All Support Options Below
Free Weider Cjxt 3 manuals!
Problems with Weider Cjxt 3?
Ask a Question
Free Weider Cjxt 3 manuals!
Problems with Weider Cjxt 3?
Ask a Question
Popular Weider Cjxt 3 Manual Pages
User Manual - Page 1
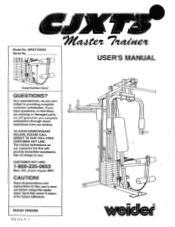
... and instructions in this user's manual before using this owner's manual for future reference.
If you have questions, or find there are missing or damaged parts, we are committed to you compete satisfaction through direct assistance from our factory. MST
CAUTION! guerarztcc you . CUSTOMER HOT LINE:
1-800-225-0653
Mon.-Fri., 6 a.m.-6 p.m. Save this equipment. Model...
User Manual - Page 2
... ASSEMBLY ADJUSTMENT TROUBLE-SHOOTING AND MAINTENANCE CABLE DIAGRAM ORDERING REPLACEMENT PARTS LIMITED WARRANTY
2 3 4 15 18 19 Back Cover Back Cover
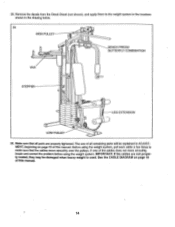
Note: A PART IDENTIFICATION CHART and a PARTS LIST/EXPLODED DRAWING are attached at iJai or nylon strap while weights are raised. Remove them .
12.
Inspect and tighten all parts each time you feel pain or dizziness at all instructions...
User Manual - Page 3
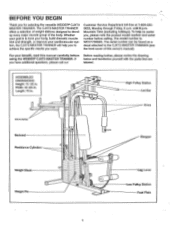
...this manual carefully before calling. ASSEMBLED DIMENSIONS: Height: 75 1/2 in .
Customer Service Department...model number and serial number before Before reading further, please review the drawing
using the WEIDER° CJXT3 MASTER TRAINER. To help you to achieve the specific results you have additional questions, please call our
labeled. If below and familiarize yourself with the parts...
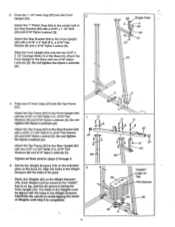
User Manual - Page 4
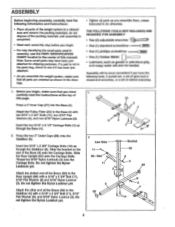
... beginning assembly, carefully read the instructions at the top of this manual. do otherwise. Before you have been preattached for shipping purposes. Attach the other end of the Brace (86) to see if it has been preattached.
• As you assemble the weight system, make sure that all parts are oriented as shown in the...
User Manual - Page 5
... in steps 2 through 4.
5. A
11
8
27 3
82
5
11
11
8 67
3 27
3
63
42
25
0
`Weider" Logo on the Weight Bumpers (19). Attach the Top Frame (67) to the center hole in the Weight Bumpers. CAUTION: Be ... 5/16" Nylon Locknuts (3). Press the 1 1/4" Inner Cap (57) into the Top Frame (67). Set the two Weight Bumpers (19) on the indicated plate on top, and the pin groove is on the...
User Manual - Page 6

...67). Insert the lower ends of the Weight Guides (72) (there are holes near the upper ends). Hold the axle between the two An-n Frame Bushings (68). Set the Arm Frame Bushings and the Arm Frame ...Weight Tube Endcap (79) into the ten Weights (25).
7. Attach the upper ends of Weight Guides have Holes
72
'Weider
Logo on the plate welded to the top of the Weight Tube (80). The Arm Frame must...
User Manual - Page 8
... a 5/16" Nylon Locknut (3). Do not thread the
Nylon Locknuts all the way onto the Bolts until
o
48
after assembly step 22 is completed.
0 A
(610
78
21
0
77
78
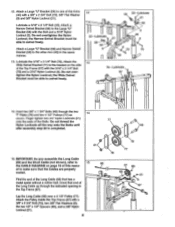
15. IMPORTANT: As you assemble the Long Cable
(66) and the Short Cable (not shown), refer to one of the Top Frame (67) with...
User Manual - Page 10
... with the 3/8" x 3 1/2" Bolt (16), a 3/8" Flat Washer (9), and a 3/8" Nylon Locknut (21).
Wrap the indicated end of this manual.
22
10423(
10
66
23 21 **-- 81 24
78
23
*2
I " Plates.
Slide the Weight Guide Bracket (81) onto the top of the Weight Tube (see the inset drawing). You may need to the indicated hole...
User Manual - Page 11
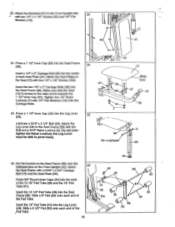
...). Attach the Seat Plates to the Seat Frame (36) with two 1/4" x 2 1/2" Screws (43) and 1/4" Flat
23
Washers (10).
- . . ......
3 10
41
24.
ci 10 '
e,.< %
36
25.
Set the bracket on the Seat Frame (36) onto the indicated pins on the Front Upright (42). Slide a 5 1/2" Pad (50) onto each end of the Pad...
User Manual - Page 14
... weight system. If one of this manual.
14 Remove the decals from the Decal Sheet (not shown), and apply them to make sure that all remaining parts will be damaged when heavy weight is used. Make sure that the cables move smoothly, locate and correct the problem before using the weight system, pull...
User Manual - Page 15
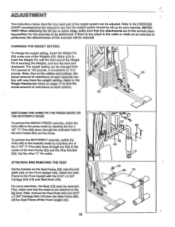
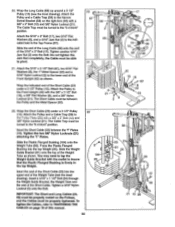
... from the Seat Frame (36). ADJUSTMENT
The instructions below describe how each exercise. ATTACHING AND REMOVING THE SEAT
Set the bracket on the Seat Frame (36) ... (25). Refer to the EXERCISE CHART accompanying this manual to see how the weight system should be reduced....the attachments are In the correct starting position for each part of resistance at each station.
26 om
2
SWITCHING...
User Manual - Page 18
...upper end of the Short Cable until there is felt, the cables should be replaced, see ORDERING
42
REPLACEMENT PARTS on the weight system, can stretch slightly when it .
15
Adjustment
Screw
... 5/16" Nylon Locknut (3) near the lower end of this
manual.
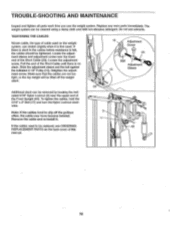
18 TROUBLE-SHOOTING AND MAINTENANCE
Inspect and tighten all parts each time you use solvents. The weight system can be cleaned...
User Manual - Page 20
... or repairs not provided by ICON at one of this manual). You may also have other rights which warranty claim is made must be received by an ICON authorized service center or for products used for which vary from the date of its authorized service centers with all freight and other warranty beyond that specifically set...
User Manual - Page 21
This chart is provided to see if it has been pre-assembled. important: Some parts may have been pre-assembled for shipping purposes; If you cannot find a part in the parts bags, check to help you identify the small parts used in assembly. REMOVE THIS PART IDENTIFICATION CHART FROM THE MANUAL!
User Manual - Page 27
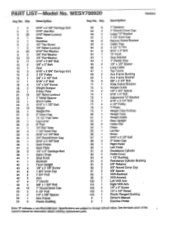
.... Specifications are subject to change without notice. Qty. WESY700920
R0495A
Key No. Description
Key No. See the back cover of the
owner's manual for information about ordering replacement parts. ... Bracket Weight Guide 1/2" x 3/4" Spacer 5/16° x 6" Bolt Adjustment "U" Bracket 5/16" x 3 1/4" Bolt 4 1/2" Pulley "I"-Plate Weight Tube Endcap Weight Tube Weight Guide Rear Upright...
Weider Cjxt 3 Reviews
We have not received any reviews for Weider yet.