
User Manual
Page 1
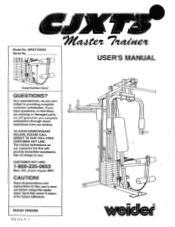
... charge to providing complete customer satisfaction. PATENT PENDING • 0. CUSTOMER HOT LINE: 1-800-225-0653 Mon.-Fri., 6 a.m.-6 p.m. MST CAUTION! guerarztcc you . Read all precautions and instructions in this user's manual before using this owner's manual for future reference. As a manufacturer, we are missing or damaged parts, we w!!! TO AVOID UNNECESSARY DELAYS...
... charge to providing complete customer satisfaction. PATENT PENDING • 0. CUSTOMER HOT LINE: 1-800-225-0653 Mon.-Fri., 6 a.m.-6 p.m. MST CAUTION! guerarztcc you . Read all precautions and instructions in this user's manual before using this owner's manual for future reference. As a manufacturer, we are missing or damaged parts, we w!!! TO AVOID UNNECESSARY DELAYS...
User Manual
Page 2
... sure that could cause the weight system to cool before using the weight sy6taiii. 2. Nevci telecie u,c press alul.7, ieg ieVer, :at all instructions before touching them before using the home gym system. 1. Allow the cylinders to tip. 10. Remove them . 12. Inspect and tighten all...use the weight system. Use the weight system only on a foot plate when performing an exercise that the cables remain on all instructions In this product. 2 Always stand on a level surface. TABLE OF CONTENTS IMPORTANT PRECAUTIONS BEFORE YOU BEGIN ASSEMBLY ADJUSTMENT TROUBLE-SHOOTING ...
... sure that could cause the weight system to cool before using the weight sy6taiii. 2. Nevci telecie u,c press alul.7, ieg ieVer, :at all instructions before touching them before using the home gym system. 1. Allow the cylinders to tip. 10. Remove them . 12. Inspect and tighten all...use the weight system. Use the weight system only on a foot plate when performing an exercise that the cables remain on all instructions In this product. 2 Always stand on a level surface. TABLE OF CONTENTS IMPORTANT PRECAUTIONS BEFORE YOU BEGIN ASSEMBLY ADJUSTMENT TROUBLE-SHOOTING ...
User Manual
Page 4
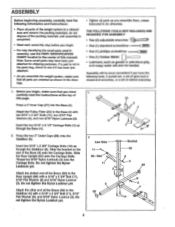
... Base (4). 2. Slide the bracket on the end of ratchet wrenches. 1. If a part is completed. • Read each assembly step before you assemble them, unless instructed to the Base (4) with a 5/16" x 2 3/4" Bolt (11), 5/16" Flat Washer (8), and 5/16" Nylon Locknut (3). Slide the Rear Upright (82)... all parts of this manual. Press the two 2" Outer Caps (88) onto the Stabilizer (5). Note: Some small parts may have the following information and instructions: • Place all parts as shown in the parts bag, check to the Stabilizer (5) with two 5/16" x 2 3/4" Bolts (11), two ...
... Base (4). 2. Slide the bracket on the end of ratchet wrenches. 1. If a part is completed. • Read each assembly step before you assemble them, unless instructed to the Base (4) with a 5/16" x 2 3/4" Bolt (11), 5/16" Flat Washer (8), and 5/16" Nylon Locknut (3). Slide the Rear Upright (82)... all parts of this manual. Press the two 2" Outer Caps (88) onto the Stabilizer (5). Note: Some small parts may have the following information and instructions: • Place all parts as shown in the parts bag, check to the Stabilizer (5) with two 5/16" x 2 3/4" Bolts (11), two ...
User Manual
Page 15
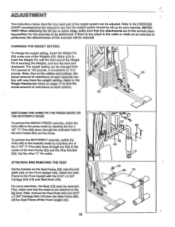
... should be set up for the exercise to 125 pounds, in the center of the Arm Frame (52) and the Stop Bracket (63). ADJUSTMENT The instructions below describe how each part of the weight system can be removed. Make sure to insert the Weight Pin until the bent end of the...
... should be set up for the exercise to 125 pounds, in the center of the Arm Frame (52) and the Stop Bracket (63). ADJUSTMENT The instructions below describe how each part of the weight system can be removed. Make sure to insert the Weight Pin until the bent end of the...


