
Weider 1120 Support Question
Weider 1120 Support Question
Find answers below for this question about Weider 1120.Need a Weider 1120 manual? We have 1 online manual for this item!
Question posted by plantguy on February 24th, 2018
How To Adjust The Weight Resistance
How do I vary the weight amounts for the various exercises?
Current Answers
Answer #1: Posted by wildloudchild on February 24th, 2018 10:52 AM
wildloudchild

Member since:
November 24th, 2017 Points: 16,160

Member since:
November 24th, 2017 Points: 16,160
Weight machines may seem complicated at first, but they are easy to use and help you to safely and quickly advance through a strength-training workout. The weight machines designed for home use - called multi-gyms - generally aren't as sophisticated as health-club machines, but in many cases, your muscles won't know the difference.
Using a typical weight machine involves two relatively simple acts: You adjust your seat and then you either push or pull a bar or a set of handles. These handles are connected to a cable, chain, or lever, which, in turn, is attached to a stack of rectangular weight plates. Each plate in the stack weighs between 5 and 20 pounds, depending on the make and model, and has a hole drilled in the center. If you want to lift 30 pounds, you stick a metal peg, called a pin, into the hole on the plate marked "30." When you pull the machine's handles, the cable picks up 30 pounds.
Answer #2: Posted by dixitsahil0 on February 25th, 2018 7:44 AM
dixitsahil0

Member since:
November 19th, 2017 Points: 8,640
Member since:
November 19th, 2017 Points: 8,640
Related Weider 1120 Manual Pages
English Manual - Page 1
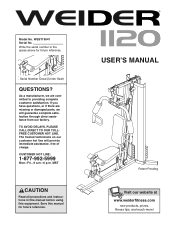
... line will guarantee complete satisfaction through direct assistance from our factory.
USER'S MANUAL
Patent Pending
Visit our website at www.weiderfitness.com
new products, prizes, fitness tips, and much more! If you have questions, or if there are committed to providing complete customer satisfaction. WESY19541 Serial No.
English Manual - Page 2
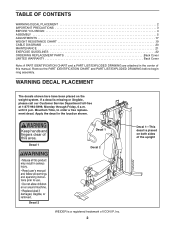
...2 Decal 1
Decal 1 Decal 2
Decal 1-This decal is placed on the weight system. Remove the PART IDENTIFICATION CHART and PART LIST/EXPLODED DRAWING before beginning assembly... 2 IMPORTANT PRECAUTIONS 3 BEFORE YOU BEGIN 4 ASSEMBLY 5 ADJUSTMENTS 17 WEIGHT RESISTANCE CHART 19 CABLE DIAGRAMS 20 MAINTENANCE 21 EXERCISE GUIDELINES 22 ORDERING REPLACEMENT PARTS Back Cover LIMITED WARRANTY Back ...
English Manual - Page 3
... setting.
4. Always stand on page 18).
3.
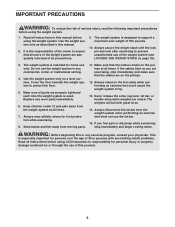
IMPORTANT PRECAUTIONS
WARNING: To reduce the risk of this product.
3 Always secure the weight stack with the lock pin and lock after exercising to support a maximum user weight of 35 or persons with great force.
14. Never release the arms, leg lever, lat bar, or handle strap...
English Manual - Page 4
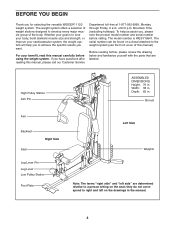
... the parts that are determined relative to a person sitting on a decal attached to the weight system (see the front cover of the body. High Pulley Station Arm Pin
ASSEMBLED DIMENSIONS:... your goal is WESY19541. The weight system offers a selection of weight stations designed to achieve the specific results you for selecting the versatile WEIDER® 1120 weight system.
To help you to ...
English Manual - Page 5
...adjustable wrenches • One standard screwdriver • One phillips screwdriver • One rubber mallet • One Allen Wrench (included)
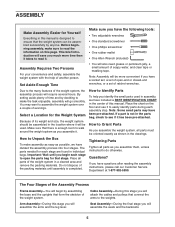
Assembly Requires Two Persons
For your convenience and safety, assemble the weight...task enjoyable, assembly will also need grease or petroleum jelly, a small amount of the weight system in a cleared area and remove the packing materials. How to read...
English Manual - Page 6
...
Bolts (71), two M10 Washers (57), and two M10
Nylon Locknuts (56). Frame Assembly
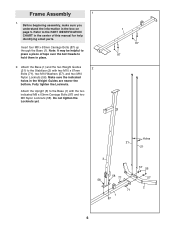
1
1. Attach the Base (1) and the two Weight Guides
2
(21) to the PART IDENTIFICATION CHART in the Weight Guides are nearer the
bottom. Do not tighten the Locknuts yet.
1 87
87
Holes 21
21
3
58 71 58
71 1 87...
English Manual - Page 7
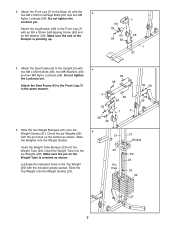
... tighten the Locknuts yet. Orient the six Weights (22)
with the pin holes on the Weight Tube is pointing up. Insert the Weight Tube into the Weight Tube (24). Do not tighten the
Locknut yet. Slide the two Weight Bumpers (27) onto the
5
Weight Guides (21).
Slide
the Weights onto the Weight Guides.
Make sure the pin on...
English Manual - Page 8
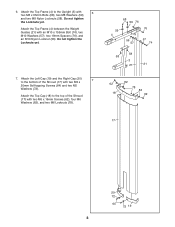
... x 65mm Bolts (68), two M8 Washers (59),
and two M8 Nylon Locknuts (58). Do not tighten
the Locknuts yet. Attach the Top Frame (4) between the Weight Guides (21) with two M6 x 16mm Screws (62), four M6 Washers (82), and two M6 Locknuts (78).
68 59 76
59 4
56 57
76
57...
English Manual - Page 14
... (24).
Tighten the M12 Nut (84) against the Large Washer (85).
55 84
85 24
14 Tighten the High Cable (55) into the Weight Tube (24) until all the way onto the High Cable (55).
Route the High Cable (55) over a 90mm Pulley
28
(48) and down through the ...
English Manual - Page 16
...that the holes on page 21.
16 Attach the Curl
Pad to the lower edge. Before using the weight system, pull each cable a few times to remove the slack by tightening the cables.
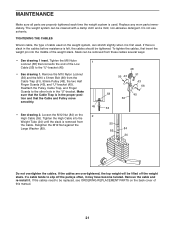
IMPORTANT: If... they may be explained in the cables, you will be damaged when heavy weight is any slack in ADJUSTMENTS, beginning on page 20 of the cables does not move smoothly around the pulleys. If...
English Manual - Page 17
... Lat Bar (35) to find the approximate amount of the Chain between the Lat Bar and the Cable with a damp cloth and a mild, non-abrasive detergent. Use the WEIGHT RESISTANCE CHART on page 22 for important information about how to adjust the weight system. Adjust the length of resistance at each exercise. Always engage the Lock Plate (not...
English Manual - Page 18
... (5) as shown. Insert the Curl Post (13) into the Front Leg (7) when performing an exercise that does not require the Curl Pad.
Store the Curl Pad away from the Front Leg (7). ...14), remove the 50mm Round Inner Cap (30) from the weight system. LOCKING THE WEIGHT STACK Lock the weight stack by inserting the Lock Pin (89) through a Weight Guide (21) and securing the Lock (88) onto the ...
English Manual - Page 19
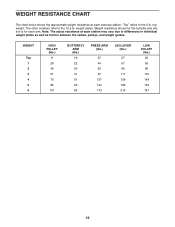
... for the butterfly arm station is for each station may vary due to differences in individual weight plates as well as friction between the cables, pulleys, and weight guides. top weight. Note: The actual resistance at each exercise station.
WEIGHT RESISTANCE CHART
The chart below shows the approximate weight resistance at each arm. The other numbers refer to the 6 lb...
English Manual - Page 20
...: 89 inches
3
6 6
4 3
Low Cable (53) Length: 128 inches
5
2 1
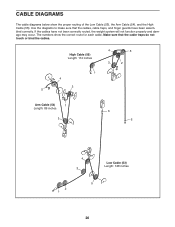
20
Make sure that the cables, cable traps, and finger guards have not been correctly routed, the weight system will not function properly and damage may occur. The numbers show the proper routing of the Low Cable (53), the Arm Cable (54), and...
English Manual - Page 21
... the other hole in the "U"-bracket. To tighten the cables, first insert the weight pin into the
Weight Tube (24) until the slack is slack in the proper position and that the Cable Trap is in the cables before resistance is used. Reattach the Pulley, Cable Trap, and Finger Guards to the "U"-bracket...
English Manual - Page 22
... 3 sets of 12 repetitions without pausing. Work your workouts, vary the exercises from both strength training and aerobic exercise for more oxygen to get a complete and well-balanced fitness program. Weight Loss To lose weight, use a low amount of resistance and increase the number of resistance.
WARMING UP
Begin each exercise, and moving only the appropriate parts of an effective...
English Manual - Page 23
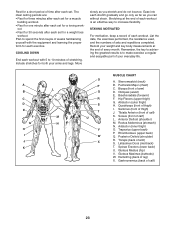
...) C. Quadriceps (front of sets and repetitions completed. Move
slowly as you stretch and do not bounce. List the date, the exercises performed, the resistance used, and the numbers of thigh) I J K
L
M N
O P Q R S T U
V W X
MUSCLE.... • Rest for one minute after each set . Include stretches for a weight loss
workout. Ease into each stretch gradually and go only as far as you ...
English Manual - Page 25

...Left Cap
20
1
Right Cap
21
2
Weight Guide
22
6
Weight
23
1
Weight Tube Cap
24
1
Weight Tube
25
1
Top Weight
26
1
Weight Pin
27
2
Weight Bumper
28
4
Small Foam Pad
29
1...
M8 x 63mm Carriage Bolt
88
1
Lock
89
1
Lock Pin
#
1
User's Manual
#
1
Exercise Guide
#
2
Grease Packet
#
1
Allen Wrench
Note: "#" indicates a non-illustrated part. WESY19541
R0904A
...
English Manual - Page 28
... to replacing or repairing, at 1-877-992-5999, Monday through one of merchantability or fitness for a period of ninety (90) days from the date of the product (WESY19541... until 6 p.m. The NAME of incidental or consequential damages.
or products used for which vary from defects in China © 2004 ICON IP, Inc. ORDERING REPLACEMENT PARTS
To order...® 1120 weight system)
3.
Similar Questions

My Xp800 Keep Saying Release Handles And Readjust Resistance As Desired,
my xp800 keep saying release handles and readjust resistance as desired. when no handles are being p...
my xp800 keep saying release handles and readjust resistance as desired. when no handles are being p...
(Posted by faithdefended 2 years ago)

Replacement Parts Foe Weider Xp 800
Hello, I'm looking for pulley brackets, # 10, two each for the weider xp 800 resistance exerciser. C...
Hello, I'm looking for pulley brackets, # 10, two each for the weider xp 800 resistance exerciser. C...
(Posted by foshizzell 7 years ago)
Weight Resistance
the motorized weight adjustment is not moving up or down
the motorized weight adjustment is not moving up or down
(Posted by ajuniorlover88 10 years ago)

Resistance Will Not Adjust
Following the instructioin in the manual and it will not adjust. It was trying to calibrate the last...
Following the instructioin in the manual and it will not adjust. It was trying to calibrate the last...
(Posted by rwcribbs76 10 years ago)

Need Help With My Weider Platinum Xp600 Weight Adjustment
On my Weider platinum xp600 the weight on the screen always sas 10 pounds and I can increase the wei...
On my Weider platinum xp600 the weight on the screen always sas 10 pounds and I can increase the wei...
(Posted by ashleyloveshorses 10 years ago)