

English Manual
Page 2
...Part List/Exploded Drawing before beginning assembly. Warning Decal Placement The decal shown below has been placed on the weight bench. WWAARRNNIINNGG •MMisusiesoutfhisspreoduocft this manual. Table of this product maayryesureltinsseurioltusin serious iinnjjuurryy.. •RReaeduasedr'sumsaneura'...center of Contents Warning Decal Placement 2 Important Precautions 3 Before You Begin 4 Part Identification Chart 5 Assembly 6 Adjusting the Weight Bench 10 Exercise Guidelines 13 Ordering Replacement Parts Back Cover Full 90 Day Warranty Back Cover Note: A Part List/Exploded...
...Part List/Exploded Drawing before beginning assembly. Warning Decal Placement The decal shown below has been placed on the weight bench. WWAARRNNIINNGG •MMisusiesoutfhisspreoduocft this manual. Table of this product maayryesureltinsseurioltusin serious iinnjjuurryy.. •RReaeduasedr'sumsaneura'...center of Contents Warning Decal Placement 2 Important Precautions 3 Before You Begin 4 Part Identification Chart 5 Assembly 6 Adjusting the Weight Bench 10 Exercise Guidelines 13 Ordering Replacement Parts Back Cover Full 90 Day Warranty Back Cover Note: A Part List/Exploded...

English Manual
Page 3
...is intended for protection. 5. Do not stand with your back to catch the barbell if you can safely return the barbell to see the weight rests while exercising so that all times. 7. Never tighten the M10 adjustment knob into the welded nut. Always fold the backrest out of ... parts each side. 11. Do not use . 14. Always wear athletic shoes for personal injury or property damage sustained by or through both weight rests at any time while exercising, stop immediately and begin cooling down. Always place 50 pounds on the seat when the backrest is especially important...
...is intended for protection. 5. Do not stand with your back to catch the barbell if you can safely return the barbell to see the weight rests while exercising so that all times. 7. Never tighten the M10 adjustment knob into the welded nut. Always fold the backrest out of ... parts each side. 11. Do not use . 14. Always wear athletic shoes for personal injury or property damage sustained by or through both weight rests at any time while exercising, stop immediately and begin cooling down. Always place 50 pounds on the seat when the backrest is especially important...

English Manual
Page 4
...dramatic muscle size and strength or improve your benefit, read this manual). Central Time (excluding holidays). To help you to the WEIDER® PRO 208 Weight Bench (see the front cover of the body. Before You Begin Thank you have additional questions, please call our toll-free ...you, please note the product model number and serial number before using the WEIDER® PRO 208 Weight Bench. Please use the drawing below to help you want. If you for selecting the versatile WEIDER® PRO 208 Weight Bench. The serial number can be found on a decal attached to achieve...
...dramatic muscle size and strength or improve your benefit, read this manual). Central Time (excluding holidays). To help you to the WEIDER® PRO 208 Weight Bench (see the front cover of the body. Before You Begin Thank you have additional questions, please call our toll-free ...you, please note the product model number and serial number before using the WEIDER® PRO 208 Weight Bench. Please use the drawing below to help you want. If you for selecting the versatile WEIDER® PRO 208 Weight Bench. The serial number can be found on a decal attached to achieve...

English Manual
Page 6
... help identifying the small parts, use the PART IDENTIFICATION CHART on the Front Leg (4) and attach it is important to make sure you assemble the weight bench, make sure all assembly steps may come pre-assembled from the factory. 2. Assembly will go smoothly. • Assembly requires two people. • Place all...
... help identifying the small parts, use the PART IDENTIFICATION CHART on the Front Leg (4) and attach it is important to make sure you assemble the weight bench, make sure all assembly steps may come pre-assembled from the factory. 2. Assembly will go smoothly. • Assembly requires two people. • Place all...

English Manual
Page 7
...sure the Adjustment Tube (12) is oriented as shown and that the pins on the Bench Frame (5) onto the Carriage Bolts. 3. Insert the other Weight Rest into the welded nut. Tighten an M8 Nylon Locknut (40) onto each Carriage Bolt. Insert an M8 x 55mm Carriage Bolt (47) through ...the Upright and the Weight Rest. Insert two M8 x 60mm Bolts (48) through the mounting bracket (B) on the Uprights (8, 9). Do not tighten the Nylon Locknuts yet. Press a ...
...sure the Adjustment Tube (12) is oriented as shown and that the pins on the Bench Frame (5) onto the Carriage Bolts. 3. Insert the other Weight Rest into the welded nut. Tighten an M8 Nylon Locknut (40) onto each Carriage Bolt. Insert an M8 x 55mm Carriage Bolt (47) through ...the Upright and the Weight Rest. Insert two M8 x 60mm Bolts (48) through the mounting bracket (B) on the Uprights (8, 9). Do not tighten the Nylon Locknuts yet. Press a ...

English Manual
Page 9
... 13. Press six 3/4" Round Inner Caps (31) into each of the holes in the Bench Frame (5). 15 Make sure the narrow end of the 11 weight tube (E) on the Front Leg (4). The Leg Lever Lock must be easy to the Left Seat Bracket (1) and 10 the Right Seat Bracket (19) with...
... 13. Press six 3/4" Round Inner Caps (31) into each of the holes in the Bench Frame (5). 15 Make sure the narrow end of the 11 weight tube (E) on the Front Leg (4). The Leg Lever Lock must be easy to the Left Seat Bracket (1) and 10 the Right Seat Bracket (19) with...

English Manual
Page 10
... mild, non-abrasive detergent. Also, refer to the accompanying exercise poster to see the correct form for important information on top of the Weight Rests (11), first remove your exercise program. Replace any worn parts immediately. The M10 adjustment knob must be inserted through both the Upright ...the Curl Pad (24) to get the most benefit from your Barbell (not shown) from one Upright (8 or 9). The use the weight bench. The weight bench can be explained in the same manner. Never tighten the M10 adjustment knob into an upright and then set both the upright and...
... mild, non-abrasive detergent. Also, refer to the accompanying exercise poster to see the correct form for important information on top of the Weight Rests (11), first remove your exercise program. Replace any worn parts immediately. The M10 adjustment knob must be inserted through both the Upright ...the Curl Pad (24) to get the most benefit from your Barbell (not shown) from one Upright (8 or 9). The use the weight bench. The weight bench can be explained in the same manner. Never tighten the M10 adjustment knob into an upright and then set both the upright and...

English Manual
Page 11
... 23 WARNING: Always fold the backrest out of the Foam Pads (18). ADJUSTING THE LEG SUPPORT PADS The Long Pad Tube (16) with your particular weight bench. 11 11 11 25 12 F 4 16 18 Note: The bracket (F) on your back to one of the way when performing squat exercises. ..., you finish the exercise. WARNING: Do not stand with Foam Pads (18) is folded. Remove the Adjustment Tube (12). Move the Weight Rests (11) to the weight bench when performing squat exercises. Pull the Pad Tube (16) with the remaining Foam Pad out of the way when performing squat exercises.
... 23 WARNING: Always fold the backrest out of the Foam Pads (18). ADJUSTING THE LEG SUPPORT PADS The Long Pad Tube (16) with your particular weight bench. 11 11 11 25 12 F 4 16 18 Note: The bracket (F) on your back to one of the way when performing squat exercises. ..., you finish the exercise. WARNING: Do not stand with Foam Pads (18) is folded. Remove the Adjustment Tube (12). Move the Weight Rests (11) to the weight bench when performing squat exercises. Pull the Pad Tube (16) with the remaining Foam Pad out of the way when performing squat exercises.

English Manual
Page 12
Insert the Curl Post (10) into the top of weight (not included) onto the Weight Tube (E). 22 1 15 19 3 WARNING: Do not place more than 130 pounds on the...When the Curl Post (10) is not in use, store it away from the weight bench so that you fully tighten the Adjustment Knob (26). ATTACHING WEIGHTS TO THE LEG LEVER To use , insert the Front Leg Endcap (27) halfway into... 17 10 26 27 4 ATTACHING THE CURL POST For some exercises, the Curl Post (10) must be attached to the weight bench. Lift up the wide end of the Seat and insert the Seat Pin (15) through the holes in the Seat ...
Insert the Curl Post (10) into the top of weight (not included) onto the Weight Tube (E). 22 1 15 19 3 WARNING: Do not place more than 130 pounds on the...When the Curl Post (10) is not in use, store it away from the weight bench so that you fully tighten the Adjustment Knob (26). ATTACHING WEIGHTS TO THE LEG LEVER To use , insert the Front Leg Endcap (27) halfway into... 17 10 26 27 4 ATTACHING THE CURL POST For some exercises, the Curl Post (10) must be attached to the weight bench. Lift up the wide end of the Seat and insert the Seat Pin (15) through the holes in the Seat ...

English Manual
Page 13
... of stretching and light exercise to three different positions: a level position, a decline position and an incline position. Weight Loss To lose weight, use a low amount of weight and increase the number of your exercise program. It is one complete cycle of adjustment brackets (C) in each workout ...user. When moving the Adjustment Tube (12), always make sure the pins on Tuesday and Thursday. • Rest from both weight training and aerobic exercise for more strenuous exercise by increasing circulation, raising your body temperature and delivering more sets rather than by ...
... of stretching and light exercise to three different positions: a level position, a decline position and an incline position. Weight Loss To lose weight, use a low amount of weight and increase the number of your exercise program. It is one complete cycle of adjustment brackets (C) in each workout ...user. When moving the Adjustment Tube (12), always make sure the pins on Tuesday and Thursday. • Rest from both weight training and aerobic exercise for more strenuous exercise by increasing circulation, raising your body temperature and delivering more sets rather than by ...

English Manual
Page 14
... to your arms and legs. Exhale during the return stroke. Exercising in each set for a weight loss workout Plan to 10 minutes of rest. Never hold your weight and key body measurements at the end of each exercise is very effective for each repetition and ...part of every month. Record your breath! Hip Flexors (upper thigh) C G. Spinae Erectors (lower back) K T. List the date, the exercises performed, the weight plus the numbers of arm) J R. Triceps (back of sets and repetitions completed. most. Latissimus Dorsi (mid back) S. Stretching at the end of your ...
... to your arms and legs. Exhale during the return stroke. Exercising in each set for a weight loss workout Plan to 10 minutes of rest. Never hold your weight and key body measurements at the end of each exercise is very effective for each repetition and ...part of every month. Record your breath! Hip Flexors (upper thigh) C G. Spinae Erectors (lower back) K T. List the date, the exercises performed, the weight plus the numbers of arm) J R. Triceps (back of sets and repetitions completed. most. Latissimus Dorsi (mid back) S. Stretching at the end of your ...
English Manual
Page 15
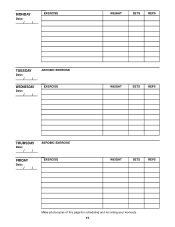
MONDAY Date: / / EXERCISE WEIGHT SETS REPS TUESDAY Date: / / WEDNESDAY Date: / / AEROBIC EXERCISE EXERCISE WEIGHT SETS REPS THURSDAY Date: / / FRIDAY Date: / / AEROBIC EXERCISE EXERCISE WEIGHT SETS REPS Make photocopies of this page for scheduling and recording your workouts. 15
MONDAY Date: / / EXERCISE WEIGHT SETS REPS TUESDAY Date: / / WEDNESDAY Date: / / AEROBIC EXERCISE EXERCISE WEIGHT SETS REPS THURSDAY Date: / / FRIDAY Date: / / AEROBIC EXERCISE EXERCISE WEIGHT SETS REPS Make photocopies of this page for scheduling and recording your workouts. 15

English Manual
Page 16
... 1 24 1 25 2 26 1 Description Seat Bracket A Leg Lever Lock Leg Lever Front Leg Bench Frame Left Base Right Base Left Upright Right Upright Curl Post Weight Rest Adjustment Tube Backrest Tube A Backrest Tube B Seat Pin Long Pad Tube Short Pad Tube Foam Pad Seat Bracket B Plastic Washers M8 Washer Seat Backrest...
... 1 24 1 25 2 26 1 Description Seat Bracket A Leg Lever Lock Leg Lever Front Leg Bench Frame Left Base Right Base Left Upright Right Upright Curl Post Weight Rest Adjustment Tube Backrest Tube A Backrest Tube B Seat Pin Long Pad Tube Short Pad Tube Foam Pad Seat Bracket B Plastic Washers M8 Washer Seat Backrest...

English Manual
Page 18
...call the toll-free numbers listed at the center of purchase, if failure occurs due to the frame. When requesting help assembling or operating the WEIDER® PRO 208 Weight Bench • a part is missing • or you may also have other rights which vary from the date of this manual). This ... parts, please be replaced, call the following information: • The MODEL NUMBER of the product (831.150860). • The NAME of the product (WEIDER® PRO 208 Weight Bench). • The KEY NUMBER and DESCRIPTION of ICON Health & Fitness, Inc. This warranty does not apply when the...
...call the toll-free numbers listed at the center of purchase, if failure occurs due to the frame. When requesting help assembling or operating the WEIDER® PRO 208 Weight Bench • a part is missing • or you may also have other rights which vary from the date of this manual). This ... parts, please be replaced, call the following information: • The MODEL NUMBER of the product (831.150860). • The NAME of the product (WEIDER® PRO 208 Weight Bench). • The KEY NUMBER and DESCRIPTION of ICON Health & Fitness, Inc. This warranty does not apply when the...


