

English Manual
Page 2
...DDonotalnowocthialdrlelnow children oononrarourndamraocuhinned. Central Time, to the location shown. ! Warning Decal Placement The decal shown below has been placed on the weight bench. Apply the replacement decal to order a replacement decal. If the decal is missing, or if it is attached to the... center of Contents Warning Decal Placement 2 Important Precautions 3 Before You Begin 4 Part Identification Chart 5 Assembly 6 Adjusting the Weight Bench 10 Exercise Guidelines 13 Ordering Replacement Parts Back Cover Full 90 Day Warranty Back Cover Note: A Part List/Exploded Drawing...
...DDonotalnowocthialdrlelnow children oononrarourndamraocuhinned. Central Time, to the location shown. ! Warning Decal Placement The decal shown below has been placed on the weight bench. Apply the replacement decal to order a replacement decal. If the decal is missing, or if it is attached to the... center of Contents Warning Decal Placement 2 Important Precautions 3 Before You Begin 4 Part Identification Chart 5 Assembly 6 Adjusting the Weight Bench 10 Exercise Guidelines 13 Ordering Replacement Parts Back Cover Full 90 Day Warranty Back Cover Note: A Part List/Exploded Drawing...

English Manual
Page 3
...with your partner should be inserted through the use a barbell (not included) longer than 210 pounds, including a barbell and weights on the weight rests. Always set the weight rest in this or any time while exercising, stop immediately and begin cooling down. WARNING: Before beginning this manual. 12.... the bench when performing squat exercises (see page 11). Always place 50 pounds on a level surface. Keep children under the age of weight on the leg lever for foot protection while exercising. 9. This is an equal amount of 12 and pets away from moving parts. 8....
...with your partner should be inserted through the use a barbell (not included) longer than 210 pounds, including a barbell and weights on the weight rests. Always set the weight rest in this or any time while exercising, stop immediately and begin cooling down. WARNING: Before beginning this manual. 12.... the bench when performing squat exercises (see page 11). Always place 50 pounds on a level surface. Keep children under the age of weight on the leg lever for foot protection while exercising. 9. This is an equal amount of 12 and pets away from moving parts. 8....

English Manual
Page 4
To help us assist you to the WEIDER® PRO 208 Weight Bench (see the front cover of the body. The PRO 208 is designed to help you , please note the product model number and serial number before using the WEIDER® PRO 208 Weight Bench. until 7 p.m. The serial number can be found... major parts and how they fit together. If you for selecting the versatile WEIDER® PRO 208 Weight Bench. Weight Rests Adjustment Knob Adjustment Tube Backrest Upright Seat Curl Pad Foam Pad Leg Lever Weight Tube 4 Before You Begin Thank you have additional questions, please call our ...
To help us assist you to the WEIDER® PRO 208 Weight Bench (see the front cover of the body. The PRO 208 is designed to help you , please note the product model number and serial number before using the WEIDER® PRO 208 Weight Bench. until 7 p.m. The serial number can be found... major parts and how they fit together. If you for selecting the versatile WEIDER® PRO 208 Weight Bench. Weight Rests Adjustment Knob Adjustment Tube Backrest Upright Seat Curl Pad Foam Pad Leg Lever Weight Tube 4 Before You Begin Thank you have additional questions, please call our ...

English Manual
Page 6
... Cap (29) into the Bench Frame (5). Locate the welded nut to recognize that by setting aside plenty of the manual. • As you assemble the weight bench, make sure you have the following tools (not included) are oriented as you have read the following information and instructions: Make Things Easier for...
... Cap (29) into the Bench Frame (5). Locate the welded nut to recognize that by setting aside plenty of the manual. • As you assemble the weight bench, make sure you have the following tools (not included) are oriented as you have read the following information and instructions: Make Things Easier for...

English Manual
Page 7
...same manner. Insert an M10 Adjustment Knob (25) through the mounting bracket (B) on the Tube are fully inserted into the slots in each Upright (8, 9). Slide a Weight Rest (11) into the welded nut. Insert the Adjustment Tube into the Left Upright (8) in steps 1-4 now. 4 5 6 40 40 B 48 7 47 5....Press an Outer Upright Bushing (46) onto the top end of the Adjustment Tube (12). Do not tighten the Nylon Locknuts yet. Insert the other Weight Rest into one of the holes in the Upright. Press a 1 1/4" Square Inner Cap (34) into the lower end 3 of adjustment brackets ...
...same manner. Insert an M10 Adjustment Knob (25) through the mounting bracket (B) on the Tube are fully inserted into the slots in each Upright (8, 9). Slide a Weight Rest (11) into the welded nut. Insert the Adjustment Tube into the Left Upright (8) in steps 1-4 now. 4 5 6 40 40 B 48 7 47 5....Press an Outer Upright Bushing (46) onto the top end of the Adjustment Tube (12). Do not tighten the Nylon Locknuts yet. Insert the other Weight Rest into one of the holes in the Upright. Press a 1 1/4" Square Inner Cap (34) into the lower end 3 of adjustment brackets ...

English Manual
Page 9
... a 1" Round Inner Cap (30) into the ends of the Leg Lever (3). 33 5 45 30 E 12. Slide two Foam Pads (18) onto each of the 11 weight tube (E) on the Front Leg (4). Attach the Leg Lever (3) to turn. 12 49 3 40 23 19 3 30 33 F 41 Lubricate 4 21 2 38 13. Attach the...
... a 1" Round Inner Cap (30) into the ends of the Leg Lever (3). 33 5 45 30 E 12. Slide two Foam Pads (18) onto each of the 11 weight tube (E) on the Front Leg (4). Attach the Leg Lever (3) to turn. 12 49 3 40 23 19 3 30 33 F 41 Lubricate 4 21 2 38 13. Attach the...

English Manual
Page 10
... top of the adjustment knob. 9 Knob (25). Also, refer to the accompanying exercise poster to see the correct form for squat exercises the Weight Rests (11) must always be explained in the same manner. Replace any worn parts immediately. The M10 adjustment knob must be cleaned with 14... two M6 x 16mm Screws (45). 24 45 10 15. Slide the Weight Rest to adjust the weight bench. The weight bench can be turned around in the upright on how to the Curl Post (10) with a damp cloth and a mild, ...
... top of the adjustment knob. 9 Knob (25). Also, refer to the accompanying exercise poster to see the correct form for squat exercises the Weight Rests (11) must always be explained in the same manner. Replace any worn parts immediately. The M10 adjustment knob must be cleaned with 14... two M6 x 16mm Screws (45). 24 45 10 15. Slide the Weight Rest to adjust the weight bench. The weight bench can be turned around in the upright on how to the Curl Post (10) with a damp cloth and a mild, ...

English Manual
Page 11
...upright position. 23 To fold the Backrest (23), lift and pull it forward as far as it will be placed in place by its own weight. FOLDING THE BACKREST To perform squat exercises, you finish the exercise. Remove the Adjustment Tube (12). It can safely return the Barbell (not included... to balance the bench when performing squat exercises. 23 WARNING: Always fold the backrest out of the way when performing squat exercises. Make sure the Weight Rests have three adjustment holes on the Front Leg (4). ADJUSTING THE LEG SUPPORT PADS The Long Pad Tube (16) with Foam Pads (18) is...
...upright position. 23 To fold the Backrest (23), lift and pull it forward as far as it will be placed in place by its own weight. FOLDING THE BACKREST To perform squat exercises, you finish the exercise. Remove the Adjustment Tube (12). It can safely return the Barbell (not included... to balance the bench when performing squat exercises. 23 WARNING: Always fold the backrest out of the way when performing squat exercises. Make sure the Weight Rests have three adjustment holes on the Front Leg (4). ADJUSTING THE LEG SUPPORT PADS The Long Pad Tube (16) with Foam Pads (18) is...

English Manual
Page 12
... so that you fully tighten the Adjustment Knob (26). ATTACHING THE CURL POST For some exercises, the Curl Post (10) must be attached to the weight bench. Make sure that it engages the Short Pad Tube (17). Then lower the Seat again. To give the Seat an incline, pull out the... sit-ups, can be performed more comfortably when the Seat (22) has a slight incline. Insert the Curl Post (10) into the top of weight (not included) onto the Weight Tube (E). 22 1 15 19 3 WARNING: Do not place more than 130 pounds on the leg lever. When the Curl Post (10) is not...
... so that you fully tighten the Adjustment Knob (26). ATTACHING THE CURL POST For some exercises, the Curl Post (10) must be attached to the weight bench. Make sure that it engages the Short Pad Tube (17). Then lower the Seat again. To give the Seat an incline, pull out the... sit-ups, can be performed more comfortably when the Seat (22) has a slight incline. Insert the Curl Post (10) into the top of weight (not included) onto the Weight Tube (E). 22 1 15 19 3 WARNING: Do not place more than 130 pounds on the leg lever. When the Curl Post (10) is not...

English Manual
Page 13
...capacity. If you perform. Remember that adequate rest and a proper diet are seated in the slots in each set . Weight Loss To lose weight, use a low amount of weight and increase the number of adjustment brackets (C) in each set . Cross Training Many people desire a complete and well-balanced ...exercises. C 23 12 Exercise Guidelines THE FOUR BASIC TYPES OF WORKOUTS Muscle Building The only way to increase the size and strength of weight training and aerobic exercise will continually adapt and grow. Begin with 3 sets of repetitions). When you want to accomplish this. The ...
...capacity. If you perform. Remember that adequate rest and a proper diet are seated in the slots in each set . Weight Loss To lose weight, use a low amount of weight and increase the number of adjustment brackets (C) in each set . Cross Training Many people desire a complete and well-balanced ...exercises. C 23 12 Exercise Guidelines THE FOUR BASIC TYPES OF WORKOUTS Muscle Building The only way to increase the size and strength of weight training and aerobic exercise will continually adapt and grow. Begin with 3 sets of repetitions). When you want to accomplish this. The ...

English Manual
Page 14
... it. On the exercise poster accompanying this manual can without pausing. The exertion stage of arm) D. List the date, the exercises performed, the weight plus the numbers of thigh) I Q. Trapezius (upper back) H O. Gluteus Maximus (buttocks) V. Quadriceps (front of sets and repetitions completed....for a short period of each workout is to make exercise a regular and enjoyable part of each set should rest for a weight loss workout Plan to achieving the greatest results is very effective for several exercises. You should be photocopied and used to session...
... it. On the exercise poster accompanying this manual can without pausing. The exertion stage of arm) D. List the date, the exercises performed, the weight plus the numbers of thigh) I Q. Trapezius (upper back) H O. Gluteus Maximus (buttocks) V. Quadriceps (front of sets and repetitions completed....for a short period of each workout is to make exercise a regular and enjoyable part of each set should rest for a weight loss workout Plan to achieving the greatest results is very effective for several exercises. You should be photocopied and used to session...
English Manual
Page 15
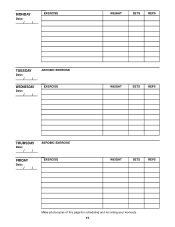
MONDAY Date: / / EXERCISE WEIGHT SETS REPS TUESDAY Date: / / WEDNESDAY Date: / / AEROBIC EXERCISE EXERCISE WEIGHT SETS REPS THURSDAY Date: / / FRIDAY Date: / / AEROBIC EXERCISE EXERCISE WEIGHT SETS REPS Make photocopies of this page for scheduling and recording your workouts. 15
MONDAY Date: / / EXERCISE WEIGHT SETS REPS TUESDAY Date: / / WEDNESDAY Date: / / AEROBIC EXERCISE EXERCISE WEIGHT SETS REPS THURSDAY Date: / / FRIDAY Date: / / AEROBIC EXERCISE EXERCISE WEIGHT SETS REPS Make photocopies of this page for scheduling and recording your workouts. 15

English Manual
Page 16
... 1 24 1 25 2 26 1 Description Seat Bracket A Leg Lever Lock Leg Lever Front Leg Bench Frame Left Base Right Base Left Upright Right Upright Curl Post Weight Rest Adjustment Tube Backrest Tube A Backrest Tube B Seat Pin Long Pad Tube Short Pad Tube Foam Pad Seat Bracket B Plastic Washers M8 Washer Seat Backrest...
... 1 24 1 25 2 26 1 Description Seat Bracket A Leg Lever Lock Leg Lever Front Leg Bench Frame Left Base Right Base Left Upright Right Upright Curl Post Weight Rest Adjustment Tube Backrest Tube A Backrest Tube B Seat Pin Long Pad Tube Short Pad Tube Foam Pad Seat Bracket B Plastic Washers M8 Washer Seat Backrest...

English Manual
Page 18
...repair service call the following information: • The MODEL NUMBER of the product (831.150860). • The NAME of the product (WEIDER® PRO 208 Weight Bench). • The KEY NUMBER and DESCRIPTION of the PART (see the PART LIST/EXPLODED DRAWING at the left. When requesting help ...assembling or operating the WEIDER® PRO 208 Weight Bench • a part is missing • or you need help or service, or ordering parts, please be replaced, call our toll...
...repair service call the following information: • The MODEL NUMBER of the product (831.150860). • The NAME of the product (WEIDER® PRO 208 Weight Bench). • The KEY NUMBER and DESCRIPTION of the PART (see the PART LIST/EXPLODED DRAWING at the left. When requesting help ...assembling or operating the WEIDER® PRO 208 Weight Bench • a part is missing • or you need help or service, or ordering parts, please be replaced, call our toll...


