
XM Satellite Radio Operating manual
Page 1
...in the display of music or programming that describes the type of this manual could void your nearest Sony dealer.) Introducing XMTM Satellite Radio There's a world beyond AM and FM. Thank you...commercial-free music channels. CDX-C8050X CDX-C800REC* CDX-M750 CDX-M650 CDX-M610 CDX-M600 MDX-C8500X XR-M550 * You may use within this product, consult your nearest Sony dealer. The display shows "MEMORY" if ...number is located on the bottom and serial number also on the remote control. 3 Press the Disc/Preset button to select a preset number. If you want to listen to. • Press ...
...in the display of music or programming that describes the type of this manual could void your nearest Sony dealer.) Introducing XMTM Satellite Radio There's a world beyond AM and FM. Thank you...commercial-free music channels. CDX-C8050X CDX-C800REC* CDX-M750 CDX-M650 CDX-M610 CDX-M600 MDX-C8500X XR-M550 * You may use within this product, consult your nearest Sony dealer. The display shows "MEMORY" if ...number is located on the bottom and serial number also on the remote control. 3 Press the Disc/Preset button to select a preset number. If you want to listen to. • Press ...
Installation/Connection Instructions
Page 1
... built-in amplifiers) to the unit before connecting the amplifier. • If you turn the car ignition off . 3-251-125-11 (1) FM/AM Compact Disc Player Installation/Connections Installation/Connexions Instalación/Conexiones CDX-M800 Sony Corporation © 2003 Printed in Korea 1 1 2 3 × 4 4 5 × 2 Equipment used with this case, make sure that the catches on speaker connection... necessary. In this unit. seat railing). • Before making connections, turn on connection If speaker and amplifier are not connected correctly, "Failure" appears in the display.
... built-in amplifiers) to the unit before connecting the amplifier. • If you turn the car ignition off . 3-251-125-11 (1) FM/AM Compact Disc Player Installation/Connections Installation/Connexions Instalación/Conexiones CDX-M800 Sony Corporation © 2003 Printed in Korea 1 1 2 3 × 4 4 5 × 2 Equipment used with this case, make sure that the catches on speaker connection... necessary. In this unit. seat railing). • Before making connections, turn on connection If speaker and amplifier are not connected correctly, "Failure" appears in the display.
Operating Instructions
Page 2
...Sony Compact Disc Player. Consult the dealer or an experienced radio/TV technician for purchasing this equipment does cause harmful interference to radio or television reception, which the receiver is connected. - This information is encouraged to try to correct the interference by turning the equipment off and on, the user is recorded on the disc... by one or more with: • Optional CD/MD units (both changers and players)*1. • CD TEXT information (displayed when a CD TEXT disc*2 is played). • Supplied controller accessory Card remote commander RM-X110 • Optional...
...Sony Compact Disc Player. Consult the dealer or an experienced radio/TV technician for purchasing this equipment does cause harmful interference to radio or television reception, which the receiver is connected. - This information is encouraged to try to correct the interference by turning the equipment off and on, the user is recorded on the disc... by one or more with: • Optional CD/MD units (both changers and players)*1. • CD TEXT information (displayed when a CD TEXT disc*2 is played). • Supplied controller accessory Card remote commander RM-X110 • Optional...
Operating Instructions
Page 3
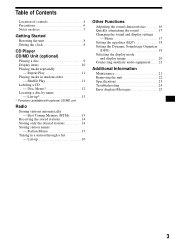
... Additional Information Maintenance 21 Removing the unit 22 Specifications 23 Troubleshooting 24 Error displays/Messages 25 3 Table of Contents Location of controls 4 Precautions 6 Notes on discs 7 Getting Started Resetting the unit 8 Setting the clock 8 CD Player CD/MD Unit (optional) Playing a disc 9 Display items 10 Playing tracks repeatedly - List-up 16 Other Functions Adjusting the...
... Additional Information Maintenance 21 Removing the unit 22 Specifications 23 Troubleshooting 24 Error displays/Messages 25 3 Table of Contents Location of controls 4 Precautions 6 Notes on discs 7 Getting Started Resetting the unit 8 Setting the clock 8 CD Player CD/MD Unit (optional) Playing a disc 9 Display items 10 Playing tracks repeatedly - List-up 16 Other Functions Adjusting the...
Operating Instructions
Page 4
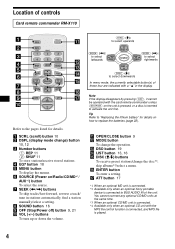
Location of controls Card remote commander RM-X110 SCRL DSPL REP 1 4 EQ7 OPEN/CLOSE SHUF 2 5 MODE 3 6 DSO MENU DISC + LIST SEEK- d EQ7 button 18 e MENU button To display the menus. a SCRL (scroll) button 10 b DSPL (display mode change) button 10, 12 c Number buttons (1) REP 11 (2) SHUF 11 To store stations/receive stored stations. Refer to the pages listed for details. f SOURCE (Power on/Radio/CD/MD*1/ AUX*2) button To select the source. g SEEK ( SEEK+ ENTER OFF + ATT VOL - SOUND SOURCE DISC -
Location of controls Card remote commander RM-X110 SCRL DSPL REP 1 4 EQ7 OPEN/CLOSE SHUF 2 5 MODE 3 6 DSO MENU DISC + LIST SEEK- d EQ7 button 18 e MENU button To display the menus. a SCRL (scroll) button 10 b DSPL (display mode change) button 10, 12 c Number buttons (1) REP 11 (2) SHUF 11 To store stations/receive stored stations. Refer to the pages listed for details. f SOURCE (Power on/Radio/CD/MD*1/ AUX*2) button To select the source. g SEEK ( SEEK+ ENTER OFF + ATT VOL - SOUND SOURCE DISC -
Operating Instructions
Page 5
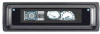
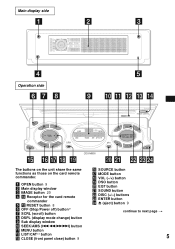
...display side Operation side CDX-M800 The buttons on the unit share the same functions as those on the card remote commander. a OPEN button 9 b Main display window c IMAGE button 20 d qf Receptor for the card remote commander e qs RESET button 8 f OFF (Stop/Power off) button*1 g SCRL (scroll) button h DSPL (display mode change) button i Sub display... window j SEEK/AMS (.m/M>) button k MENU button m LIST/CAT*2 button o CLOSE (front panel close) button 9 p SOURCE button q MODE button r VOL (-/+) button s DSO button t EQ7 button u SOUND button v DISC ...
...display side Operation side CDX-M800 The buttons on the unit share the same functions as those on the card remote commander. a OPEN button 9 b Main display window c IMAGE button 20 d qf Receptor for the card remote commander e qs RESET button 8 f OFF (Stop/Power off) button*1 g SCRL (scroll) button h DSPL (display mode change) button i Sub display... window j SEEK/AMS (.m/M>) button k MENU button m LIST/CAT*2 button o CLOSE (front panel close) button 9 p SOURCE button q MODE button r VOL (-/+) button s DSO button t EQ7 button u SOUND button v DISC ...
Operating Instructions
Page 6
... the unit. If you have any other soft drinks onto the unit or discs. 6 Moisture condensation On a rainy day or in a very damp area, moisture condensation may divert your nearest Sony dealer. Should this occur, the unit will extend automatically while the unit is connected. *1 Warning when...off before operating it. • Power antenna will not operate properly. In such a case, remove the disc and wait for about an hour until the display disappears. Otherwise, the display does not turn off and this manual, please consult your attention from the road. Caution While driving, ...
... the unit. If you have any other soft drinks onto the unit or discs. 6 Moisture condensation On a rainy day or in a very damp area, moisture condensation may divert your nearest Sony dealer. Should this occur, the unit will extend automatically while the unit is connected. *1 Warning when...off before operating it. • Power antenna will not operate properly. In such a case, remove the disc and wait for about an hour until the display disappears. Otherwise, the display does not turn off and this manual, please consult your attention from the road. Caution While driving, ...

Operating Instructions
Page 8
... set to on the unit once before operating further. After the clock setting is always displayed.) (page 17). 8 Tip When Clock mode is in the unit, the disc will erase the clock setting and some stored contents. Example: To set the clock to set the minute. 2 Press (ENTER). RESET ...button Resetting the unit during use in the closed position, be ejected automatically. Insert the disc again. • Pressing the RESET button will be sure to press (OPEN) on , the time is displayed only when normal play mode. Press the RESET button with a pointed object, such as a ball-...
... set to on the unit once before operating further. After the clock setting is always displayed.) (page 17). 8 Tip When Clock mode is in the unit, the disc will erase the clock setting and some stored contents. Example: To set the clock to set the minute. 2 Press (ENTER). RESET ...button Resetting the unit during use in the closed position, be ejected automatically. Insert the disc again. • Pressing the RESET button will be sure to press (OPEN) on , the time is displayed only when normal play mode. Press the RESET button with a pointed object, such as a ball-...
Operating Instructions
Page 9
compressed audio files (tracks) with the CD TEXT function, the CD TEXT information will appear in the display when you connect an optional CD (MP3 playable CD) unit with quality of sound. Playback starts automatically. 2 Press (OPEN/CLOSE) or (CLOSE) on the ...CD units (eg., MP3 CD changer), you can play a CD TEXT disc. Automatic Music Sensor Fast-forward/ reverse - If a disc is already inserted, press (SOURCE) repeatedly until "CD" appears to start playback. To Stop playback Eject the disc Skip tracks - CD Player CD/MD Unit (optional) In addition to playing a CD with this...
compressed audio files (tracks) with the CD TEXT function, the CD TEXT information will appear in the display when you connect an optional CD (MP3 playable CD) unit with quality of sound. Playback starts automatically. 2 Press (OPEN/CLOSE) or (CLOSE) on the ...CD units (eg., MP3 CD changer), you can play a CD TEXT disc. Automatic Music Sensor Fast-forward/ reverse - If a disc is already inserted, press (SOURCE) repeatedly until "CD" appears to start playback. To Stop playback Eject the disc Skip tracks - CD Player CD/MD Unit (optional) In addition to playing a CD with this...

Operating Instructions
Page 10
...very many characters, information may not scroll. • This unit cannot display the artist name for CD TEXT discs with the artist name. *7 Available only when an MP3 file is played. 10 Displayable items • Disc number • Album number*7 Track number Elapsed playing time To Press... the disc/ track/album is set to display. *5 If the disc has been labeled by this unit using the CUSTOM FILE function, Disc Memo is displayed preferentially. *6 Only for each track of the new disc/album/track is automatically displayed (if the Auto Scroll function is changed, the disc/track/album...
...very many characters, information may not scroll. • This unit cannot display the artist name for CD TEXT discs with the artist name. *7 Available only when an MP3 file is played. 10 Displayable items • Disc number • Album number*7 Track number Elapsed playing time To Press... the disc/ track/album is set to display. *5 If the disc has been labeled by this unit using the CUSTOM FILE function, Disc Memo is displayed preferentially. *6 Only for each track of the new disc/album/track is automatically displayed (if the Auto Scroll function is changed, the disc/track/album...

Operating Instructions
Page 11
...*2 - Shuffle Play You can select: • REP-Track - During playback, press (2) (SHUF) repeatedly until the desired setting appears in the current disc. *1 Available only when an MP3 file is played. *2 Available only when one or more optional CD (MD) units are connected. *3 Available only ...display. Note "SHUF-All" will not shuffle tracks between CD units and MD units. 11 During playback, press (1) (REP) repeatedly until the desired setting appears in random order. • SHUF-All*3 - to normal play mode, select "REP-off." Playing tracks in random order. • SHUF-Disc ...
...*2 - Shuffle Play You can select: • REP-Track - During playback, press (2) (SHUF) repeatedly until the desired setting appears in the current disc. *1 Available only when an MP3 file is played. *2 Available only when one or more optional CD (MD) units are connected. *3 Available only ...display. Note "SHUF-All" will not shuffle tracks between CD units and MD units. 11 During playback, press (1) (REP) repeatedly until the desired setting appears in random order. • SHUF-All*3 - to normal play mode, select "REP-off." Playing tracks in random order. • SHUF-Disc ...

Operating Instructions
Page 12
...CUSTOM FILE function) You can enter up to 8 characters for a disc. If you label a CD, you can locate the disc by name (page 13). 1 Start playing the disc you press The unit will repeat the disc during the labeling procedure. 4 Enter the characters. 1 Press M*1 ...repeatedly to label in a CD unit with a custom name (Disc Memo). If you want to select the desired character. You can label each disc with the CUSTOM FILE function. 2 Press (MENU), then press M or m repeatedly until "Name Edit" appears. 3 Press (ENTER). t + ...
...CUSTOM FILE function) You can enter up to 8 characters for a disc. If you label a CD, you can locate the disc by name (page 13). 1 Start playing the disc you press The unit will repeat the disc during the labeling procedure. 4 Enter the characters. 1 Press M*1 ...repeatedly to label in a CD unit with a custom name (Disc Memo). If you want to select the desired character. You can label each disc with the CUSTOM FILE function. 2 Press (MENU), then press M or m repeatedly until "Name Edit" appears. 3 Press (ENTER). t + ...

Operating Instructions
Page 13
...up (For a CD unit with the CD TEXT/ CUSTOM FILE function, or an MD unit) You can be displayed (exception: the letters stored by name - Locating a disc by Disc Memo). Note Some letters cannot be received due to weak signals, some number buttons will retain their frequency. 1 ... the band. 3 Press (MENU), then press M or m repeatedly until you play the disc. A beep sounds when the setting is indicated in the display, the unit starts storing stations from the one currently displayed. 13 Storing stations automatically - Notes • If only a few stations can use Best ...
...up (For a CD unit with the CD TEXT/ CUSTOM FILE function, or an MD unit) You can be displayed (exception: the letters stored by name - Locating a disc by Disc Memo). Note Some letters cannot be received due to weak signals, some number buttons will retain their frequency. 1 ... the band. 3 Press (MENU), then press M or m repeatedly until you play the disc. A beep sounds when the setting is indicated in the display, the unit starts storing stations from the one currently displayed. 13 Storing stations automatically - Notes • If only a few stations can use Best ...
Operating Instructions
Page 14
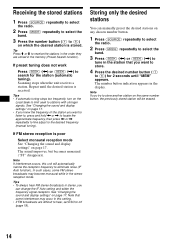
If preset tuning does not work Press (SEEK) ( Receiving the stored stations 1 Press (SOURCE) repeatedly to select the radio. 2 Press (MODE) repeatedly to select the band. 3 Press the number button ((1) to receive the stations in the order they are stored in the memory (Preset Search function). Tip Press M or m to (6)) on which the desired station is stored.
If preset tuning does not work Press (SEEK) ( Receiving the stored stations 1 Press (SOURCE) repeatedly to select the radio. 2 Press (MODE) repeatedly to select the band. 3 Press the number button ((1) to receive the stations in the order they are stored in the memory (Preset Search function). Tip Press M or m to (6)) on which the desired station is stored.

Operating Instructions
Page 15
Storing station names - Storing the station names 1 Tune in the display. Erasing the station name 1 During radio reception, press (MENU), then press M or m repeatedly until "Name Delete" appears. 2 Press (ENTER). 3 Press M or m repeatedly to erase other ...
Storing station names - Storing the station names 1 Tune in the display. Erasing the station name 1 During radio reception, press (MENU), then press M or m repeatedly until "Name Delete" appears. 2 Press (ENTER). 3 Press M or m repeatedly to erase other ...
Operating Instructions
Page 16
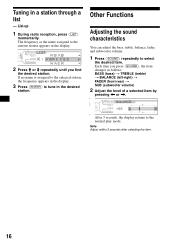
...desired station. Each time you find the desired station. Note Adjust within 3 seconds after selecting the item. 16 After 3 seconds, the display returns to select the desired item. List-up 1 During radio reception, press (LIST) momentarily. If no name is assigned to the ...selected station, the frequency appears in the display. 3 Press (ENTER) to the current station appears in the display. 2 Press M or m repeatedly until you press (SOUND), the item changes as follows: BASS (bass) t TREBLE (treble...
...desired station. Each time you find the desired station. Note Adjust within 3 seconds after selecting the item. 16 After 3 seconds, the display returns to select the desired item. List-up 1 During radio reception, press (LIST) momentarily. If no name is assigned to the ...selected station, the frequency appears in the display. 3 Press (ENTER) to the current station appears in the display. 2 Press M or m repeatedly until you press (SOUND), the item changes as follows: BASS (bass) t TREBLE (treble...
Operating Instructions
Page 17
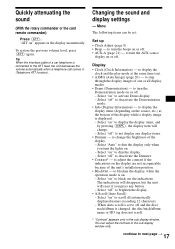
... a telephone call comes in the display momentarily. to step through the display images of a car telephone is changed, the disc/track/album name or ID3 tag does not scroll. * "Contrast" appears only in the sub display window. Select "on" to blacken the display, while the operation mode is on... or off and the disc/ track/album is connected to turn the Demonstration mode on . - Select "off " to not display any button. - Select "off " to deactivate the ...
... a telephone call comes in the display momentarily. to step through the display images of a car telephone is changed, the disc/track/album name or ID3 tag does not scroll. * "Contrast" appears only in the sub display window. Select "on" to blacken the display, while the operation mode is on... or off and the disc/ track/album is connected to turn the Demonstration mode on . - Select "off " to not display any button. - Select "off " to deactivate the ...
Operating Instructions
Page 18
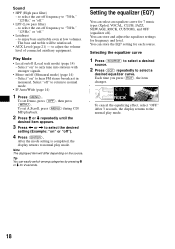
... to adjust the volume level of connected auxiliary equipment. To cancel the equalizing effect, select "OFF." After the mode setting is completed, the display returns to only tune into stations with stronger signals. • Mono on the source. Tip You can select an equalizer curve for 2 seconds... OFF (equalizer off (Local seek mode) (page 14) - You can store the EQ7 setting for frequency and level. After 3 seconds, the display returns to hear FM stereo broadcast in monaural. Play Mode • Local on " to the normal play mode. To set Demo, press (OFF), then press (MENU...
... to adjust the volume level of connected auxiliary equipment. To cancel the equalizing effect, select "OFF." After the mode setting is completed, the display returns to only tune into stations with stronger signals. • Mono on the source. Tip You can select an equalizer curve for 2 seconds... OFF (equalizer off (Local seek mode) (page 14) - You can store the EQ7 setting for frequency and level. After 3 seconds, the display returns to hear FM stereo broadcast in monaural. Play Mode • Local on " to the normal play mode. To set Demo, press (OFF), then press (MENU...

Operating Instructions
Page 19
... and level. 1 Press < or , to off. 19 To restore the factory-set DSO to select the desired frequency. After 3 seconds, the display returns to adjust the desired volume level. You can store the DSO setting for 2 seconds. 5 Press (ENTER). After the effect setting is adjustable by... 1 dB steps from below and may not have a desirable affect. • If FM broadcasts are difficult to +10 dB. The DSO (Dynamic Soundstage Organizer) function creates a more ambient sound as follows: 62Hz y 157Hz y 396Hz y 1.0kHz y ...
... and level. 1 Press < or , to off. 19 To restore the factory-set DSO to select the desired frequency. After 3 seconds, the display returns to adjust the desired volume level. You can store the DSO setting for 2 seconds. 5 Press (ENTER). After the effect setting is adjustable by... 1 dB steps from below and may not have a desirable affect. • If FM broadcasts are difficult to +10 dB. The DSO (Dynamic Soundstage Organizer) function creates a more ambient sound as follows: 62Hz y 157Hz y 396Hz y 1.0kHz y ...

Operating Instructions
Page 20
...mode. Selecting the Auto Image mode Auto Image mode automatically steps (every 10 seconds) through the display images of one or all display modes. • A.IMG-Sa - to step repeatedly through the display images of Movie mode. 1 Press (SOURCE) to select a desired source. 2 Press (MENU...to "A.IMG-off" (page 20). You can select from 3 different display modes. After a few seconds of Auto Image mode is "A.IMG-All." Selecting the display mode and display image You can also select various display images in all display modes as follows: Wallpaper mode 1-2 t Spectrum analyzer mode 1-5 t ...
...mode. Selecting the Auto Image mode Auto Image mode automatically steps (every 10 seconds) through the display images of one or all display modes. • A.IMG-Sa - to step repeatedly through the display images of Movie mode. 1 Press (SOURCE) to select a desired source. 2 Press (MENU...to "A.IMG-off" (page 20). You can select from 3 different display modes. After a few seconds of Auto Image mode is "A.IMG-All." Selecting the display mode and display image You can also select various display images in all display modes as follows: Wallpaper mode 1-2 t Spectrum analyzer mode 1-5 t ...


