
Manuals
Page 1
Read this manual carefully before using the machine. For safe and correct use this machine and keep it handy for future reference. User Guide What You Can Do with This Machine Getting Started Copy Fax Print Scan Document Server Web Image Monitor Adding Paper and Toner Troubleshooting Appendix For information not in this manual, refer to read the Safety Information in "Read This First" before you use , be sure to the HTML/PDF files on the supplied CD-ROM.
Read this manual carefully before using the machine. For safe and correct use this machine and keep it handy for future reference. User Guide What You Can Do with This Machine Getting Started Copy Fax Print Scan Document Server Web Image Monitor Adding Paper and Toner Troubleshooting Appendix For information not in this manual, refer to read the Safety Information in "Read This First" before you use , be sure to the HTML/PDF files on the supplied CD-ROM.

Manuals
Page 3
... Adding Icons to the [Home] Screen...39 Registering Functions in a Program...44 Example of Major Features...8 1. TABLE OF CONTENTS How to Read the Manuals...6 Symbols Used in the Manuals...6 Model-Specific Information...7 Names of Programs...46 1 What You Can Do with This Machine I Want to Save Paper...9 I Want to Convert Documents to...
... Adding Icons to the [Home] Screen...39 Registering Functions in a Program...44 Example of Major Features...8 1. TABLE OF CONTENTS How to Read the Manuals...6 Symbols Used in the Manuals...6 Model-Specific Information...7 Names of Programs...46 1 What You Can Do with This Machine I Want to Save Paper...9 I Want to Convert Documents to...

Manuals
Page 5
... a Computer's Information...100 Registering an SMB Folder...102 Deleting an SMB Registered Folder...105 Entering the Path to the Destination Manually 105 Basic Procedure for Sending Scan Files by E-mail 107 Registering an E-mail Destination...108 Deleting an E-mail Destination...109 Entering an... E-mail Address Manually...110 3 Canceling a Transmission Before the Original Is Scanned 80 Canceling a Transmission While the Original Is Being Scanned 80 Canceling a ...
... a Computer's Information...100 Registering an SMB Folder...102 Deleting an SMB Registered Folder...105 Entering the Path to the Destination Manually 105 Basic Procedure for Sending Scan Files by E-mail 107 Registering an E-mail Destination...108 Deleting an E-mail Destination...109 Entering an... E-mail Address Manually...110 3 Canceling a Transmission Before the Original Is Scanned 80 Canceling a Transmission While the Original Is Being Scanned 80 Canceling a ...

Manuals
Page 8
...file on a provided CD-ROM. (mainly Europe and Asia), (mainly Europe), or (mainly Asia) (mainly North America) Differences in the Manuals This manual uses the following symbols: Indicates points to pay attention to when using the machine, and explanations of likely causes of paper misfeeds, damage to ...It indicates where you are using , see p.7 "Model-Specific Information". 6 Read the information indicated by two symbols. How to Read the Manuals Symbols Used in the functions of Region A and Region B models are indicated by the symbol that corresponds to read these explanations. For details...
...file on a provided CD-ROM. (mainly Europe and Asia), (mainly Europe), or (mainly Asia) (mainly North America) Differences in the Manuals This manual uses the following symbols: Indicates points to pay attention to when using the machine, and explanations of likely causes of paper misfeeds, damage to ...It indicates where you are using , see p.7 "Model-Specific Information". 6 Read the information indicated by two symbols. How to Read the Manuals Symbols Used in the functions of Region A and Region B models are indicated by the symbol that corresponds to read these explanations. For details...

Manuals
Page 9
There is a region B model: • CODE XXXX -17 • 120-127 V • Dimensions in this manual are given in two units of the machine, located in the position shown below. The label contains details that corresponds to the region of your ...
There is a region B model: • CODE XXXX -17 • 120-127 V • Dimensions in this manual are given in two units of the machine, located in the position shown below. The label contains details that corresponds to the region of your ...

Manuals
Page 10
Names of Major Features In this manual, major features of the machine are referred to as follows: • Auto Document Feeder ADF 8
Names of Major Features In this manual, major features of the machine are referred to as follows: • Auto Document Feeder ADF 8

Manuals
Page 13
... to the Address Book", Fax . I Want to Register Destinations I Want to Register Destinations BRL060S Using the control panel to register destinations in the address book manually", Scan . Downloading destinations registered in the machine to register destinations from a computer See "Registering Internet Fax Destination Information Using Web Image Monitor", Fax . Using Web...
... to the Address Book", Fax . I Want to Register Destinations I Want to Register Destinations BRL060S Using the control panel to register destinations in the address book manually", Scan . Downloading destinations registered in the machine to register destinations from a computer See "Registering Internet Fax Destination Information Using Web Image Monitor", Fax . Using Web...

Manuals
Page 36
... unit is installed. It also allows you to two trays can be stacked. Handset Used as a telephone. 2. Up to use the On Hook Dial and Manual Dial functions. Allows you to two trays can be stacked. 34
... unit is installed. It also allows you to two trays can be stacked. Handset Used as a telephone. 2. Up to use the On Hook Dial and Manual Dial functions. Allows you to two trays can be stacked. 34

Manuals
Page 46
... the [Home] key on the top left of prints Facsimile: Transmission type, memory transmission/immediate transmission, Select Destination from Address Book (except for folder destinations), Manual Entry, TX Status Report, Send Settings (except for Subject and Sender Name) Scanner: Original, Send Settings (except for File Name, Security Settings in File Type...
... the [Home] key on the top left of prints Facsimile: Transmission type, memory transmission/immediate transmission, Select Destination from Address Book (except for folder destinations), Manual Entry, TX Status Report, Send Settings (except for Subject and Sender Name) Scanner: Original, Send Settings (except for File Name, Security Settings in File Type...
Manuals
Page 86
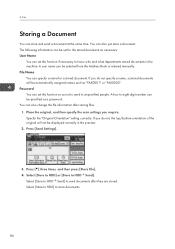
... following information can be automatically assigned names such as not to send to eight digit number can be selected from the Address Book or entered manually. You can specify a name for the stored documents as necessary: User Name You can set this function so as "FAX0001" or "FAX0002". Press [Send Settings...
... following information can be automatically assigned names such as not to send to eight digit number can be selected from the Address Book or entered manually. You can specify a name for the stored documents as necessary: User Name You can set this function so as "FAX0001" or "FAX0002". Press [Send Settings...
Manuals
Page 87
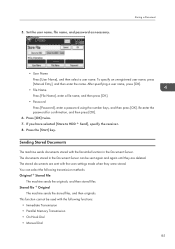
... with the facsimile function in the Document Server can select the following functions: • Immediate Transmission • Parallel Memory Transmission • On Hook Dial • Manual Dial 85 Press the [Start] key. The stored documents are deleted. 5. The documents stored in the Document Server. Stored file Original The machine sends the... again until they were stored. Storing a Document • User Name Press [User Name], and then select a user name. To specify an unregistered user name, press [Manual Entry], and then enter the name. Press [OK] twice. 7.
... with the facsimile function in the Document Server can select the following functions: • Immediate Transmission • Parallel Memory Transmission • On Hook Dial • Manual Dial 85 Press the [Start] key. The stored documents are deleted. 5. The documents stored in the Document Server. Stored file Original The machine sends the... again until they were stored. Storing a Document • User Name Press [User Name], and then select a user name. To specify an unregistered user name, press [Manual Entry], and then enter the name. Press [OK] twice. 7.
Manuals
Page 89
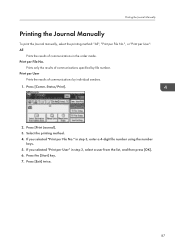
.... If you selected "Print per User Prints the results of communications specified by individual senders. 1. Press [Exit] twice. 87 Printing the Journal Manually Printing the Journal Manually To print the Journal manually, select the printing method: "All", "Print per File No.", or "Print per File No. Print per File No." Print per User...
.... If you selected "Print per User Prints the results of communications specified by individual senders. 1. Press [Exit] twice. 87 Printing the Journal Manually Printing the Journal Manually To print the Journal manually, select the printing method: "All", "Print per File No.", or "Print per File No. Print per File No." Print per User...

Manuals
Page 91
... printer port is set . The installation starts. Click [Finish]. Quick Install You can install the printer drivers easily from the CD-ROM provided with this manual.) 2. Select an interface language, and then click [OK]. 4. The software license agreement appears in the first window of the installer, and then take out the...
... printer port is set . The installation starts. Click [Finish]. Quick Install You can install the printer drivers easily from the CD-ROM provided with this manual.) 2. Select an interface language, and then click [OK]. 4. The software license agreement appears in the first window of the installer, and then take out the...

Manuals
Page 105
... computer, and then press [OK]. 18. Check that [SMB] is selected, the SMB User Name and SMB Password that you can either enter the path manually or locate the folder by browsing the network. 25. Press [Change] under "Login Password". 17. Press [Change] under "Login User Name". 15. Press [Exit]. 21...
... computer, and then press [OK]. 18. Check that [SMB] is selected, the SMB User Name and SMB Password that you can either enter the path manually or locate the folder by browsing the network. 25. Press [Change] under "Login Password". 17. Press [Change] under "Login User Name". 15. Press [Exit]. 21...

Manuals
Page 106
... to access. 2. Press [OK] three times. 28. Enter the path where the folder is not correct, a message appears. Press [Browse Network]. Locating the SMB folder manually 1. Press [OK] four times. Shared folders under "Path". 2. Locating the SMB folder using Browse Network 1. 6. Scan 27. For example: if the IP address of the...
... to access. 2. Press [OK] three times. 28. Enter the path where the folder is not correct, a message appears. Press [Browse Network]. Locating the SMB folder manually 1. Press [OK] four times. Shared folders under "Path". 2. Locating the SMB folder using Browse Network 1. 6. Scan 27. For example: if the IP address of the...

Manuals
Page 107
Press [OK] four times. Press the [User Tools/Counter] key. 2. Press [Change]. 4. Entering the Path to the Destination Manually 1. Select the name whose folder you want to delete. Press the name key, or enter the registered number using the number keys. ...currently selected. 8. You can press [Up One Level] to switch between levels. 4. Press [Folder]. 7. Press the [User Tools/Counter] key. Press [Folder]. 5. Press [Manual Entry]. 105 Select the folder you want to register. 5. Basic Procedure When Using Scan to Folder You can search by the registered name, user code...
Press [OK] four times. Press the [User Tools/Counter] key. 2. Press [Change]. 4. Entering the Path to the Destination Manually 1. Select the name whose folder you want to delete. Press the name key, or enter the registered number using the number keys. ...currently selected. 8. You can press [Up One Level] to switch between levels. 4. Press [Folder]. 7. Press the [User Tools/Counter] key. Press [Folder]. 5. Press [Manual Entry]. 105 Select the folder you want to register. 5. Basic Procedure When Using Scan to Folder You can search by the registered name, user code...

Manuals
Page 112
Select the name whose e-mail address you want to delete. Press [Email]. 7. Press [Email Address]. 8. Press [Exit]. 10. Press [Manual Entry]. 2. Press the name key, or enter the registered number using the number keys. Press [Delete All], and then press [OK]. 9. Press [OK... You can search by the registered name, user code, fax number, folder name, e-mail address, or IP-Fax destination. 6. Entering an E-mail Address Manually 1. Press [Email]. 5. Press [OK]. 11. Enter the e-mail address. 4. Scan 4. 6. Press the [User Tools/Counter] key. Press [Enter] under [Destination...
Select the name whose e-mail address you want to delete. Press [Email]. 7. Press [Email Address]. 8. Press [Exit]. 10. Press [Manual Entry]. 2. Press the name key, or enter the registered number using the number keys. Press [Delete All], and then press [OK]. 9. Press [OK... You can search by the registered name, user code, fax number, folder name, e-mail address, or IP-Fax destination. 6. Entering an E-mail Address Manually 1. Press [Email]. 5. Press [OK]. 11. Enter the e-mail address. 4. Scan 4. 6. Press the [User Tools/Counter] key. Press [Enter] under [Destination...

Manuals
Page 114
...], and then select a user name. If necessary, press [Send Settings] or [Original] to check. Press the [Start] key. 6. To specify an unregistered user name, press [Manual Entry], and then enter the name. Re-enter the password for resolution and scan size. 10. Press [ ] four times, and then press [Select/Manage Stored...
...], and then select a user name. If necessary, press [Send Settings] or [Original] to check. Press the [Start] key. 6. To specify an unregistered user name, press [Manual Entry], and then enter the name. Re-enter the password for resolution and scan size. 10. Press [ ] four times, and then press [Select/Manage Stored...

Manuals
Page 118
... [Home] key on the top left of stored documents will be displayed. The user names shown are names that were registered in the screen, press [Manual Entry], and then enter a user name. 5. For double-check, enter the password again, and then press [OK]. 10. The original is saved in the Document...
... [Home] key on the top left of stored documents will be displayed. The user names shown are names that were registered in the screen, press [Manual Entry], and then enter a user name. 5. For double-check, enter the password again, and then press [OK]. 10. The original is saved in the Document...

Manuals
Page 155
... image data size is being edited by another function. Cannot use Web Image Monitor to create the shortcut on the [Status/Information] menu. See the manual for shortcut image, see p.135 "Recommended Paper Sizes and Types". • Using curled paper often causes misfeeds, soiled paper edges, or slipped positions while performing...
... image data size is being edited by another function. Cannot use Web Image Monitor to create the shortcut on the [Status/Information] menu. See the manual for shortcut image, see p.135 "Recommended Paper Sizes and Types". • Using curled paper often causes misfeeds, soiled paper edges, or slipped positions while performing...


