
Manuals
Page 4
...-Sided Combine...63 Two-Sided Combine...64 Copying onto Custom Size Paper from the Bypass Tray 67 Copying onto Envelopes...68 Sort...70 Changing the Number of Sets...70 Storing Data in the Auto Document Feeder 54 3.
...-Sided Combine...63 Two-Sided Combine...64 Copying onto Custom Size Paper from the Bypass Tray 67 Copying onto Envelopes...68 Sort...70 Changing the Number of Sets...70 Storing Data in the Auto Document Feeder 54 3.
Manuals
Page 21
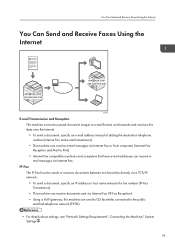
...between two facsimiles directly via a TCP/IP network. • To send a document, specify an IP address or host name instead of a fax number (IP-Fax Transmission). • This machine can receive documents sent via Internet Fax (IP-Fax Reception). • Using a VoIP gateway, this ...data over the Internet. • To send a document, specify an e-mail address instead of dialing the destination telephone number (Internet Fax and e-mail transmission). • This machine can receive e-mail messages via Internet Fax or from computers (Internet Fax Reception and Mail ...
...between two facsimiles directly via a TCP/IP network. • To send a document, specify an IP address or host name instead of a fax number (IP-Fax Transmission). • This machine can receive documents sent via Internet Fax (IP-Fax Reception). • Using a VoIP gateway, this ...data over the Internet. • To send a document, specify an e-mail address instead of dialing the destination telephone number (Internet Fax and e-mail transmission). • This machine can receive e-mail messages via Internet Fax or from computers (Internet Fax Reception and Mail ...

Manuals
Page 38
...Tools", Maintenance and Specifications . 10. [Simple Screen] key Press to switch to check or print the counter value. Number keys Use to enter the numbers for copies, fax numbers and data for the initial display when modes are cleared or reset, or immediately after the main power switch is turned... values entered or items specified. 12. [Start] key Press to start copying, printing, scanning, or sending. 13. [Clear] key Press to delete a number entered. 14. [Stop] key Press to program defaults for the selected function. 16. When the machine is being received and stored in progress, such as...
...Tools", Maintenance and Specifications . 10. [Simple Screen] key Press to switch to check or print the counter value. Number keys Use to enter the numbers for copies, fax numbers and data for the initial display when modes are cleared or reset, or immediately after the main power switch is turned... values entered or items specified. 12. [Start] key Press to start copying, printing, scanning, or sending. 13. [Clear] key Press to delete a number entered. 14. [Stop] key Press to program defaults for the selected function. 16. When the machine is being received and stored in progress, such as...

Manuals
Page 40
... settings for using the machine as a printer. To display the [Home] screen, press the [Home] key. 5 1 6 7 2 8 3 4 9 CMR615 1. [Copier] Press to the [Home] screen. The program number appears on the lower left of added shortcuts appear on the [Home] screen. You can be recalled easily by pressing the shortcut icons. For details...
... settings for using the machine as a printer. To display the [Home] screen, press the [Home] key. 5 1 6 7 2 8 3 4 9 CMR615 1. [Copier] Press to the [Home] screen. The program number appears on the lower left of added shortcuts appear on the [Home] screen. You can be recalled easily by pressing the shortcut icons. For details...

Manuals
Page 46
...the initial document print screen): 2 Sided: Top to Top, 2 Sided: Top to Bottom, Sort, Other Func. (Other functions), number of prints Facsimile: Transmission type, memory transmission/immediate transmission, Select Destination from Address Book (except for folder destinations), Manual Entry, TX ...Name) Scanner: Original, Send Settings (except for Originals), Auto Reduce/Enlarge, Red./Enlg. (Reduce/ Enlarge), Other Func. (Other functions), number of programs that can be registered is different. • Copier: 25 programs • Document Server: 25 programs • Facsimile: 100 programs...
...the initial document print screen): 2 Sided: Top to Top, 2 Sided: Top to Bottom, Sort, Other Func. (Other functions), number of prints Facsimile: Transmission type, memory transmission/immediate transmission, Select Destination from Address Book (except for folder destinations), Manual Entry, TX ...Name) Scanner: Original, Send Settings (except for Originals), Auto Reduce/Enlarge, Red./Enlg. (Reduce/ Enlarge), Other Func. (Other functions), number of programs that can be registered is different. • Copier: 25 programs • Document Server: 25 programs • Facsimile: 100 programs...

Manuals
Page 47
Enter the program name. 7. Press [Exit] twice. • The number of the Initial Screen", Convenient Functions . • When the paper tray you specified in a program is empty and if there is turned on the functions ... Default Functions of characters you want to register. 6. Registering Functions in the [Tray Paper Settings] tab will be selected first. Press [Program]. 5. Press the program number you can enter for a program name varies depending on . Press [OK]. 8. For details, see "System Settings", Connecting the Machine/ System Settings . 45 3. Press the [Program...
Enter the program name. 7. Press [Exit] twice. • The number of the Initial Screen", Convenient Functions . • When the paper tray you specified in a program is empty and if there is turned on the functions ... Default Functions of characters you want to register. 6. Registering Functions in the [Tray Paper Settings] tab will be selected first. Press [Program]. 5. Press the program number you can enter for a program name varies depending on . Press [OK]. 8. For details, see "System Settings", Connecting the Machine/ System Settings . 45 3. Press the [Program...

Manuals
Page 48
... that you can be registered to the [Home] Screen". You can easily digitize documents to "PDF/A" file format, which is deleted or overwritten. • Program numbers with next to four pages onto one side of Original] and [High Compress. You can copy up to them already have settings made for long...
... that you can be registered to the [Home] Screen". You can easily digitize documents to "PDF/A" file format, which is deleted or overwritten. • Program numbers with next to four pages onto one side of Original] and [High Compress. You can copy up to them already have settings made for long...

Manuals
Page 49
... your business details or the type of the data may be used if the receiver specifies forwarding destinations by splitting it into groups of a specified number of pages. Batch document Select [Batch] in [Send Settings]. You can apply multiple scans to save scanned data in [File Type], and also specify [Digital...
... your business details or the type of the data may be used if the receiver specifies forwarding destinations by splitting it into groups of a specified number of pages. Batch document Select [Batch] in [Send Settings]. You can apply multiple scans to save scanned data in [File Type], and also specify [Digital...

Manuals
Page 58
... same size and orientation as Batch mode may require that [Use Paper Tray Settg] is selected, the paper size and orientation of copies with the number keys. When placing the original on screen. 9. Some functions such as the originals. 4. Make sure that you have selected will appear in the ADF. Press..., press the [Reset] key to clear the settings. 56 When there are scanned. Place the originals. 6. Copy 2. Make sure no previous settings remain. Enter the number of the tray you press the [ ] key when placing originals in [Orig.]. 5.
... same size and orientation as Batch mode may require that [Use Paper Tray Settg] is selected, the paper size and orientation of copies with the number keys. When placing the original on screen. 9. Some functions such as the originals. 4. Make sure that you have selected will appear in the ADF. Press..., press the [Reset] key to clear the settings. 56 When there are scanned. Place the originals. 6. Copy 2. Make sure no previous settings remain. Enter the number of the tray you press the [ ] key when placing originals in [Orig.]. 5.

Manuals
Page 64
... [From Left to Right]. Orientation of the original and image position of Combine The image position of Combine differs according to original orientation and the number of originals to be used to select a reproduction ratio automatically and copy the originals onto a single sheet of the copy paper, the machine will automatically...
... [From Left to Right]. Orientation of the original and image position of Combine The image position of Combine differs according to original orientation and the number of originals to be used to select a reproduction ratio automatically and copy the originals onto a single sheet of the copy paper, the machine will automatically...

Manuals
Page 66
... [Orientation]. Place the originals, and then press the [Start] key. To specify the original orientation is whether readable or unreadable, press [Orig.'s Orientation]. 7. Select the number of a sheet. 1. Two-Sided Combine Combines various pages of originals onto two sides of one side of originals to one sheet. 64 Press [Cmb. 1 Side...
... [Orientation]. Place the originals, and then press the [Start] key. To specify the original orientation is whether readable or unreadable, press [Orig.'s Orientation]. 7. Select the number of a sheet. 1. Two-Sided Combine Combines various pages of originals onto two sides of one side of originals to one sheet. 64 Press [Cmb. 1 Side...

Manuals
Page 68
Select the paper tray. 13. Copy 7. Press [Orientation]. 9. Select [Top to Top] or [Top to combine. 11. Select the number of originals to Bottom] for [Original] and/or [Copy], and then press [OK]. 10. Press [Cmb. 2 Sides]. 8. Press [OK] twice. 12. 3. Place the originals, and then press the [Start] key. 66
Select the paper tray. 13. Copy 7. Press [Orientation]. 9. Select [Top to Top] or [Top to combine. 11. Select the number of originals to Bottom] for [Original] and/or [Copy], and then press [OK]. 10. Press [Cmb. 2 Sides]. 8. Press [OK] twice. 12. 3. Place the originals, and then press the [Start] key. 66

Manuals
Page 69
Enter the vertical size with the number keys, and then press [ ]. 6. Load the paper face down in from the Bypass Tray Paper that has a horizontal length of 139.0-600.0 mm (5.48-23....62 inches) and a vertical length of 90.0-216.0 mm (3.55-8.50 inches) can be fed in the bypass tray. Enter the horizontal size with the number keys, and then press [ ]. 7. Press [OK] twice. 8. The bypass tray ( ) is automatically selected. 2. Press [Custom Size]. 5. Press [Paper Size]. 4. Place the originals, and then press...
Enter the vertical size with the number keys, and then press [ ]. 6. Load the paper face down in from the Bypass Tray Paper that has a horizontal length of 139.0-600.0 mm (5.48-23....62 inches) and a vertical length of 90.0-216.0 mm (3.55-8.50 inches) can be fed in the bypass tray. Enter the horizontal size with the number keys, and then press [ ]. 7. Press [OK] twice. 8. The bypass tray ( ) is automatically selected. 2. Press [Custom Size]. 5. Press [Paper Size]. 4. Place the originals, and then press...

Manuals
Page 72
..., press the [Stop] key. 70 Press [Sort], and then press [OK]. 3. Press [Other Func.]. 2. Changing the Number of Sets You can change the number of copy sets using the number keys. 4. Select the paper tray. 5. is selected. 1. 3. Place the originals, and then press the [Start] key.... Copy Sort The machine assembles copies as sets in sequential order. While "Copying..." Enter the number of copy sets during ...
..., press the [Stop] key. 70 Press [Sort], and then press [OK]. 3. Press [Other Func.]. 2. Changing the Number of Sets You can change the number of copy sets using the number keys. 4. Select the paper tray. 5. is selected. 1. 3. Place the originals, and then press the [Start] key.... Copy Sort The machine assembles copies as sets in sequential order. While "Copying..." Enter the number of copy sets during ...

Manuals
Page 73
Press [Continue]. Enter the number of copy sets with the number keys. 3. Copying starts again. 71 Sort 2.
Press [Continue]. Enter the number of copy sets with the number keys. 3. Copying starts again. 71 Sort 2.

Manuals
Page 76
... or e-mail destinations or enable the "Email TX Results" function, specify a sender. 9. TX] is not highlighted. 4. Press the [Start] key. 6. You can enter the destination's number or address directly or select from the Address Book by pressing the destination key. Specify a destination. 4. Make the scan settings you make a mistake, press the...
... or e-mail destinations or enable the "Email TX Results" function, specify a sender. 9. TX] is not highlighted. 4. Press the [Start] key. 6. You can enter the destination's number or address directly or select from the Address Book by pressing the destination key. Specify a destination. 4. Make the scan settings you make a mistake, press the...

Manuals
Page 78
... settings such as "SUB Code", "SEP Code", and "International TX Mode". Press [Change]. 4. You can search by the registered name, user code, fax number, folder name, e-mail address, or IPFax destination. 6. Press [Fax Dest.]. 7. Press the [User Tools/Counter] key. Press [Fax Dest.]. 5. Press... Fax Destination • If you want to delete. Features]. 15. Press [Exit]. 17. Press the name key, or enter the registered number using the number keys, and then press [OK]. 14. Be sure to its registered Personal Box, for example, cannot be delivered. To specify [SUB Code...
... settings such as "SUB Code", "SEP Code", and "International TX Mode". Press [Change]. 4. You can search by the registered name, user code, fax number, folder name, e-mail address, or IPFax destination. 6. Press [Fax Dest.]. 7. Press the [User Tools/Counter] key. Press [Fax Dest.]. 5. Press... Fax Destination • If you want to delete. Features]. 15. Press [Exit]. 17. Press the name key, or enter the registered number using the number keys, and then press [OK]. 14. Be sure to its registered Personal Box, for example, cannot be delivered. To specify [SUB Code...

Manuals
Page 85
... time, and then press [ ]. (mainly Europe and Asia) Enter the time (24 hour format) using the number keys. (mainly North America) Enter the time using the number keys, and then select [AM] or [PM]. When entering numbers smaller than 10, add a zero at the time. Use Memory Transmission for this function. If documents...
... time, and then press [ ]. (mainly Europe and Asia) Enter the time (24 hour format) using the number keys. (mainly North America) Enter the time using the number keys, and then select [AM] or [PM]. When entering numbers smaller than 10, add a zero at the time. Use Memory Transmission for this function. If documents...
Manuals
Page 86
... You can also change the file information after they are stored. You can store and send a document at the same time. A four to eight digit number can be automatically assigned names such as not to send to know who and what departments stored documents in the preview. 2. Specify the "Original Orientation...
... You can also change the file information after they are stored. You can store and send a document at the same time. A four to eight digit number can be automatically assigned names such as not to send to know who and what departments stored documents in the preview. 2. Specify the "Original Orientation...
Manuals
Page 87
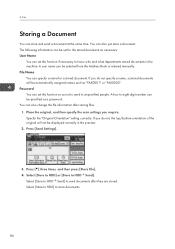
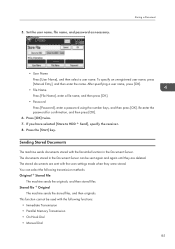
... a user name, press [OK]. • File Name Press [File Name], enter a file name, and then press [OK]. • Password Press [Password], enter a password using the number keys, and then press [OK]. Storing a Document • User Name Press [User Name], and then select a user name. If you have selected [Store to HDD...
... a user name, press [OK]. • File Name Press [File Name], enter a file name, and then press [OK]. • Password Press [Password], enter a password using the number keys, and then press [OK]. Storing a Document • User Name Press [User Name], and then select a user name. If you have selected [Store to HDD...


