
Manuals
Page 5
... Properties...90 Standard Printing...91 When Using the PCL 6 Printer Driver...91 Locked Print...92 Sending a Locked Print File...92 Printing a Locked Print File Using the Control Panel 92 Hold Print...94 Sending a Hold Print ...
... Properties...90 Standard Printing...91 When Using the PCL 6 Printer Driver...91 Locked Print...92 Sending a Locked Print File...92 Printing a Locked Print File Using the Control Panel 92 Hold Print...94 Sending a Hold Print ...

Manuals
Page 6
... Paper into Tray 1...123 Loading Paper into Trays 2 and 3...124 Loading Paper into the Bypass Tray...127 Settings to Use the Bypass Tray under the Printer Function 129 Loading Orientation-Fixed Paper or Two-Sided Paper 132 Recommended Paper Sizes and Types...135 Thick Paper...138 Envelopes...139 Adding Toner...142... Panel 154 Messages Displayed When Using the Copy/Document Server Function 154 Messages Displayed When Using the Facsimile Function 156 Messages Displayed When Using the Printer Function 169 Messages Displayed When Using the Scanner Function 182 4
... Paper into Tray 1...123 Loading Paper into Trays 2 and 3...124 Loading Paper into the Bypass Tray...127 Settings to Use the Bypass Tray under the Printer Function 129 Loading Orientation-Fixed Paper or Two-Sided Paper 132 Recommended Paper Sizes and Types...135 Thick Paper...138 Envelopes...139 Adding Toner...142... Panel 154 Messages Displayed When Using the Copy/Document Server Function 154 Messages Displayed When Using the Facsimile Function 156 Messages Displayed When Using the Printer Function 169 Messages Displayed When Using the Scanner Function 182 4

Manuals
Page 14
Changing the initial settings of the printer driver to Operate the Machine More Effectively BQX139S Registering and using frequently-used printing settings See "Displaying the Printing Preferences Dialog Box", Print . Changing the ... Default Functions of Icons on the [Home] Screen", Convenient Functions . 12 1. Adding shortcuts to frequently used programs or Web pages See "Adding Icons to the printer driver See "Using One Click Presets", Print .
Changing the initial settings of the printer driver to Operate the Machine More Effectively BQX139S Registering and using frequently-used printing settings See "Displaying the Printing Preferences Dialog Box", Print . Changing the ... Default Functions of Icons on the [Home] Screen", Convenient Functions . 12 1. Adding shortcuts to frequently used programs or Web pages See "Adding Icons to the printer driver See "Using One Click Presets", Print .
Manuals
Page 17
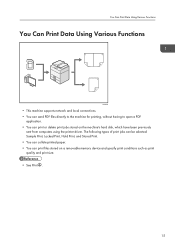
... having to open a PDF application. • You can print files stored on the machine's hard disk, which have been previously sent from computers using the printer driver.
... having to open a PDF application. • You can print files stored on the machine's hard disk, which have been previously sent from computers using the printer driver.

Manuals
Page 18
... in scanner mode to your computer. • Using the file format converter, you can download documents stored in copier, Document Server, or printer mode to your computer to use the Document Server, see "Storing Data in the Document Server" and "Document Server", Copy/ Document Server .... • For details about the Document Server in printer mode, see "Saving and Printing Using the Document Server", Print . • For details about the Document Server in fax mode, see "Storing a ...
... in scanner mode to your computer. • Using the file format converter, you can download documents stored in copier, Document Server, or printer mode to your computer to use the Document Server, see "Storing Data in the Document Server" and "Document Server", Copy/ Document Server .... • For details about the Document Server in printer mode, see "Saving and Printing Using the Document Server", Print . • For details about the Document Server in fax mode, see "Storing a ...
Manuals
Page 20
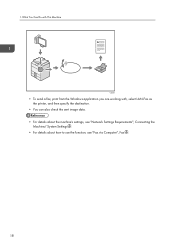
1. What You Can Do with This Machine CJQ605 • To send a fax, print from the Windows application you are working with, select LAN-Fax as the printer, and then specify the destination. • You can also check the sent image data. • For details about the machine's settings, see "Network Settings Requirements", Connecting the Machine/ System Settings . • For details about how to use the function, see "Fax via Computer", Fax . 18
1. What You Can Do with This Machine CJQ605 • To send a fax, print from the Windows application you are working with, select LAN-Fax as the printer, and then specify the destination. • You can also check the sent image data. • For details about the machine's settings, see "Network Settings Requirements", Connecting the Machine/ System Settings . • For details about how to use the function, see "Fax via Computer", Fax . 18

Manuals
Page 26
... unit, the machine beeps to prevent them from being transmitted or stored. If the document is unauthorized. • Using the printer driver, you can embed text in the copy, discouraging such unauthorized copying. • For details, see the... printer driver Help, Print , and Security Guide . 24 CJQ613 • Using the printer driver, you can embed a pattern in the copy, preventing confidential information from being attempted. If a document protected by a copier or multifunction printer, the embedded text appears conspicuous in the ...
... unit, the machine beeps to prevent them from being transmitted or stored. If the document is unauthorized. • Using the printer driver, you can embed text in the copy, discouraging such unauthorized copying. • For details, see the... printer driver Help, Print , and Security Guide . 24 CJQ613 • Using the printer driver, you can embed a pattern in the copy, preventing confidential information from being attempted. If a document protected by a copier or multifunction printer, the embedded text appears conspicuous in the ...

Manuals
Page 39
Data In indicator (facsimile and printer mode) Flashes when the machine is inserted in the media slot or accessed. 20. See Fax and Print . 19. See "Personal Boxes" and "Printing a File ...
Data In indicator (facsimile and printer mode) Flashes when the machine is inserted in the media slot or accessed. 20. See Fax and Print . 19. See "Personal Boxes" and "Printing a File ...

Manuals
Page 40
Getting Started How to make settings for using the machine as a printer. To display the [Home] screen, press the [Home] key. 5 1 6 7 2 8 3 4 9 CMR615 1. [Copier] Press to Use the [Home] Screen The icons of each function are displayed on ... can be recalled easily by pressing the shortcut icons. For details about how to use the copy function, see Copy/ Document Server . 2. [Printer] Press to make settings for the printer function, see Print . 3. [Document Server] Press to make copies. 2. For details about how to use the Document Server function, see p.39 "Adding...
Getting Started How to make settings for using the machine as a printer. To display the [Home] screen, press the [Home] key. 5 1 6 7 2 8 3 4 9 CMR615 1. [Copier] Press to Use the [Home] Screen The icons of each function are displayed on ... can be recalled easily by pressing the shortcut icons. For details about how to use the copy function, see Copy/ Document Server . 2. [Printer] Press to make settings for the printer function, see Print . 3. [Document Server] Press to make copies. 2. For details about how to use the Document Server function, see p.39 "Adding...

Manuals
Page 91
...to use in [Connect To]. 7. For network connection via parallel connection, the printer port is set . Print This chapter describes frequently used printer functions and operations. Quick Install You can install the printer drivers easily from the CD-ROM provided with this manual.) 2. After reading the... 5. If the [User Account Control] dialog box appears, and then click [Yes] or [Continue]. 10. Using Quick Install, the PCL 6 printer driver is displayed in this chapter, see Print on as necessary. 9. For the information not included in [Connect To]. Quit all applications. (Do...
...to use in [Connect To]. 7. For network connection via parallel connection, the printer port is set . Print This chapter describes frequently used printer functions and operations. Quick Install You can install the printer drivers easily from the CD-ROM provided with this manual.) 2. After reading the... 5. If the [User Account Control] dialog box appears, and then click [Yes] or [Continue]. 10. Using Quick Install, the PCL 6 printer driver is displayed in this chapter, see Print on as necessary. 9. For the information not included in [Connect To]. Quit all applications. (Do...

Manuals
Page 92
Print Displaying the Printer Driver Properties This section explains how to open the printer driver properties from [Devices and Printers]. • Manage Printers permission is required to all users. 1. Click [Printer properties]. 90 On the [Start] menu, click [Devices and Printers]. 2. Settings made in the printer properties dialog box are applied to change the machine default settings for individual users. Right-click the icon of the printer you want to use. 3. Log on as an Administrators group member. • You cannot change the printer settings. 5.
Print Displaying the Printer Driver Properties This section explains how to open the printer driver properties from [Devices and Printers]. • Manage Printers permission is required to all users. 1. Click [Printer properties]. 90 On the [Start] menu, click [Devices and Printers]. 2. Settings made in the printer properties dialog box are applied to change the machine default settings for individual users. Right-click the icon of the printer you want to use. 3. Log on as an Administrators group member. • You cannot change the printer settings. 5.

Manuals
Page 93
... selected according to the paper size and type specified. 8. In this case, check if the document was printed. When Using the PCL 6 Printer Driver 1. Click the WordPad menu button in Low Power mode or Sleep mode, an error message might appear when the print job is in... the "Paper Type:" list, select the type of the original. 7. In the "Job Type:" list, select [Normal Print]. 5. In the [Select Printer] list, select the printer you send a print job via USB 2.0 while the machine is complete. Start printing from the application's [Print] dialog box. 91 In the "Orientation:"...
... selected according to the paper size and type specified. 8. In this case, check if the document was printed. When Using the PCL 6 Printer Driver 1. Click the WordPad menu button in Low Power mode or Sleep mode, an error message might appear when the print job is in... the "Paper Type:" list, select the type of the original. 7. In the "Job Type:" list, select [Normal Print]. 5. In the [Select Printer] list, select the printer you send a print job via USB 2.0 while the machine is complete. Start printing from the application's [Print] dialog box. 91 In the "Orientation:"...
Manuals
Page 94
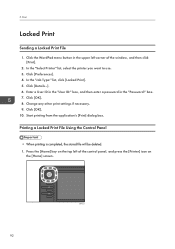
...the application's [Print] dialog box. Click [Preferences]. 4. Click [OK]. 8. Press the [Home] key on the top left corner of the control panel, and press the [Printer] icon on the [Home] screen. 92 CMR612 Click [Details...]. 6. Change any other print settings if necessary. 9. 5. Enter a User ID in the "User ID:" box,... [Print]. 2. Printing a Locked Print File Using the Control Panel • When printing is completed, the stored file will be deleted. 1. In the "Select Printer" list, select the printer you want to use. 3. Print Locked Print Sending a Locked Print File 1.
...the application's [Print] dialog box. Click [Preferences]. 4. Click [OK]. 8. Press the [Home] key on the top left corner of the control panel, and press the [Printer] icon on the [Home] screen. 92 CMR612 Click [Details...]. 6. Change any other print settings if necessary. 9. 5. Enter a User ID in the "User ID:" box,... [Print]. 2. Printing a Locked Print File Using the Control Panel • When printing is completed, the stored file will be deleted. 1. In the "Select Printer" list, select the printer you want to use. 3. Print Locked Print Sending a Locked Print File 1.

Manuals
Page 96
... [Details...]. 6. Enter a User ID in the upper left of a Hold Print file. 7. In the "Select Printer" list, select the printer you want to use. 3. You can optionally set a file name of the control panel, and press the [Printer] icon on the [Home] screen. 94 CMR612 Change any other print settings if necessary. 10...
... [Details...]. 6. Enter a User ID in the upper left of a Hold Print file. 7. In the "Select Printer" list, select the printer you want to use. 3. You can optionally set a file name of the control panel, and press the [Printer] icon on the [Home] screen. 94 CMR612 Change any other print settings if necessary. 10...

Manuals
Page 98
... (Shared) Prints the file immediately and also stores the file in the machine and allows any other print settings if necessary. 9. In the "Select Printer" list, select the printer you want to use the Stored Print (Shared) and Store and Print (Shared) functions, authentication must be used for Stored Print files. In...
... (Shared) Prints the file immediately and also stores the file in the machine and allows any other print settings if necessary. 9. In the "Select Printer" list, select the printer you want to use the Stored Print (Shared) and Store and Print (Shared) functions, authentication must be used for Stored Print files. In...

Manuals
Page 99
.... Press the [Home] key on the [Home] screen. Select the files you set the password in the printer driver, enter the password. To change the print settings of the control panel, and press the [Printer] icon on the top left of the document, press [Det.Settings]. 7. You can select all the Stored...
.... Press the [Home] key on the [Home] screen. Select the files you set the password in the printer driver, enter the password. To change the print settings of the control panel, and press the [Printer] icon on the top left of the document, press [Det.Settings]. 7. You can select all the Stored...

Manuals
Page 130
... the paper and place it on the bypass tray. For details about [Panel Key Sound], see p.129 "Settings to Use the Bypass Tray under the Printer Function". • Certain types of paper might not be detected properly when placed on the bypass tray again. • Pull the extender out when loading...
... the paper and place it on the bypass tray. For details about [Panel Key Sound], see p.129 "Settings to Use the Bypass Tray under the Printer Function". • Certain types of paper might not be detected properly when placed on the bypass tray again. • Pull the extender out when loading...

Manuals
Page 131
... settings for the next user. • For details about setting printer drivers, see "System", Print . • The default setting of the Printer Features menu, the settings made using the control panel 1. CMR633 2. Press [Printer Bypass Paper Size]. 5. Press [OK]. 7. Press [Tray Paper...Priority] in [System] of [Bypass Tray] is the default setting for [Printer Bypass Paper Size]. For details, see "Printing Documents", Print . • (mainly Europe and Asia) • [A4 ] is the default setting for [Printer Bypass Paper Size]. • (mainly North America) • [81/2...
... settings for the next user. • For details about setting printer drivers, see "System", Print . • The default setting of the Printer Features menu, the settings made using the control panel 1. CMR633 2. Press [Printer Bypass Paper Size]. 5. Press [OK]. 7. Press [Tray Paper...Priority] in [System] of [Bypass Tray] is the default setting for [Printer Bypass Paper Size]. For details, see "Printing Documents", Print . • (mainly Europe and Asia) • [A4 ] is the default setting for [Printer Bypass Paper Size]. • (mainly North America) • [81/2...

Manuals
Page 132
9. Press the [User Tools/Counter] key. If a custom size is already specified, press [Change]. 6. Press [OK] twice. 11. Press [Printer Bypass Paper Size]. 5. Press [Custom Size]. Setting thick paper or OHP transparencies using the control panel • Use A4 or 81/2 × 11 size OHP ...
9. Press the [User Tools/Counter] key. If a custom size is already specified, press [Change]. 6. Press [OK] twice. 11. Press [Printer Bypass Paper Size]. 5. Press [Custom Size]. Setting thick paper or OHP transparencies using the control panel • Use A4 or 81/2 × 11 size OHP ...

Manuals
Page 133
... onto OHP transparencies, proceed to step 11. 10. Select the paper type, and then press [OK]. Press [Thick Paper], and then press [OK]. 11. Press [Printer Bypass Paper Size], and then specify the paper size. 5. To load thick paper, make sure that you use specified OHP transparencies. • For details about...
... onto OHP transparencies, proceed to step 11. 10. Select the paper type, and then press [OK]. Press [Thick Paper], and then press [OK]. 11. Press [Printer Bypass Paper Size], and then specify the paper size. 5. To load thick paper, make sure that you use specified OHP transparencies. • For details about...


