Manuals
Page 21
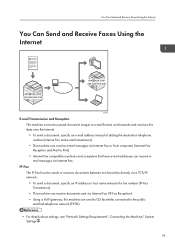
... Using the Internet [email protected] xxx.xxx.xxx.xxx [email protected] xxx.xxx.xxx.xxx CJQ606 E-mail Transmission and Reception This machine converts scanned document images to e-mail format, and transmits and receives this data over the Internet. • To send a document, specify an e-mail address ... This machine can send to G3 facsimiles connected to Print). • Internet Fax compatible machines and computers that have e-mail addresses can receive email messages via Internet Fax (IP-Fax Reception). • Using a VoIP gateway, this machine can receive documents sent via Internet Fax.
... Using the Internet [email protected] xxx.xxx.xxx.xxx [email protected] xxx.xxx.xxx.xxx CJQ606 E-mail Transmission and Reception This machine converts scanned document images to e-mail format, and transmits and receives this data over the Internet. • To send a document, specify an e-mail address ... This machine can send to G3 facsimiles connected to Print). • Internet Fax compatible machines and computers that have e-mail addresses can receive email messages via Internet Fax (IP-Fax Reception). • Using a VoIP gateway, this machine can receive documents sent via Internet Fax.

Manuals
Page 49
... as one file by senders. • Depending on your business details or the type of originals and send the scanned originals. You can add a digital signature to your objectives. • Depending on the options installed, some functions cannot be recommended.... name Program description Transmission result notification fax Select [Preview] and specify [Email TX Results] in a Program Program name Program description Effect Digital signature scan In [Send Settings], specify [PDF], [High Compress. Scanned documents maintain much of the detail of the originals, but the size of...
... as one file by senders. • Depending on your business details or the type of originals and send the scanned originals. You can add a digital signature to your objectives. • Depending on the options installed, some functions cannot be recommended.... name Program description Transmission result notification fax Select [Preview] and specify [Email TX Results] in a Program Program name Program description Effect Digital signature scan In [Send Settings], specify [PDF], [High Compress. Scanned documents maintain much of the detail of the originals, but the size of...

Manuals
Page 76
...Sending Originals Using the Exposure Glass (Memory Transmission) 1. Repeat this step for each page. 74 If you require. 5. Make the scan settings you send documents to several destinations (broadcasting), specify the next destination. 8. Place the next original on the exposure glass. 3....5. TX] is not highlighted. 4. TX] is not highlighted. 2. When sending the same original to Internet Fax or e-mail destinations or enable the "Email TX Results" function, specify a sender. 9. Press the [Start] key. 6. 4. Fax 3. Make sure [Immed. Specify a destination. If you send...
...Sending Originals Using the Exposure Glass (Memory Transmission) 1. Repeat this step for each page. 74 If you require. 5. Make the scan settings you send documents to several destinations (broadcasting), specify the next destination. 8. Place the next original on the exposure glass. 3....5. TX] is not highlighted. 4. TX] is not highlighted. 2. When sending the same original to Internet Fax or e-mail destinations or enable the "Email TX Results" function, specify a sender. 9. Press the [Start] key. 6. 4. Fax 3. Make sure [Immed. Specify a destination. If you send...

Manuals
Page 109
... [File Type], and then press [PDF]. 6. CMR612 2. Place originals. 5. Example: Scanning the document in [Send Settings] twice, select [Sender Name], and then specify the e-mail sender (originator). 107 Press the [Email] tab. 4. Specify the destination. Select [Type of the control panel, and press the... [Scanner] icon on the [Home] screen. Basic Procedure for Sending Scan Files by E-mail Basic Procedure for Sending Scan Files by Email 1. Make sure that no previous settings remain. Press [ ] in color/duplex mode, and saving as a PDF...
... [File Type], and then press [PDF]. 6. CMR612 2. Place originals. 5. Example: Scanning the document in [Send Settings] twice, select [Sender Name], and then specify the e-mail sender (originator). 107 Press the [Email] tab. 4. Specify the destination. Select [Type of the control panel, and press the... [Scanner] icon on the [Home] screen. Basic Procedure for Sending Scan Files by E-mail Basic Procedure for Sending Scan Files by Email 1. Make sure that no previous settings remain. Press [ ] in color/duplex mode, and saving as a PDF...

Manuals
Page 110
... Notice]. 6. Press the [User Tools/Counter] key. 2. Press [Title 1], [Title 2] or [Title 3] to select the key for each title. 9. Press [Exit]. 11. Press [Email]. 108 Press [OK]. 10. Scan 8. The keys you select [Reception Notice], the selected e-mail sender will receive e-mail notification when the e-mail recipient has opened the e-mail. 9. Press...
... Notice]. 6. Press the [User Tools/Counter] key. 2. Press [Title 1], [Title 2] or [Title 3] to select the key for each title. 9. Press [Exit]. 11. Press [Email]. 108 Press [OK]. 10. Scan 8. The keys you select [Reception Notice], the selected e-mail sender will receive e-mail notification when the e-mail recipient has opened the e-mail. 9. Press...

Manuals
Page 111
... fax display on the scanner function screen. Press [Exit]. 20. Press the [User Tools/Counter] key. 2. 12. Press [Email Address]. Press [Use Email Address for Sending Scan Files by E-mail 13. If [Email/Internet Fax Dest.] is specified, registered e-mail addresses only appear in the address display on the fax function screen. 16...18. Press the [User Tools/Counter] key. Enter the e-mail address. 14. Press [OK]. 17. Deleting an E-mail Destination 1. Basic Procedure for ], and then select [Email/Internet Fax Dest.] or [Internet Fax Destination Only]. Press [OK]. 15.
... fax display on the scanner function screen. Press [Exit]. 20. Press the [User Tools/Counter] key. 2. 12. Press [Email Address]. Press [Use Email Address for Sending Scan Files by E-mail 13. If [Email/Internet Fax Dest.] is specified, registered e-mail addresses only appear in the address display on the fax function screen. 16...18. Press the [User Tools/Counter] key. Enter the e-mail address. 14. Press [OK]. 17. Deleting an E-mail Destination 1. Basic Procedure for ], and then select [Email/Internet Fax Dest.] or [Internet Fax Destination Only]. Press [OK]. 15.

Manuals
Page 112
Press [Email Address]. 8. Press the [User Tools/Counter] key. Entering an E-mail Address Manually 1. Press [Enter] under [Destination]. 3. Enter the e-mail address. 4. You can search by the ..., e-mail address, or IP-Fax destination. 6. Press [OK]. 11. Press the name key, or enter the registered number using the number keys. Press [Email]. 7. Press [Delete All], and then press [OK]. 9. Press [Exit]. 10. Press [Email]. 5. 6. Press [Manual Entry]. 2. Scan 4. Select the name whose e-mail address you want to delete. Press [OK]. 110
Press [Email Address]. 8. Press the [User Tools/Counter] key. Entering an E-mail Address Manually 1. Press [Enter] under [Destination]. 3. Enter the e-mail address. 4. You can search by the ..., e-mail address, or IP-Fax destination. 6. Press [OK]. 11. Press the name key, or enter the registered number using the number keys. Press [Email]. 7. Press [Delete All], and then press [OK]. 9. Press [Exit]. 10. Press [Email]. 5. 6. Press [Manual Entry]. 2. Scan 4. Select the name whose e-mail address you want to delete. Press [OK]. 110

Manuals
Page 187
A time out occurred when using WSD Scanner. Time outs occur when too much time passes between scanning an original and sending its data. The correct protection code was sent." Please re-enter." Sending email has been cancelled. Change the [Scanner Features] settings as follows: • Increase the e-mail size limit in Scanner Features...
A time out occurred when using WSD Scanner. Time outs occur when too much time passes between scanning an original and sending its data. The correct protection code was sent." Please re-enter." Sending email has been cancelled. Change the [Scanner Features] settings as follows: • Increase the e-mail size limit in Scanner Features...

Manuals
Page 191
... set SMTP authentication, see "Loading Paper", Paper Specifications and Adding Paper . "SMTP authentication email address and administrator email address mismatch." Press [Write] to write the current scanned data to the memory storage device, or press [Cancel] to the memory device. Scanning has been cancelled. inserted. specified paper tray. Too many jobs are in standby...
... set SMTP authentication, see "Loading Paper", Paper Specifications and Adding Paper . "SMTP authentication email address and administrator email address mismatch." Press [Write] to write the current scanned data to the memory storage device, or press [Cancel] to the memory device. Scanning has been cancelled. inserted. specified paper tray. Too many jobs are in standby...
Quick Start Guide
Page 41
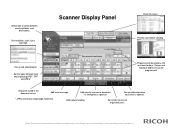
... touch buttons. Select file stored in single page mode only. Your display may vary depending on your email is opened. * JPEG scanning in the document server. Set file types between email and folder scan destinations. Set resolution, scan size & scan type. Scanner Display Panel Check file status. Add subject heading. Set up notification when your operating...
... touch buttons. Select file stored in single page mode only. Your display may vary depending on your email is opened. * JPEG scanning in the document server. Set file types between email and folder scan destinations. Set resolution, scan size & scan type. Scanner Display Panel Check file status. Add subject heading. Set up notification when your operating...
Quick Start Guide
Page 42
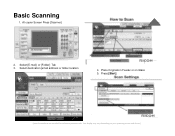
Basic Scanning 1. Select [E-mail] or [Folder] Tab 3. Press [Start] (Note: Screenshots are provided for reference purposes only. Place Originals in Feeder or on your operating system and device.) Your display may vary depending on Glass 5. Select destination [email address or folder location 4. At copier Screen Press [Scanner] 2.
Basic Scanning 1. Select [E-mail] or [Folder] Tab 3. Press [Start] (Note: Screenshots are provided for reference purposes only. Place Originals in Feeder or on your operating system and device.) Your display may vary depending on Glass 5. Select destination [email address or folder location 4. At copier Screen Press [Scanner] 2.


