
Operating Instructions (Large File - 15.18 MB)
Page 5
...Surround Sound Enjoying a pre-programmed sound field ....59 Resetting sound fields to the initial settings 64 Enjoying the surround effect at low volume levels (NIGHT MODE 65 Advanced Speakers Set Up Adjusting the speaker settings manually ....65 Adjusting the equalizer 70 Tuner Operations Listening to FM/AM radio 71 Listening to satellite radio 74 Control for HDMI Using the Control for HDMI function for "BRAVIA" Sync 85 Preparing Control for HDMI function ........87 Watching a DVD (One-Touch Play 88 Enjoying the TV sound from the speakers connected to the receiver (System Audio Control...
...Surround Sound Enjoying a pre-programmed sound field ....59 Resetting sound fields to the initial settings 64 Enjoying the surround effect at low volume levels (NIGHT MODE 65 Advanced Speakers Set Up Adjusting the speaker settings manually ....65 Adjusting the equalizer 70 Tuner Operations Listening to FM/AM radio 71 Listening to satellite radio 74 Control for HDMI Using the Control for HDMI function for "BRAVIA" Sync 85 Preparing Control for HDMI function ........87 Watching a DVD (One-Touch Play 88 Enjoying the TV sound from the speakers connected to the receiver (System Audio Control...
Operating Instructions (Large File - 15.18 MB)
Page 13
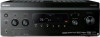
... digital and analog jacks (page 94). S DISC SKIP Press to adjust the volume level of all speakers at the same time. is compatible with pink printing. Name Function W RESOLUTION Press repeatedly to change the resolution of signals output from the speakers connected to this section may operate differently than described. X 2CH/ A.DIRECT Press to select a sound field (page 116) or to switch the audio of the TV. b)The TV/5, N /CATEGORY MODE and PRESET...
... digital and analog jacks (page 94). S DISC SKIP Press to adjust the volume level of all speakers at the same time. is compatible with pink printing. Name Function W RESOLUTION Press repeatedly to change the resolution of signals output from the speakers connected to this section may operate differently than described. X 2CH/ A.DIRECT Press to select a sound field (page 116) or to switch the audio of the TV. b)The TV/5, N /CATEGORY MODE and PRESET...
Operating Instructions (Large File - 15.18 MB)
Page 20
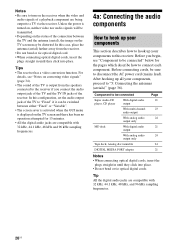
... video and audio signals of the receiver. In this case, place the antenna (aerial) farther away from the speakers connected to the receiver if you begin, see "Notes on the TV screen and there has been no operation attempted for the pages which describe how to connect each component. Component to be connected Super Audio CD player, CD player With digital audio output With multi channel audio output With analog audio output only MD deck With digital audio output With analog audio output only Tape deck, Analog disc...
... video and audio signals of the receiver. In this case, place the antenna (aerial) farther away from the speakers connected to the receiver if you begin, see "Notes on the TV screen and there has been no operation attempted for the pages which describe how to connect each component. Component to be connected Super Audio CD player, CD player With digital audio output With multi channel audio output With analog audio output only MD deck With digital audio output With analog audio output only Tape deck, Analog disc...

Operating Instructions (Large File - 15.18 MB)
Page 28
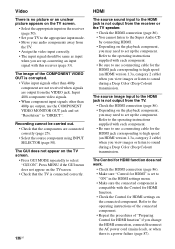
... speaker output jacks, HDMI OUT jack and PRE OUT jacks. If set to "AMP", the sound is not output from the TV speaker. • DSD signals of Super Audio CD are not output from the HDMI OUT jack while the receiver menu is displayed. • When you want to listen to the sound from the TV speaker, set "Input Assign" in the HDMI settings menu. Notes on HDMI connections • An audio signal input to the HDMI IN jack is not output from any other audio cords or digital connecting cords...
... speaker output jacks, HDMI OUT jack and PRE OUT jacks. If set to "AMP", the sound is not output from the TV speaker. • DSD signals of Super Audio CD are not output from the HDMI OUT jack while the receiver menu is displayed. • When you want to listen to the sound from the TV speaker, set "Input Assign" in the HDMI settings menu. Notes on HDMI connections • An audio signal input to the HDMI IN jack is not output from any other audio cords or digital connecting cords...
Operating Instructions (Large File - 15.18 MB)
Page 38
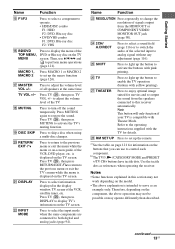
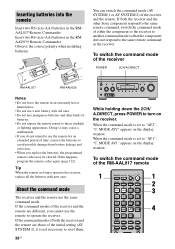
... when installing batteries. About the command mode The receiver and the remote use the remote to operate the receiver. When the command mode is set to direct sunlight or lighting apparatuses. MODE AV1" appears on the receiver. You can switch the command mode (AV SYSTEM 1 or AV SYSTEM 2) of the RM-AAL017 remote 1 THEATER SHIFT TV ZONE AMP 1 2 3 TV INPUT VIDEO1 VIDEO2 BD DVD 4 SAT 7 TUNER -/-- 5 TV 8 PHONO 0/10 6 WIDE MD/ TAPE SA-CD/ CD 9 D.TUNING MULTI...
... when installing batteries. About the command mode The receiver and the remote use the remote to operate the receiver. When the command mode is set to direct sunlight or lighting apparatuses. MODE AV1" appears on the receiver. You can switch the command mode (AV SYSTEM 1 or AV SYSTEM 2) of the RM-AAL017 remote 1 THEATER SHIFT TV ZONE AMP 1 2 3 TV INPUT VIDEO1 VIDEO2 BD DVD 4 SAT 7 TUNER -/-- 5 TV 8 PHONO 0/10 6 WIDE MD/ TAPE SA-CD/ CD 9 D.TUNING MULTI...

Operating Instructions (Large File - 15.18 MB)
Page 45
... receiver as a pre-amplifier. However, there will be further away from the actual distance value. In this case, the distance value shown on the subwoofer and turn on the display may be no problems even if you continue to the AUTO CAL MIC jack. 2 Set up the volume beforehand. Turn the MASTER VOLUME knob to just before the mid-point. • If you connect a subwoofer with the crossover frequency function, set...
... receiver as a pre-amplifier. However, there will be further away from the actual distance value. In this case, the distance value shown on the subwoofer and turn on the display may be no problems even if you continue to the AUTO CAL MIC jack. 2 Set up the volume beforehand. Turn the MASTER VOLUME knob to just before the mid-point. • If you connect a subwoofer with the crossover frequency function, set...
Operating Instructions (Large File - 15.18 MB)
Page 51
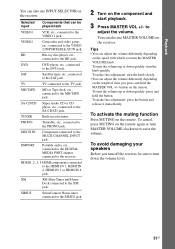
... hold the button. Component connected to the receiver. Portable audio, etc., connected to the DIGITAL MEDIA PORT adapter connected to the MULTI CHANNEL INPUT jack. SIRIUS SiriusConnect Home tuner connected to turn the MASTER VOLUME knob. Super Audio CD or CD player, etc., connected to adjust the volume. to the SA-CD/CD jack. To avoid damaging your speakers Before you turn down the volume level. 51US Playback You can also use MASTER VOLUME on the remote. TV TV connected to the DVD jack. button on...
... hold the button. Component connected to the receiver. Portable audio, etc., connected to the DIGITAL MEDIA PORT adapter connected to the MULTI CHANNEL INPUT jack. SIRIUS SiriusConnect Home tuner connected to turn the MASTER VOLUME knob. Super Audio CD or CD player, etc., connected to adjust the volume. to the SA-CD/CD jack. To avoid damaging your speakers Before you turn down the volume level. 51US Playback You can also use MASTER VOLUME on the remote. TV TV connected to the DVD jack. button on...
Operating Instructions (Large File - 15.18 MB)
Page 57
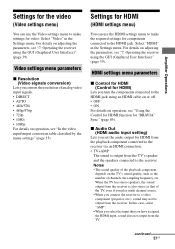
... use the HDMI settings menu to make settings for components connected to the HDMI jack. In this case, select "AMP". • When you select the input that of the TV, even if you play multi channel source. • When you convert the resolution of channels, the sampling frequency, etc. x Audio Out (HDMI audio input setting) Lets you turn the components connected to the receiver. When the TV has stereo speakers, the sound output from the receiver is also stereo as the number of analog video input signals. • DIRECT • AUTO...
... use the HDMI settings menu to make settings for components connected to the HDMI jack. In this case, select "AMP". • When you select the input that of the TV, even if you play multi channel source. • When you convert the resolution of channels, the sampling frequency, etc. x Audio Out (HDMI audio input setting) Lets you turn the components connected to the receiver. When the TV has stereo speakers, the sound output from the receiver is also stereo as the number of analog video input signals. • DIRECT • AUTO...
Operating Instructions (Large File - 15.18 MB)
Page 62
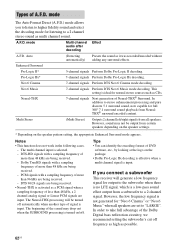
... output to "LARGE". Dolby TrueHD signals with a sampling frequency of more than 48 kHz, a 2 channel analog signal or Linear PCM signals are being received. - mode Multi channel Effect audio after decoding A.F.D. Multi Stereo (Multi Stereo) Outputs 2 channel left/right signals from certain speakers depending on the speaker settings. * Depending on the speaker pattern setting, the appropriate Enhanced Surround mode appears. PCM signals with a sampling frequency of more than 48 kHz are input. DTS 96/24 signals are being received. • Neural-THX is a low-pass sound...
... output to "LARGE". Dolby TrueHD signals with a sampling frequency of more than 48 kHz, a 2 channel analog signal or Linear PCM signals are being received. - mode Multi channel Effect audio after decoding A.F.D. Multi Stereo (Multi Stereo) Outputs 2 channel left/right signals from certain speakers depending on the speaker settings. * Depending on the speaker pattern setting, the appropriate Enhanced Surround mode appears. PCM signals with a sampling frequency of more than 48 kHz are input. DTS 96/24 signals are being received. • Neural-THX is a low-pass sound...
Operating Instructions (Large File - 15.18 MB)
Page 80
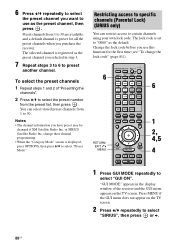
... preset channels 1 Repeat steps 1 and 2 of the receiver and the GUI menu appears on the TV screen. 2 Press V/v repeatedly to select "SIRIUS", then press or b. 80US The lock code is displayed, press OPTIONS, then press V/v to select "GUI ON". Change the lock code before you use as the default. SOURCE MOVIE MUSIC INPUT NIGHT RESOLUTION MODE SLEEP MODE GUI MODE 1 RETURN/ EXIT O MENU HOME CATEGORY 2, 4,5 4 TUNING CATEGORY MODE TUNING DISC SKIP 1 Press GUI MODE repeatedly to select "Preset Mode...
... preset channels 1 Repeat steps 1 and 2 of the receiver and the GUI menu appears on the TV screen. 2 Press V/v repeatedly to select "SIRIUS", then press or b. 80US The lock code is displayed, press OPTIONS, then press V/v to select "GUI ON". Change the lock code before you use as the default. SOURCE MOVIE MUSIC INPUT NIGHT RESOLUTION MODE SLEEP MODE GUI MODE 1 RETURN/ EXIT O MENU HOME CATEGORY 2, 4,5 4 TUNING CATEGORY MODE TUNING DISC SKIP 1 Press GUI MODE repeatedly to select "Preset Mode...
Operating Instructions (Large File - 15.18 MB)
Page 89
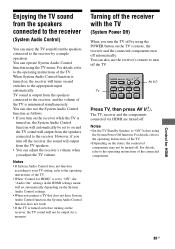
... use the receiver's remote to the receiver by using the POWER button on , the receiver will automatically be output for a moment. TV sound is turned on the TV's remote, the receiver and the connected components turn off . The TV, receiver and the components connected via HDMI are turned off automatically. When System Audio Control function is output from the speakers connected to the appropriate input automatically. You can also use the System Audio Control function as follows. • If you adjust the TV volume...
... use the receiver's remote to the receiver by using the POWER button on , the receiver will automatically be output for a moment. TV sound is turned on the TV's remote, the receiver and the connected components turn off . The TV, receiver and the components connected via HDMI are turned off automatically. When System Audio Control function is output from the speakers connected to the appropriate input automatically. You can also use the System Audio Control function as follows. • If you adjust the TV volume...
Operating Instructions (Large File - 15.18 MB)
Page 112
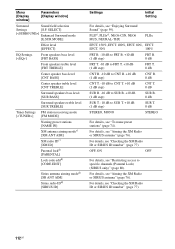
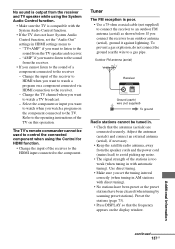
... For details, see "Aiming the XM Radio or SIRIUS antenna" (page 76). For details, see "Enjoying Surround Sound" (page 59). SELECT] [] Enhanced Surround mode [E.SUR MODE] Effect level [EFFECT] EQ Settings [] Front speakers bass level [FRT BASS] Front speakers treble level [FRT TREBLE] Center speaker bass level [CNT BASS] Center speaker treble level [CNT TREBLE] Surround speakers bass level [SUR BASS] Surround speakers treble level [SUR TREBLE] Tuner Settings FM station receiving mode [] [FM MODE] Naming preset stations [NAME IN] XM antenna aiming modec) [XM ANT AIM] XM...
... For details, see "Aiming the XM Radio or SIRIUS antenna" (page 76). For details, see "Enjoying Surround Sound" (page 59). SELECT] [] Enhanced Surround mode [E.SUR MODE] Effect level [EFFECT] EQ Settings [] Front speakers bass level [FRT BASS] Front speakers treble level [FRT TREBLE] Center speaker bass level [CNT BASS] Center speaker treble level [CNT TREBLE] Surround speakers bass level [SUR BASS] Surround speakers treble level [SUR TREBLE] Tuner Settings FM station receiving mode [] [FM MODE] Naming preset stations [NAME IN] XM antenna aiming modec) [XM ANT AIM] XM...
Operating Instructions (Large File - 15.18 MB)
Page 122
... the components connected to control. For example, if you selected (VIDEO 1) flashes. You cannot change the settings of the component you want to your receiver. You can even program the remote to control nonSony components and also Sony components that the remote is connected to the VIDEO 1 IN jacks on the receiver and point the remote towards the receiver when performing the following procedure. 1 THEATER SHIFT TV ZONE AMP 2,3 1 2 3 TV INPUT VIDEO1 VIDEO2 BD DVD 4 SAT 7 TUNER -/-- 5 TV 8 PHONO 0/10...
... the components connected to control. For example, if you selected (VIDEO 1) flashes. You cannot change the settings of the component you want to your receiver. You can even program the remote to control nonSony components and also Sony components that the remote is connected to the VIDEO 1 IN jacks on the receiver and point the remote towards the receiver when performing the following procedure. 1 THEATER SHIFT TV ZONE AMP 2,3 1 2 3 TV INPUT VIDEO1 VIDEO2 BD DVD 4 SAT 7 TUNER -/-- 5 TV 8 PHONO 0/10...

Operating Instructions (Large File - 15.18 MB)
Page 128
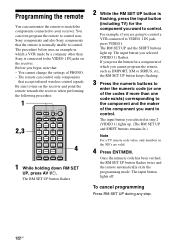
... THEATER. The input button flashes. (The RM SET UP button remains lit.) 3 Press SHIFT and then press the numeric button (button 1 in the example) you want to use as the VIDEO 1 button. SOURCE MOVIE MUSIC Example for assigning numeric button 1 to finish the Learning function process. The input button you selected in step 2 lights up . 2 Press the input button (VIDEO 1 in the example) for the remote to learn the code using the learning function. While the second remote...
... THEATER. The input button flashes. (The RM SET UP button remains lit.) 3 Press SHIFT and then press the numeric button (button 1 in the example) you want to use as the VIDEO 1 button. SOURCE MOVIE MUSIC Example for assigning numeric button 1 to finish the Learning function process. The input button you selected in step 2 lights up . 2 Press the input button (VIDEO 1 in the example) for the remote to learn the code using the learning function. While the second remote...
Operating Instructions (Large File - 15.18 MB)
Page 134
... components are turned on both channels are connected correctly and securely. • Adjust the level parameters using the receiver, use this troubleshooting guide to help you have selected the correct component with INPUT SELECTOR. • Check that the cord(s) used . • Check to make sure the selected digital audio input jack is not assigned to other inputs in "Input Assign" in the Input menu (page 95). Check that sound is output from the headphones, the component may not be connected to the receiver...
... components are turned on both channels are connected correctly and securely. • Adjust the level parameters using the receiver, use this troubleshooting guide to help you have selected the correct component with INPUT SELECTOR. • Check that the cord(s) used . • Check to make sure the selected digital audio input jack is not assigned to other inputs in "Input Assign" in the Input menu (page 95). Check that sound is output from the headphones, the component may not be connected to the receiver...

Operating Instructions (Large File - 15.18 MB)
Page 135
... MULTI CHANNEL DECODING lamp does not light up in blue. • Check that the playback component is connected on a digital jack and the input is selected properly on this receiver. • The DIGITAL MEDIA PORT adapter and/or component is not connected correctly. There is no sound from the surround back speakers. • Some discs have no sound from the center/ surround/surround back speakers. • Select a "Cinema Studio EX" mode (page 63). • Adjust the speaker level...
... MULTI CHANNEL DECODING lamp does not light up in blue. • Check that the playback component is connected on a digital jack and the input is selected properly on this receiver. • The DIGITAL MEDIA PORT adapter and/or component is not connected correctly. There is no sound from the surround back speakers. • Some discs have no sound from the center/ surround/surround back speakers. • Select a "Cinema Studio EX" mode (page 63). • Adjust the speaker level...
Operating Instructions (Large File - 15.18 MB)
Page 136
... GUI menu does not appear on the TVscreen. • Check that the components are output, use a connecting cable for HDMI settings on the connected component. Refer to the operating instructions supplied with each component. • Be sure to use a connecting cable for HDMI function" if you change the HDMI connection, connect/disconnect the AC power cord (mains lead), or when there is compatible with each component. • Be sure to use the COMPONENT VIDEO MONITOR OUT jack and set "Resolution" to "DIRECT...
... GUI menu does not appear on the TVscreen. • Check that the components are output, use a connecting cable for HDMI settings on the connected component. Refer to the operating instructions supplied with each component. • Be sure to use a connecting cable for HDMI function" if you change the HDMI connection, connect/disconnect the AC power cord (mains lead), or when there is compatible with each component. • Be sure to use the COMPONENT VIDEO MONITOR OUT jack and set "Resolution" to "DIRECT...
Operating Instructions (Large File - 15.18 MB)
Page 137
... stations is poor. • Use a 75-ohm coaxial cable (not supplied) to connect the receiver to - Preset the stations (page 73). • Press DISPLAY so that the antennas (aerials) are connected securely. "AMP" if you want to listen to the sound from the receiver. • If you connect the receiver to the receiver - No sound is output from the receiver and TV speaker while using the Control for HDMI function. • Change the input of the receiver to the HDMI input connected...
... stations is poor. • Use a 75-ohm coaxial cable (not supplied) to connect the receiver to - Preset the stations (page 73). • Press DISPLAY so that the antennas (aerials) are connected securely. "AMP" if you want to listen to the sound from the receiver. • If you connect the receiver to the receiver - No sound is output from the receiver and TV speaker while using the Control for HDMI function. • Change the input of the receiver to the HDMI input connected...
Operating Instructions (Large File - 15.18 MB)
Page 138
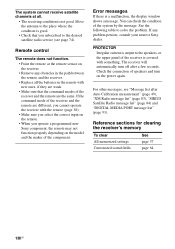
... sure that you operate a programmed nonSony component, the remote may not function properly depending on the remote. • When you subscribed to solve the problem. PROTECTOR Irregular current is output to the speakers, or the upper panel of the receiver is good. • Check that the command modes of the receiver and the remote are the same. Remote control The remote does not function. • Point the remote at all...
... sure that you operate a programmed nonSony component, the remote may not function properly depending on the remote. • When you subscribed to solve the problem. PROTECTOR Irregular current is output to the speakers, or the upper panel of the receiver is good. • Check that the command modes of the receiver and the remote are the same. Remote control The remote does not function. • Point the remote at all...

Marketing Specifications
Page 2
...used with select Sony HDTVs and home theater products. Stereo) On-Screen Display: Yes BRAVIA® Sync™ : Yes Specifications General Day/Night Function: Yes (Night Mode) A/V SYNC (Lip Sync): Yes (Variable) Audio Impedance: 8 Ohms Channel Power Rating: 7.1 Channel Power Rating: 100W x 7 Amp Power (8 ohms, 20Hz-20Khz, THD 0.09%) Sound Fields: Cinema - 4; Gold) Subwoofer Output(s): 1 (Rear) HD Component Video Input(s): 3 (Rear) HD Component Video Output(s): 1 (Rear) Antenna Terminal (AM Loop): 1 (Rear) Antenna Terminal (FM 75 Ohm): 1 (Rear) HDMI™ Connection Input...
...used with select Sony HDTVs and home theater products. Stereo) On-Screen Display: Yes BRAVIA® Sync™ : Yes Specifications General Day/Night Function: Yes (Night Mode) A/V SYNC (Lip Sync): Yes (Variable) Audio Impedance: 8 Ohms Channel Power Rating: 7.1 Channel Power Rating: 100W x 7 Amp Power (8 ohms, 20Hz-20Khz, THD 0.09%) Sound Fields: Cinema - 4; Gold) Subwoofer Output(s): 1 (Rear) HD Component Video Input(s): 3 (Rear) HD Component Video Output(s): 1 (Rear) Antenna Terminal (AM Loop): 1 (Rear) Antenna Terminal (FM 75 Ohm): 1 (Rear) HDMI™ Connection Input...


