Operating Instructions (Large File - 15.18 MB)
Page 1
3-289-137-12(1) Multi Channel AV Receiver Operating Instructions STR-DA3400ES ©2008 Sony Corporation
3-289-137-12(1) Multi Channel AV Receiver Operating Instructions STR-DA3400ES ©2008 Sony Corporation
Operating Instructions (Large File - 15.18 MB)
Page 2
... communications. These limits are located on the rear of important operating and maintenance (servicing) instructions in a particular installation. Reorient or relocate the receiving antenna. - Do not install the appliance in a confined space, such as a bookcase or built-in the space provided below. However, ... trouble. Refer to them whenever you call upon your Sony dealer regarding this equipment does cause harmful interference to radio or television reception, which can be unplugged from that to which the receiver is no guarantee that interference will not occur in the...
... communications. These limits are located on the rear of important operating and maintenance (servicing) instructions in a particular installation. Reorient or relocate the receiving antenna. - Do not install the appliance in a confined space, such as a bookcase or built-in the space provided below. However, ... trouble. Refer to them whenever you call upon your Sony dealer regarding this equipment does cause harmful interference to radio or television reception, which can be unplugged from that to which the receiver is no guarantee that interference will not occur in the...

Operating Instructions (Large File - 15.18 MB)
Page 3
..., Symbol, DTS-HD and DTS-HD Master Audio are trademarks of XM Satellite Radio Inc. You can also use the controls on the receiver if they have the same or similar names as practical. All rights reserved. ©2008 SIRIUS Satellite Radio Inc. HDMI, the HDMI... NEC that provides guidelines for proper grounding and, in particular, specifies that any changes or modification not expressly approved in this manual are for model STR-DA3400ES. and worldwide patents issued & pending. continued 3US Patent #'s: 5,451,942; 5,956,674; 5,974,380; 5,978,762; 6,226,616; 6,487,535 & other U.S....
..., Symbol, DTS-HD and DTS-HD Master Audio are trademarks of XM Satellite Radio Inc. You can also use the controls on the receiver if they have the same or similar names as practical. All rights reserved. ©2008 SIRIUS Satellite Radio Inc. HDMI, the HDMI... NEC that provides guidelines for proper grounding and, in particular, specifies that any changes or modification not expressly approved in this manual are for model STR-DA3400ES. and worldwide patents issued & pending. continued 3US Patent #'s: 5,451,942; 5,956,674; 5,974,380; 5,978,762; 6,226,616; 6,487,535 & other U.S....
Operating Instructions (Large File - 15.18 MB)
Page 4
... owned by the Bluetooth SIG, Inc. All rights reserved. All other countries. Sony Corporation hereby grants the user a non-exclusive, non-transferable, limited right of use of Sony Corporation. These names are trademarks of Apple Inc., registered in this receiver is under license from Neural Audio Corporation and THX Ltd. Other trademarks and...
... owned by the Bluetooth SIG, Inc. All rights reserved. All other countries. Sony Corporation hereby grants the user a non-exclusive, non-transferable, limited right of use of Sony Corporation. These names are trademarks of Apple Inc., registered in this receiver is under license from Neural Audio Corporation and THX Ltd. Other trademarks and...

Operating Instructions (Large File - 15.18 MB)
Page 5
... Connecting the audio components ....... 20 4b: Connecting the video components ....... 25 5: Connecting the antennas (aerials 36 6: Preparing the receiver and the remote .... 37 7: Operating the receiver using the GUI (Graphical User Interface 39 8: Setting the speakers 42 9: Calibrating the appropriate speaker settings automatically (Auto Calibration 44 Playback... for HDMI function ........87 Watching a DVD (One-Touch Play 88 Enjoying the TV sound from the speakers connected to the receiver (System Audio Control 89 Turning off the receiver with the TV (System Power Off 89 continued 5US
... Connecting the audio components ....... 20 4b: Connecting the video components ....... 25 5: Connecting the antennas (aerials 36 6: Preparing the receiver and the remote .... 37 7: Operating the receiver using the GUI (Graphical User Interface 39 8: Setting the speakers 42 9: Calibrating the appropriate speaker settings automatically (Auto Calibration 44 Playback... for HDMI function ........87 Watching a DVD (One-Touch Play 88 Enjoying the TV sound from the speakers connected to the receiver (System Audio Control 89 Turning off the receiver with the TV (System Power Off 89 continued 5US
Operating Instructions (Large File - 15.18 MB)
Page 6
... audio (INPUT MODE 94 Enjoying the sound/images from other inputs 95 Changing the display window 98 Using the sleep timer 101 Recording using the receiver 102 Using multi-zone features 103 Using a bi-amplifier connection 107 Operating without connecting to the TV ..108 Using the Remote Operating each component using...
... audio (INPUT MODE 94 Enjoying the sound/images from other inputs 95 Changing the display window 98 Using the sleep timer 101 Recording using the receiver 102 Using multi-zone features 103 Using a bi-amplifier connection 107 Operating without connecting to the TV ..108 Using the Remote Operating each component using...
Operating Instructions (Large File - 15.18 MB)
Page 7
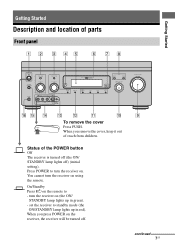
.... When you remove the cover, keep it out of reach from children. Press POWER to turn the receiver on the receiver, the receiver will be turned off ) (initial setting). On/Standby Press ?/1 on (the ON/ STANDBY lamp lights up in green). - Getting Started Getting Started ...Description and location of the POWER button Off The receiver is turned off (the ON/ STANDBY lamp lights off . set the receiver to - continued 7US When you press POWER on using the remote. Status of parts Front panel To remove the...
.... When you remove the cover, keep it out of reach from children. Press POWER to turn the receiver on the receiver, the receiver will be turned off ) (initial setting). On/Standby Press ?/1 on (the ON/ STANDBY lamp lights up in green). - Getting Started Getting Started ...Description and location of the POWER button Off The receiver is turned off (the ON/ STANDBY lamp lights off . set the receiver to - continued 7US When you press POWER on using the remote. Status of parts Front panel To remove the...
Operating Instructions (Large File - 15.18 MB)
Page 8
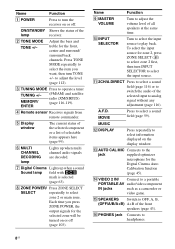
...jack Connects to turn TONE +/- E Display window The current status of the selected component or a list of the receiver. Each time you want, then turn the receiver on the display window. A.F.D. Name Function A POWER Press to headphones. 8US Shows the status of selectable items ...+/- C TUNING MODE Press to select the item you press ZONE POWER, the output signals for the front, center and surround/ surround back channels. F MULTI CHANNEL DECODING lamp Lights up when a sound Sound lamp field with DCS mark is selected (page 63). O SPEAKERS Switch to OFF, A, B,...
...jack Connects to turn TONE +/- E Display window The current status of the selected component or a list of the receiver. Each time you want, then turn the receiver on the display window. A.F.D. Name Function A POWER Press to headphones. 8US Shows the status of selectable items ...+/- C TUNING MODE Press to select the item you press ZONE POWER, the output signals for the front, center and surround/ surround back channels. F MULTI CHANNEL DECODING lamp Lights up when a sound Sound lamp field with DCS mark is selected (page 63). O SPEAKERS Switch to OFF, A, B,...
Operating Instructions (Large File - 15.18 MB)
Page 9
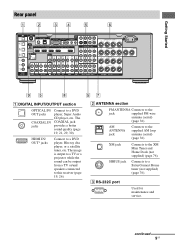
... Mini Tuner and Home Dock (not supplied) (page 76). XM jack Connects to a DVD player, Super Audio CD player, etc. SIRIUS jack Connects to this receiver (page 19, 26). continued 9US The COAXIAL jack provides a better sound quality (page 19, 21, 29, 30). The image is output to a TV or a projector...
... Mini Tuner and Home Dock (not supplied) (page 76). XM jack Connects to a DVD player, Super Audio CD player, etc. SIRIUS jack Connects to this receiver (page 19, 26). continued 9US The COAXIAL jack provides a better sound quality (page 19, 21, 29, 30). The image is output to a TV or a projector...
Operating Instructions (Large File - 15.18 MB)
Page 10
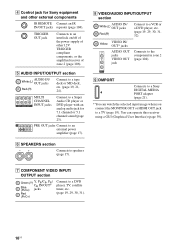
...VIDEO INPUT/ OUTPUT section Green (Y) Y, PB/CB, PR/ Blue (PB/CB) CR IN/OUT* jacks Red (PR/CR) Connect to speakers (page 17). MULTI CHANNEL INPUT jacks Connect to an interlock on/off of the power supply of zone 2 (page 106). I DMPORT Connects to a TV (page 19). You can watch... the selected input image when you connect the MONITOR OUT or HDMI OUT jack to a Sony DIGITAL MEDIA PORT adapter (page 21). * You can operate this receiver using a GUI (Graphical User Interface) (page 39). F SPEAKERS section Connects to a DVD player, TV, satellite tuner, etc. (page...
...VIDEO INPUT/ OUTPUT section Green (Y) Y, PB/CB, PR/ Blue (PB/CB) CR IN/OUT* jacks Red (PR/CR) Connect to speakers (page 17). MULTI CHANNEL INPUT jacks Connect to an interlock on/off of the power supply of zone 2 (page 106). I DMPORT Connects to a TV (page 19). You can watch... the selected input image when you connect the MONITOR OUT or HDMI OUT jack to a Sony DIGITAL MEDIA PORT adapter (page 21). * You can operate this receiver using a GUI (Graphical User Interface) (page 39). F SPEAKERS section Connects to a DVD player, TV, satellite tuner, etc. (page...
Operating Instructions (Large File - 15.18 MB)
Page 11
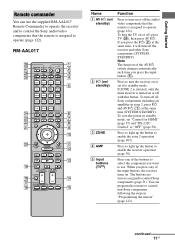
...the input button (E). Press to turn off with this button. To save the power in standby mode, set it will turn the receiver on or off the receiver and other Sony components (SYSTEM STANDBY). Press one of the AV ?/1 switch changes automatically each time you press the ?/1 (B) at the same time... , press TV (Z), then press AV ?/1. The buttons are factory assigned to use the supplied RM-AAL017 Remote Commander to operate the receiver and to control the Sony audio/video components that the remote is turned on or set "Control for HDMI" (page 57) and "RS-232C Control" to ...
...the input button (E). Press to turn off with this button. To save the power in standby mode, set it will turn the receiver on or off the receiver and other Sony components (SYSTEM STANDBY). Press one of the AV ?/1 switch changes automatically each time you press the ?/1 (B) at the same time... , press TV (Z), then press AV ?/1. The buttons are factory assigned to use the supplied RM-AAL017 Remote Commander to operate the receiver and to control the Sony audio/video components that the remote is turned on or set "Control for HDMI" (page 57) and "RS-232C Control" to ...
Operating Instructions (Large File - 15.18 MB)
Page 12
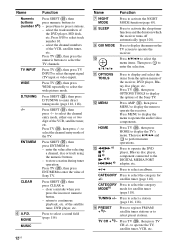
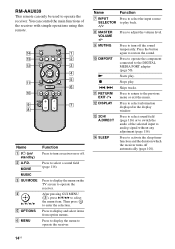
...press ENT/MEM to display and select the items from the option menus of the Sony TV. of Sony TV. Press to - CATEGORY Press to select a sound field (page 116). N PRESET + b)/- enter the value after selecting a channel, disc or track using the numeric buttons. - clear a mistake when you .... to activate the sleep timer function and the duration which the receiver turns off automatically (page 101). H SLEEP Press to store a station during tuner operation. Press MENU to display the menu to select the channel entry mode, either one or two digit of the TV. to...
...press ENT/MEM to display and select the items from the option menus of the Sony TV. of Sony TV. Press to - CATEGORY Press to select a sound field (page 116). N PRESET + b)/- enter the value after selecting a channel, disc or track using the numeric buttons. - clear a mistake when you .... to activate the sleep timer function and the duration which the receiver turns off automatically (page 101). H SLEEP Press to store a station during tuner operation. Press MENU to display the menu to select the channel entry mode, either one or two digit of the TV. to...
Operating Instructions (Large File - 15.18 MB)
Page 13
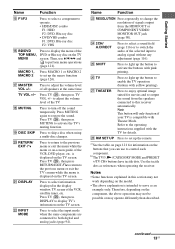
... to the previous menu or exit the TV's menu while the menu is intended to serve as references when operating the receiver. U DISPLAY Press to select information displayed in this receiver automatically. a)See the table on page 121 for information on the TV screen. Press to adjust the volume level of the...
... to the previous menu or exit the TV's menu while the menu is intended to serve as references when operating the receiver. U DISPLAY Press to select information displayed in this receiver automatically. a)See the table on page 121 for information on the TV screen. Press to adjust the volume level of the...
Operating Instructions (Large File - 15.18 MB)
Page 14
...display the menu to restore the sound. M 2CH/ A.DIRECT Press to select sound field (page 116) or to switch the audio of the receiver with simple operations using this remote. Press to adjust the volume level. Press to select a sound field (page 116). N Starts play back.... L DISPLAY Press to activate the sleep timer function and the duration which the receiver turns off automatically (page 101). 14US You can only be used to operate the receiver. MOVIE MUSIC C GUI MODE D V/v/B/b E OPTIONS F MENU Function Press to turn off . Name Function G...
...display the menu to restore the sound. M 2CH/ A.DIRECT Press to select sound field (page 116) or to switch the audio of the receiver with simple operations using this remote. Press to adjust the volume level. Press to select a sound field (page 116). N Starts play back.... L DISPLAY Press to activate the sleep timer function and the duration which the receiver turns off automatically (page 101). 14US You can only be used to operate the receiver. MOVIE MUSIC C GUI MODE D V/v/B/b E OPTIONS F MENU Function Press to turn off . Name Function G...
Operating Instructions (Large File - 15.18 MB)
Page 15
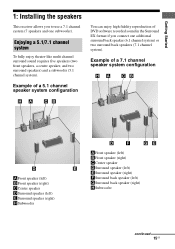
...speakers, a center speaker, and two surround speakers) and a subwoofer (5.1 channel system). Getting Started 1: Installing the speakers This receiver allows you connect one subwoofer). Example of a 5.1 channel speaker system configuration You can enjoy high fidelity reproduction of a 7.1 channel speaker system configuration AFront speaker (left) BFront speaker (right) CCenter speaker ...speaker (right) HSubwoofer continued 15US Example of DVD software recorded sound in the Surround EX format if you to use a 7.1 channel system (7 speakers and one additional surround back speaker...
...speakers, a center speaker, and two surround speakers) and a subwoofer (5.1 channel system). Getting Started 1: Installing the speakers This receiver allows you connect one subwoofer). Example of a 5.1 channel speaker system configuration You can enjoy high fidelity reproduction of a 7.1 channel speaker system configuration AFront speaker (left) BFront speaker (right) CCenter speaker ...speaker (right) HSubwoofer continued 15US Example of DVD software recorded sound in the Surround EX format if you to use a 7.1 channel system (7 speakers and one additional surround back speaker...
Operating Instructions (Large File - 15.18 MB)
Page 19
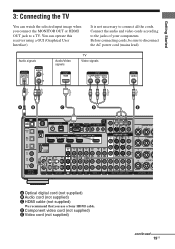
You can watch the selected input image when you use a Sony HDMI cable. Audio signals Audio/Video signals TV Video signals AB C D E A Optical digital cord (not supplied) B Audio cord (not supplied) C HDMI cable (not supplied) We ... 19US Connect the audio and video cords according to disconnect the AC power cord (mains lead). Getting Started 3: Connecting the TV You can operate this receiver using a GUI (Graphical User Interface). It is not necessary to a TV.
You can watch the selected input image when you use a Sony HDMI cable. Audio signals Audio/Video signals TV Video signals AB C D E A Optical digital cord (not supplied) B Audio cord (not supplied) C HDMI cable (not supplied) We ... 19US Connect the audio and video cords according to disconnect the AC power cord (mains lead). Getting Started 3: Connecting the TV You can operate this receiver using a GUI (Graphical User Interface). It is not necessary to a TV.
Operating Instructions (Large File - 15.18 MB)
Page 20
... in until they click into place. Component to be connected Super Audio CD player, CD player With digital audio output With multi channel audio output With analog audio output only MD deck With digital audio output With analog audio output only Tape deck, Analog disc turntable...32 kHz, 44.1 kHz, 48 kHz, and 96 kHz sampling frequencies. 20US In this configuration, set the audio output jack of the receiver. Tips • The receiver has a video conversion function. For details, see "Component to be switched between the TV and the antenna (aerial), the image on...
... in until they click into place. Component to be connected Super Audio CD player, CD player With digital audio output With multi channel audio output With analog audio output only MD deck With digital audio output With analog audio output only Tape deck, Analog disc turntable...32 kHz, 44.1 kHz, 48 kHz, and 96 kHz sampling frequencies. 20US In this configuration, set the audio output jack of the receiver. Tips • The receiver has a video conversion function. For details, see "Component to be switched between the TV and the antenna (aerial), the image on...
Operating Instructions (Large File - 15.18 MB)
Page 22
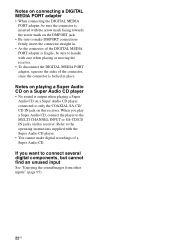
... PORT adapter, squeeze the sides of a Super Audio CD. If you play a Super Audio CD, connect the player to the MULTI CHANNEL INPUT or SA-CD/CD IN jacks on this receiver. Notes on playing a Super Audio CD on a Super Audio CD player • No sound is output when playing a Super Audio... recordings of the connector, since the connector is locked in place. When you want to only the COAXIAL SA-CD/ CD IN jack on this receiver.
... PORT adapter, squeeze the sides of a Super Audio CD. If you play a Super Audio CD, connect the player to the MULTI CHANNEL INPUT or SA-CD/CD IN jacks on this receiver. Notes on playing a Super Audio CD on a Super Audio CD player • No sound is output when playing a Super Audio... recordings of the connector, since the connector is locked in place. When you want to only the COAXIAL SA-CD/ CD IN jack on this receiver.

Operating Instructions (Large File - 15.18 MB)
Page 23
... jacks If your DVD player, Blu-ray disc player or Super Audio CD player is invalid. • Audio signals input from the MULTI CHANNEL INPUT jacks are not output to other audio output jacks. B A Audio cord (not supplied) B Monaural audio cord (not supplied) Notes • DVD ...or "ZONE 2" in the Speaker settings menu, the input to enjoy multi channel sound. Alternatively, the multi channel input jacks can connect them to the MULTI CHANNEL INPUT jacks of this receiver to the SUR BACK jacks is equipped with multi channel output jacks, you can be recorded. 23US A DVD player, Blu-ray...
... jacks If your DVD player, Blu-ray disc player or Super Audio CD player is invalid. • Audio signals input from the MULTI CHANNEL INPUT jacks are not output to other audio output jacks. B A Audio cord (not supplied) B Monaural audio cord (not supplied) Notes • DVD ...or "ZONE 2" in the Speaker settings menu, the input to enjoy multi channel sound. Alternatively, the multi channel input jacks can connect them to the MULTI CHANNEL INPUT jacks of this receiver to the SUR BACK jacks is equipped with multi channel output jacks, you can be recorded. 23US A DVD player, Blu-ray...
Operating Instructions (Large File - 15.18 MB)
Page 25
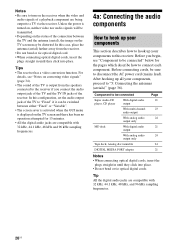
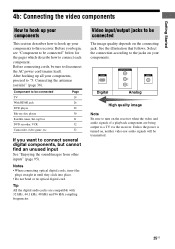
... being output to turn on the connecting jack. See the illustration that follows. Digital Analog High quality image Note Be sure to a TV via the receiver. Before you want to the jacks on , neither video nor audio signals will be connected" below for the pages which describe how to disconnect the... AC power cord (mains lead). Page 19 26 29 30 31 32 32 If you begin, see "Component to this receiver. Notes • When connecting optical digital cords, insert the plugs straight in until they click into place. • Do not bend or tie optical digital...
... being output to turn on the connecting jack. See the illustration that follows. Digital Analog High quality image Note Be sure to a TV via the receiver. Before you want to the jacks on , neither video nor audio signals will be connected" below for the pages which describe how to disconnect the... AC power cord (mains lead). Page 19 26 29 30 31 32 32 If you begin, see "Component to this receiver. Notes • When connecting optical digital cords, insert the plugs straight in until they click into place. • Do not bend or tie optical digital...


