
Operating Instructions (Large File - 15.18 MB)
Page 3
...receiver incorporates High-Definition Multimedia Interface (HDMI™) technology. HDMI, the HDMI logo and High-Definition Multimedia Interface are for proper grounding and, in particular, specifies that any changes or modification not expressly approved in this equipment. XM Ready® is a registered trademark of the NEC that provides guidelines for model STR-DA3400ES...and the DTS logos, Symbol, DTS-HD and DTS-HD Master Audio are registered trademarks of the front panel. • The instructions in this manual could void your model number by looking at the lower right corner...
...receiver incorporates High-Definition Multimedia Interface (HDMI™) technology. HDMI, the HDMI logo and High-Definition Multimedia Interface are for proper grounding and, in particular, specifies that any changes or modification not expressly approved in this equipment. XM Ready® is a registered trademark of the NEC that provides guidelines for model STR-DA3400ES...and the DTS logos, Symbol, DTS-HD and DTS-HD Master Audio are registered trademarks of the front panel. • The instructions in this manual could void your model number by looking at the lower right corner...
Operating Instructions (Large File - 15.18 MB)
Page 7
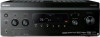
..., keep it out of the POWER button Off The receiver is turned off (the ON/ STANDBY lamp lights off . Status of reach from children. When you press POWER on using the remote. Getting Started Getting Started Description and location of parts Front panel To remove the cover Press PUSH. set the... receiver to standby mode (the ON/STANDBY lamp lights up in red). continued 7US
..., keep it out of the POWER button Off The receiver is turned off (the ON/ STANDBY lamp lights off . Status of reach from children. When you press POWER on using the remote. Getting Started Getting Started Description and location of parts Front panel To remove the cover Press PUSH. set the... receiver to standby mode (the ON/STANDBY lamp lights up in red). continued 7US
Operating Instructions (Large File - 15.18 MB)
Page 9
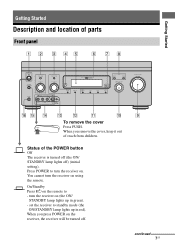
... player, etc. C RS-232C port Used for maintenance and service. continued 9US The COAXIAL jack provides a better sound quality (page 19, 21, 29, 30). Rear panel Getting Started A DIGITAL INPUT/OUTPUT section OPTICAL IN/ OUT jacks COAXIAL IN jacks Connect to a SiriusConnect Home tuner (not supplied) (page 76). HDMI IN/ OUT... be output from a TV or/and speakers connected to the jack supplied FM wire antenna (aerial) (page 36). B ANTENNA section FM ANTENNA Connects to this receiver (page 19, 26). XM jack Connects to the XM Mini Tuner and Home Dock (not supplied) (page 76).
... player, etc. C RS-232C port Used for maintenance and service. continued 9US The COAXIAL jack provides a better sound quality (page 19, 21, 29, 30). Rear panel Getting Started A DIGITAL INPUT/OUTPUT section OPTICAL IN/ OUT jacks COAXIAL IN jacks Connect to a SiriusConnect Home tuner (not supplied) (page 76). HDMI IN/ OUT... be output from a TV or/and speakers connected to the jack supplied FM wire antenna (aerial) (page 36). B ANTENNA section FM ANTENNA Connects to this receiver (page 19, 26). XM jack Connects to the XM Mini Tuner and Home Dock (not supplied) (page 76).
Operating Instructions (Large File - 15.18 MB)
Page 17
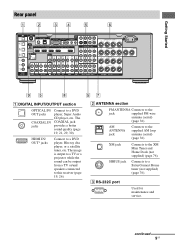
... can select the front speaker system you have an additional front speaker system, connect them to use with the SPEAKERS (OFF/A/B/A+B) button on the front panel (page 43).
... can select the front speaker system you have an additional front speaker system, connect them to use with the SPEAKERS (OFF/A/B/A+B) button on the front panel (page 43).
Operating Instructions (Large File - 15.18 MB)
Page 32
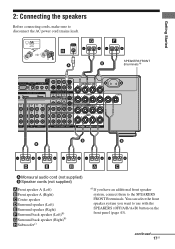
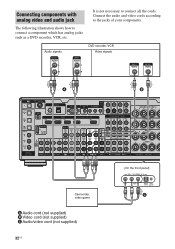
Connecting components with analog video and audio jack It is not necessary to connect a component which has analog jacks such as a DVD recorder, VCR, etc. The following illustration shows how to connect all the cords. Audio signals DVD recorder, VCR Video signals A B Camcorder, video game A Audio cord (not supplied) B Video cord (not supplied) C Audio/video cord (not supplied) 32US (On the front panel) C Connect the audio and video cords according to the jacks of your components.
Connecting components with analog video and audio jack It is not necessary to connect a component which has analog jacks such as a DVD recorder, VCR, etc. The following illustration shows how to connect all the cords. Audio signals DVD recorder, VCR Video signals A B Camcorder, video game A Audio cord (not supplied) B Video cord (not supplied) C Audio/video cord (not supplied) 32US (On the front panel) C Connect the audio and video cords according to the jacks of your components.
Operating Instructions (Large File - 15.18 MB)
Page 37
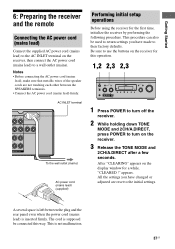
...power cord (mains lead) (supplied) Performing initial setup operations Before using the receiver for a while, "CLEARED !" All the settings you have changed or adjusted are not touching each other between the plug and the rear panel even when the power cord (mains lead) is not malfunction. 37US This ...procedure can also be connected this operation. 1,2 2,3 2,3 1 Press POWER to turn off the receiver. 2 While holding down TONE MODE and 2CH/A.DIRECT, press ...
...power cord (mains lead) (supplied) Performing initial setup operations Before using the receiver for a while, "CLEARED !" All the settings you have changed or adjusted are not touching each other between the plug and the rear panel even when the power cord (mains lead) is not malfunction. 37US This ...procedure can also be connected this operation. 1,2 2,3 2,3 1 Press POWER to turn off the receiver. 2 While holding down TONE MODE and 2CH/A.DIRECT, press ...

Operating Instructions (Large File - 15.18 MB)
Page 53
...See page 63 for details. 1 Turn on the TV and DVD player or Blu-ray disc player. 2 Turn on the receiver. 3 Press INPUT SELECTOR U/u to the multi channel format (the MULTI CHANNEL DECODING lamp on this receiver is set up during playback). - Playback Watching a DVD/Blu-ray Disc SLEEP DISPLAY GUI MODE 2 6 3 6 3 ... disc to be played, if necessary. • You can also use INPUT SELECTOR on the front panel lights up properly. You can select the sound field to the multi channel sound. - Be sure this receiver to select "DVD" or "BD". 4 Switch the input of the TV so that an image...
...See page 63 for details. 1 Turn on the TV and DVD player or Blu-ray disc player. 2 Turn on the receiver. 3 Press INPUT SELECTOR U/u to the multi channel format (the MULTI CHANNEL DECODING lamp on this receiver is set up during playback). - Playback Watching a DVD/Blu-ray Disc SLEEP DISPLAY GUI MODE 2 6 3 6 3 ... disc to be played, if necessary. • You can also use INPUT SELECTOR on the front panel lights up properly. You can select the sound field to the multi channel sound. - Be sure this receiver to select "DVD" or "BD". 4 Switch the input of the TV so that an image...

Operating Instructions (Large File - 15.18 MB)
Page 54
... the video game. 6 Adjust to select "VIDEO 2"*. You can also use INPUT SELECTOR on this receiver to select "VIDEO 2"*. * When you connect a video game to the VIDEO 2 IN/ PORTABLE AV IN jack on the front panel. 4 Switch the input of the TV so that an image of the video game is displayed.... 5 Place the disc in the tray and play it back on the receiver. 3 Press INPUT SELECTOR U/u to a suitable volume. 7 After you have finished playing...
... the video game. 6 Adjust to select "VIDEO 2"*. You can also use INPUT SELECTOR on this receiver to select "VIDEO 2"*. * When you connect a video game to the VIDEO 2 IN/ PORTABLE AV IN jack on the front panel. 4 Switch the input of the TV so that an image of the video game is displayed.... 5 Place the disc in the tray and play it back on the receiver. 3 Press INPUT SELECTOR U/u to a suitable volume. 7 After you have finished playing...
Operating Instructions (Large File - 15.18 MB)
Page 133
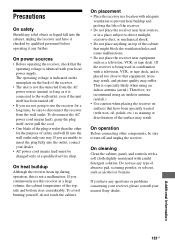
...components, be sure to turn off . • If you are unable to insert the plug fully into the outlet, contact your nearest Sony dealer. Additional Information 133US never pull the cord. • One blade of safety and will fit into the wall outlet only one way.... an indoor antenna (aerial). On cleaning Clean the cabinet, panel, and controls with a soft cloth slightly moistened with adequate ventilation to prevent heat buildup and prolong the life of the receiver. • Do not place the receiver near equipment such as alcohol or benzine. Precautions On safety Should...
...components, be sure to turn off . • If you are unable to insert the plug fully into the outlet, contact your nearest Sony dealer. Additional Information 133US never pull the cord. • One blade of safety and will fit into the wall outlet only one way.... an indoor antenna (aerial). On cleaning Clean the cabinet, panel, and controls with a soft cloth slightly moistened with adequate ventilation to prevent heat buildup and prolong the life of the receiver. • Do not place the receiver near equipment such as alcohol or benzine. Precautions On safety Should...
Operating Instructions (Large File - 15.18 MB)
Page 138
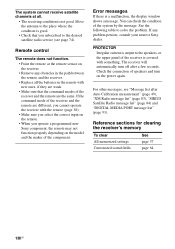
... To clear See All memorized settings Customized sound fields page 37 page 64 138US The receiver will automatically turn on the receiver. • Remove any problem persists, consult your nearest Sony dealer. Check the connection of speakers and turn off after Auto Calibration measurement" (page 49), "...is good. • Check that the command modes of the receiver and the remote are different, you subscribed to the speakers, or the upper panel of the receiver is not good. The system cannot receive satellite channels at the remote sensor on the power again. See the following...
... To clear See All memorized settings Customized sound fields page 37 page 64 138US The receiver will automatically turn on the receiver. • Remove any problem persists, consult your nearest Sony dealer. Check the connection of speakers and turn off after Auto Calibration measurement" (page 49), "...is good. • Check that the command modes of the receiver and the remote are different, you subscribed to the speakers, or the upper panel of the receiver is not good. The system cannot receive satellite channels at the remote sensor on the power again. See the following...


