
Operating Instructions (Large File - 15.18 MB)
Page 5
... remote .... 37 7: Operating the receiver using the GUI (Graphical User Interface 39 8: Setting the speakers 42 9: Calibrating the appropriate speaker settings automatically (Auto Calibration 44 Playback Selecting a component 50 Listening to a Super Audio CD/CD 52 Watching a DVD/Blu-ray Disc 53 Enjoying video ...HDMI function for "BRAVIA" Sync 85 Preparing Control for HDMI function ........87 Watching a DVD (One-Touch Play 88 Enjoying the TV sound from the speakers connected to the receiver (System Audio Control 89 Turning off the receiver with the TV (System Power Off 89 continued 5US
... remote .... 37 7: Operating the receiver using the GUI (Graphical User Interface 39 8: Setting the speakers 42 9: Calibrating the appropriate speaker settings automatically (Auto Calibration 44 Playback Selecting a component 50 Listening to a Super Audio CD/CD 52 Watching a DVD/Blu-ray Disc 53 Enjoying video ...HDMI function for "BRAVIA" Sync 85 Preparing Control for HDMI function ........87 Watching a DVD (One-Touch Play 88 Enjoying the TV sound from the speakers connected to the receiver (System Audio Control 89 Turning off the receiver with the TV (System Power Off 89 continued 5US
Operating Instructions (Large File - 15.18 MB)
Page 9
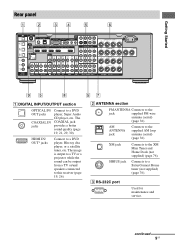
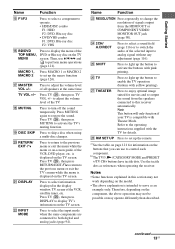
Rear panel Getting Started A DIGITAL INPUT/OUTPUT section OPTICAL IN/ OUT jacks COAXIAL IN jacks Connect to a DVD player, Blu-ray disc player, or a satellite tuner, etc. HDMI IN/ OUT* jacks Connect to a DVD player, Super Audio CD player, etc. B ANTENNA section FM ANTENNA Connects to a SiriusConnect Home tuner (not supplied) (page 76... 36). continued 9US The image is output to a TV or a projector while the sound can be output from a TV or/and speakers connected to this receiver (page 19, 26).
Rear panel Getting Started A DIGITAL INPUT/OUTPUT section OPTICAL IN/ OUT jacks COAXIAL IN jacks Connect to a DVD player, Blu-ray disc player, or a satellite tuner, etc. HDMI IN/ OUT* jacks Connect to a DVD player, Super Audio CD player, etc. B ANTENNA section FM ANTENNA Connects to a SiriusConnect Home tuner (not supplied) (page 76... 36). continued 9US The image is output to a TV or a projector while the sound can be output from a TV or/and speakers connected to this receiver (page 19, 26).
Operating Instructions (Large File - 15.18 MB)
Page 10
...HDMI OUT jack to an external power amplifier (page 17). E AUDIO INPUT/OUTPUT section AUDIO IN/ White (L) OUT jacks Red (R) Connect to a VCR or a DVD player, etc. (page 19, 29, 30, 31, 32). H VIDEO/AUDIO INPUT/OUTPUT section AUDIO IN/ White (L) OUT jacks Red (R) Connect to a ..., etc. (page 19, 21, 24). I DMPORT Connects to a Sony DIGITAL MEDIA PORT adapter (page 21). * You can operate this receiver using a GUI (Graphical User Interface) (page 39). PRE OUT jacks Connect to a TV (page 19). MULTI CHANNEL INPUT jacks Connect to the component in zone 2 (page 104). TRIGGER ...
...HDMI OUT jack to an external power amplifier (page 17). E AUDIO INPUT/OUTPUT section AUDIO IN/ White (L) OUT jacks Red (R) Connect to a VCR or a DVD player, etc. (page 19, 29, 30, 31, 32). H VIDEO/AUDIO INPUT/OUTPUT section AUDIO IN/ White (L) OUT jacks Red (R) Connect to a ..., etc. (page 19, 21, 24). I DMPORT Connects to a Sony DIGITAL MEDIA PORT adapter (page 21). * You can operate this receiver using a GUI (Graphical User Interface) (page 39). PRE OUT jacks Connect to a TV (page 19). MULTI CHANNEL INPUT jacks Connect to the component in zone 2 (page 104). TRIGGER ...
Operating Instructions (Large File - 15.18 MB)
Page 11
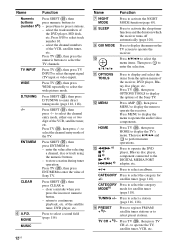
...MODE SLEEP MODE GUI MODE HOME CATEGORY TUNING CATEGORY MODE TUNING DISC SKIP BD/DVD TOP MENU MENU F1 F2 MACRO 1 MACRO 2 Name A AV ?/1 (on/ standby) B ?/1 (on/ standby) C ZONE D AMP E Input buttons (TVb)) Function Press to turn the receiver on or set "Control for HDMI" (page 57) and "RS-232C Control..." to "OFF" (page 58). If ZONE 2 is selected, only the main receiver is assigned to control Sony components (page 51). To save the power in zone 2, press ?/1 and AV ?/1 (A) at the same time, it to enable the zone 2 operation ...
...MODE SLEEP MODE GUI MODE HOME CATEGORY TUNING CATEGORY MODE TUNING DISC SKIP BD/DVD TOP MENU MENU F1 F2 MACRO 1 MACRO 2 Name A AV ?/1 (on/ standby) B ?/1 (on/ standby) C ZONE D AMP E Input buttons (TVb)) Function Press to turn the receiver on or set "Control for HDMI" (page 57) and "RS-232C Control..." to "OFF" (page 58). If ZONE 2 is selected, only the main receiver is assigned to control Sony components (page 51). To save the power in zone 2, press ?/1 and AV ?/1 (A) at the same time, it to enable the zone 2 operation ...
Operating Instructions (Large File - 15.18 MB)
Page 12
... the TV, satellite tuner, VCR, etc. to enter the value of the satellite tuner, DVD player, etc. Press TV (Z), then press ENT/MEM to select the channel entry mode of the receiver, DVD player, Bluray disc player, etc. of Sony TV. CATEGORY Press to select the category MODEb) mode for +/- CATEGORY Press to select the...
... the TV, satellite tuner, VCR, etc. to enter the value of the satellite tuner, DVD player, etc. Press TV (Z), then press ENT/MEM to select the channel entry mode of the receiver, DVD player, Bluray disc player, etc. of Sony TV. CATEGORY Press to select the category MODEb) mode for +/- CATEGORY Press to select the...
Operating Instructions (Large File - 15.18 MB)
Page 13
...page 94). T RETURN/ EXIT O Press to return to the previous menu or exit the menu while the menu or on-screen guide of the DVD or Blu-ray disc on the buttons that you can use V/v/B/b and to activate the buttons with Theater Mode. Z TV Press to light up ... Press TV (Z), then press TV VOL +/- S DISC SKIP Press to activate the TV's muting function. wj THEATER Press to select information displayed in this receiver automatically. Therefore, depending on the TV screen. Press TV (Z), then press MUTING to skip a disc when using a multi-disc changer. is displayed on ...
...page 94). T RETURN/ EXIT O Press to return to the previous menu or exit the menu while the menu or on-screen guide of the DVD or Blu-ray disc on the buttons that you can use V/v/B/b and to activate the buttons with Theater Mode. Z TV Press to light up ... Press TV (Z), then press TV VOL +/- S DISC SKIP Press to activate the TV's muting function. wj THEATER Press to select information displayed in this receiver automatically. Therefore, depending on the TV screen. Press TV (Z), then press MUTING to skip a disc when using a multi-disc changer. is displayed on ...
Operating Instructions (Large File - 15.18 MB)
Page 15
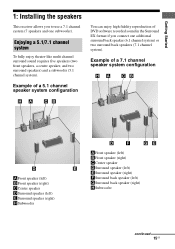
...). Getting Started 1: Installing the speakers This receiver allows you connect one subwoofer). Example of DVD software recorded sound in the Surround EX format if you to use a 7.1 channel system (7 speakers and one additional surround back speaker (6.1 channel system) or two surround back speakers (7.1 channel system). Example of a 5.1 channel speaker system configuration You can enjoy high fidelity...
...). Getting Started 1: Installing the speakers This receiver allows you connect one subwoofer). Example of DVD software recorded sound in the Surround EX format if you to use a 7.1 channel system (7 speakers and one additional surround back speaker (6.1 channel system) or two surround back speakers (7.1 channel system). Example of a 5.1 channel speaker system configuration You can enjoy high fidelity...

Operating Instructions (Large File - 15.18 MB)
Page 23
... to connect an external multi channel decoder. Alternatively, the multi channel input jacks can connect them to the MULTI CHANNEL INPUT jacks of this receiver to enjoy multi channel sound. A DVD player, Blu-ray disc player, Super Audio CD player, etc. Getting Started Connecting components with multi channel output jacks If your DVD player, Blu-ray disc player...
... to connect an external multi channel decoder. Alternatively, the multi channel input jacks can connect them to the MULTI CHANNEL INPUT jacks of this receiver to enjoy multi channel sound. A DVD player, Blu-ray disc player, Super Audio CD player, etc. Getting Started Connecting components with multi channel output jacks If your DVD player, Blu-ray disc player...
Operating Instructions (Large File - 15.18 MB)
Page 25
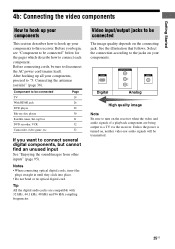
... signals will be connected The image quality depends on the connecting jack. Tip All the digital audio jacks are being output to this receiver. Component to connect several digital components, but cannot find an unused input See "Enjoying the sound/images from other inputs" (page 95... 96 kHz sampling frequencies. After hooking up your components to a TV via the receiver. Before connecting cords, be connected TV With HDMI jack DVD player Blu-ray disc player Satellite tuner, Set-top box DVD recorder, VCR Camcorder, video game, etc. See the illustration that follows. Select the...
... signals will be connected The image quality depends on the connecting jack. Tip All the digital audio jacks are being output to this receiver. Component to connect several digital components, but cannot find an unused input See "Enjoying the sound/images from other inputs" (page 95... 96 kHz sampling frequencies. After hooking up your components to a TV via the receiver. Before connecting cords, be connected TV With HDMI jack DVD player Blu-ray disc player Satellite tuner, Set-top box DVD recorder, VCR Camcorder, video game, etc. See the illustration that follows. Select the...
Operating Instructions (Large File - 15.18 MB)
Page 27
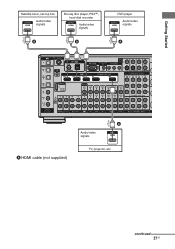
continued 27US Getting Started Satellite tuner, set-top box Audio/video signals Blu-ray disc player, PS3™, hard disk recorder Audio/video signals A A DVD player Audio/video signals A A HDMI cable (not supplied) A Audio/video signals TV, projector, etc.
continued 27US Getting Started Satellite tuner, set-top box Audio/video signals Blu-ray disc player, PS3™, hard disk recorder Audio/video signals A A DVD player Audio/video signals A A HDMI cable (not supplied) A Audio/video signals TV, projector, etc.

Operating Instructions (Large File - 15.18 MB)
Page 29
... The following illustration shows how to connect all the cords. It is not necessary to connect a DVD player. Audio signals DVD player Video signals A B C D E A Optical digital cord (not supplied) B Coaxial digital cord (not supplied) C Audio cord (not supplied) D Component video cord (...not supplied) E Video cord (not supplied) * When you connect your components. Note To output multi channel digital audio from the DVD player, set "Input Assign" in the Input menu. Tip The COMPONENT VIDEO COMPO 2 IN jacks have been assigned to the jacks of...
... The following illustration shows how to connect all the cords. It is not necessary to connect a DVD player. Audio signals DVD player Video signals A B C D E A Optical digital cord (not supplied) B Coaxial digital cord (not supplied) C Audio cord (not supplied) D Component video cord (...not supplied) E Video cord (not supplied) * When you connect your components. Note To output multi channel digital audio from the DVD player, set "Input Assign" in the Input menu. Tip The COMPONENT VIDEO COMPO 2 IN jacks have been assigned to the jacks of...
Operating Instructions (Large File - 15.18 MB)
Page 32
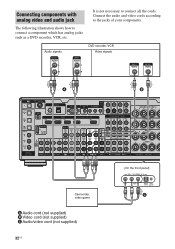
Audio signals DVD recorder, VCR Video signals A B Camcorder, video game A Audio cord (not supplied) B Video cord (not supplied) C Audio/video cord (not supplied) 32US (On the front panel) C Connecting components with analog video and audio jack It is not necessary to the jacks of your components. Connect the audio and video cords according to connect all the cords. The following illustration shows how to connect a component which has analog jacks such as a DVD recorder, VCR, etc.
Audio signals DVD recorder, VCR Video signals A B Camcorder, video game A Audio cord (not supplied) B Video cord (not supplied) C Audio/video cord (not supplied) 32US (On the front panel) C Connecting components with analog video and audio jack It is not necessary to the jacks of your components. Connect the audio and video cords according to connect all the cords. The following illustration shows how to connect a component which has analog jacks such as a DVD recorder, VCR, etc.
Operating Instructions (Large File - 15.18 MB)
Page 38
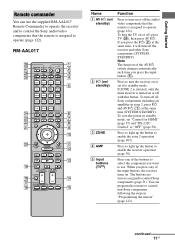
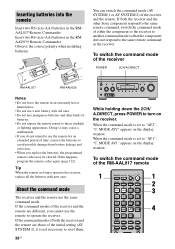
... all the batteries with old ones. • Do not mix manganese batteries and other Sony component respond to the same remote command, switch the command mode of the receiver POWER 2CH/A.DIRECT RM-AAL017 RM-AAU039 Notes • Do not leave the remote in an extremely hot or humid place. &#... can switch the command mode (AV SYSTEM 1 or AV SYSTEM 2) of the RM-AAL017 remote 1 THEATER SHIFT TV ZONE AMP 1 2 3 TV INPUT VIDEO1 VIDEO2 BD DVD 4 SAT 7 TUNER -/-- 5 TV 8 PHONO 0/10 6 WIDE MD/ TAPE SA-CD/ CD 9 D.TUNING MULTI IN DMPORT ENT/MEM CLEAR HDMI1 HDMI2 HDMI3 HDMI4 XM...
... all the batteries with old ones. • Do not mix manganese batteries and other Sony component respond to the same remote command, switch the command mode of the receiver POWER 2CH/A.DIRECT RM-AAL017 RM-AAU039 Notes • Do not leave the remote in an extremely hot or humid place. &#... can switch the command mode (AV SYSTEM 1 or AV SYSTEM 2) of the RM-AAL017 remote 1 THEATER SHIFT TV ZONE AMP 1 2 3 TV INPUT VIDEO1 VIDEO2 BD DVD 4 SAT 7 TUNER -/-- 5 TV 8 PHONO 0/10 6 WIDE MD/ TAPE SA-CD/ CD 9 D.TUNING MULTI IN DMPORT ENT/MEM CLEAR HDMI1 HDMI2 HDMI3 HDMI4 XM...

Operating Instructions (Large File - 15.18 MB)
Page 39
...the RM-AAU039 remote SLEEP DISPLAY DISPLAY GUI MODE MUTING Press and hold DISPLAY, then press MUTING and at the same time. 7: Operating the receiver using the following procedures. SOURCE MOVIE MUSIC INPUT NIGHT RESOLUTION MODE SLEEP MODE GUI MODE 2 3 4 5 HOME CATEGORY MENU TUNING CATEGORY MODE TUNING... the command mode of the menu to AV SYSTEM 2. When you are not going to this receiver. Displaying the GUI menu on the TV screen THEATER SHIFT TV ZONE AMP 1 2 3 TV INPUT VIDEO1 VIDEO2 BD DVD 4 SAT 7 TUNER -/-- 5 TV 8 PHONO 0/10 6 WIDE MD/ TAPE SA-CD/ CD ...
...the RM-AAU039 remote SLEEP DISPLAY DISPLAY GUI MODE MUTING Press and hold DISPLAY, then press MUTING and at the same time. 7: Operating the receiver using the following procedures. SOURCE MOVIE MUSIC INPUT NIGHT RESOLUTION MODE SLEEP MODE GUI MODE 2 3 4 5 HOME CATEGORY MENU TUNING CATEGORY MODE TUNING... the command mode of the menu to AV SYSTEM 2. When you are not going to this receiver. Displaying the GUI menu on the TV screen THEATER SHIFT TV ZONE AMP 1 2 3 TV INPUT VIDEO1 VIDEO2 BD DVD 4 SAT 7 TUNER -/-- 5 TV 8 PHONO 0/10 6 WIDE MD/ TAPE SA-CD/ CD ...

Operating Instructions (Large File - 15.18 MB)
Page 50
Tip Depending on page 48. Press to return to step 1 of the input buttons to select the component you continue to use the receiver with that value. Optional menu parameters for polarity may vary. However, there will be no problems even if you want. 50US To ... conditions. • Calibration Type For details, see "Naming inputs" (page 94). Playback Selecting a component THEATER SHIFT TV ZONE AMP 1 2 3 TV INPUT VIDEO1 VIDEO2 BD DVD 4 SAT 7 TUNER -/-- 5 TV 8 PHONO 0/10 6 WIDE MD/ TAPE SA-CD/ CD 9 D.TUNING MULTI IN DMPORT ENT/MEM CLEAR HDMI1 HDMI2 HDMI3 HDMI4 XM...
Tip Depending on page 48. Press to return to step 1 of the input buttons to select the component you continue to use the receiver with that value. Optional menu parameters for polarity may vary. However, there will be no problems even if you want. 50US To ... conditions. • Calibration Type For details, see "Naming inputs" (page 94). Playback Selecting a component THEATER SHIFT TV ZONE AMP 1 2 3 TV INPUT VIDEO1 VIDEO2 BD DVD 4 SAT 7 TUNER -/-- 5 TV 8 PHONO 0/10 6 WIDE MD/ TAPE SA-CD/ CD 9 D.TUNING MULTI IN DMPORT ENT/MEM CLEAR HDMI1 HDMI2 HDMI3 HDMI4 XM...
Operating Instructions (Large File - 15.18 MB)
Page 51
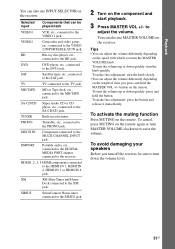
...CHANNEL INPUT jack. Built-in radio tuner. Component connected to the DVD jack. You can adjust the volume differently depending on the length of time you press and hold the button. To make fine adjustment: turn the knob slowly. • You can also use INPUT SELECTOR on the receiver... and release it immediately. HDMI1, 2, 3, 4 HDMI components connected to the XM jack. To avoid damaging your speakers Before you turn off the receiver, be played back VIDEO1 VCR, etc., connected to the VIDEO 1 jack. XM XM Mini-Tuner and Home Dock connected to the HDMI IN 1,...
...CHANNEL INPUT jack. Built-in radio tuner. Component connected to the DVD jack. You can adjust the volume differently depending on the length of time you press and hold the button. To make fine adjustment: turn the knob slowly. • You can also use INPUT SELECTOR on the receiver... and release it immediately. HDMI1, 2, 3, 4 HDMI components connected to the XM jack. To avoid damaging your speakers Before you turn off the receiver, be played back VIDEO1 VCR, etc., connected to the VIDEO 1 jack. XM XM Mini-Tuner and Home Dock connected to the HDMI IN 1,...

Operating Instructions (Large File - 15.18 MB)
Page 53
... on the front panel lights up properly. Be sure the sound source corresponds to the multi channel format (the MULTI CHANNEL DECODING lamp on the receiver. 3 Press INPUT SELECTOR U/u to the multi channel sound. - Be sure this receiver to select "DVD" or "BD". 4 Switch the input of the TV so that an image of the disc...
... on the front panel lights up properly. Be sure the sound source corresponds to the multi channel format (the MULTI CHANNEL DECODING lamp on the receiver. 3 Press INPUT SELECTOR U/u to the multi channel sound. - Be sure this receiver to select "DVD" or "BD". 4 Switch the input of the TV so that an image of the disc...
Operating Instructions (Large File - 15.18 MB)
Page 59
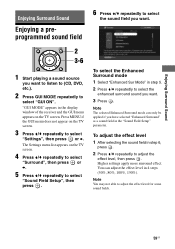
... "Enhanced Sur Mode" in 4 steps (50%, 80%, 100%, 150%). To adjust the effect level 1 After selecting the sound field in the display window of the receiver and the GUI menu appears on the TV screen. 3 Press V/v repeatedly to select "Sound Field Setup", then press . Enjoying Surround Sound Enjoying Surround Sound Enjoying...
... "Enhanced Sur Mode" in 4 steps (50%, 80%, 100%, 150%). To adjust the effect level 1 After selecting the sound field in the display window of the receiver and the GUI menu appears on the TV screen. 3 Press V/v repeatedly to select "Sound Field Setup", then press . Enjoying Surround Sound Enjoying Surround Sound Enjoying...
Operating Instructions (Large File - 15.18 MB)
Page 62
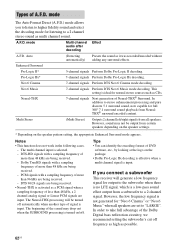
... signal for output to stereo enhancement processing and pure discrete 5.1 surround sound, now capable for listening to take full advantage of DVD software, etc., by looking at the logo on the speaker pattern setting, the appropriate Enhanced Surround mode appears. Tips •...of signal is selected. - mode The Auto Format Direct (A.F.D.) mode allows you connect a subwoofer This receiver will be output from NeuralTHX® surround encoded content. Neo:6 Cinema 7-channel signals Perform DTS Neo:6 Cinema mode decoding. Notes • This function does not work in the ...
... signal for output to stereo enhancement processing and pure discrete 5.1 surround sound, now capable for listening to take full advantage of DVD software, etc., by looking at the logo on the speaker pattern setting, the appropriate Enhanced Surround mode appears. Tips •...of signal is selected. - mode The Auto Format Direct (A.F.D.) mode allows you connect a subwoofer This receiver will be output from NeuralTHX® surround encoded content. Neo:6 Cinema 7-channel signals Perform DTS Neo:6 Cinema mode decoding. Notes • This function does not work in the ...
Operating Instructions (Large File - 15.18 MB)
Page 72
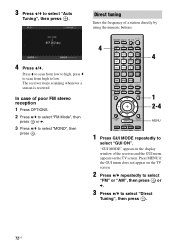
... using the numeric buttons. 4 Press V/v. Press MENU if the GUI menu does not appear on the TV screen. Direct tuning Enter the frequency of the receiver and the GUI menu appears on the TV screen. 2 Press V/v repeatedly to select "FM" or "AM", then press or b. 3 Press V/v to select... to select "FM Mode", then press or b. 3 Press V/v to select "MONO", then press . 4 THEATER SHIFT TV ZONE AMP 1 2 3 TV INPUT VIDEO1 VIDEO2 BD DVD 4 SAT 7 TUNER -/-- 5 TV 8 PHONO 0/10 6 WIDE MD/ TAPE SA-CD/ CD 9 D.TUNING MULTI IN DMPORT ENT/MEM CLEAR HDMI1 HDMI2 HDMI3 HDMI4 XM SIRIUS 2CH...
... using the numeric buttons. 4 Press V/v. Press MENU if the GUI menu does not appear on the TV screen. Direct tuning Enter the frequency of the receiver and the GUI menu appears on the TV screen. 2 Press V/v repeatedly to select "FM" or "AM", then press or b. 3 Press V/v to select... to select "FM Mode", then press or b. 3 Press V/v to select "MONO", then press . 4 THEATER SHIFT TV ZONE AMP 1 2 3 TV INPUT VIDEO1 VIDEO2 BD DVD 4 SAT 7 TUNER -/-- 5 TV 8 PHONO 0/10 6 WIDE MD/ TAPE SA-CD/ CD 9 D.TUNING MULTI IN DMPORT ENT/MEM CLEAR HDMI1 HDMI2 HDMI3 HDMI4 XM SIRIUS 2CH...

