
Operating Instructions (Large File - 15.18 MB)
Page 28
... watch a video image of Super Audio CD are not output from the HDMI OUT jack while the receiver menu is not output from the TV speaker. • DSD signals of 1080p or higher. •... a Sony HDMI cable. • We recommend that you use an HDMI cable with the HDMI logo (made before you connect an HDMI-DVI conversion cable to the HDMI IN jack can enjoy multi channel Linear...setup of the connected component if an image is poor or the sound does not come out of a component connected via the HDMI cable. • Sound may not be interrupted when the sampling frequency, the number of channels...
... watch a video image of Super Audio CD are not output from the HDMI OUT jack while the receiver menu is not output from the TV speaker. • DSD signals of 1080p or higher. •... a Sony HDMI cable. • We recommend that you use an HDMI cable with the HDMI logo (made before you connect an HDMI-DVI conversion cable to the HDMI IN jack can enjoy multi channel Linear...setup of the connected component if an image is poor or the sound does not come out of a component connected via the HDMI cable. • Sound may not be interrupted when the sampling frequency, the number of channels...
Operating Instructions (Large File - 15.18 MB)
Page 37
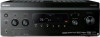
AC INLET terminal To the wall outlet (mains) AC power cord (mains lead) (supplied) Performing initial setup operations Before using the receiver for this way. Notes • Before connecting the AC power cord (mains lead), make sure that metallic wires of the speaker cords are ...is inserted firmly. appears. The cord is supposed be used to return settings you have made to their factory defaults. Getting Started 6: Preparing the receiver and the remote Connecting the AC power cord (mains lead) Connect the supplied AC power cord (mains lead) to the AC INLET terminal on the...
AC INLET terminal To the wall outlet (mains) AC power cord (mains lead) (supplied) Performing initial setup operations Before using the receiver for this way. Notes • Before connecting the AC power cord (mains lead), make sure that metallic wires of the speaker cords are ...is inserted firmly. appears. The cord is supposed be used to return settings you have made to their factory defaults. Getting Started 6: Preparing the receiver and the remote Connecting the AC power cord (mains lead) Connect the supplied AC power cord (mains lead) to the AC INLET terminal on the...

Operating Instructions (Large File - 15.18 MB)
Page 45
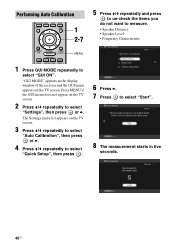
... this case, the distance value shown on the subwoofer and turn on the display may be no problems even if you continue to use the receiver with an auto standby function, set the value to the AUTO CAL MIC jack. 2 Set up the optimizer microphone. Getting Started Optimizer microphone On setting... connected, turn up the volume beforehand. Note Depending on the characteristics of the subwoofer you use the Auto Calibration function when you are using, the setup distance value may differ from the actual position. Using the receiver as a preamplifier You can use the...
... this case, the distance value shown on the subwoofer and turn on the display may be no problems even if you continue to use the receiver with an auto standby function, set the value to the AUTO CAL MIC jack. 2 Set up the optimizer microphone. Getting Started Optimizer microphone On setting... connected, turn up the volume beforehand. Note Depending on the characteristics of the subwoofer you use the Auto Calibration function when you are using, the setup distance value may differ from the actual position. Using the receiver as a preamplifier You can use the...
Operating Instructions (Large File - 15.18 MB)
Page 46
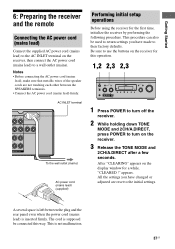
... the TV screen. 3 Press V/v repeatedly to select "Auto Calibration", then press or b. 4 Press V/v repeatedly to select "Quick Setup", then press . 6 Press b. 7 Press to select "Start". 8 The measurement starts in the display window of the receiver and the GUI menu appears on the TV screen. 2 Press V/v repeatedly to select "GUI ON". Press MENU...
... the TV screen. 3 Press V/v repeatedly to select "Auto Calibration", then press or b. 4 Press V/v repeatedly to select "Quick Setup", then press . 6 Press b. 7 Press to select "Start". 8 The measurement starts in the display window of the receiver and the GUI menu appears on the TV screen. 2 Press V/v repeatedly to select "GUI ON". Press MENU...
Operating Instructions (Large File - 15.18 MB)
Page 47
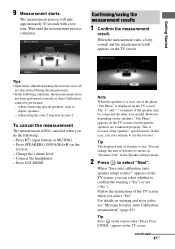
...8226; Operations other way around. Press GUI MODE. This is because of distance is feet. When "Save auto calibration (auto speaker setup) results?" appears on or off are deactivated during the measurement. • In the following : - Confirming/saving the measurement results ...1 Confirm the measurement result. when using the zone 2 function in the Speaker settings menu. 2 Press to use the receiver. However, depending on the speakers, "Out Phase" appears on the TV screen. You can change the unit of the phase, "Out Phase...
...8226; Operations other way around. Press GUI MODE. This is because of distance is feet. When "Save auto calibration (auto speaker setup) results?" appears on or off are deactivated during the measurement. • In the following : - Confirming/saving the measurement results ...1 Confirm the measurement result. when using the zone 2 function in the Speaker settings menu. 2 Press to use the receiver. However, depending on the speakers, "Out Phase" appears on the TV screen. You can change the unit of the phase, "Out Phase...

Operating Instructions (Large File - 15.18 MB)
Page 50
...F2 MACRO 1 MACRO 2 1 Press one of the input buttons to use the receiver with that value. To set Auto Calibration items more precisely (Enhanced Setup) On the Auto Calibration menu, select "Enhanced Setup", then press . • Seating Position You can rename the position number. Press...see "Naming inputs" (page 94). When a warning code appears If a warning on the position of the subwoofer, the measurement results for Enhanced Setup settings • EQ Curve Activates/deactivates the EQ curve measurement. • Name Input You can register three patterns as position 1, 2, and ...
...F2 MACRO 1 MACRO 2 1 Press one of the input buttons to use the receiver with that value. To set Auto Calibration items more precisely (Enhanced Setup) On the Auto Calibration menu, select "Enhanced Setup", then press . • Seating Position You can rename the position number. Press...see "Naming inputs" (page 94). When a warning code appears If a warning on the position of the subwoofer, the measurement results for Enhanced Setup settings • EQ Curve Activates/deactivates the EQ curve measurement. • Name Input You can register three patterns as position 1, 2, and ...
Operating Instructions (Large File - 15.18 MB)
Page 59
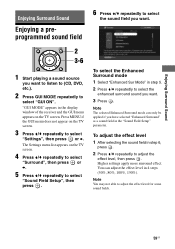
... 4 Press V/v repeatedly to select "Surround", then press or b. 5 Press V/v repeatedly to select "Sound Field Setup", then press . The Settings menu list appears on the TV screen. 3 Press V/v repeatedly to select "Settings",...repeatedly to adjust the effect level for some sound fields. 59US "GUI MODE" appears in the "Sound Field Setup" parameter. Higher settings apply more surround effect. Enjoying Surround Sound Enjoying Surround Sound Enjoying a preprogrammed sound field ..." as a sound field in the display window of the receiver and the GUI menu appears on the TV screen.
... 4 Press V/v repeatedly to select "Surround", then press or b. 5 Press V/v repeatedly to select "Sound Field Setup", then press . The Settings menu list appears on the TV screen. 3 Press V/v repeatedly to select "Settings",...repeatedly to adjust the effect level for some sound fields. 59US "GUI MODE" appears in the "Sound Field Setup" parameter. Higher settings apply more surround effect. Enjoying Surround Sound Enjoying Surround Sound Enjoying a preprogrammed sound field ..." as a sound field in the display window of the receiver and the GUI menu appears on the TV screen.
Operating Instructions (Large File - 15.18 MB)
Page 65
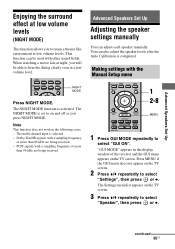
...select "Settings", then press or b. The NIGHT MODE is completed. Making settings with the Manual Setup menu INPUT NIGHT RESOLUTION MODE SLEEP MODE GUI MODE 1 2-8 HOME CATEGORY MENU TUNING CATEGORY MODE ... DISC SKIP 1 Press GUI MODE repeatedly to on the TV screen. continued 65US The multi channel input is activated. "GUI MODE" appears in the following cases. - Note This function does...in the display window of more than 96 kHz are being received. - Dolby TrueHD signals with a sampling frequency of the receiver and the GUI menu appears on and off as you will...
...select "Settings", then press or b. The NIGHT MODE is completed. Making settings with the Manual Setup menu INPUT NIGHT RESOLUTION MODE SLEEP MODE GUI MODE 1 2-8 HOME CATEGORY MENU TUNING CATEGORY MODE ... DISC SKIP 1 Press GUI MODE repeatedly to on the TV screen. continued 65US The multi channel input is activated. "GUI MODE" appears in the following cases. - Note This function does...in the display window of more than 96 kHz are being received. - Dolby TrueHD signals with a sampling frequency of the receiver and the GUI menu appears on and off as you will...
Operating Instructions (Large File - 15.18 MB)
Page 66
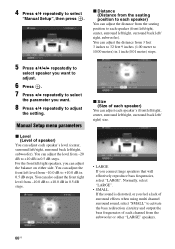
... +10 dB in 1 inch (0.01 meter) steps. 5 Press V/v/B/b repeatedly to select speaker you want to adjust. 6 Press . 7 Press B/b repeatedly to select "Manual Setup", then press . You can adjust each channel from 3 feet 3 inches to 32 feet 9 inches (1.00 meter to 10.00 meters) in 0.5 dB steps. Manual... Setup menu parameters x Level (Level of each speaker's level (center, surround left/right, surround back left / right) size. • LARGE If you want. 8 ...
... +10 dB in 1 inch (0.01 meter) steps. 5 Press V/v/B/b repeatedly to select speaker you want to adjust. 6 Press . 7 Press B/b repeatedly to select "Manual Setup", then press . You can adjust each channel from 3 feet 3 inches to 32 feet 9 inches (1.00 meter to 10.00 meters) in 0.5 dB steps. Manual... Setup menu parameters x Level (Level of each speaker's level (center, surround left/right, surround back left / right) size. • LARGE If you want. 8 ...

Operating Instructions (Large File - 15.18 MB)
Page 135
...component connected to the DIGITAL MEDIA PORT adapter. • Adjust the volume of the software being played back corresponds to the multi channel format. • Check whether the setup on your audio components away from the TV. • Make sure you are connected correctly (page 20). • Select .../surround back speakers. • Select a "Cinema Studio EX" mode (page 63). • Adjust the speaker level (page 65). Turn off the receiver, then reconnect the DIGITAL MEDIA PORT adapter and/or component. • Check the DIGITAL MEDIA PORT adapter and/or component device to make sure it...
...component connected to the DIGITAL MEDIA PORT adapter. • Adjust the volume of the software being played back corresponds to the multi channel format. • Check whether the setup on your audio components away from the TV. • Make sure you are connected correctly (page 20). • Select .../surround back speakers. • Select a "Cinema Studio EX" mode (page 63). • Adjust the speaker level (page 65). Turn off the receiver, then reconnect the DIGITAL MEDIA PORT adapter and/or component. • Check the DIGITAL MEDIA PORT adapter and/or component device to make sure it...
Operating Instructions (Large File - 15.18 MB)
Page 140
... 3/8 inches (430 x 157.5 x 388 mm) including projecting parts and controls Mass (Approx.) 26 lb 15 oz (12.2 kg) Supplied accessories Operating Instructions (this manual) Quick Setup Guide (1) GUI Menu List (1) Optimizer microphone (ECM-AC2) (1) FM wire antenna (aerial) (1) AM loop antenna (aerial) (1) AC power cord (mains lead) (1) Remote commander (RM-AAL017...
... 3/8 inches (430 x 157.5 x 388 mm) including projecting parts and controls Mass (Approx.) 26 lb 15 oz (12.2 kg) Supplied accessories Operating Instructions (this manual) Quick Setup Guide (1) GUI Menu List (1) Optimizer microphone (ECM-AC2) (1) FM wire antenna (aerial) (1) AM loop antenna (aerial) (1) AC power cord (mains lead) (1) Remote commander (RM-AAL017...

Operating Instructions (Large File - 15.18 MB)
Page 142
... Level 66, 70 LFE (Low Frequency Effect) 99 List Mode 93 Lock Code 81, 112 142US M Manual Setup 65, 66 MASTER VOLUME 8, 52, 53, 54, 55 Messages Auto Calibration 49 DIGITAL MEDIA PORT 93 error ...138 SIRIUS 84 XM 83 Movie 63 MULTI CHANNEL DECODING lamp 53 Music 63 Muting 51 N Name Input 94 Network Client 92 Neural-THX 62 NIGHT MODE...PHONES 8 PLII 62 PLIIx 62 Position (Auto Calibration) 50, 110 Preset channels 79, 119 Preset Mode 80 Preset stations 73, 117 PROTECTOR 138 Q Quick Setup 46 R Radio ID 77, 112, 118 Recording 102, 103 Remote 11-...
... Level 66, 70 LFE (Low Frequency Effect) 99 List Mode 93 Lock Code 81, 112 142US M Manual Setup 65, 66 MASTER VOLUME 8, 52, 53, 54, 55 Messages Auto Calibration 49 DIGITAL MEDIA PORT 93 error ...138 SIRIUS 84 XM 83 Movie 63 MULTI CHANNEL DECODING lamp 53 Music 63 Muting 51 N Name Input 94 Network Client 92 Neural-THX 62 NIGHT MODE...PHONES 8 PLII 62 PLIIx 62 Position (Auto Calibration) 50, 110 Preset channels 79, 119 Preset Mode 80 Preset stations 73, 117 PROTECTOR 138 Q Quick Setup 46 R Radio ID 77, 112, 118 Recording 102, 103 Remote 11-...

Operating Instructions (Large File - 15.18 MB)
Page 143
S Satellite radio 74 Screen Saver 58 SIRIUS Satellite Radio 75 Sleep timer 101 Sound Field Select 59, 116 Sound Field Setup 59 Speaker (Settings) 42, 69, 111 Speaker Impedance 42, 111 Speaker Pattern 67, 111 SPEAKERS (OFF/A/B/A+B) 8, 43 Super Audio CD player 21, 23, 24, 52 ...
S Satellite radio 74 Screen Saver 58 SIRIUS Satellite Radio 75 Sleep timer 101 Sound Field Select 59, 116 Sound Field Setup 59 Speaker (Settings) 42, 69, 111 Speaker Impedance 42, 111 Speaker Pattern 67, 111 SPEAKERS (OFF/A/B/A+B) 8, 43 Super Audio CD player 21, 23, 24, 52 ...


