
Operating Instructions (Large File - 15.18 MB)
Page 5
... the antennas (aerials 36 6: Preparing the receiver and the remote .... 37 7: Operating the receiver using the GUI (Graphical User Interface 39 8: Setting the speakers 42 9: Calibrating the appropriate speaker settings automatically (Auto Calibration 44 Playback Selecting a component...Settings for the audio (Audio settings menu 56 Settings for the video (Video settings menu 57 Settings for HDMI (HDMI settings menu 57 Settings for the system (System settings menu 58 Enjoying Surround Sound Enjoying a pre-programmed sound field ....59 Resetting sound fields to the initial settings...
... the antennas (aerials 36 6: Preparing the receiver and the remote .... 37 7: Operating the receiver using the GUI (Graphical User Interface 39 8: Setting the speakers 42 9: Calibrating the appropriate speaker settings automatically (Auto Calibration 44 Playback Selecting a component...Settings for the audio (Audio settings menu 56 Settings for the video (Video settings menu 57 Settings for HDMI (HDMI settings menu 57 Settings for the system (System settings menu 58 Enjoying Surround Sound Enjoying a pre-programmed sound field ....59 Resetting sound fields to the initial settings...
Operating Instructions (Large File - 15.18 MB)
Page 7
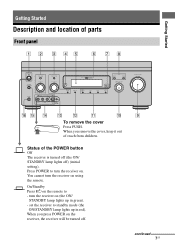
... off (the ON/ STANDBY lamp lights off . Press POWER to - On/Standby Press ?/1 on the remote to turn the receiver on (the ON/ STANDBY lamp lights up in green). - turn the receiver on using the remote. You cannot turn the receiver on the receiver, the receiver will be turned off ) (initial setting). When you press POWER on .
... off (the ON/ STANDBY lamp lights off . Press POWER to - On/Standby Press ?/1 on the remote to turn the receiver on (the ON/ STANDBY lamp lights up in green). - turn the receiver on using the remote. You cannot turn the receiver on the receiver, the receiver will be turned off ) (initial setting). When you press POWER on .
Operating Instructions (Large File - 15.18 MB)
Page 35
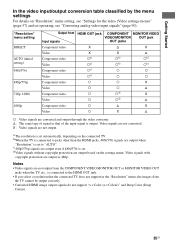
.... Video signals are converted and output through the video converter. a)The resolution is connected to "AUTO". "Resolution" menu setting DIRECT AUTO (initial setting) 480i/576i 480p/576p 720p, 1080i 1080p Output from HDMI OUT jack COMPONENT MONITOR VIDEO VIDEO MONITOR OUT jack Input signals OUT jacks..." menu, the images from the COMPONENT VIDEO MONITOR OUT or MONITOR VIDEO OUT jacks when the TV, etc., is set . Video signals with copyright protection are output when "Resolution" is set to the HDMI OUT jack. • If you select a resolution that of the input signal is...
.... Video signals are converted and output through the video converter. a)The resolution is connected to "AUTO". "Resolution" menu setting DIRECT AUTO (initial setting) 480i/576i 480p/576p 720p, 1080i 1080p Output from HDMI OUT jack COMPONENT MONITOR VIDEO VIDEO MONITOR OUT jack Input signals OUT jacks..." menu, the images from the COMPONENT VIDEO MONITOR OUT or MONITOR VIDEO OUT jacks when the TV, etc., is set . Video signals with copyright protection are output when "Resolution" is set to the HDMI OUT jack. • If you select a resolution that of the input signal is...
Operating Instructions (Large File - 15.18 MB)
Page 37
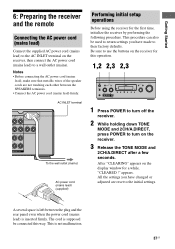
... on the display window for a while, "CLEARED !" The cord is supposed be used to return settings you have made to use the buttons on the receiver for the first time, initialize the receiver by performing the following procedure. A several space is not malfunction. 37US This is left between the ... lead) Connect the supplied AC power cord (mains lead) to the AC INLET terminal on the receiver, then connect the AC power cord (mains lead) to the initial settings. All the settings you have changed or adjusted are not touching each other between the plug and the rear panel even...
... on the display window for a while, "CLEARED !" The cord is supposed be used to return settings you have made to use the buttons on the receiver for the first time, initialize the receiver by performing the following procedure. A several space is not malfunction. 37US This is left between the ... lead) Connect the supplied AC power cord (mains lead) to the AC INLET terminal on the receiver, then connect the AC power cord (mains lead) to the initial settings. All the settings you have changed or adjusted are not touching each other between the plug and the rear panel even...
Operating Instructions (Large File - 15.18 MB)
Page 38
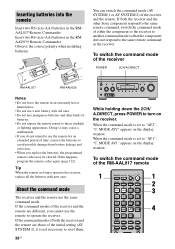
... other Sony component respond to the same remote command, switch the command mode of the receiver and the remote are those of batteries. • Do not expose the remote sensor to direct sunlight or lighting apparatuses. If the command modes of both the receiver and the other kinds of the initial setting (AV...; If you cannot use the remote for an extended period of time, remove the batteries to turn on the receiver. When the command mode is set to the same remote command as the receiver. You can switch the command mode (AV SYSTEM 1 or AV SYSTEM 2) of the RM-AAL017 remote 1 ...
... other Sony component respond to the same remote command, switch the command mode of the receiver and the remote are those of batteries. • Do not expose the remote sensor to direct sunlight or lighting apparatuses. If the command modes of both the receiver and the other kinds of the initial setting (AV...; If you cannot use the remote for an extended period of time, remove the batteries to turn on the receiver. When the command mode is set to the same remote command as the receiver. You can switch the command mode (AV SYSTEM 1 or AV SYSTEM 2) of the RM-AAL017 remote 1 ...

Operating Instructions (Large File - 15.18 MB)
Page 64
... more than 48 kHz are being received. - DTS 96/24 signals are being received. - The multi channel input is selected, the Digital Cinema Sound lamp lights up on the display window. Auto" in the following cases. - CLEAR" appears on the receiver for this operation. 1,2 2 1 Press POWER to their initial setting. 64US To turn off the surround...
... more than 48 kHz are being received. - DTS 96/24 signals are being received. - The multi channel input is selected, the Digital Cinema Sound lamp lights up on the display window. Auto" in the following cases. - CLEAR" appears on the receiver for this operation. 1,2 2 1 Press POWER to their initial setting. 64US To turn off the surround...

Operating Instructions (Large File - 15.18 MB)
Page 110
..., SR/SBR, SR/SL, FR/SR, FR/SL, CNT/FR, FL/CNT Phase audio [P. RANGE] COMP. OFF Initial Setting FULL FLAT POS 1 OFF OFF OFF FL 0 dB FR 0 dB CNT 0 dB SL 0 dB SR 0 dB...SB 0 dB SBL 0 dB SBR 0 dB SW 0 dB COMP. Menu [Display window] Parameters [Display window] Settings Auto Calibration Auto Calibration start [] [A.CAL START] Calibration type [CAL TYPE] FULL FLAT, ENGINEER, FRONT REF, OFF Position [...POSITION] POS 3, POS 2, POS 1 Level Settings [] Naming Inputs [NAME IN] Test tone [TEST TONE] For details, see page 41. OFF, FIX...
..., SR/SBR, SR/SL, FR/SR, FR/SL, CNT/FR, FL/CNT Phase audio [P. RANGE] COMP. OFF Initial Setting FULL FLAT POS 1 OFF OFF OFF FL 0 dB FR 0 dB CNT 0 dB SL 0 dB SR 0 dB...SB 0 dB SBL 0 dB SBR 0 dB SW 0 dB COMP. Menu [Display window] Parameters [Display window] Settings Auto Calibration Auto Calibration start [] [A.CAL START] Calibration type [CAL TYPE] FULL FLAT, ENGINEER, FRONT REF, OFF Position [...POSITION] POS 3, POS 2, POS 1 Level Settings [] Naming Inputs [NAME IN] Test tone [TEST TONE] For details, see page 41. OFF, FIX...
Operating Instructions (Large File - 15.18 MB)
Page 111
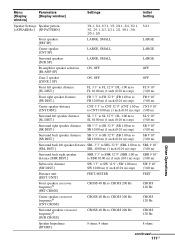
Menu [Display window] Parameters [Display window] Settings Initial Setting Speaker Settings Speaker pattern [] [SP PATTERN] 3/4.1, 3/4, 3/3.1, 3/3, 2/4.1, 2/4, 3/2.1, 3/2, 2/3.1, 2/3, 2/2.1, 2/2, 3/0.1, 3/0, 2/0.1, 2/0 3/4.1 Front speakers [FRT SP] LARGE, SMALL LARGE Center speaker [CNT SP] LARGE, SMALL LARGE Surround speakers [SUR SP] LARGE, SMALL LARGE ...
Menu [Display window] Parameters [Display window] Settings Initial Setting Speaker Settings Speaker pattern [] [SP PATTERN] 3/4.1, 3/4, 3/3.1, 3/3, 2/4.1, 2/4, 3/2.1, 3/2, 2/3.1, 2/3, 2/2.1, 2/2, 3/0.1, 3/0, 2/0.1, 2/0 3/4.1 Front speakers [FRT SP] LARGE, SMALL LARGE Center speaker [CNT SP] LARGE, SMALL LARGE Surround speakers [SUR SP] LARGE, SMALL LARGE ...
Operating Instructions (Large File - 15.18 MB)
Page 112
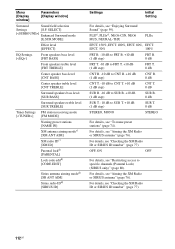
...10 dB (1 dB step) CNT T. 0 dB SUR B. -10 dB to SUR B. +10 dB (1 dB step) SUR B. 0 dB SUR T. -10 dB to specific channels (Parental Lock) (SIRIUS only)" (page 80). PLIIe), PLIIxe), NEO6 CIN, NEO6 MUS, NEURAL-THX PLIIx EFCT. 150%, EFCT. 100%, EFCT. 80%, EFCT. SELECT] []...] Tuner Settings FM station receiving mode [] [FM MODE] Naming preset stations [NAME IN] XM antenna aiming modec) [XM ANT AIM] XM radio IDc) [XM ID] Parental lockd) [PARENTAL] Lock code editd) [CODE EDIT] Sirius antenna aiming moded) [SR ANT AIM] Sirius radio IDd) [SIRIUS ID] Settings Initial Setting For details...
...10 dB (1 dB step) CNT T. 0 dB SUR B. -10 dB to SUR B. +10 dB (1 dB step) SUR B. 0 dB SUR T. -10 dB to specific channels (Parental Lock) (SIRIUS only)" (page 80). PLIIe), PLIIxe), NEO6 CIN, NEO6 MUS, NEURAL-THX PLIIx EFCT. 150%, EFCT. 100%, EFCT. 80%, EFCT. SELECT] []...] Tuner Settings FM station receiving mode [] [FM MODE] Naming preset stations [NAME IN] XM antenna aiming modec) [XM ANT AIM] XM radio IDc) [XM ID] Parental lockd) [PARENTAL] Lock code editd) [CODE EDIT] Sirius antenna aiming moded) [SR ANT AIM] Sirius radio IDd) [SIRIUS ID] Settings Initial Setting For details...
Operating Instructions (Large File - 15.18 MB)
Page 113
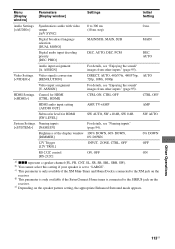
...-Tuner and Home Dock is connected to the XM jack on the receiver d) This parameter is only available if the SiriusConnect Home tuner is set to the SIRIUS jack on the speaker pattern setting, the appropriate Enhanced Surround mode appears. Brightness of the display window ..., OFF ON [RS-232C] a) xxx represent a speaker channel (FL, FR, CNT, SL, SR, SB, SBL, SBR, SW). b) You cannot select this setting if your speaker is connected to "LARGE". Menu [Display window] Parameters [Display window] Settings Initial Setting Audio Settings Synchronizes audio with video 0 to 300 ms 0 ms []...
...-Tuner and Home Dock is connected to the XM jack on the receiver d) This parameter is only available if the SiriusConnect Home tuner is set to the SIRIUS jack on the speaker pattern setting, the appropriate Enhanced Surround mode appears. Brightness of the display window ..., OFF ON [RS-232C] a) xxx represent a speaker channel (FL, FR, CNT, SL, SR, SB, SBL, SBR, SW). b) You cannot select this setting if your speaker is connected to "LARGE". Menu [Display window] Parameters [Display window] Settings Initial Setting Audio Settings Synchronizes audio with video 0 to 300 ms 0 ms []...
Operating Instructions (Large File - 15.18 MB)
Page 118
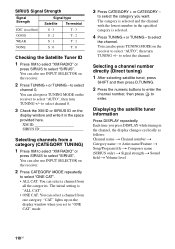
...initial setting is selected. 4 Press TUNING + or TUNING - to select channel 0. Each time you press DISPLAY while tuning in the space provided here. You can also press TUNING MODE on the receiver to "ONE CAT" mode. 3 Press CATEGORY + or CATEGORY - XM ID SIRIUS ID Selecting channels from one category. to select the channel... • ONE CAT: You can also use INPUT SELECTOR on the receiver. 2 Press TUNING + or TUNING - You can select a channel from all the categories. Selecting a channel number directly (Direct tuning) 1 After selecting satellite tuner, press SHIFT and...
...initial setting is selected. 4 Press TUNING + or TUNING - to select channel 0. Each time you press DISPLAY while tuning in the space provided here. You can also press TUNING MODE on the receiver to "ONE CAT" mode. 3 Press CATEGORY + or CATEGORY - XM ID SIRIUS ID Selecting channels from one category. to select the channel... • ONE CAT: You can also use INPUT SELECTOR on the receiver. 2 Press TUNING + or TUNING - You can select a channel from all the categories. Selecting a channel number directly (Direct tuning) 1 After selecting satellite tuner, press SHIFT and...
Operating Instructions (Large File - 15.18 MB)
Page 126
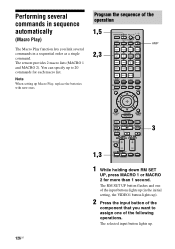
...MENU F1 F2 MACRO 1 MACRO 2 1 While holding down RM SET UP, press MACRO 1 or MACRO 2 for each macro list. You can specify up ). 2 Press the input button of the component that you link several commands in the initial setting, the VIDEO1 button lights up to assign one of the following... operations. The RM SET UP button flashes and one of the operation 1,5 2,3 THEATER SHIFT TV ZONE AMP 1 2 3 TV INPUT ...
...MENU F1 F2 MACRO 1 MACRO 2 1 While holding down RM SET UP, press MACRO 1 or MACRO 2 for each macro list. You can specify up ). 2 Press the input button of the component that you link several commands in the initial setting, the VIDEO1 button lights up to assign one of the following... operations. The RM SET UP button flashes and one of the operation 1,5 2,3 THEATER SHIFT TV ZONE AMP 1 2 3 TV INPUT ...


