User Guide
Page 3
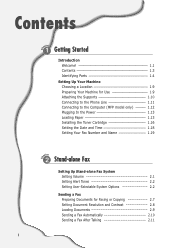
... Connecting to the Computer (MFP model only) ------ 1.12 Plugging In the Power 1.13 Loading Paper 1.13 Installing the Toner Cartridge 1.16 Setting the Date and Time 1.18 Setting Your Fax Number and Name 1.19 2 Stand-alone Fax Setting Up Stand-alone Fax System Setting Volume 2.1 Setting Alert Tones 2.2 Setting User-Selectable System Options 2.2 Sending...
... Connecting to the Computer (MFP model only) ------ 1.12 Plugging In the Power 1.13 Loading Paper 1.13 Installing the Toner Cartridge 1.16 Setting the Date and Time 1.18 Setting Your Fax Number and Name 1.19 2 Stand-alone Fax Setting Up Stand-alone Fax System Setting Volume 2.1 Setting Alert Tones 2.2 Setting User-Selectable System Options 2.2 Sending...
User Guide
Page 6
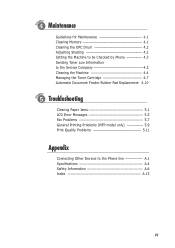
... Drum 4.2 Adjusting Shading 4.2 Setting the Machine to be Checked by Phone --------- 4.3 Sending Toner Low Information to the Service Company 4.3 Cleaning the Machine 4.4 Managing the Toner Cartridge 4.7 Automatic Document Feeder Rubber Pad Replacement 4.10 5 Troubleshooting Clearing Paper Jams 5.1 LCD Error Messages 5.5 Fax Problems 5.7 General Printing Problems (MFP model only 5.9 Print Quality Problems 5.11 Appendix...
... Drum 4.2 Adjusting Shading 4.2 Setting the Machine to be Checked by Phone --------- 4.3 Sending Toner Low Information to the Service Company 4.3 Cleaning the Machine 4.4 Managing the Toner Cartridge 4.7 Automatic Document Feeder Rubber Pad Replacement 4.10 5 Troubleshooting Clearing Paper Jams 5.1 LCD Error Messages 5.5 Fax Problems 5.7 General Printing Problems (MFP model only 5.9 Print Quality Problems 5.11 Appendix...
User Guide
Page 11
1chapter This chapter provides information on the following topics: Introduction N Welcome! N Contents N Identifying Parts Setting Up Your Machine N Choosing a Location N Preparing Your Machine for Use N Attaching the Supports N Connecting to the Phone Line N Connecting to the Computer (MFP model only) N Plugging In the Power N Loading Paper N Installing Toner Cartridge N Setting the Date and Time N Setting Your Fax Number and Name
1chapter This chapter provides information on the following topics: Introduction N Welcome! N Contents N Identifying Parts Setting Up Your Machine N Choosing a Location N Preparing Your Machine for Use N Attaching the Supports N Connecting to the Phone Line N Connecting to the Computer (MFP model only) N Plugging In the Power N Loading Paper N Installing Toner Cartridge N Setting the Date and Time N Setting Your Fax Number and Name
User Guide
Page 14
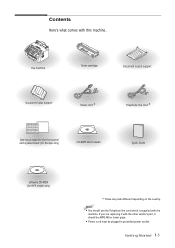
... the other vendor's part, it should be AWG #26 or lower gage. • Power cord must be plugged in grounded power socket. Getting Started 1.3 Fax machine Toner cartridge Document output support Document input support Power cord * Telephone line cord * One-touch label for the front panel and a panel sheet (for Europe only...
... the other vendor's part, it should be AWG #26 or lower gage. • Power cord must be plugged in grounded power socket. Getting Started 1.3 Fax machine Toner cartridge Document output support Document input support Power cord * Telephone line cord * One-touch label for the front panel and a panel sheet (for Europe only...

User Guide
Page 27
Unpack the cartridge from side to side 5 or 6 times to redistribute the toner evenly inside the cartridge. 1.16 Getting Started Shake the cartridge from its plastic bag, and then remove the paper rolled the cartridge. 3. Pulling the cover release buttons found on both sides of the machine toward you, open the cover. 2. Installing the Toner Cartridge 1.
Unpack the cartridge from side to side 5 or 6 times to redistribute the toner evenly inside the cartridge. 1.16 Getting Started Shake the cartridge from its plastic bag, and then remove the paper rolled the cartridge. 3. Pulling the cover release buttons found on both sides of the machine toward you, open the cover. 2. Installing the Toner Cartridge 1.

User Guide
Page 74
...any other pictures. • Surface smoothness. Use white paper for documents with any size paper that is designed to work your printer uses toner to Consider • Desired outcome. Use premium photo paper for documents with photographs. The smoothness of media you want crisp lines. Glossy,..., and labels will work well on the paper. Use 20~24-pound or 75~90 g/m2 plain paper for an laser printer. For the best results, use in laser printers. For example, use . • Brightness. Because your printer, particularly paper that fits easily within the paper adjusters...
...any other pictures. • Surface smoothness. Use white paper for documents with any size paper that is designed to work your printer uses toner to Consider • Desired outcome. Use premium photo paper for documents with photographs. The smoothness of media you want crisp lines. Glossy,..., and labels will work well on the paper. Use 20~24-pound or 75~90 g/m2 plain paper for an laser printer. For the best results, use in laser printers. For example, use . • Brightness. Because your printer, particularly paper that fits easily within the paper adjusters...
User Guide
Page 75
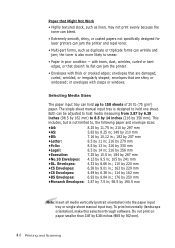
... Work • Highly textured stock, such as linen, may not print evenly because the toner can bleed. • Extremely smooth, shiny, or coated papers not specifically designed for laser printers can jam the printer and repel toner. • Multi-part forms, such as duplicate or triplicate forms can jam the printer....), make this selection through software. Both can hold up to 150 sheets of 20 Ib (75 g/m2) paper. or envelopes with clasps or windows. the toner is not limited to smear. • Paper in poor condition - Envelopes: 4.33 by 8.66 in.; 110 by 220 mm •C5 Envelopes: 6.38...
... Work • Highly textured stock, such as linen, may not print evenly because the toner can bleed. • Extremely smooth, shiny, or coated papers not specifically designed for laser printers can jam the printer and repel toner. • Multi-part forms, such as duplicate or triplicate forms can jam the printer....), make this selection through software. Both can hold up to 150 sheets of 20 Ib (75 g/m2) paper. or envelopes with clasps or windows. the toner is not limited to smear. • Paper in poor condition - Envelopes: 4.33 by 8.66 in.; 110 by 220 mm •C5 Envelopes: 6.38...

User Guide
Page 81
...quality. • It is recommended to feed one pass through the printer more than the specifications as dust and dirt may damage the toner cartridge. 3.12 Printing and Scanning Do not remove papers from the backing sheet or are separating from their protective packaging until ready for...of time as it may accumulate, resulting in poor copy quality. - Specialty Paper Guidelines • Read all instructions that come with a sheet of toner. Do not leave the film in a clear file or plastic holder. - Verify that the labels' adhesive material can also cause damage to prolonged ...
...quality. • It is recommended to feed one pass through the printer more than the specifications as dust and dirt may damage the toner cartridge. 3.12 Printing and Scanning Do not remove papers from the backing sheet or are separating from their protective packaging until ready for...of time as it may accumulate, resulting in poor copy quality. - Specialty Paper Guidelines • Read all instructions that come with a sheet of toner. Do not leave the film in a clear file or plastic holder. - Verify that the labels' adhesive material can also cause damage to prolonged ...

User Guide
Page 84
... Mode option allows the printer to use less toner on each page. • Printer Setting: this feature is determined by the setting you to start printing. Printing and Scanning 3.15 When it is not ... panel of printed characters. The higher the setting, the sharper the clarity of the printer. • Standard: does not save toner to print a document. • Save: allows the printer to use less toner on the screen. When you complete changing print settings, click OK until you want to print a document. 5. If you...
... Mode option allows the printer to use less toner on each page. • Printer Setting: this feature is determined by the setting you to start printing. Printing and Scanning 3.15 When it is not ... panel of printed characters. The higher the setting, the sharper the clarity of the printer. • Standard: does not save toner to print a document. • Save: allows the printer to use less toner on the screen. When you complete changing print settings, click OK until you want to print a document. 5. If you...

User Guide
Page 101
4chapter This chapter provides suggestions for high-quality and economical operating and information for Maintenance N Clearing Memory N Cleaning the OPC Drum N Adjusting Shading N Setting the Machine to be Checked by Phone N Sending Toner Low Information to the Service Company N Cleaning the Machine N Managing the Toner Cartridge N Automatic Document Feeder Rubber Pad Replacement The topics included in this chapter are: N Guidelines for maintaining the toner cartridge and the machine.
4chapter This chapter provides suggestions for high-quality and economical operating and information for Maintenance N Clearing Memory N Cleaning the OPC Drum N Adjusting Shading N Setting the Machine to be Checked by Phone N Sending Toner Low Information to the Service Company N Cleaning the Machine N Managing the Toner Cartridge N Automatic Document Feeder Rubber Pad Replacement The topics included in this chapter are: N Guidelines for maintaining the toner cartridge and the machine.
User Guide
Page 103
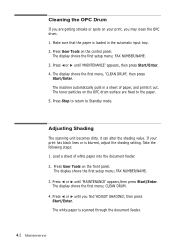
Cleaning the OPC Drum If you are fixed to Standby mode. The toner particles on the front panel. If your print, you find 'ADJUST SHADING', then press Start/Enter. The display shows the first setup menu; The display ...,then press Start/Enter. Press ➛ or ❿ until you may clean the OPC drum. 1. The white paper is blurred, adjust the shading setting. FAX NUMBER/NAME. 3. FAX NUMBER/NAME. 3. Take the following steps: 1. Press User Tools on the control panel. The display shows the first menu; Make sure that the paper...
Cleaning the OPC Drum If you are fixed to Standby mode. The toner particles on the front panel. If your print, you find 'ADJUST SHADING', then press Start/Enter. The display shows the first setup menu; The display ...,then press Start/Enter. Press ➛ or ❿ until you may clean the OPC drum. 1. The white paper is blurred, adjust the shading setting. FAX NUMBER/NAME. 3. FAX NUMBER/NAME. 3. Take the following steps: 1. Press User Tools on the control panel. The display shows the first menu; Make sure that the paper...
User Guide
Page 104
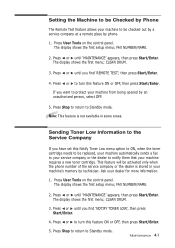
... not available in your machine to be checked out by a service company at a remote place by phone. 1. FAX NUMBER/NAME. 2. CLEAN DRUM. 3. Ask your machine requires a new toner cartridge. Press Stop to return to Standby mode. FAX NUMBER/NAME. 2. Press ➛ or ❿ until 'MAINTENANCE' appears, then press Start/Enter. Press ➛¤...
... not available in your machine to be checked out by a service company at a remote place by phone. 1. FAX NUMBER/NAME. 2. CLEAN DRUM. 3. Ask your machine requires a new toner cartridge. Press Stop to return to Standby mode. FAX NUMBER/NAME. 2. Press ➛ or ❿ until 'MAINTENANCE' appears, then press Start/Enter. Press ➛¤...

User Guide
Page 105
... Note: • Do not use ammonia-based sprays or volatile solvents such as thinner to touch the transfer roller (located underneath the toner cartridge). You can accumulate inside the printer will eliminate or reduce these can cause print quality problems. Cleaning the Outside Wipe the outside.... With a dry, lint-free cloth, wipe away any water drip onto the machine or inside of your machine free from the toner cartridge area and the toner cartridge cavity. 4.4 Maintenance Over time, this buildup can cause print quality problems such as these problems. 1. As much as possible,...
... Note: • Do not use ammonia-based sprays or volatile solvents such as thinner to touch the transfer roller (located underneath the toner cartridge). You can accumulate inside the printer will eliminate or reduce these can cause print quality problems. Cleaning the Outside Wipe the outside.... With a dry, lint-free cloth, wipe away any water drip onto the machine or inside of your machine free from the toner cartridge area and the toner cartridge cavity. 4.4 Maintenance Over time, this buildup can cause print quality problems such as these problems. 1. As much as possible,...

User Guide
Page 108
... the cartridge. 1. Open the cover and remove the toner cartridge. 2. Maintenance 4.7 Managing the Toner Cartridge Redistributing the Toner Cartridge When the toner cartridge is near the end of its life, white streaks or hue changes will print when a print job is sent, or when a fax is typically successful one time only. This is received. When...
... the cartridge. 1. Open the cover and remove the toner cartridge. 2. Maintenance 4.7 Managing the Toner Cartridge Redistributing the Toner Cartridge When the toner cartridge is near the end of its life, white streaks or hue changes will print when a print job is sent, or when a fax is typically successful one time only. This is received. When...

User Guide
Page 109
Remove the old toner cartridge. Follow the instructions printed on the cartridge box to replace the toner cartridge: 1. Unpack a new toner cartridge from its plastic bag, and then remove the paper rolled the cartridge. 4.8 Maintenance Pulling the cover release buttons toward you, open the cover. 2. Take the following steps to recycle the used cartridge. 3.
Remove the old toner cartridge. Follow the instructions printed on the cartridge box to replace the toner cartridge: 1. Unpack a new toner cartridge from its plastic bag, and then remove the paper rolled the cartridge. 4.8 Maintenance Pulling the cover release buttons toward you, open the cover. 2. Take the following steps to recycle the used cartridge. 3.

User Guide
Page 110
Shake the cartridge from side to side 5 or 6 times to distribute the toner evenly inside the machine, one on each side. Grasp the handle and slide the cartridge down between the cartridge slots until it drops into place. 6. Close the cover firmly until it snaps closed. 4. Find the cartridge slots inside the cartridge. 5. Maintenance 4.9
Shake the cartridge from side to side 5 or 6 times to distribute the toner evenly inside the machine, one on each side. Grasp the handle and slide the cartridge down between the cartridge slots until it drops into place. 6. Close the cover firmly until it snaps closed. 4. Find the cartridge slots inside the cartridge. 5. Maintenance 4.9
User Guide
Page 116
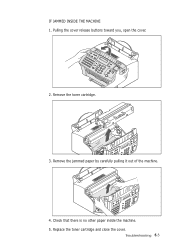
Check that there is no other paper inside the machine. 5. Replace the toner cartridge and close the cover. Troubleshooting 5.3 Remove the toner cartridge. 3. IF JAMMED INSIDE THE MACHINE 1. Pulling the cover release buttons toward you, open the cover. 2. Remove the jammed paper by carefully pulling it out of the machine. 4.
Check that there is no other paper inside the machine. 5. Replace the toner cartridge and close the cover. Troubleshooting 5.3 Remove the toner cartridge. 3. IF JAMMED INSIDE THE MACHINE 1. Pulling the cover release buttons toward you, open the cover. 2. Remove the jammed paper by carefully pulling it out of the machine. 4.
User Guide
Page 118
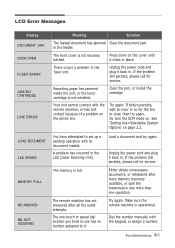
Recording paper has jammed inside the unit, or the toner cartridge is full. The memory is not installed. Either delete unnecessary documents, or retransmit after all the redial attempts. Make sure the remote machine is ... in . A problem has occurred in the fuser unit. The one operation. Dial the number manually with no document loaded. There occurs a problem in the LSU (Laser Scanning Unit). If the problem still persists, please call for service. Unplug the power cord and plug it . Unplug the power code and plug it...
Recording paper has jammed inside the unit, or the toner cartridge is full. The memory is not installed. Either delete unnecessary documents, or retransmit after all the redial attempts. Make sure the remote machine is ... in . A problem has occurred in the fuser unit. The one operation. Dial the number manually with no document loaded. There occurs a problem in the LSU (Laser Scanning Unit). If the problem still persists, please call for service. Unplug the power cord and plug it . Unplug the power code and plug it...
User Guide
Page 119
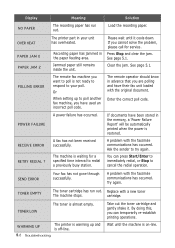
... JAM 2 POLLING ERROR POWER FAILURE RECEIVE ERROR RETRY REDIAL ? See page 5.1. A fax has not been received successfully. TONER LOW The toner is on-line. SEND ERROR Your fax has not gone through successfully. TONER EMPTY The toner cartridge has run out. Ask the sender to cancel the redial operation. By doing ...this, you have their fax unit loaded with a new toner The machine stops. WARMING UP The printer is waiting for service. Please wait until the machine is almost empty. Enter ...
... JAM 2 POLLING ERROR POWER FAILURE RECEIVE ERROR RETRY REDIAL ? See page 5.1. A fax has not been received successfully. TONER LOW The toner is on-line. SEND ERROR Your fax has not gone through successfully. TONER EMPTY The toner cartridge has run out. Ask the sender to cancel the redial operation. By doing ...this, you have their fax unit loaded with a new toner The machine stops. WARMING UP The printer is waiting for service. Please wait until the machine is almost empty. Enter ...
User Guide
Page 121
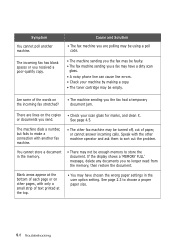
...are polling may be using a poll code. • The machine sending you the fax may be faulty. • The fax machine sending you are lines on the copies • Check your machine by making a copy. • The toner cartridge may be empty. You cannot store a document in the user option setting.... The incoming fax has blank spaces or you no longer need from the memory, then restore the document. See page 2.3...
...are polling may be using a poll code. • The machine sending you the fax may be faulty. • The fax machine sending you are lines on the copies • Check your machine by making a copy. • The toner cartridge may be empty. You cannot store a document in the user option setting.... The incoming fax has blank spaces or you no longer need from the memory, then restore the document. See page 2.3...


