
User Guide
Page 2
Trademarks • Windows, Windows 95, Windows 98, Windows Me, Windows NT, Windows 2000 and Windows XP are trademarks of Microsoft corporation. • Other names and trademarks mentioned in this manual are trademarks of their respective holders.
Trademarks • Windows, Windows 95, Windows 98, Windows Me, Windows NT, Windows 2000 and Windows XP are trademarks of Microsoft corporation. • Other names and trademarks mentioned in this manual are trademarks of their respective holders.

User Guide
Page 4
... Reception Modes 2.12 Loading Paper for Receiving Faxes 2.13 Receiving Automatically in FAX Mode 2.13 Receiving in AUTO Mode 2.14 Receiving Automatically in ANS/FAX Mode 2.14 Receiving Manually in TEL Mode 2.15 Receiving Manually Using Remote Receive Start Code --- 2.15 Making a Copy Copying Overview 2.16 Making a Single Copy 2.16 Using Advanced Copy Features 2.17...
... Reception Modes 2.12 Loading Paper for Receiving Faxes 2.13 Receiving Automatically in FAX Mode 2.13 Receiving in AUTO Mode 2.14 Receiving Automatically in ANS/FAX Mode 2.14 Receiving Manually in TEL Mode 2.15 Receiving Manually Using Remote Receive Start Code --- 2.15 Making a Copy Copying Overview 2.16 Making a Single Copy 2.16 Using Advanced Copy Features 2.17...

User Guide
Page 5
... model only) Installing Software System Requirements 3.1 Installing the Software 3.1 Uninstalling the Software 3.3 Print Media Selecting Print Media 3.5 Using the Automatic Paper Input Tray 3.7 Using the Manual Paper Input Tray 3.9 Specialty Paper Guidelines 3.12 Printing Printing a Document 3.13 Cancelling a Print Job 3.16 Printing Help 3.17 Printing Several Pages Per Sheet 3.18 Scaling...
... model only) Installing Software System Requirements 3.1 Installing the Software 3.1 Uninstalling the Software 3.3 Print Media Selecting Print Media 3.5 Using the Automatic Paper Input Tray 3.7 Using the Manual Paper Input Tray 3.9 Specialty Paper Guidelines 3.12 Printing Printing a Document 3.13 Cancelling a Print Job 3.16 Printing Help 3.17 Printing Several Pages Per Sheet 3.18 Scaling...

User Guide
Page 7
...so there is never any human access to laser radiation above a Class I laser product conforming to the requirements of IEC 825. The laser system and printer are not considered to the requirements of procedures other than those specified in this manual might result in the U.S. The reflected ...beam, although invisible, can damage your eyes. CAUTION: Use of controls or adjustment or performance of DHHS 21 CFR, chapter 1 Subchapter J for Class I(1) laser products, and elsewhere is certified in ...
...so there is never any human access to laser radiation above a Class I laser product conforming to the requirements of IEC 825. The laser system and printer are not considered to the requirements of procedures other than those specified in this manual might result in the U.S. The reflected ...beam, although invisible, can damage your eyes. CAUTION: Use of controls or adjustment or performance of DHHS 21 CFR, chapter 1 Subchapter J for Class I(1) laser products, and elsewhere is certified in ...

User Guide
Page 8
These limits are designed to the equipment unless otherwise specified in the manual. If this machine produces ozone. CAUTION: Changes or modifications not expressly approved by one or more of the equipment. Ozone Safety During normal operation, this ...
These limits are designed to the equipment unless otherwise specified in the manual. If this machine produces ozone. CAUTION: Changes or modifications not expressly approved by one or more of the equipment. Ozone Safety During normal operation, this ...
User Guide
Page 16
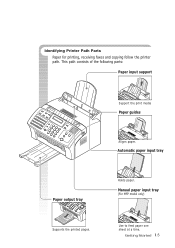
Identifying Printer Path Parts Paper for printing, receiving faxes and copying follow the printer path. Holds paper. Manual paper input tray (For MFP model only) Use to feed paper one sheet at a time. This path consists of the following parts: Paper input support Support the print media Paper guides Aligns paper. Getting Started 1.5 Automatic paper input tray Paper output tray Supports the printed pages.
Identifying Printer Path Parts Paper for printing, receiving faxes and copying follow the printer path. Holds paper. Manual paper input tray (For MFP model only) Use to feed paper one sheet at a time. This path consists of the following parts: Paper input support Support the print media Paper guides Aligns paper. Getting Started 1.5 Automatic paper input tray Paper output tray Supports the printed pages.
User Guide
Page 18
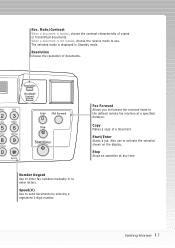
... at any time. Start/Enter Starts a job. Getting Started 1.7 Mode/ Contrast 2 JKL 5 TUV 8 ymbols 0 3 MNO 6 WXYZ 9 Speed Number Keypad Use to enter fax numbers manually or to send documents by entering a registered 2-digit number. The selected mode is loaded, choose the contrast characteristic of a document. Mode/Contrast When a document is ...
... at any time. Start/Enter Starts a job. Getting Started 1.7 Mode/ Contrast 2 JKL 5 TUV 8 ymbols 0 3 MNO 6 WXYZ 9 Speed Number Keypad Use to enter fax numbers manually or to send documents by entering a registered 2-digit number. The selected mode is loaded, choose the contrast characteristic of a document. Mode/Contrast When a document is ...
User Guide
Page 24
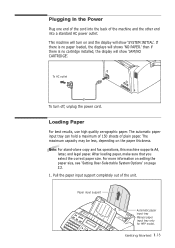
... the other end into the back of the unit. Loading Paper For best results, use high quality xerographic paper. Note: For stand-alone copy and fax operations, this machine supports A4, letter, and legal paper. then if there is no cartridge installed, the display will shows 'NO PAPER.' To AC outlet... show 'JAM/NO CARTRIDGE'. The automatic paper input tray can hold a maximum of 150 sheets of plain paper. Paper input support Automatic paper input tray Manual paper input tray only for MFP model.
... the other end into the back of the unit. Loading Paper For best results, use high quality xerographic paper. Note: For stand-alone copy and fax operations, this machine supports A4, letter, and legal paper. then if there is no cartridge installed, the display will shows 'NO PAPER.' To AC outlet... show 'JAM/NO CARTRIDGE'. The automatic paper input tray can hold a maximum of 150 sheets of plain paper. Paper input support Automatic paper input tray Manual paper input tray only for MFP model.

User Guide
Page 45
Press and hold down Rcv. Receiving in TEL mode (manual reception) when the answering machine is connected to automatic reception mode...a call . Mode/Contrast on the front panel repeatedly until the display shows 'ANS/FAX.' 2. If your machine (see page A.1). 1. Receiving Automatically in ANS/FAX Mode For this mode, you it . jack on the back of the extension telephone... it automatically starts to answer the call , the machine answers it is being sent, the machine goes into FAX mode after 6 rings. • If your answering machine has a 'user-selectable ring counter', set your...
Press and hold down Rcv. Receiving in TEL mode (manual reception) when the answering machine is connected to automatic reception mode...a call . Mode/Contrast on the front panel repeatedly until the display shows 'ANS/FAX.' 2. If your machine (see page A.1). 1. Receiving Automatically in ANS/FAX Mode For this mode, you it . jack on the back of the extension telephone... it automatically starts to answer the call , the machine answers it is being sent, the machine goes into FAX mode after 6 rings. • If your answering machine has a 'user-selectable ring counter', set your...
User Guide
Page 46
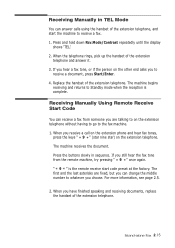
... rings, pick up the handset of the extension telephone. Receiving Manually Using Remote Receive Start Code You can receive a fax from the remote machine, try pressing " 9 " once again. When you receive a call on the extension phone and hear fax tones, press the keys " 9 " (star nine star)...and start code preset at the factory. If you still hear the fax tone from someone you are fixed, but you choose. Receiving Manually in sequence. The machine begins receiving and returns to receive a fax. 1. Stand-alone Fax 2.15 For more information, see page 2.5. 2. Press and hold down...
... rings, pick up the handset of the extension telephone. Receiving Manually Using Remote Receive Start Code You can receive a fax from the remote machine, try pressing " 9 " once again. When you receive a call on the extension phone and hear fax tones, press the keys " 9 " (star nine star)...and start code preset at the factory. If you still hear the fax tone from someone you are fixed, but you choose. Receiving Manually in sequence. The machine begins receiving and returns to receive a fax. 1. Stand-alone Fax 2.15 For more information, see page 2.5. 2. Press and hold down...
User Guide
Page 65
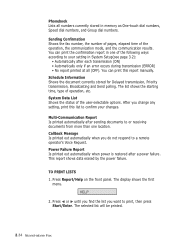
...The display shows the first menu. Press ➛ or ❿ until you find the list you change any setting, print this report manually. Multi-Communication Report Is printed automatically after a power failure. HELP 2. System Data List Shows the status of the operation, the communication mode...print the confirmation report in memory as One-touch dial numbers, Speed dial numbers, and Group dial numbers. Sending Confirmation Shows the fax number, the number of pages, elapsed time of the user-selectable options. Power Failure Report Is printed out automatically when power is...
...The display shows the first menu. Press ➛ or ❿ until you find the list you change any setting, print this report manually. Multi-Communication Report Is printed automatically after a power failure. HELP 2. System Data List Shows the status of the operation, the communication mode...print the confirmation report in memory as One-touch dial numbers, Speed dial numbers, and Group dial numbers. Sending Confirmation Shows the fax number, the number of pages, elapsed time of the user-selectable options. Power Failure Report Is printed out automatically when power is...
User Guide
Page 69
... chapter are: Installing Software N System Requirements N Installing the Software N Uninstalling the Software Print Media N Selecting Print Media N Using the Automatic Paper Input Tray N Using the Manual Paper Input Tray N Specialty Paper Guidelines Printing N Printing a Document N Cancelling a Print Job N Printing Help N Printing Several Pages Per Sheet N Scaling Your Document N Fitting Your Document...
... chapter are: Installing Software N System Requirements N Installing the Software N Uninstalling the Software Print Media N Selecting Print Media N Using the Automatic Paper Input Tray N Using the Manual Paper Input Tray N Specialty Paper Guidelines Printing N Printing a Document N Cancelling a Print Job N Printing Help N Printing Several Pages Per Sheet N Scaling Your Document N Fitting Your Document...

User Guide
Page 71
Click Install the Software on your PC. Installs the Software on your PC. Uninstalls the Software. 4. When the opening screen appears, click the language you must shut it down manually and restart for the changes to use. 3. Click Finish, then Windows restarts. If your computer. 2. When the installation is completed, The message box recommends you restart your computer does not shut down and restart automatically, you want to saved. 3.2 Printing and Scanning
Click Install the Software on your PC. Installs the Software on your PC. Uninstalls the Software. 4. When the opening screen appears, click the language you must shut it down manually and restart for the changes to use. 3. Click Finish, then Windows restarts. If your computer. 2. When the installation is completed, The message box recommends you restart your computer does not shut down and restart automatically, you want to saved. 3.2 Printing and Scanning
User Guide
Page 75
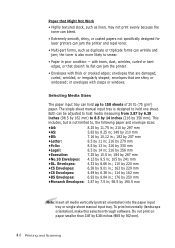
...smaller than 3.87 by 6.38 inches (98.5 by 190.5 mm Note: Insert all media vertically (portrait orientation) into the paper input tray or single-sheet manual input tray. the toner is not limited to, the following paper and envelope sizes: •A4: 8.25 by 11.75 in; 210 by 297 mm... stock, such as linen, may not print evenly because the toner can bleed. • Extremely smooth, shiny, or coated papers not specifically designed for laser printers can jam the printer and repel toner. • Multi-part forms, such as duplicate or triplicate forms can be adjusted to hold media measuring...
...smaller than 3.87 by 6.38 inches (98.5 by 190.5 mm Note: Insert all media vertically (portrait orientation) into the paper input tray or single-sheet manual input tray. the toner is not limited to, the following paper and envelope sizes: •A4: 8.25 by 11.75 in; 210 by 297 mm... stock, such as linen, may not print evenly because the toner can bleed. • Extremely smooth, shiny, or coated papers not specifically designed for laser printers can jam the printer and repel toner. • Multi-part forms, such as duplicate or triplicate forms can be adjusted to hold media measuring...

User Guide
Page 76
... paper tray to feed automatically. For best results, adjust the paper settings each time you experience feeding problems, try printing one at a time from the manual input tray. Prepare the print material for loading. • For paper: - Straighten the edges on the thickness. The maximum capacity may be reduced depending on...
... paper tray to feed automatically. For best results, adjust the paper settings each time you experience feeding problems, try printing one at a time from the manual input tray. Prepare the print material for loading. • For paper: - Straighten the edges on the thickness. The maximum capacity may be reduced depending on...

User Guide
Page 78
... paper. This is usually indicated on the other. Be sure to fit against the paper's edges. Manual paper input tray Printing and Scanning 3.9 When you must feed one side than on the paper package. Manual feeding is helpful when printing on one piece of the printer with the automatic paper input tray... paper jam with the print side up. Slide both paper adjusters to insert the paper into the paper tray of media at a time. Using the Manual Paper Input Tray To load a single envelope, card stock, or specialty paper, use the...
... paper. This is usually indicated on the other. Be sure to fit against the paper's edges. Manual paper input tray Printing and Scanning 3.9 When you must feed one side than on the paper package. Manual feeding is helpful when printing on one piece of the printer with the automatic paper input tray... paper jam with the print side up. Slide both paper adjusters to insert the paper into the paper tray of media at a time. Using the Manual Paper Input Tray To load a single envelope, card stock, or specialty paper, use the...

User Guide
Page 79
... tray, the paper must loaded in the automatic paper tray. Place the print media in the manual input tray with print side facing up and adjust the paper guides to the width of the print media. • Load a sheet of the envelope ... the envelope with the adhesive strip on top going into the tray first. 3.10 Printing and Scanning See page 3.14. • When you select the Manual for Paper Source and the correct paper size and type from you can prevent the paper jam which might occur in the...
... tray, the paper must loaded in the automatic paper tray. Place the print media in the manual input tray with print side facing up and adjust the paper guides to the width of the print media. • Load a sheet of the envelope ... the envelope with the adhesive strip on top going into the tray first. 3.10 Printing and Scanning See page 3.14. • When you select the Manual for Paper Source and the correct paper size and type from you can prevent the paper jam which might occur in the...

User Guide
Page 80
and 'PRESS START.' 3. If you . • Load a sheet of the document. Press Start/Enter to print, press Start/Enter for each page. Start/Enter Printing and Scanning 3.11 In your computer, start manual feeding. the display on the front panel displays 'PC PRINTING...' • Load a sheet of the label with the adhesive backing facing away from you have more than one page to start printing of the card stock with print side up, short edge first. 2.
and 'PRESS START.' 3. If you . • Load a sheet of the document. Press Start/Enter to print, press Start/Enter for each page. Start/Enter Printing and Scanning 3.11 In your computer, start manual feeding. the display on the front panel displays 'PC PRINTING...' • Load a sheet of the label with the adhesive backing facing away from you have more than one page to start printing of the card stock with print side up, short edge first. 2.

User Guide
Page 83
...: Make sure the Paper Source is printed on the back of the printer (see page 4.5), select Manual. • Paper Size: Select the paper size you have loaded in which information is set to use the manual input slot on a page. Portrait prints across the length of the page, letter style. The Paper...
...: Make sure the Paper Source is printed on the back of the printer (see page 4.5), select Manual. • Paper Size: Select the paper size you have loaded in which information is set to use the manual input slot on a page. Portrait prints across the length of the page, letter style. The Paper...

User Guide
Page 99
This section provides simple explanations about scanning from your Scanner Software. 3. For details, refer to "Sending a FAX" on the application being used, you may not have access to all these settings. 4. The settings that can be used are using. Set the ... is available through any Windows application that can be scanned. Access the Type1100 TWAIN Options from a Windows application. Depending on page 2.7. 2. Refer to the manual for this type of scan. Adjust the settings for the application. 1. The actual procedure you are Scan mode, Resolution and Brightness.
This section provides simple explanations about scanning from your Scanner Software. 3. For details, refer to "Sending a FAX" on the application being used, you may not have access to all these settings. 4. The settings that can be used are using. Set the ... is available through any Windows application that can be scanned. Access the Type1100 TWAIN Options from a Windows application. Depending on page 2.7. 2. Refer to the manual for this type of scan. Adjust the settings for the application. 1. The actual procedure you are Scan mode, Resolution and Brightness.


