User Guide
Page 3
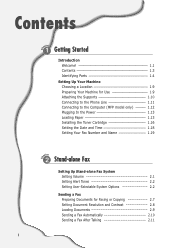
... Paper 1.13 Installing the Toner Cartridge 1.16 Setting the Date and Time 1.18 Setting Your Fax Number and Name 1.19 2 Stand-alone Fax Setting Up Stand-alone Fax System Setting Volume 2.1 Setting Alert Tones 2.2 Setting User-Selectable System Options 2.2 Sending a Fax Preparing Documents for Faxing or Copying 2.7 Setting Document Resolution and Contrast 2.8 Loading Documents 2.9 Sending...
... Paper 1.13 Installing the Toner Cartridge 1.16 Setting the Date and Time 1.18 Setting Your Fax Number and Name 1.19 2 Stand-alone Fax Setting Up Stand-alone Fax System Setting Volume 2.1 Setting Alert Tones 2.2 Setting User-Selectable System Options 2.2 Sending a Fax Preparing Documents for Faxing or Copying 2.7 Setting Document Resolution and Contrast 2.8 Loading Documents 2.9 Sending...

User Guide
Page 4
... Reception Modes 2.12 Loading Paper for Receiving Faxes 2.13 Receiving Automatically in FAX Mode 2.13 Receiving in AUTO Mode 2.14 Receiving Automatically in ANS/FAX Mode 2.14 Receiving Manually in TEL Mode 2.15 Receiving Manually Using Remote Receive Start Code --- 2....18 One-Touch Dialling 2.20 Speed Dialling 2.22 Searching for a Number in the Memory 2.24 Transmission Options Broadcasting 2.25 Delayed Fax 2.26 Priority Fax 2.28 Polling 2.29 Adding Documents To a Scheduled Operation --------- 2.31 Cancelling a Scheduled Operation 2.31 Additional Functions Monitoring a Dual Job...
... Reception Modes 2.12 Loading Paper for Receiving Faxes 2.13 Receiving Automatically in FAX Mode 2.13 Receiving in AUTO Mode 2.14 Receiving Automatically in ANS/FAX Mode 2.14 Receiving Manually in TEL Mode 2.15 Receiving Manually Using Remote Receive Start Code --- 2....18 One-Touch Dialling 2.20 Speed Dialling 2.22 Searching for a Number in the Memory 2.24 Transmission Options Broadcasting 2.25 Delayed Fax 2.26 Priority Fax 2.28 Polling 2.29 Adding Documents To a Scheduled Operation --------- 2.31 Cancelling a Scheduled Operation 2.31 Additional Functions Monitoring a Dual Job...
User Guide
Page 6
... to the Service Company 4.3 Cleaning the Machine 4.4 Managing the Toner Cartridge 4.7 Automatic Document Feeder Rubber Pad Replacement 4.10 5 Troubleshooting Clearing Paper Jams 5.1 LCD Error Messages 5.5 Fax Problems 5.7 General Printing Problems (MFP model only 5.9 Print Quality Problems 5.11 Appendix Connecting Other Devices to the Phone line A.1 Specifications A.4 Safety Information A.6 Index A.13 IV
... to the Service Company 4.3 Cleaning the Machine 4.4 Managing the Toner Cartridge 4.7 Automatic Document Feeder Rubber Pad Replacement 4.10 5 Troubleshooting Clearing Paper Jams 5.1 LCD Error Messages 5.5 Fax Problems 5.7 General Printing Problems (MFP model only 5.9 Print Quality Problems 5.11 Appendix Connecting Other Devices to the Phone line A.1 Specifications A.4 Safety Information A.6 Index A.13 IV

User Guide
Page 9
Ricoh/NRG/LANIER: The CE Decalration of the Industry and Science Canada. Canadian Radio Interference Regulations This digital apparatus does not exceed the Class B limits for ... set out in the interference-causing equipment standard entitled "Digital Apparatus", ICES-003 of Conformity is available on the Internet at URL: http://www.ricoh.co.jp/fax/ce_doc/ VII Declaration of Conformity Notice to Users in EEA Countries This product complies with the essential requirements and provisions of Directive 1999/5/EC...
Ricoh/NRG/LANIER: The CE Decalration of the Industry and Science Canada. Canadian Radio Interference Regulations This digital apparatus does not exceed the Class B limits for ... set out in the interference-causing equipment standard entitled "Digital Apparatus", ICES-003 of Conformity is available on the Internet at URL: http://www.ricoh.co.jp/fax/ce_doc/ VII Declaration of Conformity Notice to Users in EEA Countries This product complies with the essential requirements and provisions of Directive 1999/5/EC...
User Guide
Page 11
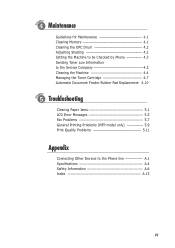
1chapter This chapter provides information on the following topics: Introduction N Welcome! N Contents N Identifying Parts Setting Up Your Machine N Choosing a Location N Preparing Your Machine for Use N Attaching the Supports N Connecting to the Phone Line N Connecting to the Computer (MFP model only) N Plugging In the Power N Loading Paper N Installing Toner Cartridge N Setting the Date and Time N Setting Your Fax Number and Name
1chapter This chapter provides information on the following topics: Introduction N Welcome! N Contents N Identifying Parts Setting Up Your Machine N Choosing a Location N Preparing Your Machine for Use N Attaching the Supports N Connecting to the Phone Line N Connecting to the Computer (MFP model only) N Plugging In the Power N Loading Paper N Installing Toner Cartridge N Setting the Date and Time N Setting Your Fax Number and Name
User Guide
Page 12
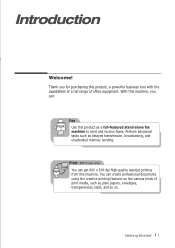
... a powerful business tool with the capabilities of a full range of print media, such as a full-featured stand-alone fax machine to send and receive faxes. Print (MFP model only) You can create professional documents using the creative printing features on the various kinds of office... equipment. Getting Started 1.1 Thank you can: Fax Use this machine. You can get 600 x 600 dpi high-quality laserjet printing from this product as plain papers, envelopes, transparencies, ...
... a powerful business tool with the capabilities of a full range of print media, such as a full-featured stand-alone fax machine to send and receive faxes. Print (MFP model only) You can create professional documents using the creative printing features on the various kinds of office... equipment. Getting Started 1.1 Thank you can: Fax Use this machine. You can get 600 x 600 dpi high-quality laserjet printing from this product as plain papers, envelopes, transparencies, ...
User Guide
Page 14
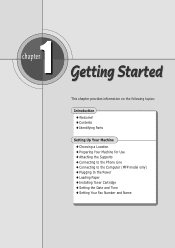
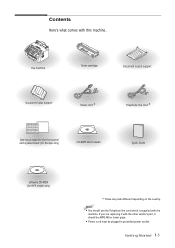
Getting Started 1.3 Fax machine Toner cartridge Document output support Document input support Power cord * Telephone line cord * One-touch label for the front panel and a panel sheet (for ...
Getting Started 1.3 Fax machine Toner cartridge Document output support Document input support Power cord * Telephone line cord * One-touch label for the front panel and a panel sheet (for ...
User Guide
Page 15
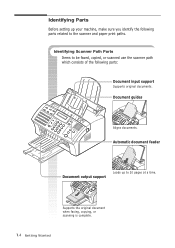
Identifying Scanner Path Parts Items to be faxed, copied, or scanned use the scanner path which consists of the following parts related to 20 pages at a time. Automatic document feeder Document output support Loads up your machine, make sure you identify the following parts: Document input support Supports original documents. Supports the original document when faxing, copying, or scanning is complete. 1.4 Getting Started Identifying Parts Before setting up to the scanner and paper print paths. Document guides Aligns documents.
Identifying Scanner Path Parts Items to be faxed, copied, or scanned use the scanner path which consists of the following parts related to 20 pages at a time. Automatic document feeder Document output support Loads up your machine, make sure you identify the following parts: Document input support Supports original documents. Supports the original document when faxing, copying, or scanning is complete. 1.4 Getting Started Identifying Parts Before setting up to the scanner and paper print paths. Document guides Aligns documents.
User Guide
Page 16
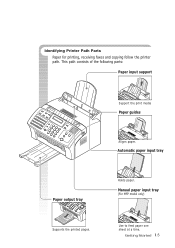
Identifying Printer Path Parts Paper for printing, receiving faxes and copying follow the printer path. Automatic paper input tray Paper output tray Supports the printed pages. Manual paper input tray (For MFP model only) Use to feed paper one sheet at a time. This path consists of the following parts: Paper input support Support the print media Paper guides Aligns paper. Holds paper. Getting Started 1.5
Identifying Printer Path Parts Paper for printing, receiving faxes and copying follow the printer path. Automatic paper input tray Paper output tray Supports the printed pages. Manual paper input tray (For MFP model only) Use to feed paper one sheet at a time. This path consists of the following parts: Paper input support Support the print media Paper guides Aligns paper. Holds paper. Getting Started 1.5
User Guide
Page 17
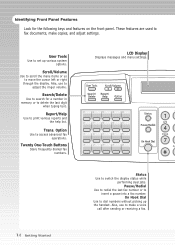
Also, use to make copies, and adjust settings. Pause/Redial Use to redial the last fax number or to adjust the ringer volume. Scroll/Volume Use to scroll the menu items or us to print various reports and the help list. ... to delete the last digit when typing text. Also, use to insert a pause into a fax number. Identifying Front Panel Features Look for a number in memory or to access advanced fax operations. Twenty One-Touch Buttons Store frequently dialled fax numbers. These features are used to set up the handset. Search/Delete Use to...
Also, use to make copies, and adjust settings. Pause/Redial Use to redial the last fax number or to adjust the ringer volume. Scroll/Volume Use to scroll the menu items or us to print various reports and the help list. ... to delete the last digit when typing text. Also, use to insert a pause into a fax number. Identifying Front Panel Features Look for a number in memory or to access advanced fax operations. Twenty One-Touch Buttons Store frequently dialled fax numbers. These features are used to set up the handset. Search/Delete Use to...
User Guide
Page 18
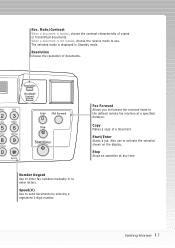
...enter letters. Start/Enter Starts a job. Resolution Rcv. Mode/ Contrast 2 JKL 5 TUV 8 ymbols 0 3 MNO 6 WXYZ 9 Speed Number Keypad Use to enter fax numbers manually or to send documents by entering a registered 2-digit number. Copy Makes a copy of documents. Getting Started 1.7 Also use . Mode/Contrast When a document is... not loaded, choose the receive mode to use to the defined remote fax machine at any time. The selected mode is displayed in Standby mode. Resolution Choose the resolution of a document...
...enter letters. Start/Enter Starts a job. Resolution Rcv. Mode/ Contrast 2 JKL 5 TUV 8 ymbols 0 3 MNO 6 WXYZ 9 Speed Number Keypad Use to enter fax numbers manually or to send documents by entering a registered 2-digit number. Copy Makes a copy of documents. Getting Started 1.7 Also use . Mode/Contrast When a document is... not loaded, choose the receive mode to use to the defined remote fax machine at any time. The selected mode is displayed in Standby mode. Resolution Choose the resolution of a document...

User Guide
Page 23
... into the side of the unit marked the word LINE. 2. Notes: • If you are not connecting other end of your computer documentation for the fax number. See your machine. To Connect to a Wall Jack that has a built-in splitter, plug a phone unit splitter (not included) into the jack on the...
... into the side of the unit marked the word LINE. 2. Notes: • If you are not connecting other end of your computer documentation for the fax number. See your machine. To Connect to a Wall Jack that has a built-in splitter, plug a phone unit splitter (not included) into the jack on the...
User Guide
Page 24
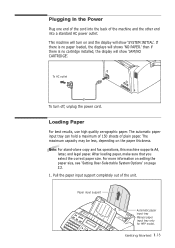
... Paper For best results, use high quality xerographic paper. Pull the paper input support completely out of the unit. Note: For stand-alone copy and fax operations, this machine supports A4, letter, and legal paper. For more information on setting the paper size, see 'Setting User-Selectable System Options' on the...
... Paper For best results, use high quality xerographic paper. Pull the paper input support completely out of the unit. Note: For stand-alone copy and fax operations, this machine supports A4, letter, and legal paper. For more information on setting the paper size, see 'Setting User-Selectable System Options' on the...

User Guide
Page 26
... paper. DO NOT use the following papers can be obtained with the preferred side facing up. The following types of paper with your machine for fax: • Letter : 216 x 279 mm (8.5 x 11.0 in.) - 60 g/m2 ~ 90 g/m2 (16 ~ 24 lb) • A4 : 210 x 297 mm (8.3 x 11.7 in.) - 60 g/m2 ~ 90 g/m2...
... paper. DO NOT use the following papers can be obtained with the preferred side facing up. The following types of paper with your machine for fax: • Letter : 216 x 279 mm (8.5 x 11.0 in.) - 60 g/m2 ~ 90 g/m2 (16 ~ 24 lb) • A4 : 210 x 297 mm (8.3 x 11.7 in.) - 60 g/m2 ~ 90 g/m2...

User Guide
Page 29
...time for each item using the selected date format and asks you to set . 19-MAR 12:30 FAX (EUROPE Format) 1.18 Getting Started For example, enter 2230 for 10:30 P.M. If this series ...time in format of Month-Day-Year. When you install this happens, re-enter the correct number. 6. FAX NUMBER/NAME. 2. If you find the desired date format, then press Start/Enter. If you have set..., the display prompts you to access the Time/Date Setup menu. 3. Press User Tools on all transmitted faxes. The display returns to save the setting. Press ➛ or ❿ until 'TIME/DATE SETUP' ...
...time for each item using the selected date format and asks you to set . 19-MAR 12:30 FAX (EUROPE Format) 1.18 Getting Started For example, enter 2230 for 10:30 P.M. If this series ...time in format of Month-Day-Year. When you install this happens, re-enter the correct number. 6. FAX NUMBER/NAME. 2. If you find the desired date format, then press Start/Enter. If you have set..., the display prompts you to access the Time/Date Setup menu. 3. Press User Tools on all transmitted faxes. The display returns to save the setting. Press ➛ or ❿ until 'TIME/DATE SETUP' ...

User Guide
Page 30
....' 3. If you entered a wrong number, press Search/Delete to access the Fax Number/Name menu. NAME: 6. Press Start/Enter to delete it. 5. Enter your machine is connected to enter alphanumeric characters, see page 2.19. 7. If there is ... can enter up to 20 digits. Press for plus sign (+) and # for a hyphen. Getting Started 1.19 You can enter up to 40 characters. Setting Your Fax Number and Name Your fax number and name can be printed at the top of each page transmitted...
....' 3. If you entered a wrong number, press Search/Delete to access the Fax Number/Name menu. NAME: 6. Press Start/Enter to delete it. 5. Enter your machine is connected to enter alphanumeric characters, see page 2.19. 7. If there is ... can enter up to 20 digits. Press for plus sign (+) and # for a hyphen. Getting Started 1.19 You can enter up to 40 characters. Setting Your Fax Number and Name Your fax number and name can be printed at the top of each page transmitted...

User Guide
Page 31
This chapter provides information on the fax system. 2chapter This chapter explains how to use the Transmission Option features and change the settings on the following topics: N Setting Up Stand-alone Fax System N Sending a Fax N Receiving a Fax N Making a Copy N Automatic Dialling N Transmission Options N Additional Functions This chapter also demonstrates how to send and receive faxes from the front panel of this machine.
This chapter provides information on the fax system. 2chapter This chapter explains how to use the Transmission Option features and change the settings on the following topics: N Setting Up Stand-alone Fax System N Sending a Fax N Receiving a Fax N Making a Copy N Automatic Dialling N Transmission Options N Additional Functions This chapter also demonstrates how to send and receive faxes from the front panel of this machine.

User Guide
Page 32
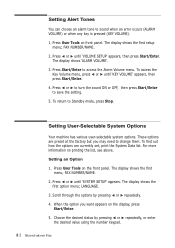
... ➛ or ❿ repeatedly until you find the desired loudness. After choosing the desired volume level, press On Hook Dial. Stand-alone Fax 2.1 Four levels are available; 0~3. The machine will show the level. Press ➛ or ❿ until you cannot hear dial tone, check... Dial to save the setting. Setting '0' turns the ringer off . 3. Press Start/Enter to adjust the speaker volume. Setting up Standalone Fax System Setting Volume Ringer Volume You can adjust the volume of the ringer to off . The display shows the current ringer volume setting. SPEAKER...
... ➛ or ❿ repeatedly until you find the desired loudness. After choosing the desired volume level, press On Hook Dial. Stand-alone Fax 2.1 Four levels are available; 0~3. The machine will show the level. Press ➛ or ❿ until you cannot hear dial tone, check... Dial to save the setting. Setting '0' turns the ringer off . 3. Press Start/Enter to adjust the speaker volume. Setting up Standalone Fax System Setting Volume Ringer Volume You can adjust the volume of the ringer to off . The display shows the current ringer volume setting. SPEAKER...
User Guide
Page 33
...or ❿ until 'VOLUME SETUP' appears, then press Start/Enter. Setting Alert Tones You can choose an alarm tone to Standby mode, press Stop. FAX NUMBER/NAME. 2. Press ➛ or ❿ to turn the sound ON or OFF, then press Start/Enter to access the Alarm Volume menu. ... access the Key Volume menu, press ➛ or ❿ until 'KEY VOLUME' appears, then press Start/Enter. 4. For more information on front panel. FAX NUMBER/NAME. 2. Scroll through the options by pressing ➛ or ❿ repeatedly, or enter the desired value using the number keypad. 2.2 Stand-alone...
...or ❿ until 'VOLUME SETUP' appears, then press Start/Enter. Setting Alert Tones You can choose an alarm tone to Standby mode, press Stop. FAX NUMBER/NAME. 2. Press ➛ or ❿ to turn the sound ON or OFF, then press Start/Enter to access the Alarm Volume menu. ... access the Key Volume menu, press ➛ or ❿ until 'KEY VOLUME' appears, then press Start/Enter. 4. For more information on front panel. FAX NUMBER/NAME. 2. Scroll through the options by pressing ➛ or ❿ repeatedly, or enter the desired value using the number keypad. 2.2 Stand-alone...
User Guide
Page 34
... will use for recording. 6. You can select the display language. Select OFF to save the setting. Select ERROR to turn off. • FAX PAPER SIZE - Select OFF to print only when an error occurs and the transmission was successful or not, how many pages were sent, etc...., ITALIAN, SPANISH, PORTUGUESE and DUTCH. • SEND FROM MEMORY-Enables all transmission documents to Standby mode without saving the setting you send a fax. Stand-alone Fax 2.3 Note: If you set the Auto Reduction menu option, or turned Paper Save mode on page 2.2 under 'Setting an Option' and the ...
... will use for recording. 6. You can select the display language. Select OFF to save the setting. Select ERROR to turn off. • FAX PAPER SIZE - Select OFF to print only when an error occurs and the transmission was successful or not, how many pages were sent, etc...., ITALIAN, SPANISH, PORTUGUESE and DUTCH. • SEND FROM MEMORY-Enables all transmission documents to Standby mode without saving the setting you send a fax. Stand-alone Fax 2.3 Note: If you set the Auto Reduction menu option, or turned Paper Save mode on page 2.2 under 'Setting an Option' and the ...


