
User Guide
Page 9
...(s 121 The following cartridge is not intended for use in this printer 121 The following cartridge appears to print...122 Previously used genuine HP cartridge 122 Ink Service Capacity Warning 122 General printer error...122 6 Control-panel lights reference Interpreting control-panel lights 124 A HP supplies and accessories Order printing supplies online 131 Accessories...131 Supplies...131...
...(s 121 The following cartridge is not intended for use in this printer 121 The following cartridge appears to print...122 Previously used genuine HP cartridge 122 Ink Service Capacity Warning 122 General printer error...122 6 Control-panel lights reference Interpreting control-panel lights 124 A HP supplies and accessories Order printing supplies online 131 Accessories...131 Supplies...131...

User Guide
Page 63
... on some models, press the Wireless button) until the ink cartridge lights blink, approximately five seconds, and then release the buttons. HP partners who assist in the HP product. Any third party possessing the cartridge might have access to improve future HP products. If you prefer to not allow access to identify a customer... cartridge into the slot that has the same shaped icon and color as well. Related topics Order printing supplies online Usage information collection The HP cartridges used , any printing errors that might have occurred, and the product model.
... on some models, press the Wireless button) until the ink cartridge lights blink, approximately five seconds, and then release the buttons. HP partners who assist in the HP product. Any third party possessing the cartridge might have access to improve future HP products. If you prefer to not allow access to identify a customer... cartridge into the slot that has the same shaped icon and color as well. Related topics Order printing supplies online Usage information collection The HP cartridges used , any printing errors that might have occurred, and the product model.
User Guide
Page 69
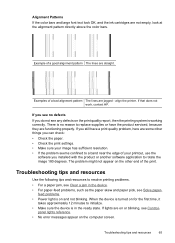
align the printer. If you still have the product serviced, because they are some other end of a bad alignment pattern The lines are on or blinking, see Solve paper- feed problems. • Power light is working correctly. panel lights reference. • No error messages appear on for the... first time, it takes approximately 12 minutes to rotate the image 180 degrees. Examples of the print. The problem might not appear on and not blinking. If that does not work, contact HP....
align the printer. If you still have the product serviced, because they are some other end of a bad alignment pattern The lines are on or blinking, see Solve paper- feed problems. • Power light is working correctly. panel lights reference. • No error messages appear on for the... first time, it takes approximately 12 minutes to rotate the image 180 degrees. Examples of the print. The problem might not appear on and not blinking. If that does not work, contact HP....
User Guide
Page 112
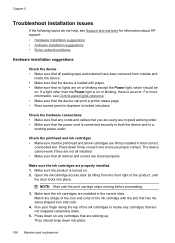
... than the Power light is an error. Make sure the ink cartridges are not snapped completely down firmly on or blinking, there is on each one to a working power outlet. For more information, see Support and warranty for information about HP support. • Hardware installation suggestions • Software installation ...are closed properly. The device cannot work if they are not all installed. • Make sure that the device can print a printer status page. • Rear access panel or duplexer is loaded with the slot that has the same shaped icon and color. 4.
... than the Power light is an error. Make sure the ink cartridges are not snapped completely down firmly on or blinking, there is on each one to a working power outlet. For more information, see Support and warranty for information about HP support. • Hardware installation suggestions • Software installation ...are closed properly. The device cannot work if they are not all installed. • Make sure that the device can print a printer status page. • Rear access panel or duplexer is loaded with the slot that has the same shaped icon and color. 4.
User Guide
Page 119
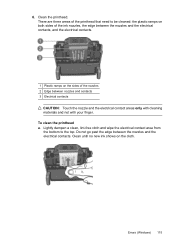
There are three areas of the printhead that need to the top. Lightly dampen a clean, lint-free cloth and wipe the electrical contact area from the bottom to be cleaned: the plastic ramps on both sides of the ... with your finger. Do not go past the edge between the nozzles and the electrical contacts, and the electrical contacts. 1 Plastic ramps on the cloth. Errors (Windows) 115 To clean the printhead a. Clean until no new ink shows on the sides of the ink nozzles, the edge between the nozzles and...
There are three areas of the printhead that need to the top. Lightly dampen a clean, lint-free cloth and wipe the electrical contact area from the bottom to be cleaned: the plastic ramps on both sides of the ... with your finger. Do not go past the edge between the nozzles and the electrical contacts, and the electrical contacts. 1 Plastic ramps on the cloth. Errors (Windows) 115 To clean the printhead a. Clean until no new ink shows on the sides of the ink nozzles, the edge between the nozzles and...
User Guide
Page 121
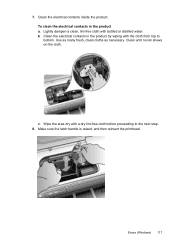
Lightly dampen a clean, lint-free cloth with the cloth from top to the next step. 8. Make sure the latch handle is raised, and then reinsert the printhead. Clean until no ink shows on the cloth. Wipe the area dry with a dry lint-free cloth before proceeding to bottom. 7. Clean the electrical contacts in the product a. c. Errors (Windows) 117 To clean the electrical contacts in the product by wiping with bottled or distilled water. Use as many fresh, clean cloths as necessary. b. Clean the electrical contacts inside the product.
Lightly dampen a clean, lint-free cloth with the cloth from top to the next step. 8. Make sure the latch handle is raised, and then reinsert the printhead. Clean until no ink shows on the cloth. Wipe the area dry with a dry lint-free cloth before proceeding to bottom. 7. Clean the electrical contacts in the product a. c. Errors (Windows) 117 To clean the electrical contacts in the product by wiping with bottled or distilled water. Use as many fresh, clean cloths as necessary. b. Clean the electrical contacts inside the product.

User Guide
Page 129
...The device is jammed in the print driver to dry. The Power light is processing a print job. The device is required. The Power light and the Resume light blink. The device is pausing for the ink to continue printing. • If the error persists, turn the device off, and then on or off, ...the media setting in the device. Locate and clear the jam. For more information, visit the HP Web site (www.hp.com/support) for the ink to match the media Interpreting control-panel lights 125 The Power light blinks. No action is out of paper. The media width setting does not match the media...
...The device is jammed in the print driver to dry. The Power light is processing a print job. The device is required. The Power light and the Resume light blink. The device is pausing for the ink to continue printing. • If the error persists, turn the device off, and then on or off, ...the media setting in the device. Locate and clear the jam. For more information, visit the HP Web site (www.hp.com/support) for the ink to match the media Interpreting control-panel lights 125 The Power light blinks. No action is out of paper. The media width setting does not match the media...
User Guide
Page 130
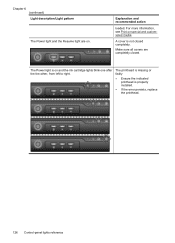
Explanation and recommended action loaded. The printhead is missing or faulty • Ensure the indicated printhead is on and the ink cartridge lights blink one after the the other, from left to right. Make sure all covers are on special and customsized media A cover is not closed . The Power light is properly installed. • If the error persists, replace the printhead. 126 Control-panel lights reference Chapter 6 (continued) Light description/Light pattern The Power light and the Resume light are completely closed completely. For more information, see Print on .
Explanation and recommended action loaded. The printhead is missing or faulty • Ensure the indicated printhead is on and the ink cartridge lights blink one after the the other, from left to right. Make sure all covers are on special and customsized media A cover is not closed . The Power light is properly installed. • If the error persists, replace the printhead. 126 Control-panel lights reference Chapter 6 (continued) Light description/Light pattern The Power light and the Resume light are completely closed completely. For more information, see Print on .
User Guide
Page 131
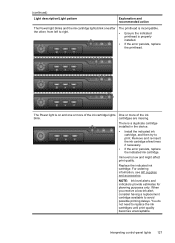
... installed. • If the error persists, replace the printhead. Ink level is on and one after the other, from left to print. (continued) Light description/Light pattern Explanation and recommended action The Power light blinks and the ink cartridge lights blink one or more of the... or more of the ink blink. cartridges are missing. Interpreting control-panel lights 127 You do not need to avoid possible printing delays. For ordering information, see HP supplies and accessories. When you receive a low-ink alert, consider having a replacement cartridge available ...
... installed. • If the error persists, replace the printhead. Ink level is on and one after the other, from left to print. (continued) Light description/Light pattern Explanation and recommended action The Power light blinks and the ink cartridge lights blink one or more of the... or more of the ink blink. cartridges are missing. Interpreting control-panel lights 127 You do not need to avoid possible printing delays. For ordering information, see HP supplies and accessories. When you receive a low-ink alert, consider having a replacement cartridge available ...

User Guide
Page 132
...soon. Chapter 6 (continued) Light description/Light pattern Explanation and recommended action The Power light and one or more of the ink cartridge lights One or more of the ...ink are on. cartridges are faulty, need to avoid possible printing delays. 128 Control-panel lights...alerts and indicators provide estimates for planning purposes only. The Power light is properly installed, and then try to print. One or ...the ink cartridge lights blink. Remove and re-insert the ink cartridge a few times if ...
...soon. Chapter 6 (continued) Light description/Light pattern Explanation and recommended action The Power light and one or more of the ink cartridge lights One or more of the ...ink are on. cartridges are faulty, need to avoid possible printing delays. 128 Control-panel lights...alerts and indicators provide estimates for planning purposes only. The Power light is properly installed, and then try to print. One or ...the ink cartridge lights blink. Remove and re-insert the ink cartridge a few times if ...

User Guide
Page 134
Chapter 6 (continued) Light description/Light pattern All lights are on. A non-recoverable error has occurred. If this symptom persists, replace the indicated ink cartridge with new ink cartridge or press (Resume button) to initialize the printhead. Unplug the ... using the existing ink cartridges, press (Resume button). • You have just installed a new printhead and the ink in , and try printing. 130 Control-panel lights reference Explanation and recommended action To continue printing using the existing ink cartridge.
Chapter 6 (continued) Light description/Light pattern All lights are on. A non-recoverable error has occurred. If this symptom persists, replace the indicated ink cartridge with new ink cartridge or press (Resume button) to initialize the printhead. Unplug the ... using the existing ink cartridges, press (Resume button). • You have just installed a new printhead and the ink in , and try printing. 130 Control-panel lights reference Explanation and recommended action To continue printing using the existing ink cartridge.


