
Setup Guide
Page 6
b. AR USB My Computer HP .setup.exe AR USB USB a HP All-in-One USB b 6 • HP Photosmart C4600 All-in-One series / HP Photosmart C4600 All-in -One, and then to complete the software installation. EN a. FR REMARQUE: ne connectez pas le câble USB avant d'y ê...exibidas na tela. b. Windows A B EN NOTE: Do not connect the USB cable until prompted. Turn on the back of the HP All-in -One series Insérez le CD de couleur bleue et suivez les instructions à l'écran. Insira o CD azul e siga...
b. AR USB My Computer HP .setup.exe AR USB USB a HP All-in-One USB b 6 • HP Photosmart C4600 All-in-One series / HP Photosmart C4600 All-in -One, and then to complete the software installation. EN a. FR REMARQUE: ne connectez pas le câble USB avant d'y ê...exibidas na tela. b. Windows A B EN NOTE: Do not connect the USB cable until prompted. Turn on the back of the HP All-in -One series Insérez le CD de couleur bleue et suivez les instructions à l'écran. Insira o CD azul e siga...
Basics Guide
Page 3
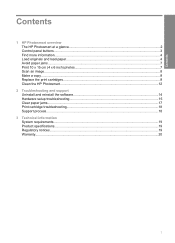
......4 Load originals and load paper...4 Avoid paper jams...7 Print 10 x 15 cm (4 x 6 inch) photos 7 Scan an image...8 Make a copy...9 Replace the print cartridges...9 Clean the HP Photosmart...12 2 Troubleshooting and support Uninstall and reinstall the software 14 Hardware setup troubleshooting 15 Clear paper jams...17 Print cartridge troubleshooting 18 Support process...18...
......4 Load originals and load paper...4 Avoid paper jams...7 Print 10 x 15 cm (4 x 6 inch) photos 7 Scan an image...8 Make a copy...9 Replace the print cartridges...9 Clean the HP Photosmart...12 2 Troubleshooting and support Uninstall and reinstall the software 14 Hardware setup troubleshooting 15 Clear paper jams...17 Print cartridge troubleshooting 18 Support process...18...
Basics Guide
Page 4
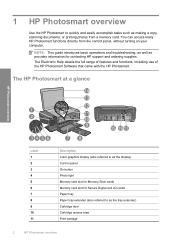
You can access many HP Photosmart functions directly from a memory card. The HP Photosmart at a glance HP Photosmart overview Label 1 2 3 4 5 6 7 8 9 10 11 Description Color graphics display (also referred to as the display) Control panel On button Photo light ...and troubleshooting, as well as the tray extender) Cartridge door Cartridge access area Print carriage 2 HP Photosmart overview 1 HP Photosmart overview Use the HP Photosmart to as provides information for contacting HP support and ordering supplies. The Electronic Help details the full range of features and functions, ...
You can access many HP Photosmart functions directly from a memory card. The HP Photosmart at a glance HP Photosmart overview Label 1 2 3 4 5 6 7 8 9 10 11 Description Color graphics display (also referred to as the display) Control panel On button Photo light ...and troubleshooting, as well as the tray extender) Cartridge door Cartridge access area Print carriage 2 HP Photosmart overview 1 HP Photosmart overview Use the HP Photosmart to as provides information for contacting HP support and ordering supplies. The Electronic Help details the full range of features and functions, ...
Basics Guide
Page 5
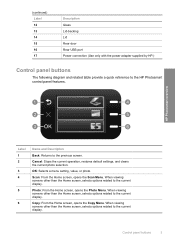
...Rear door Rear USB port Power connection (Use only with the power adapter supplied by HP.) Control panel buttons The following diagram and related table provide a quick reference to the previous screen. HP Photosmart overview 2. Cancel: Stops the current operation, restores default settings, and clears the current... photo selection. Label 1 2 3 4 5 6 Name and Description Back: Returns to the HP Photosmart control panel features. Scan: From the Home screen, opens the Scan Menu. When viewing screens other than the Home screen, selects...
...Rear door Rear USB port Power connection (Use only with the power adapter supplied by HP.) Control panel buttons The following diagram and related table provide a quick reference to the previous screen. HP Photosmart overview 2. Cancel: Stops the current operation, restores default settings, and clears the current... photo selection. Label 1 2 3 4 5 6 Name and Description Back: Returns to the HP Photosmart control panel features. Scan: From the Home screen, opens the Scan Menu. When viewing screens other than the Home screen, selects...
Basics Guide
Page 6
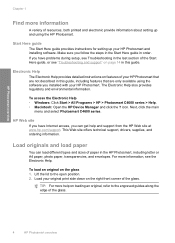
... guide, including features that are not described in this guide. Load originals and load paper You can get help on page 14 in the HP Photosmart, including letter or A4 paper, photo paper, transparencies, and envelopes. For more information, see "Troubleshooting and support" on loading an original,... refer to the open position. 2. Lift the lid to the engraved guides along the edge of the glass. 4 HP Photosmart overview Start Here guide The Start Here guide provides instructions for setting up and using the software you follow the steps in the Start Here...
... guide, including features that are not described in this guide. Load originals and load paper You can get help on page 14 in the HP Photosmart, including letter or A4 paper, photo paper, transparencies, and envelopes. For more information, see "Troubleshooting and support" on loading an original,... refer to the open position. 2. Lift the lid to the engraved guides along the edge of the glass. 4 HP Photosmart overview Start Here guide The Start Here guide provides instructions for setting up and using the software you follow the steps in the Start Here...
Basics Guide
Page 7
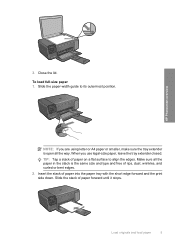
TIP: Tap a stack of rips, dust, wrinkles, and curled or bent edges. 2. HP Photosmart overview NOTE: If you use legal-size paper, leave the tray extender closed. 3. Load originals and load paper 5 Insert the stack of paper forward until ...
TIP: Tap a stack of rips, dust, wrinkles, and curled or bent edges. 2. HP Photosmart overview NOTE: If you use legal-size paper, leave the tray extender closed. 3. Load originals and load paper 5 Insert the stack of paper forward until ...
Basics Guide
Page 8
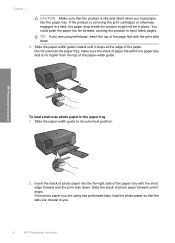
... the page first with the short edge forward and the print side down . 3. Do not overload the paper tray; HP Photosmart overview To load small-size photo paper in place. TIP: If you . 6 HP Photosmart overview Chapter 1 CAUTION: Make sure that the tabs are closest to you are using has perforated tabs, load the...
... the page first with the short edge forward and the print side down . 3. Do not overload the paper tray; HP Photosmart overview To load small-size photo paper in place. TIP: If you . 6 HP Photosmart overview Chapter 1 CAUTION: Make sure that the tabs are closest to you are using has perforated tabs, load the...
Basics Guide
Page 9
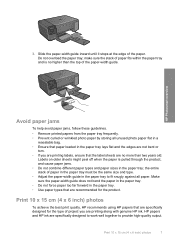
...• Do not force paper too far forward in the paper tray to provide high-quality output. Do not overload the paper tray; 3. HP papers and HP ink are specifically designed to work well together to fit snugly against all unused photo paper flat in a resealable bag. • Ensure that ... that paper loaded in the paper tray; Slide the paper-width guide inward until it stops at the edge of the paper-width guide. HP Photosmart overview Avoid paper jams To help avoid paper jams, follow these guidelines. • Remove printed papers from the paper tray frequently. • Prevent ...
...• Do not force paper too far forward in the paper tray to provide high-quality output. Do not overload the paper tray; 3. HP papers and HP ink are specifically designed to work well together to fit snugly against all unused photo paper flat in a resealable bag. • Ensure that ... that paper loaded in the paper tray; Slide the paper-width guide inward until it stops at the edge of the paper-width guide. HP Photosmart overview Avoid paper jams To help avoid paper jams, follow these guidelines. • Remove printed papers from the paper tray frequently. • Prevent ...
Basics Guide
Page 10
.... Using this software, you can also use the software you installed with the HP Photosmart to scroll through the photos on the product. 3. adapter required), TransFlash MicroSD Card, or Secure MultiMedia Card To print one or more photos to the print queue by pressing the button next to print appears.... 4. Insert your memory card until the photo you want to print of copies you can start a scan from the control panel of the HP Photosmart. Load 10 x 15 (4 x...
.... Using this software, you can also use the software you installed with the HP Photosmart to scroll through the photos on the product. 3. adapter required), TransFlash MicroSD Card, or Secure MultiMedia Card To print one or more photos to the print queue by pressing the button next to print appears.... 4. Insert your memory card until the photo you want to print of copies you can start a scan from the control panel of the HP Photosmart. Load 10 x 15 (4 x...

Basics Guide
Page 11
... the image. 4. You can improve the overall image quality by using the software installed with the HP Photosmart. To make quality copies from the control panel 1. Load your product, and then click one of the shopping links on the right front corner of the glass. 3. Press the button next ... also replace the print cartridges when you see faded text or if you can also check the ink levels by adjusting the brightness, sharpness, color tone, and saturation. To order print cartridges for the print cartridge is low, a message appears on your computer screen. Press the button...
... the image. 4. You can improve the overall image quality by using the software installed with the HP Photosmart. To make quality copies from the control panel 1. Load your product, and then click one of the shopping links on the right front corner of the glass. 3. Press the button next ... also replace the print cartridges when you see faded text or if you can also check the ink levels by adjusting the brightness, sharpness, color tone, and saturation. To order print cartridges for the print cartridge is low, a message appears on your computer screen. Press the button...
Basics Guide
Page 12
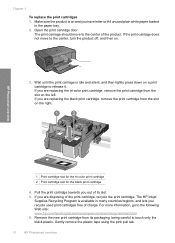
...turn the product off, and then on the right. The print carriage should move to the following Web site: www.hp.com/hpinfo/globalcitizenship/environment/recycle/inkjet.html 6. Chapter 1 To replace the print cartridges 1. Open the print cartridge door. Wait until the print carriage is ...are disposing of charge. If you out of the product. Remove the new print cartridge from its slot. 5. HP Photosmart overview 1 Print cartridge slot for the tri-color print cartridge 2 Print cartridge slot for the black print cartridge 4. Gently remove the plastic tape using the pink pull...
...turn the product off, and then on the right. The print carriage should move to the following Web site: www.hp.com/hpinfo/globalcitizenship/environment/recycle/inkjet.html 6. Chapter 1 To replace the print cartridges 1. Open the print cartridge door. Wait until the print carriage is ...are disposing of charge. If you out of the product. Remove the new print cartridge from its slot. 5. HP Photosmart overview 1 Print cartridge slot for the tri-color print cartridge 2 Print cartridge slot for the black print cartridge 4. Gently remove the plastic tape using the pink pull...
Basics Guide
Page 13
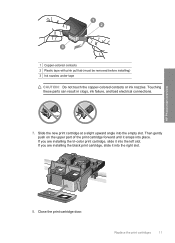
HP Photosmart overview 1 Copper-colored contacts 2 Plastic tape with pink pull tab (must be removed before installing) 3 Ink nozzles under tape CAUTION: Do not touch the copper-colored contacts or ink nozzles. Touching these parts can result in clogs, ink failure, and bad electrical connections. 7. If you are installing the tri-color print cartridge, slide it...
HP Photosmart overview 1 Copper-colored contacts 2 Plastic tape with pink pull tab (must be removed before installing) 3 Ink nozzles under tape CAUTION: Do not touch the copper-colored contacts or ink nozzles. Touching these parts can result in clogs, ink failure, and bad electrical connections. 7. If you are installing the tri-color print cartridge, slide it...
Basics Guide
Page 14
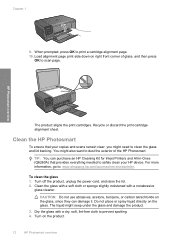
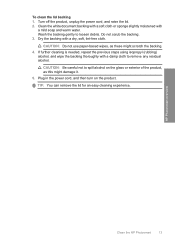
... remain clear, you might need to clean the glass and lid backing. Do not place or spray liquid directly on right front corner of the HP Photosmart. When prompted, press OK to prevent spotting. 4. Dry the glass with a nonabrasive glass cleaner. Clean the glass with a soft cloth or sponge...to dust the exterior of glass, and then press OK to : www.shopping.hp.com/accessories-store/printer. Turn on the glass, since they can purchase an HP Cleaning Kit for Inkjet Printers and All-in-Ones (Q6260A) that your HP device. To clean the glass 1. Turn off the product, unplug the power...
... remain clear, you might need to clean the glass and lid backing. Do not place or spray liquid directly on right front corner of the HP Photosmart. When prompted, press OK to prevent spotting. 4. Dry the glass with a nonabrasive glass cleaner. Clean the glass with a soft cloth or sponge...to dust the exterior of glass, and then press OK to : www.shopping.hp.com/accessories-store/printer. Turn on the glass, since they can purchase an HP Cleaning Kit for Inkjet Printers and All-in-Ones (Q6260A) that your HP device. To clean the glass 1. Turn off the product, unplug the power...
Basics Guide
Page 15
.... 5. Do not scrub the backing. 3. To clean the lid backing 1. CAUTION: Do not use paper-based wipes, as this might scratch the backing. 4. HP Photosmart overview Clean the HP Photosmart 13 Wash the backing gently to spill alcohol on the product. CAUTION: Be careful not to loosen debris. TIP: You can remove the lid...
.... 5. Do not scrub the backing. 3. To clean the lid backing 1. CAUTION: Do not use paper-based wipes, as this might scratch the backing. 4. HP Photosmart overview Clean the HP Photosmart 13 Wash the backing gently to spill alcohol on the product. CAUTION: Be careful not to loosen debris. TIP: You can remove the lid...
Basics Guide
Page 16
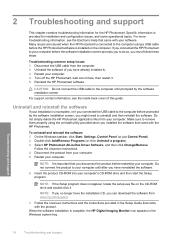
...then start the Setup program. For support contact information, see the Electronic Help that came with the product. Turn off the HP Photosmart, wait one minute, then restart it . Uninstall and reinstall the software If your installation is incomplete, or if you connected the USB cable... to remove them properly using a USB cable before the HP Photosmart software is important that you installed the software that came with the HP Photosmart. Specific information is complete, the HP Digital Imaging Monitor icon appears in -One Driver Software, and then click Change/Remove. Make sure ...
...then start the Setup program. For support contact information, see the Electronic Help that came with the product. Turn off the HP Photosmart, wait one minute, then restart it . Uninstall and reinstall the software If your installation is incomplete, or if you connected the USB cable... to remove them properly using a USB cable before the HP Photosmart software is important that you installed the software that came with the HP Photosmart. Specific information is complete, the HP Digital Imaging Monitor icon appears in -One Driver Software, and then click Change/Remove. Make sure ...
Basics Guide
Page 17
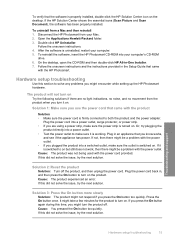
...might take a few minutes for the product to on but still does not work, then there might be a problem with the HP Photosmart. If the HP Solution Center shows the essential icons (Scan Picture and Scan Document), the software has been properly installed. Hardware setup troubleshooting Use this ... . Plug the power cord back in an appliance that the software is working. Follow the onscreen instructions and the instructions provided in -One Installer. 7. If this did not solve the issue, try the next solution. To uninstall from the product when you press the On...
...might take a few minutes for the product to on but still does not work, then there might be a problem with the HP Photosmart. If the HP Solution Center shows the essential icons (Scan Picture and Scan Document), the software has been properly installed. Hardware setup troubleshooting Use this ... . Plug the power cord back in an appliance that the software is working. Follow the onscreen instructions and the instructions provided in -One Installer. 7. If this did not solve the issue, try the next solution. To uninstall from the product when you press the On...
Basics Guide
Page 21
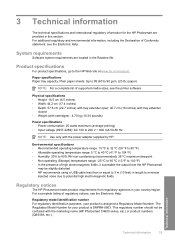
.... System requirements Software system requirements are provided in the Readme file. The Regulatory Model Number for the HP Photosmart are located in this section. 3 Technical information The technical specifications and international regulatory information for your product...Regulatory Model Number. Product specifications For product specifications, go to potential high electromagnetic fields Regulatory notices The HP Photosmart meets product requirements from the HP Photosmart may be confused with cartridges) : 4.70 kg (10.34 pounds) Power specifications • Power ...
.... System requirements Software system requirements are provided in the Readme file. The Regulatory Model Number for the HP Photosmart are located in this section. 3 Technical information The technical specifications and international regulatory information for your product...Regulatory Model Number. Product specifications For product specifications, go to potential high electromagnetic fields Regulatory notices The HP Photosmart meets product requirements from the HP Photosmart may be confused with cartridges) : 4.70 kg (10.34 pounds) Power specifications • Power ...
User Guide
Page 3
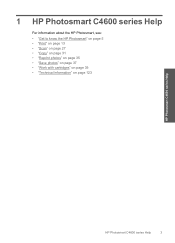
... series Help 3 2 Get to know the HP Photosmart Printer parts...5 Control panel features...6 4 Print Print documents...13 Print photos...14 Print envelopes...21 Print on specialty media...21 Print a Web page...22 5 Scan ......37 9 Work with cartridges Check the estimated ink levels 39 Replace the cartridges...40 Order ink supplies...42 Cartridge warranty information 43 10 Solve a problem HP support...45 Uninstall and reinstall the software 48 Setup troubleshooting...49 Print quality troubleshooting...58 Print troubleshooting...73 Memory card troubleshooting 77 Copy troubleshooting...81...
... series Help 3 2 Get to know the HP Photosmart Printer parts...5 Control panel features...6 4 Print Print documents...13 Print photos...14 Print envelopes...21 Print on specialty media...21 Print a Web page...22 5 Scan ......37 9 Work with cartridges Check the estimated ink levels 39 Replace the cartridges...40 Order ink supplies...42 Cartridge warranty information 43 10 Solve a problem HP support...45 Uninstall and reinstall the software 48 Setup troubleshooting...49 Print quality troubleshooting...58 Print troubleshooting...73 Memory card troubleshooting 77 Copy troubleshooting...81...
User Guide
Page 5
1 HP Photosmart C4600 series Help For information about the HP Photosmart, see: • "Get to know the HP Photosmart" on page 5 • "Print" on page 13 • "Scan" on page 27 • "Copy" on page 31 • "Reprint photos" on page 35 • "Save photos" on page 37 • "Work with cartridges" on page 39 • "Technical information" on page 123 HP Photosmart C4600 series Help HP Photosmart C4600 series Help 3
1 HP Photosmart C4600 series Help For information about the HP Photosmart, see: • "Get to know the HP Photosmart" on page 5 • "Print" on page 13 • "Scan" on page 27 • "Copy" on page 31 • "Reprint photos" on page 35 • "Save photos" on page 37 • "Work with cartridges" on page 39 • "Technical information" on page 123 HP Photosmart C4600 series Help HP Photosmart C4600 series Help 3
User Guide
Page 7
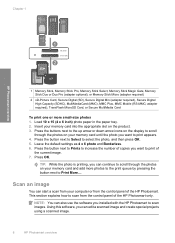
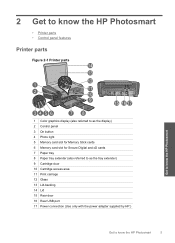
...; Printer parts • Control panel features Printer parts Figure 2-1 Printer parts Get to know the HP Photosmart 1 Color graphics display (also referred to as the display) 2 Control panel 3 On button 4 Photo light 5 Memory card slot for Memory Stick cards 6 Memory card slot for ... 12 Glass 13 Lid-backing 14 Lid 15 Rear door 16 Rear USB port 17 Power connection (Use only with the power adapter supplied by HP.) Get to know the HP Photosmart 5
...; Printer parts • Control panel features Printer parts Figure 2-1 Printer parts Get to know the HP Photosmart 1 Color graphics display (also referred to as the display) 2 Control panel 3 On button 4 Photo light 5 Memory card slot for Memory Stick cards 6 Memory card slot for ... 12 Glass 13 Lid-backing 14 Lid 15 Rear door 16 Rear USB port 17 Power connection (Use only with the power adapter supplied by HP.) Get to know the HP Photosmart 5


