
Setup Guide
Page 6
...ordinateur. Insira o CD azul e siga as instruções exibidas na tela para concluir a instalação do HP All-in -One series PT a. Follow the onscreen instructions to appear. IMPORTANT: Si l'écran de démarrage n'apparaît pas, double...224; l'écran. AR USB My Computer HP .setup.exe AR USB USB a HP All-in-One USB b 6 • HP Photosmart C4600 All-in-One series / HP Photosmart C4600 All-in -One e a qualquer porta USB no ícone de CD-ROM com o logotipo da HP e duas vezes em setup.exe. Windows A...
...ordinateur. Insira o CD azul e siga as instruções exibidas na tela para concluir a instalação do HP All-in -One series PT a. Follow the onscreen instructions to appear. IMPORTANT: Si l'écran de démarrage n'apparaît pas, double...224; l'écran. AR USB My Computer HP .setup.exe AR USB USB a HP All-in-One USB b 6 • HP Photosmart C4600 All-in-One series / HP Photosmart C4600 All-in -One e a qualquer porta USB no ícone de CD-ROM com o logotipo da HP e duas vezes em setup.exe. Windows A...
Basics Guide
Page 3
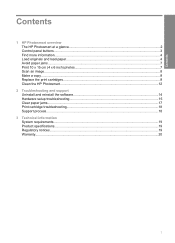
......4 Load originals and load paper...4 Avoid paper jams...7 Print 10 x 15 cm (4 x 6 inch) photos 7 Scan an image...8 Make a copy...9 Replace the print cartridges...9 Clean the HP Photosmart...12 2 Troubleshooting and support Uninstall and reinstall the software 14 Hardware setup troubleshooting 15 Clear paper jams...17 Print cartridge troubleshooting 18 Support process...18...
......4 Load originals and load paper...4 Avoid paper jams...7 Print 10 x 15 cm (4 x 6 inch) photos 7 Scan an image...8 Make a copy...9 Replace the print cartridges...9 Clean the HP Photosmart...12 2 Troubleshooting and support Uninstall and reinstall the software 14 Hardware setup troubleshooting 15 Clear paper jams...17 Print cartridge troubleshooting 18 Support process...18...
Basics Guide
Page 4
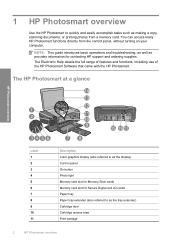
...: This guide introduces basic operations and troubleshooting, as well as the tray extender) Cartridge door Cartridge access area Print carriage 2 HP Photosmart overview The HP Photosmart at a glance HP Photosmart overview Label 1 2 3 4 5 6 7 8 9 10 11 Description Color graphics display (also referred to as the display) Control panel On button Photo light Memory card slot for Memory Stick cards...
...: This guide introduces basic operations and troubleshooting, as well as the tray extender) Cartridge door Cartridge access area Print carriage 2 HP Photosmart overview The HP Photosmart at a glance HP Photosmart overview Label 1 2 3 4 5 6 7 8 9 10 11 Description Color graphics display (also referred to as the display) Control panel On button Photo light Memory card slot for Memory Stick cards...
Basics Guide
Page 5
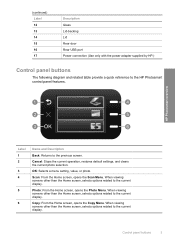
..., selects options related to the previous screen. Photo: From the Home screen, opens the Photo Menu. Copy: From the Home screen, opens the Copy Menu. HP Photosmart overview 2. Label 1 2 3 4 5 6 Name and Description Back: Returns to the current display. Scan: From the Home screen, opens the Scan Menu... restores default settings, and clears the current photo selection. When viewing screens other than the Home screen, selects options related to the HP Photosmart control panel features. (continued) Label 12 13 14 15 16 17 Description Glass Lid-backing Lid Rear door Rear USB port Power ...
..., selects options related to the previous screen. Photo: From the Home screen, opens the Photo Menu. Copy: From the Home screen, opens the Copy Menu. HP Photosmart overview 2. Label 1 2 3 4 5 6 Name and Description Back: Returns to the current display. Scan: From the Home screen, opens the Scan Menu... restores default settings, and clears the current photo selection. When viewing screens other than the Home screen, selects options related to the HP Photosmart control panel features. (continued) Label 12 13 14 15 16 17 Description Glass Lid-backing Lid Rear door Rear USB port Power ...
Basics Guide
Page 6
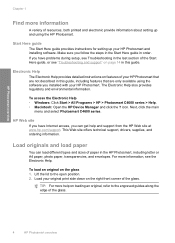
..., see the Electronic Help. Load your original print side down on features of your HP Photosmart that are not described in this guide. For more information, see Troubleshooting in the HP Photosmart, including letter or A4 paper, photo paper, transparencies, and envelopes. Lift the lid... to the engraved guides along the edge of the glass. 4 HP Photosmart overview The Electronic Help also provides regulatory and environmental information. This Web site offers technical support, drivers, supplies, and ordering ...
..., see the Electronic Help. Load your original print side down on features of your HP Photosmart that are not described in this guide. For more information, see Troubleshooting in the HP Photosmart, including letter or A4 paper, photo paper, transparencies, and envelopes. Lift the lid... to the engraved guides along the edge of the glass. 4 HP Photosmart overview The Electronic Help also provides regulatory and environmental information. This Web site offers technical support, drivers, supplies, and ordering ...
Basics Guide
Page 7
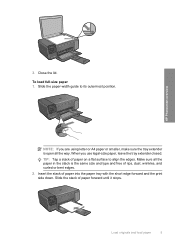
3. HP Photosmart overview NOTE: If you use legal-size paper, leave the tray extender closed. Insert the stack of paper on a flat surface to its outermost position. ...
3. HP Photosmart overview NOTE: If you use legal-size paper, leave the tray extender closed. Insert the stack of paper on a flat surface to its outermost position. ...
Basics Guide
Page 8
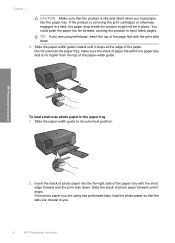
... tabs, load the photo paper so that the product is idle and silent when you load paper into the far-right side of the paper. HP Photosmart overview To load small-size photo paper in place. Slide the paper-width guide inward until it stops at the edge of the paper tray... a task, the paper stop inside the product might not be in the paper tray 1. Chapter 1 CAUTION: Make sure that the tabs are closest to you. 6 HP Photosmart overview make sure the stack of the page first with the short edge forward and the print side down . 3.
... tabs, load the photo paper so that the product is idle and silent when you load paper into the far-right side of the paper. HP Photosmart overview To load small-size photo paper in place. Slide the paper-width guide inward until it stops at the edge of the paper tray... a task, the paper stop inside the product might not be in the paper tray 1. Chapter 1 CAUTION: Make sure that the tabs are closest to you. 6 HP Photosmart overview make sure the stack of the page first with the short edge forward and the print side down . 3.
Basics Guide
Page 9
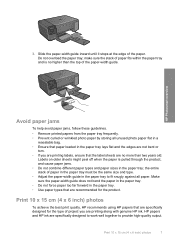
... loaded in the paper tray. • Use paper types that the label sheets are printing along with genuine HP ink. HP papers and HP ink are recommended for the type of the paper-width guide. HP Photosmart overview Avoid paper jams To help avoid paper jams, follow these guidelines. • Remove printed papers from the...
... loaded in the paper tray. • Use paper types that the label sheets are printing along with genuine HP ink. HP papers and HP ink are recommended for the type of the paper-width guide. HP Photosmart overview Avoid paper jams To help avoid paper jams, follow these guidelines. • Remove printed papers from the...
Basics Guide
Page 10
... from the control panel of the HP Photosmart only. Press the buttons next to the up arrow or down arrow icons on the display to Print More.... Leave the default settings as 4 x 6 photo and Borderless. 6. adapter required), TransFlash MicroSD Card, or Secure MultiMedia Card To print one or more photos to the print...
... from the control panel of the HP Photosmart only. Press the buttons next to the up arrow or down arrow icons on the display to Print More.... Leave the default settings as 4 x 6 photo and Borderless. 6. adapter required), TransFlash MicroSD Card, or Secure MultiMedia Card To print one or more photos to the print...

Basics Guide
Page 11
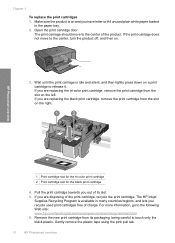
...preview image, and then click Accept when you have a replacement print cartridge available. Make any edits to select your product, and then click one of the glass. Press OK. To order print cartridges for the print cartridge is low, a message appears on the right front corner of... related to the current scan session only. When you receive a low-ink warning message, make quality copies from the control panel 1. HP Photosmart overview To scan to Black Copy or Color Copy. 5. Load your original print side down on the product. 2. Press the button next to a computer 1.
...preview image, and then click Accept when you have a replacement print cartridge available. Make any edits to select your product, and then click one of the glass. Press OK. To order print cartridges for the print cartridge is low, a message appears on the right front corner of... related to the current scan session only. When you receive a low-ink warning message, make quality copies from the control panel 1. HP Photosmart overview To scan to Black Copy or Color Copy. 5. Load your original print side down on the product. 2. Press the button next to a computer 1.
Basics Guide
Page 12
... move to the center, turn the product off, and then on a print cartridge to the following Web site: www.hp.com/hpinfo/globalcitizenship/environment/recycle/inkjet.html 6. HP Photosmart overview 1 Print cartridge slot for the tri-color print cartridge 2 Print cartridge slot for the black print cartridge 4. Remove the new print cartridge from its slot...
... move to the center, turn the product off, and then on a print cartridge to the following Web site: www.hp.com/hpinfo/globalcitizenship/environment/recycle/inkjet.html 6. HP Photosmart overview 1 Print cartridge slot for the tri-color print cartridge 2 Print cartridge slot for the black print cartridge 4. Remove the new print cartridge from its slot...
Basics Guide
Page 13
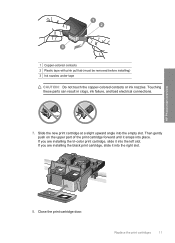
Replace the print cartridges 11 HP Photosmart overview 1 Copper-colored contacts 2 Plastic tape with pink pull tab (must be removed before installing) 3 Ink nozzles under tape CAUTION: Do not touch the copper-colored contacts or ink nozzles. Touching these parts can result in clogs, ink failure, and bad electrical ...door. Then gently push on the upper part of the print cartridge forward until it into place. If you are installing the tri-color print cartridge, slide it snaps into the left slot. Slide the new print cartridge at a slight upward angle into the right slot...
Replace the print cartridges 11 HP Photosmart overview 1 Copper-colored contacts 2 Plastic tape with pink pull tab (must be removed before installing) 3 Ink nozzles under tape CAUTION: Do not touch the copper-colored contacts or ink nozzles. Touching these parts can result in clogs, ink failure, and bad electrical ...door. Then gently push on the upper part of the print cartridge forward until it into place. If you are installing the tri-color print cartridge, slide it snaps into the left slot. Slide the new print cartridge at a slight upward angle into the right slot...
Basics Guide
Page 14
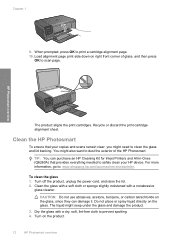
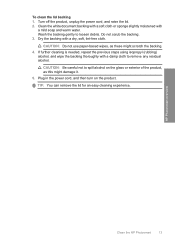
... clean the glass 1. Do not place or spray liquid directly on right front corner of the HP Photosmart. Turn on the glass, since they can purchase an HP Cleaning Kit for Inkjet Printers and All-in-Ones (Q6260A) that your HP device. You might seep under the glass and damage the product. 3. TIP: You can damage...
... clean the glass 1. Do not place or spray liquid directly on right front corner of the HP Photosmart. Turn on the glass, since they can purchase an HP Cleaning Kit for Inkjet Printers and All-in-Ones (Q6260A) that your HP device. You might seep under the glass and damage the product. 3. TIP: You can damage...
Basics Guide
Page 15
.... Do not scrub the backing. 3. Dry the backing with a mild soap and warm water. Wash the backing gently to remove any residual alcohol. HP Photosmart overview Clean the HP Photosmart 13 Clean the white document backing with a soft cloth or sponge slightly moistened with a dry, soft, lint-free cloth. Turn off the product, unplug...
.... Do not scrub the backing. 3. Dry the backing with a mild soap and warm water. Wash the backing gently to remove any residual alcohol. HP Photosmart overview Clean the HP Photosmart 13 Clean the white document backing with a soft cloth or sponge slightly moistened with a dry, soft, lint-free cloth. Turn off the product, unplug...
Basics Guide
Page 16
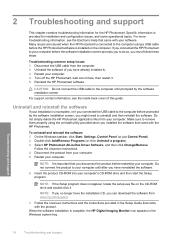
...on the CD-ROM drive and double-click it. Disconnect the USB cable from www.hp.com/support. 7. Double-click Add/Remove Programs (or click Uninstall a program). 3. Turn off the HP Photosmart, wait one minute, then restart it ). 3. Follow the onscreen instructions. 4. Do not connect ...On the Windows taskbar, click Start, Settings, Control Panel (or just Control Panel). 2. Select HP Photosmart All-in the Windows system tray. NOTE: It is provided for the HP Photosmart. Make sure to remove them properly using a USB cable before the software installation screen prompts you ...
...on the CD-ROM drive and double-click it. Disconnect the USB cable from www.hp.com/support. 7. Double-click Add/Remove Programs (or click Uninstall a program). 3. Turn off the HP Photosmart, wait one minute, then restart it ). 3. Follow the onscreen instructions. 4. Do not connect ...On the Windows taskbar, click Start, Settings, Control Panel (or just Control Panel). 2. Select HP Photosmart All-in the Windows system tray. NOTE: It is provided for the HP Photosmart. Make sure to remove them properly using a USB cable before the software installation screen prompts you ...
Basics Guide
Page 17
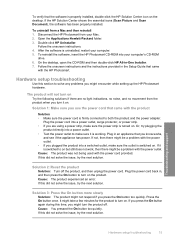
...-ROM drive. 6. Plug the power cord into a switched outlet, make sure the outlet is turned on the desktop. Plug in -One Installer. 7. Solution 2: Reset the product Solution: Turn off . Cause: The product experienced an error. Troubleshooting and support Hardware setup troubleshooting 15 ...(Scan Picture and Scan Document), the software has been properly installed. To uninstall from your Mac. 2. To reinstall the software, insert the HP Photosmart CD-ROM into a power outlet. • Test the power outlet to turn on . Follow the onscreen instructions and the instructions provided in...
...-ROM drive. 6. Plug the power cord into a switched outlet, make sure the outlet is turned on the desktop. Plug in -One Installer. 7. Solution 2: Reset the product Solution: Turn off . Cause: The product experienced an error. Troubleshooting and support Hardware setup troubleshooting 15 ...(Scan Picture and Scan Document), the software has been properly installed. To uninstall from your Mac. 2. To reinstall the software, insert the HP Photosmart CD-ROM into a power outlet. • Test the power outlet to turn on . Follow the onscreen instructions and the instructions provided in...
Basics Guide
Page 21
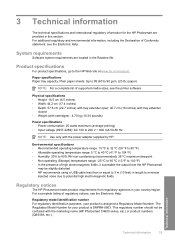
...V ~ 600 mA 50-60 Hz NOTE: Use only with the marketing name (HP Photosmart C4600 series, etc.) or product numbers (Q8418A, etc.). The Regulatory Model Number for the HP Photosmart are located in the Readme file. Environmental specifications • Recommended operating temperature range:...in length to minimize injected noise due to potential high electromagnetic fields Regulatory notices The HP Photosmart meets product requirements from the HP Photosmart may be confused with the power adapter supplied by HP. Paper specifications Paper tray capacity: Plain paper sheets: Up to 85 (60 to...
...V ~ 600 mA 50-60 Hz NOTE: Use only with the marketing name (HP Photosmart C4600 series, etc.) or product numbers (Q8418A, etc.). The Regulatory Model Number for the HP Photosmart are located in the Readme file. Environmental specifications • Recommended operating temperature range:...in length to minimize injected noise due to potential high electromagnetic fields Regulatory notices The HP Photosmart meets product requirements from the HP Photosmart may be confused with the power adapter supplied by HP. Paper specifications Paper tray capacity: Plain paper sheets: Up to 85 (60 to...
User Guide
Page 3
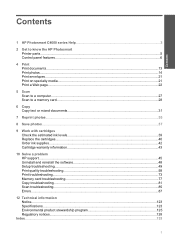
... series Help 3 2 Get to know the HP Photosmart Printer parts...5 Control panel features...6 4 Print Print documents...13 Print photos...14 Print envelopes...21 Print on specialty media...21 Print a Web page...22 5 Scan ......37 9 Work with cartridges Check the estimated ink levels 39 Replace the cartridges...40 Order ink supplies...42 Cartridge warranty information 43 10 Solve a problem HP support...45 Uninstall and reinstall the software 48 Setup troubleshooting...49 Print quality troubleshooting...58 Print troubleshooting...73 Memory card troubleshooting 77 Copy troubleshooting...81...
... series Help 3 2 Get to know the HP Photosmart Printer parts...5 Control panel features...6 4 Print Print documents...13 Print photos...14 Print envelopes...21 Print on specialty media...21 Print a Web page...22 5 Scan ......37 9 Work with cartridges Check the estimated ink levels 39 Replace the cartridges...40 Order ink supplies...42 Cartridge warranty information 43 10 Solve a problem HP support...45 Uninstall and reinstall the software 48 Setup troubleshooting...49 Print quality troubleshooting...58 Print troubleshooting...73 Memory card troubleshooting 77 Copy troubleshooting...81...
User Guide
Page 5
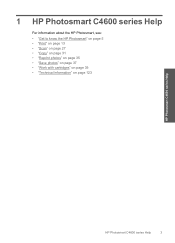
1 HP Photosmart C4600 series Help For information about the HP Photosmart, see: • "Get to know the HP Photosmart" on page 5 • "Print" on page 13 • "Scan" on page 27 • "Copy" on page 31 • "Reprint photos" on page 35 • "Save photos" on page 37 • "Work with cartridges" on page 39 • "Technical information" on page 123 HP Photosmart C4600 series Help HP Photosmart C4600 series Help 3
1 HP Photosmart C4600 series Help For information about the HP Photosmart, see: • "Get to know the HP Photosmart" on page 5 • "Print" on page 13 • "Scan" on page 27 • "Copy" on page 31 • "Reprint photos" on page 35 • "Save photos" on page 37 • "Work with cartridges" on page 39 • "Technical information" on page 123 HP Photosmart C4600 series Help HP Photosmart C4600 series Help 3
User Guide
Page 7
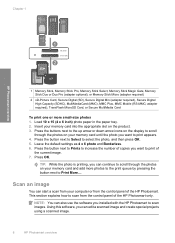
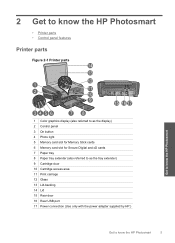
...; Printer parts • Control panel features Printer parts Figure 2-1 Printer parts Get to know the HP Photosmart 1 Color graphics display (also referred to as the display) 2 Control panel 3 On button 4 Photo light 5 Memory card slot for Memory Stick cards 6 Memory card slot for ... 12 Glass 13 Lid-backing 14 Lid 15 Rear door 16 Rear USB port 17 Power connection (Use only with the power adapter supplied by HP.) Get to know the HP Photosmart 5
...; Printer parts • Control panel features Printer parts Figure 2-1 Printer parts Get to know the HP Photosmart 1 Color graphics display (also referred to as the display) 2 Control panel 3 On button 4 Photo light 5 Memory card slot for Memory Stick cards 6 Memory card slot for ... 12 Glass 13 Lid-backing 14 Lid 15 Rear door 16 Rear USB port 17 Power connection (Use only with the power adapter supplied by HP.) Get to know the HP Photosmart 5


