
Setup Guide
Page 6
... instructions to appear. b. AR USB My Computer HP .setup.exe AR USB USB a HP All-in-One USB b 6 • HP Photosmart C4600 All-in-One series / HP Photosmart C4600 All-in -One e a qualquer porta USB no ícone de CD-ROM com o logotipo da HP e duas vezes em setup.exe. Turn on the... the USB cable to the port on the back of the HP All-in-One, and then to any USB port on your computer, login if necessary, and then wait for the desktop to complete the software installation. PT a. IMPORTANT: Si l'écran de démarrage ...
... instructions to appear. b. AR USB My Computer HP .setup.exe AR USB USB a HP All-in-One USB b 6 • HP Photosmart C4600 All-in-One series / HP Photosmart C4600 All-in -One e a qualquer porta USB no ícone de CD-ROM com o logotipo da HP e duas vezes em setup.exe. Turn on the... the USB cable to the port on the back of the HP All-in-One, and then to any USB port on your computer, login if necessary, and then wait for the desktop to complete the software installation. PT a. IMPORTANT: Si l'écran de démarrage ...
Basics Guide
Page 6
If you have Internet access, you installed with your original print side down on features of the glass. 4 HP Photosmart overview Electronic Help The Electronic Help provides detailed instructions on the right front corner of the Start Here guide,...instructions for setting up and using the software you can load different types and sizes of resources, both printed and electronic provide information about setting up your HP Photosmart and installing software. Load originals and load paper You can get help on the glass 1. HP Photosmart overview Chapter 1 Find more information ...
If you have Internet access, you installed with your original print side down on features of the glass. 4 HP Photosmart overview Electronic Help The Electronic Help provides detailed instructions on the right front corner of the Start Here guide,...instructions for setting up and using the software you can load different types and sizes of resources, both printed and electronic provide information about setting up your HP Photosmart and installing software. Load originals and load paper You can get help on the glass 1. HP Photosmart overview Chapter 1 Find more information ...
Basics Guide
Page 10
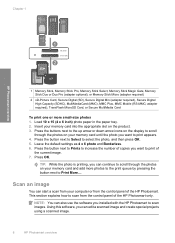
...Prints to increase the number of copies you want to print appears. 4. adapter required), TransFlash MicroSD Card, or Secure MultiMedia Card To print one or more photos to the print queue by pressing the button next to select the photo, and then press OK. 5. NOTE: You can... use the software you can start a scan from your memory card until the photo you want to print of the current image. 7. Insert your memory card into the appropriate slot on your computer or from the control panel of the HP Photosmart. Using this software, you installed with the HP Photosmart to scan...
...Prints to increase the number of copies you want to print appears. 4. adapter required), TransFlash MicroSD Card, or Secure MultiMedia Card To print one or more photos to the print queue by pressing the button next to select the photo, and then press OK. 5. NOTE: You can... use the software you can start a scan from your memory card until the photo you want to print of the current image. 7. Insert your memory card into the appropriate slot on your computer or from the control panel of the HP Photosmart. Using this software, you installed with the HP Photosmart to scan...

Basics Guide
Page 11
...that you can improve the overall image quality by using the software installed with the HP Photosmart. Press the button next to www.hp.com/buy/supplies. Press OK. You can also check the ink levels by adjusting the brightness, sharpness, color tone, and saturation. To order print cartridges for the print ... to PC. Following these instructions to edit your product, and then click one of the shopping links on the right front corner of thick originals, such as books, you can remove the lid. HP Photosmart overview To scan to Scan. Load your original print side down on your...
...that you can improve the overall image quality by using the software installed with the HP Photosmart. Press the button next to www.hp.com/buy/supplies. Press OK. You can also check the ink levels by adjusting the brightness, sharpness, color tone, and saturation. To order print cartridges for the print ... to PC. Following these instructions to edit your product, and then click one of the shopping links on the right front corner of thick originals, such as books, you can remove the lid. HP Photosmart overview To scan to Scan. Load your original print side down on your...
Basics Guide
Page 16
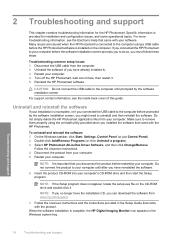
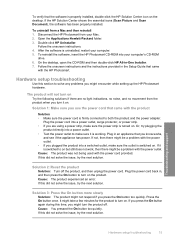
... the software installation is provided for the HP Photosmart. Disconnect the USB cable from www.hp.com/support. 7. To uninstall and reinstall the software 1. Select HP Photosmart All-in the Windows system tray. Follow the onscreen instructions and the instructions provided in the Setup Guide that came with your computer. Restart your software. Turn off the HP Photosmart, wait one minute, then...
... the software installation is provided for the HP Photosmart. Disconnect the USB cable from www.hp.com/support. 7. To uninstall and reinstall the software 1. Select HP Photosmart All-in the Windows system tray. Follow the onscreen instructions and the instructions provided in the Setup Guide that came with your computer. Restart your software. Turn off the HP Photosmart, wait one minute, then...
Basics Guide
Page 17
... back in the Setup Guide that you use the power cord that came with the power cord provided. To reinstall the software, insert the HP Photosmart CD-ROM into a switched outlet, make sure the power strip is working. Follow the onscreen instructions and the instructions provided...the Applications:Hewlett-Packard folder. 3. After the software is properly installed, double-click the HP Solution Center icon on . On the desktop, open the CD-ROM and then double-click HP All-in an appliance that came with the power outlet. Plug in -One Installer. 7. Cause: You pressed the On button...
... back in the Setup Guide that you use the power cord that came with the power cord provided. To reinstall the software, insert the HP Photosmart CD-ROM into a switched outlet, make sure the power strip is working. Follow the onscreen instructions and the instructions provided...the Applications:Hewlett-Packard folder. 3. After the software is properly installed, double-click the HP Solution Center icon on . On the desktop, open the CD-ROM and then double-click HP All-in an appliance that came with the power outlet. Plug in -One Installer. 7. Cause: You pressed the On button...
Basics Guide
Page 18
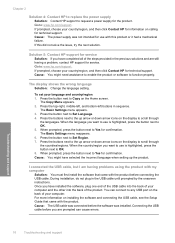
... to Set Language. 4. If prompted, choose your computer. Go to Set Region. 7. Cause: You might have installed the software, plug one end of the USB cable into the back of your country/region, and then click Contact HP for service Solution: If you have selected the incorrect language when setting up arrow or down...
... to Set Language. 4. If prompted, choose your computer. Go to Set Region. 7. Cause: You might have installed the software, plug one end of the USB cable into the back of your country/region, and then click Contact HP for service Solution: If you have selected the incorrect language when setting up arrow or down...
User Guide
Page 39
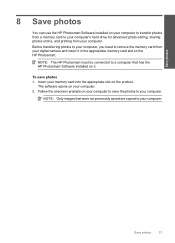
...photos to save photos 1. Follow the onscreen prompts on your computer to your computer. Save photos 8 Save photos You can use the HP Photosmart Software installed on your computer to transfer photos from a memory card to a computer that were not previously saved are copied to remove the memory ...card from your computer. The software opens on the product. Before transferring photos to your computer, you need to your computer. NOTE: Only images that has the HP Photosmart Software installed on it in the appropriate memory card slot on the...
...photos to save photos 1. Follow the onscreen prompts on your computer to your computer. Save photos 8 Save photos You can use the HP Photosmart Software installed on your computer to transfer photos from a memory card to a computer that were not previously saved are copied to remove the memory ...card from your computer. The software opens on the product. Before transferring photos to your computer, you need to your computer. NOTE: Only images that has the HP Photosmart Software installed on it in the appropriate memory card slot on the...
User Guide
Page 41
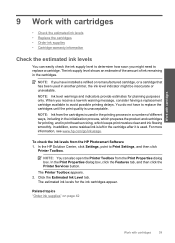
...the amount of different ways, including in the initialization process, which keeps print nozzles clear and ink flowing smoothly. You do not have installed a refilled or remanufactured cartridge, or a cartridge that has been used in the cartridge after it is left in another printer, the... • Order ink supplies • Cartridge warranty information Check the estimated ink levels You can also open the Printer Toolbox from the HP Photosmart Software 1. Click the Estimated Ink Level tab. The estimated ink levels for planning purposes only. To check the ink levels from the Print ...
...the amount of different ways, including in the initialization process, which keeps print nozzles clear and ink flowing smoothly. You do not have installed a refilled or remanufactured cartridge, or a cartridge that has been used in the cartridge after it is left in another printer, the... • Order ink supplies • Cartridge warranty information Check the estimated ink levels You can also open the Printer Toolbox from the HP Photosmart Software 1. Click the Estimated Ink Level tab. The estimated ink levels for planning purposes only. To check the ink levels from the Print ...
User Guide
Page 50
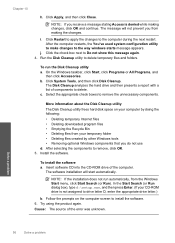
...uninstall utility provided when you installed the software that came with the HP Photosmart. To uninstall and reinstall the software 1. On the Windows taskbar, click Start, Settings, Control Panel (or just Control Panel). 2. Restart your computer. 5. Occasionally, TSR's prevent the HP software from loading so that it...'s CD-ROM drive and then start the Setup program. Follow the onscreen instructions and the instructions provided in -One Driver Software, and then click Change/ Remove. Additional warranty options Extended service plans are not required for your computer until after...
...uninstall utility provided when you installed the software that came with the HP Photosmart. To uninstall and reinstall the software 1. On the Windows taskbar, click Start, Settings, Control Panel (or just Control Panel). 2. Restart your computer. 5. Occasionally, TSR's prevent the HP software from loading so that it...'s CD-ROM drive and then start the Setup program. Follow the onscreen instructions and the instructions provided in -One Driver Software, and then click Change/ Remove. Additional warranty options Extended service plans are not required for your computer until after...
User Guide
Page 51
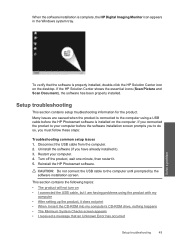
... installed on the computer. Reinstall the HP Photosmart software. This section contains the following topics: • The product will not turn on • I connected the USB cable, but I received a message that the software is complete, the HP Digital Imaging Monitor icon appears in the Windows system tray. Turn off the product, wait one minute, then restart it...
... installed on the computer. Reinstall the HP Photosmart software. This section contains the following topics: • The product will not turn on • I connected the USB cable, but I received a message that the software is complete, the HP Digital Imaging Monitor icon appears in the Windows system tray. Turn off the product, wait one minute, then restart it...

User Guide
Page 54
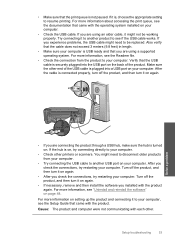
Simply plug one end of the USB cable into the back of your computer. Connecting the USB cable before you are blocking the print carriage, including any packing materials. If it is not lit, the product is turned off the product, and then turn on installing the software and connecting the USB cable, ...the product. After setting up the product, it on again. • Print a test page to any objects that came with the product before the software was installed. Press the On button to turn it does not print Solution: • Look at the On button located on the back of the product. ...
Simply plug one end of the USB cable into the back of your computer. Connecting the USB cable before you are blocking the print carriage, including any packing materials. If it is not lit, the product is turned off the product, and then turn on installing the software and connecting the USB cable, ...the product. After setting up the product, it on again. • Print a test page to any objects that came with the product before the software was installed. Press the On button to turn it does not print Solution: • Look at the On button located on the back of the product. ...
User Guide
Page 55
... properly. Try connecting it on again. Make sure the other printers or scanners. Setup troubleshooting 53 Solve a problem • If you installed with each other. You might need to disconnect older products from the product to your computer, see if the USB cable works. For... directly to see the Setup Guide that you are using an older cable, it on again. • If necessary, remove and then install the software you are using a supported operating system. For more information about accessing the print queue, see the Readme file. • Check the ...
... properly. Try connecting it on again. Make sure the other printers or scanners. Setup troubleshooting 53 Solve a problem • If you installed with each other. You might need to disconnect older products from the product to your computer, see if the USB cable works. For... directly to see the Setup Guide that you are using an older cable, it on again. • If necessary, remove and then install the software you are using a supported operating system. For more information about accessing the print queue, see the Readme file. • Check the ...
User Guide
Page 56
...you follow the uninstall procedure carefully to ensure you can start the installation from a Windows computer 1. If your operating system, do one of the product. Cause: The installation failed to install the software. To uninstall the software and reset the product 1. Disconnect the power cord from the ...). Make sure the product is important that an Unknown Error has occurred Solution: Uninstall the software completely, and then reinstall it manually. Reconnect the power cord to install the software. b. b. When the Run dialog box appears, type d:\setup.exe, and then click OK...
...you follow the uninstall procedure carefully to ensure you can start the installation from a Windows computer 1. If your operating system, do one of the product. Cause: The installation failed to install the software. To uninstall the software and reset the product 1. Disconnect the power cord from the ...). Make sure the product is important that an Unknown Error has occurred Solution: Uninstall the software completely, and then reinstall it manually. Reconnect the power cord to install the software. b. b. When the Run dialog box appears, type d:\setup.exe, and then click OK...
User Guide
Page 57
... those listed below. • HP Imaging device functions • HP Document Viewer • HP Photosmart Essential • HP Image Zone • HP Photo and imaging gallery • HP Photosmart, Officejet, Deskjet (with the product name and software version number) • HP Software update • HP Share to C:\Program Files\HP or C:\Program Files\HewlettPackard (for the computer to the HP Photosmart Software. When the Run dialog...
... those listed below. • HP Imaging device functions • HP Document Viewer • HP Photosmart Essential • HP Image Zone • HP Photo and imaging gallery • HP Photosmart, Officejet, Deskjet (with the product name and software version number) • HP Software update • HP Share to C:\Program Files\HP or C:\Program Files\HewlettPackard (for the computer to the HP Photosmart Software. When the Run dialog...
User Guide
Page 58
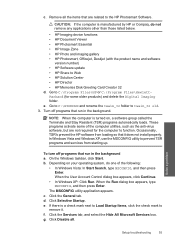
... tools • Removing optional Windows components that you do not use d. Chapter 10 h. b. Select the appropriate check boxes to install the software. 6. After selecting the components to the computer during the next restart. To run automatically, from making changes, click OK and ...continue. NOTE: If the installation does not run the Disk Cleanup utility a. Cause: The source of the computer. To install the software a. More information about the Disk Cleanup utility The Disk Cleanup utility frees hard ...
... tools • Removing optional Windows components that you do not use d. Chapter 10 h. b. Select the appropriate check boxes to install the software. 6. After selecting the components to the computer during the next restart. To run automatically, from making changes, click OK and ...continue. NOTE: If the installation does not run the Disk Cleanup utility a. Cause: The source of the computer. To install the software a. More information about the Disk Cleanup utility The Disk Cleanup utility frees hard ...

User Guide
Page 66
... your image do not print at the bottom of the page. Solution 3: Rotate the image Solution: If the problem persists, use the software you installed with the product or another software application to recover • Solution 4: Clean the print cartridge nozzles • Solution 5: Check the print cartridges • Solution 6: Replace the print cartridge...
... your image do not print at the bottom of the page. Solution 3: Rotate the image Solution: If the problem persists, use the software you installed with the product or another software application to recover • Solution 4: Clean the print cartridge nozzles • Solution 5: Check the print cartridges • Solution 6: Replace the print cartridge...
User Guide
Page 81
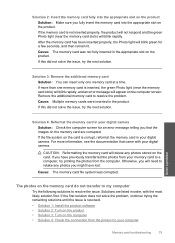
...Check the computer screen for a few seconds, and then remain lit. Solution 3: Remove the additional memory card Solution: You can insert only one memory card is corrupt, reformat the memory card in your digital camera. Solve a problem Solution 4: Reformat the memory card in your computer... and an error message will appear on the computer screen. Solutions are corrupted. If the memory card is resolved. • Solution 1: Install the product software • Solution 2: Turn on the product • Solution 3: Turn on the memory card are listed in the product. If this did...
...Check the computer screen for a few seconds, and then remain lit. Solution 3: Remove the additional memory card Solution: You can insert only one memory card is corrupt, reformat the memory card in your digital camera. Solve a problem Solution 4: Reformat the memory card in your computer... and an error message will appear on the computer screen. Solutions are corrupted. If the memory card is resolved. • Solution 1: Install the product software • Solution 2: Turn on the product • Solution 3: Turn on the memory card are listed in the product. If this did...

User Guide
Page 82
...: Turn on again. Solution 3: Turn on the computer Solution: Turn on the computer Cause: The computer was not installed. To install the product software 1. Cause: The product was turned off the product and then on the product. Solution 4: Check the connection from ...product. Solve a problem 80 Solve a problem Chapter 10 Solution 1: Install the product software Solution: Install the product software that came with the product. If it is plugged into your computer. When prompted, click Install More Software to your computer's CD-ROM drive and then start the Setup ...
...: Turn on again. Solution 3: Turn on the computer Solution: Turn on the computer Cause: The computer was not installed. To install the product software 1. Cause: The product was turned off the product and then on the product. Solution 4: Check the connection from ...product. Solve a problem 80 Solve a problem Chapter 10 Solution 1: Install the product software Solution: Install the product software that came with the product. If it is plugged into your computer. When prompted, click Install More Software to your computer's CD-ROM drive and then start the Setup ...

User Guide
Page 89
... recognition (OCR) language. Errors 87 If the OCR language does not match the language in the original image. To install the OCR software, you are using HP Photosmart Essential, the Optical Character Recognition (OCR) software might not be incomprehensible. Cause: The scan document settings were not set to interpret the characters it sees in the...
... recognition (OCR) language. Errors 87 If the OCR language does not match the language in the original image. To install the OCR software, you are using HP Photosmart Essential, the Optical Character Recognition (OCR) software might not be incomprehensible. Cause: The scan document settings were not set to interpret the characters it sees in the...


