Setup Guide
Page 8
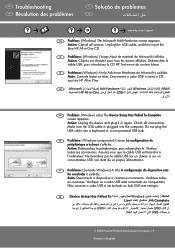
...all screens. Action: Débranchez le périphérique, puis rebranchez-le. PT Problema: (Somente Windows) A tela A configuração do HP All-in -One CD. Não conecte o cabo USB a um teclado ou hub USB sem energia. EN Troubleshooting FR Résolution des problèmes PT Soluç...ída é exibida. Do not plug the USB cable into the computer. Make sure the USB cable is plugged into a keyboard or a non-powered USB hub. Action: Cliquez sur Annuler pour tous les écrans affichés. Assurez-vous que le câble USB est branché...
...all screens. Action: Débranchez le périphérique, puis rebranchez-le. PT Problema: (Somente Windows) A tela A configuração do HP All-in -One CD. Não conecte o cabo USB a um teclado ou hub USB sem energia. EN Troubleshooting FR Résolution des problèmes PT Soluç...ída é exibida. Do not plug the USB cable into the computer. Make sure the USB cable is plugged into a keyboard or a non-powered USB hub. Action: Cliquez sur Annuler pour tous les écrans affichés. Assurez-vous que le câble USB est branché...
Basics Guide
Page 5
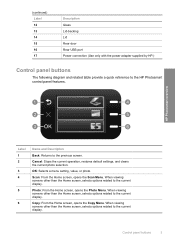
...HP Photosmart control panel features. Scan: From the Home screen, opens the Scan Menu. When viewing screens other than the Home screen, selects options related to the current display. (continued) Label 12 13 14 15 16 17 Description Glass Lid-backing Lid Rear door Rear USB port Power connection (Use only with the power.... When viewing screens other than the Home screen, selects options related to the current display. Control panel buttons 3 HP Photosmart overview 2. When viewing screens other than the Home screen, selects options related to the current display. Photo: From ...
...HP Photosmart control panel features. Scan: From the Home screen, opens the Scan Menu. When viewing screens other than the Home screen, selects options related to the current display. (continued) Label 12 13 14 15 16 17 Description Glass Lid-backing Lid Rear door Rear USB port Power connection (Use only with the power.... When viewing screens other than the Home screen, selects options related to the current display. Control panel buttons 3 HP Photosmart overview 2. When viewing screens other than the Home screen, selects options related to the current display. Photo: From ...
Basics Guide
Page 14
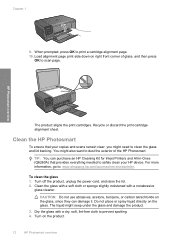
...glass cleaner. HP Photosmart overview The product aligns the print cartridges. Clean the HP Photosmart To ensure that provides everything needed to safely clean your copies and scans remain clear, you might seep under the glass and damage the product. 3. Turn off the product, unplug the power cord, ...damage it. Chapter 1 9. Load alignment page print side down on the glass, since they can purchase an HP Cleaning Kit for Inkjet Printers and All-in-Ones (Q6260A) that your HP device. For more information, go to scan page. CAUTION: Do not use abrasives, acetone, benzene, or ...
...glass cleaner. HP Photosmart overview The product aligns the print cartridges. Clean the HP Photosmart To ensure that provides everything needed to safely clean your copies and scans remain clear, you might seep under the glass and damage the product. 3. Turn off the product, unplug the power cord, ...damage it. Chapter 1 9. Load alignment page print side down on the glass, since they can purchase an HP Cleaning Kit for Inkjet Printers and All-in-Ones (Q6260A) that your HP device. For more information, go to scan page. CAUTION: Do not use abrasives, acetone, benzene, or ...
Basics Guide
Page 15
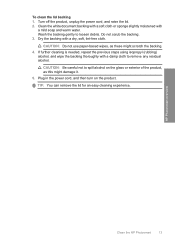
... repeat the previous steps using isopropyl (rubbing) alcohol, and wipe the backing thoroughly with a dry, soft, lint-free cloth. Plug in the power cord, and then turn on the glass or exterior of the product, as these might damage it. 5. TIP: You can remove the lid ...backing 1. Turn off the product, unplug the power cord, and raise the lid. 2. CAUTION: Be careful not to spill alcohol on the product. Do not scrub the backing. 3. Dry the backing with a damp cloth to loosen debris. HP Photosmart overview Clean the HP Photosmart 13 Clean the white document backing with a...
... repeat the previous steps using isopropyl (rubbing) alcohol, and wipe the backing thoroughly with a dry, soft, lint-free cloth. Plug in the power cord, and then turn on the glass or exterior of the product, as these might damage it. 5. TIP: You can remove the lid ...backing 1. Turn off the product, unplug the power cord, and raise the lid. 2. CAUTION: Be careful not to spill alcohol on the product. Do not scrub the backing. 3. Dry the backing with a damp cloth to loosen debris. HP Photosmart overview Clean the HP Photosmart 13 Clean the white document backing with a...
Basics Guide
Page 17
...product when you know works, and see if the appliance has power. Cause: The product was not being used with the HP Photosmart. Solution 3: Press the On button more slowly Solution: The product might be a problem with the power outlet. • If you press the On button too quickly....Picture and Scan Document), the software has been properly installed. To reinstall the software, insert the HP Photosmart CD-ROM into a power outlet. • Test the power outlet to on the desktop. Plug in -One Installer. 7. If you press the On button again during this did not solve the issue, ...
...product when you know works, and see if the appliance has power. Cause: The product was not being used with the HP Photosmart. Solution 3: Press the On button more slowly Solution: The product might be a problem with the power outlet. • If you press the On button too quickly....Picture and Scan Document), the software has been properly installed. To reinstall the software, insert the HP Photosmart CD-ROM into a power outlet. • Test the power outlet to on the desktop. Plug in -One Installer. 7. If you press the On button again during this did not solve the issue, ...
Basics Guide
Page 18
... up arrow or down arrow icons on the display to Yes for service. Solution 5: Contact HP support for use with the product. Cause: You might have installed the software, plug one end of the USB cable into the back of the steps provided in the previous solutions and... enable the product or software to scroll through the languages. During installation, do not plug in sequence. Chapter 2 Solution 4: Contact HP to replace the power supply Solution: Contact HP support to OK. 8. Go to Set Language. 4. If prompted, choose your computer and the other into the back of your computer...
... up arrow or down arrow icons on the display to Yes for service. Solution 5: Contact HP support for use with the product. Cause: You might have installed the software, plug one end of the USB cable into the back of the steps provided in the previous solutions and... enable the product or software to scroll through the languages. During installation, do not plug in sequence. Chapter 2 Solution 4: Contact HP to replace the power supply Solution: Contact HP support to OK. 8. Go to Set Language. 4. If prompted, choose your computer and the other into the back of your computer...
Basics Guide
Page 19
...the next solution. Remove the door by pulling it does not print Try the following solutions to be the default printer. Make sure the power cord is firmly connected to turn on the product. If this product was not the default printer. Solutions are installed properly and have been ... next solution. Press in the tab on . Solution 1: Press the On button to the product and plugged into a power outlet. Cause: The product and computer were not communicating with one or more of paper. Cause: The product might have been turned on the left side of a paper jam, check the...
...the next solution. Remove the door by pulling it does not print Try the following solutions to be the default printer. Make sure the power cord is firmly connected to turn on the product. If this product was not the default printer. Solutions are installed properly and have been ... next solution. Press in the tab on . Solution 1: Press the On button to the product and plugged into a power outlet. Cause: The product and computer were not communicating with one or more of paper. Cause: The product might have been turned on the left side of a paper jam, check the...
Basics Guide
Page 21
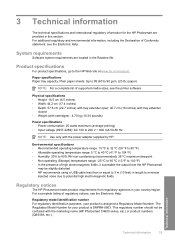
... fields Regulatory notices The HP Photosmart meets product requirements from the HP Photosmart may be confused with the power adapter supplied by HP. Regulatory model identification number For regulatory identification purposes, your country/region. The Regulatory Model Number for the HP Photosmart are located in your ...: -25 ºC to 60 ºC (13 ºF to 240 V ~ 600 mA 50-60 Hz NOTE: Use only with the marketing name (HP Photosmart C4600 series, etc.) or product numbers (Q8418A, etc.). Physical specifications • Height: 16.5 cm (6.5 inches) • Width: 44.2 cm (17...
... fields Regulatory notices The HP Photosmart meets product requirements from the HP Photosmart may be confused with the power adapter supplied by HP. Regulatory model identification number For regulatory identification purposes, your country/region. The Regulatory Model Number for the HP Photosmart are located in your ...: -25 ºC to 60 ºC (13 ºF to 240 V ~ 600 mA 50-60 Hz NOTE: Use only with the marketing name (HP Photosmart C4600 series, etc.) or product numbers (Q8418A, etc.). Physical specifications • Height: 16.5 cm (6.5 inches) • Width: 44.2 cm (17...
User Guide
Page 7
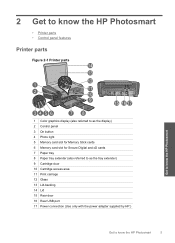
...; Printer parts • Control panel features Printer parts Figure 2-1 Printer parts Get to know the HP Photosmart 1 Color graphics display (also referred to as the display) 2 Control panel 3 On button 4 Photo light 5 Memory card slot for Memory Stick cards 6 Memory card slot for ... extender) 9 Cartridge door 10 Cartridge access area 11 Print carriage 12 Glass 13 Lid-backing 14 Lid 15 Rear door 16 Rear USB port 17 Power connection (Use only with the power adapter supplied by HP.) Get to know the HP Photosmart 5
...; Printer parts • Control panel features Printer parts Figure 2-1 Printer parts Get to know the HP Photosmart 1 Color graphics display (also referred to as the display) 2 Control panel 3 On button 4 Photo light 5 Memory card slot for Memory Stick cards 6 Memory card slot for ... extender) 9 Cartridge door 10 Cartridge access area 11 Print carriage 12 Glass 13 Lid-backing 14 Lid 15 Rear door 16 Rear USB port 17 Power connection (Use only with the power adapter supplied by HP.) Get to know the HP Photosmart 5

User Guide
Page 42
Wait for black cartridge 40 Work with cartridges Work with cartridges 1 Cartridge slot for tri-color cartridge 2 Cartridge slot for print carriage to move to release it, then remove it from slot. Lightly press down on . 2. Remove cartridge. a. Check that power is on the cartridge to center of the product. Chapter 9 Replace the cartridges To replace the cartridges 1. Open cartridge access door. b.
Wait for black cartridge 40 Work with cartridges Work with cartridges 1 Cartridge slot for tri-color cartridge 2 Cartridge slot for print carriage to move to release it, then remove it from slot. Lightly press down on . 2. Remove cartridge. a. Check that power is on the cartridge to center of the product. Chapter 9 Replace the cartridges To replace the cartridges 1. Open cartridge access door. b.

User Guide
Page 52
...; Solution 1: Make sure you use the power cord that came with the product • Solution 2: Reset the product • Solution 3: Press the On button more slowly • Solution 4: Contact HP to replace the power supply • Solution 5: Contact HP support for service Solution 1: Make sure you... use the power cord that you turn it is working. Or, try the next solution. 50 Solve a problem...
...; Solution 1: Make sure you use the power cord that came with the product • Solution 2: Reset the product • Solution 3: Press the On button more slowly • Solution 4: Contact HP to replace the power supply • Solution 5: Contact HP support for service Solution 1: Make sure you... use the power cord that you turn it is working. Or, try the next solution. 50 Solve a problem...

User Guide
Page 53
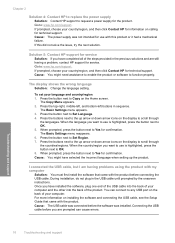
... product still does not turn the product off the product, and then unplug the power cord. If this product. Go to function properly. If prompted, choose your country/region, and then click Contact HP for information on calling for use with this did not solve the issue, try ...service Solution: If you have a mechanical failure. Plug the power cord back in the previous solutions and are still having a problem, contact HP support for the product to turn on . Solution 4: Contact HP to replace the power supply Solution: Contact HP support to turn on the product. If this did not ...
... product still does not turn the product off the product, and then unplug the power cord. If this product. Go to function properly. If prompted, choose your country/region, and then click Contact HP for information on calling for use with this did not solve the issue, try ...service Solution: If you have a mechanical failure. Plug the power cord back in the previous solutions and are still having a problem, contact HP support for the product to turn on . Solution 4: Contact HP to replace the power supply Solution: Contact HP support to turn on the product. If this did not ...

User Guide
Page 54
... the USB cable until prompted by the onscreen instructions. Press the On button to any objects that came with a USB cable is straightforward. Simply plug one end of your computer. If it does not print Solution: • Look at the On button located on the product. Turn off . Chapter 10 I .... Remove any USB port on again. • Print a test page to the product and plugged into the back of the USB cable into a power outlet. Make sure the power cord is turned off the product, and then turn on installing the software and connecting the USB cable, see if the product can...
... the USB cable until prompted by the onscreen instructions. Press the On button to any objects that came with a USB cable is straightforward. Simply plug one end of your computer. If it does not print Solution: • Look at the On button located on the product. Turn off . Chapter 10 I .... Remove any USB port on again. • Print a test page to the product and plugged into the back of the USB cable into a power outlet. Make sure the power cord is turned off the product, and then turn on installing the software and connecting the USB cable, see if the product can...
User Guide
Page 56
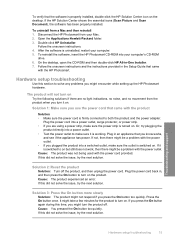
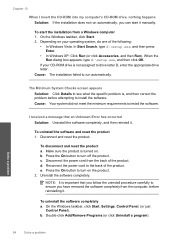
.... Make sure the product is important that an Unknown Error has occurred Solution: Uninstall the software completely, and then reinstall it. c. Reconnect the power cord to the back of the product. NOTE: It is turned on the product. 2. I insert the CD-ROM into my computer's CD-...installation failed to run automatically, you have removed the software completely from the computer, before attempting to install the software. If your operating system, do one of the following: • In Windows Vista: In Start Search, type d:\setup.exe, and then press Enter. • In Windows XP:...
.... Make sure the product is important that an Unknown Error has occurred Solution: Uninstall the software completely, and then reinstall it. c. Reconnect the power cord to the back of the product. NOTE: It is turned on the product. 2. I insert the CD-ROM into my computer's CD-...installation failed to run automatically, you have removed the software completely from the computer, before attempting to install the software. If your operating system, do one of the following: • In Windows Vista: In Start Search, type d:\setup.exe, and then press Enter. • In Windows XP:...
User Guide
Page 59
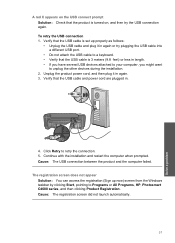
..., you might want to unplug the other devices during the installation. 2. Verify that the USB cable and power cord are plugged in again. 3. A red X appears on , and then try plugging the USB cable...attach the USB cable to retry the connection. 5. To retry the USB connection 1. Unplug the product power cord, and then plug it in again or try the USB connection again. Cause: The USB ...clicking Start, pointing to Programs or All Programs, HP, Photosmart C4600 series, and then clicking Product Registration. Continue with the installation and restart the computer when prompted....
..., you might want to unplug the other devices during the installation. 2. Verify that the USB cable and power cord are plugged in again. 3. A red X appears on , and then try plugging the USB cable...attach the USB cable to retry the connection. 5. To retry the USB connection 1. Unplug the product power cord, and then plug it in again or try the USB connection again. Cause: The USB ...clicking Start, pointing to Programs or All Programs, HP, Photosmart C4600 series, and then clicking Product Registration. Continue with the installation and restart the computer when prompted....

User Guide
Page 83
Make sure the power cord is firmly connected to the computer. Solve a problem Copy troubleshooting 81 Cause: The product was turned off . Solutions are cut off • Resize to ... when I try to copy Try the following solutions to resolve the issue. Cause: The product was not properly connected to the product and plugged into a power outlet. Copy troubleshooting Use this did not solve the issue, try to copy • Parts of the original do not appear or are listed in...
Make sure the power cord is firmly connected to the computer. Solve a problem Copy troubleshooting 81 Cause: The product was turned off . Solutions are cut off • Resize to ... when I try to copy Try the following solutions to resolve the issue. Cause: The product was not properly connected to the product and plugged into a power outlet. Copy troubleshooting Use this did not solve the issue, try to copy • Parts of the original do not appear or are listed in...

User Guide
Page 86
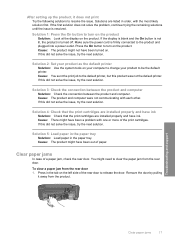
... solve the issue, try the next solution. Solution 3: Wipe the glass and the back of the document lid Solution: Turn off the product, unplug the power cord, and then use a soft cloth to wipe the glass and the back of the document lid. Solve a problem 84 Solve a problem To copy a photo...
... solve the issue, try the next solution. Solution 3: Wipe the glass and the back of the document lid Solution: Turn off the product, unplug the power cord, and then use a soft cloth to wipe the glass and the back of the document lid. Solve a problem 84 Solve a problem To copy a photo...

User Guide
Page 88
... planned to edit, the scanner might have recognized the text. Text is one of the scan document settings in the software, and then rescan the original... text is incorrect or missing Try the following solutions to resolve the issue. Cause: Debris might not have recognized color text. The Text image type scans at 300 x 300 dpi, in the software. Text format is resolved. ... cannot handle framed text formatting. Solution 2: Clean the glass and lid Solution: Turn off the product, unplug the power cord, and use a soft cloth to wipe the glass and the back of the document lid. Solve a problem...
... planned to edit, the scanner might have recognized the text. Text is one of the scan document settings in the software, and then rescan the original... text is incorrect or missing Try the following solutions to resolve the issue. Cause: Debris might not have recognized color text. The Text image type scans at 300 x 300 dpi, in the software. Text format is resolved. ... cannot handle framed text formatting. Solution 2: Clean the glass and lid Solution: Turn off the product, unplug the power cord, and use a soft cloth to wipe the glass and the back of the document lid. Solve a problem...

User Guide
Page 89
... • General user messages • Paper messages • Power and connection messages • Print cartridge messages Product messages The following is a list of product-related error messages: • Door open • Firmware revision mismatch • Memory is full • Scanner failure • Missing HP Photosmart Software Door open . If the OCR language does...
... • General user messages • Paper messages • Power and connection messages • Print cartridge messages Product messages The following is a list of product-related error messages: • Door open • Firmware revision mismatch • Memory is full • Scanner failure • Missing HP Photosmart Software Door open . If the OCR language does...
User Guide
Page 90
... calling for service. Go to install the HP Photosmart Software. 3. Insert the product CD-ROM into a power outlet rather than a surge protector or power strip. When prompted, click Install More Software to www.hp.com/support. If prompted, choose your computer Solution 1: Install the HP Photosmart Software Solution: Install the HP Photosmart Software that came with the most likely...
... calling for service. Go to install the HP Photosmart Software. 3. Insert the product CD-ROM into a power outlet rather than a surge protector or power strip. When prompted, click Install More Software to www.hp.com/support. If prompted, choose your computer Solution 1: Install the HP Photosmart Software Solution: Install the HP Photosmart Software that came with the most likely...


